- gparted.x86_64 on Oracle Linux 8
- 2. Uninstall / Remove gparted.x86_64 package
- 3. Details of gparted.x86_64 package
- 4. References on Oracle Linux 8
- gparted on Arch Linux
- 2. Uninstall / Remove gparted package
- 3. Details of gparted package
- 4. References on Arch Linux
- 5. The same packages on other Linux Distributions
- Create USB Installation Media for Oracle Linux with Fedora Media Writer
- Oracle Support Disclaimer
- Introduction
- Objectives
- Prerequisites
- Downloading the Oracle Linux ISO
- Formatting the USB flash drive
- Formatting the USB flash drive on Windows
- Formatting the USB flash drive on macOS
- Formatting the USB flash drive on Linux
- Installing Fedora Media Writer
- Installing Fedora Media Writer on Windows
- Installing Fedora Media Writer on macOS
- Installing Fedora Media Writer on Linux
- Creating a bootable USB memory stick
- Installing Oracle Linux on compatible machines
- For more information:
- More Learning Resources
- How to install Gparted on Ubuntu 22.04 | 20.04 LTS Linux
- Steps to install Gparted Disk manager on Ubuntu 22.04 | 20.04
- 1. Update APT repository cache
- 2. Command to install Gparted in Ubuntu 20.04 | 22.04
- 3. Run Gparted
- 4. GParted Menu
gparted.x86_64 on Oracle Linux 8
This is a short guide on how to install gparted.x86_64 package:
2. Uninstall / Remove gparted.x86_64 package
Please follow the guidelines below to uninstall gparted.x86_64 package:
3. Details of gparted.x86_64 package
Last metadata expiration check: 6:36:48 ago on Mon Sep 12 02:51:38 2022.
Available Packages
Name : gparted
Version : 1.3.1
Release : 1.el8
Architecture : x86_64
Size : 2.2 M
Source : gparted-1.3.1-1.el8.src.rpm
Repository : epel
Summary : Gnome Partition Editor
URL : http://gparted.org
License : GPLv2+
Description : GParted stands for Gnome Partition Editor and is a graphical frontend to
: libparted. Among other features it supports creating, resizing, moving
: and copying of partitions. Also several (optional) filesystem tools provide
: support for filesystems not included in libparted. These optional packages
: will be detected at runtime and don’t require a rebuild of GParted
4. References on Oracle Linux 8
![]()
php-pecl-yaconf-devel.x86_64 (1.1.2)
![]()
radcli-devel.x86_64 (1.2.12)
![]()
holland-lvm.noarch (1.2.10)
![]()
libudfread.x86_64 (1.1.2)
![]()
perl-Path-Class.noarch (0.37)
![]()
libcouchbase-tools.x86_64 (3.2.4)
![]()
gnome-autoar.src (0.2.3)
![]()
libcgroup-tools.x86_64 (0.41)
![]()
seabios.x86_64 (1.15.0)
![]()
php73-php-pecl-memprof.x86_64 (3.0.2)
![]()
log4cplus.x86_64 (1.2.0)
![]()
rr.x86_64 (5.6.0)
![]()
php71-php-pecl-mongodb.x86_64 (1.11.1)
![]()
php73-php-pecl-tensor.x86_64 (2.2.3)
![]()
Field3D-devel.x86_64 (1.7.2)
![]()
python3-zope-exceptions.noarch (4.0.8)
gparted on Arch Linux
Please follow the steps below to install gparted package:
2. Uninstall / Remove gparted package
This tutorial shows how to uninstall gparted package:
3. Details of gparted package
Repository : extra
Name : gparted
Version : 1.4.0-1
Description : A Partition Magic clone, frontend to GNU Parted
Architecture : x86_64
URL : https://gparted.org/
Licenses : GPL
Groups : None
Provides : None
Depends On : parted gtkmm3
Optional Deps : dosfstools: for FAT16 and FAT32 partitions
jfsutils: for jfs partitions
f2fs-tools: for Flash-Friendly File System
btrfs-progs: for btrfs partitions
exfatprogs: for exFAT partitions
ntfs-3g: for ntfs partitions
reiserfsprogs: for reiser partitions
udftools: for UDF file system support
xfsprogs: for xfs partitions
nilfs-utils: for nilfs2 support
polkit: to run gparted from application menu
gpart: for recovering corrupt partition tables
mtools: utilities to access MS-DOS disks
xorg-xhost: authorization from wayland
Conflicts With : None
Replaces : None
Download Size : 1717.37 KiB
Installed Size : 7349.52 KiB
Packager : Christian Hesse
Build Date : Mon Mar 28 17:25:39 2022
Validated By : MD5 Sum SHA-256 Sum Signature
4. References on Arch Linux
5. The same packages on other Linux Distributions
![]()
gparted (0.30.0-3ubuntu2) Ubuntu 18.04 LTS (Bionic Beaver)
![]()
gparted (0.25.0-1) Ubuntu 16.04 LTS (Xenial Xerus)
![]()
gparted (1.1.0-0.1ubuntu1) Ubuntu 21.04 (Hirsute Hippo)
![]()
gparted (1.0.0-0.1build1) Ubuntu 20.10 (Groovy Gorilla)
![]()
gparted (1.2.0-1ubuntu2) Ubuntu 21.10 (Impish Indri)
![]()
gparted (0.31.0-bp153.1.17) openSUSE Leap
![]()
gparted (1.3.1-1.1) openSuSE Tumbleweed
![]()
gparted (1.3.1-1ubuntu1) Ubuntu 22.04 LTS (Jammy Jellyfish)
![]()
gparted (0.32.0-2) Debian 10 (Buster)
Create USB Installation Media for Oracle Linux with Fedora Media Writer
This tutorial describes how to use Fedora Media Writer to create Oracle Linux installation media on a USB device.
Oracle Support Disclaimer
Oracle does not provide technical support for the instructions in this tutorial because the steps refer to software programs and operating systems that are not provided by Oracle. This tutorial provides optional instructions only as a convenience.
Introduction
Oracle Linux is distributed as an ISO image, which is a binary representation of the files and contents for installing the operating system. An Oracle Linux installation requires that you need to create an installation media from the ISO image.
As the official documentation shows, Oracle’s supported method for creating the installation media is by using the dd command. However, you can choose any preferred third party utility, such as Balena Etcher or Rufus. This tutorial focuses on using Fedora Media Writer to create installation media on a USB drive.
The Fedora Media Writer is a utility from the Fedora project for creating installation media primarily for Fedora Linux installations. However, it can be used for other Linux distributions as well, such as Oracle Linux. Fedora Media Writer is supported on Windows and macOS. Therefore, users of those systems can also avail of the utility to create Oracle Linux installation media.
Objectives
At the end of this tutorial, you should be able to do the following:
- Download an Oracle Linux ISO.
- Format the USB drive with the correct file system.
- Copy the ISO image to the USB drive.
Prerequisites
- Any system that is running Windows 10, macOS 10.15, or a recent Linux distribution.
- A secure USB flash drive or external hard drive.
Downloading the Oracle Linux ISO
- Log in to Oracle Software Delivery Cloud. Your Oracle Single Sign On (SSO) credentials are required to access the download site.
- Search for Oracle Linux and select the latest version of the operating system. The selected item is automatically added to the cart.
- Click Continue at the top right side of the screen.
- Select the platform of the operating system to be installed.
- Accept the Oracle License Agreement.
- Deselect the check boxes for the source DVD and Boot ISOs so that you would download only a single installation ISO image, for example, V984216-01.iso.
- Click Download to install the Oracle Download Manager to your computer.
- Use the Oracle Download Manager to download the selected ISO file.
Alternatively, you can download the ISO file directly from http://yum.oracle.com/oracle-linux-isos.html. Select the Full ISO to download.
Formatting the USB flash drive
The procedure for formatting the USB flash drive differs depending on your workstation’s operating system.
Formatting the USB flash drive on Windows
- Insert your USB flash drive, open Explorer, and then locate the device in This PC.
- Right-click the correct drive letter, then select Format….
- Select exFAT as the file system, set a volume label, and then select Quick Format.
- Click Start to begin the format process, then click Yes to proceed.
Formatting the USB flash drive on macOS
- Insert your USB flash drive, then wait for the storage device icon to appear on your desktop.
- Open Disk Utility, then select your storage device on the left panel of the window.
- Click Erase, select FAT32 as the file system, then set a volume label.
- Click Erase and wait for the format process to complete.
Formatting the USB flash drive on Linux
- Install gparted through your Linux distribution package manager.
- Start gparted and select the storage device from the drop-down list, which is located at the top right side of the window.
- Delete any existing partitions and then create one single FAT32 partition.
- Click the green tick mark, then click Apply to start the format process.
- After the format process has completed, disconnect and then reconnect your USB flash drive.
Installing Fedora Media Writer
The procedure for installing Fedora Media Writer differs depending on your workstation’s operating system.
Installing Fedora Media Writer on Windows
- Download the Windows exe installer at https://getfedora.org/fmw/FedoraMediaWriter-win32-latest.exe.
- Run the installer, agree to the license terms, and then follow the prompts.
Installing Fedora Media Writer on macOS
- Download the utility’s dmg for macOS installations at https://getfedora.org/fmw/FedoraMediaWriter-osx-latest.dmg.
- Open the dmg file, then click and drag the universal binary to your Applications folder.
Installing Fedora Media Writer on Linux
- Install the flatpak application and the external Flathub repository for the application by following the instructions that are provided for your Linux distribution at https://flatpak.org/setup/.
- Install Fedora Media Writer as a flatpak from Flathub as follows:
sudo flatpak install flathub org.fedoraproject.MediaWriter Creating a bootable USB memory stick
- Insert your USB flash drive if you have not done so already, then start Fedora Media Writer.
- Click Custom image and then select the downloaded Oracle Linux ISO image.
- In the drop-down list, select your USB flash drive as the boot media, then click Write to Disk.
- When the write process has completed, remove your USB flash drive and then reinsert it to verify that the device is no longer empty.
- Safely remove or unmount the USB flash drive before removing it from the USB slot.
Installing Oracle Linux on compatible machines
The key combination for editing the BIOS/UEFI configuration or for selecting the current boot device varies depending on the manufacturer. Refer to the manufacturer of your particular hardware for related technical support documentation.
- Insert the newly created USB installation media and then restart the system.
- Press the appropriate key combination when the machine boots, then select your USB flash drive as the boot device.
- Follow the instructions provided in the installation guide for the Oracle Linux version that you are installing at the Oracle Linux library.
For more information:
- Wikipedia page for Fedora Media Writer at https://en.wikipedia.org/wiki/Fedora_Media_Writer
- dd(1) manual page
- Create bootable USB memory sticks on Windows with Rufus at https://rufus.ie/
- Oracle Linux Documentation
More Learning Resources
Explore other labs on docs.oracle.com/learn or access more free learning content on the Oracle Learning YouTube channel. Additionally, visit education.oracle.com/learning-explorer to become an Oracle Learning Explorer.
For product documentation, visit Oracle Help Center.
Create USB Installation Media for Oracle Linux with Fedora Media Writer
Copyright © 2020, Oracle and/or its affiliates.
How to install Gparted on Ubuntu 22.04 | 20.04 LTS Linux
GParted is a GTK -based graphical user interface for GNU Parted. With GParted the partitioning of a drive can easily be changed, for example, partitions can be enlarged or reduced, newly created, moved, or reformatted. General information and safety instructions on partitioning can be found in the article Partitioning.
Steps to install Gparted Disk manager on Ubuntu 22.04 | 20.04
If you are using a minimal Ubuntu Linux version then the Gparted application will not be there on your system by default, hence, we have to install it manually. Use the below-given commands.
1. Update APT repository cache
Let’s first run the system update command that will flush and rebuild the system’s APT package manager repository cache. Also, installs, if there are any updates available.
2. Command to install Gparted in Ubuntu 20.04 | 22.04
As packages to install Gparted is available via the default repository of Ubuntu 20.04 and 22.04 Linux, hence we don’t need to add any kind of third-party repository at all. Just use the APT package manager command given below.
sudo apt install gparted -y
3. Run Gparted
Go to Application launcher and search for this Disk partition and management application. As you see its icon, click to run the same.
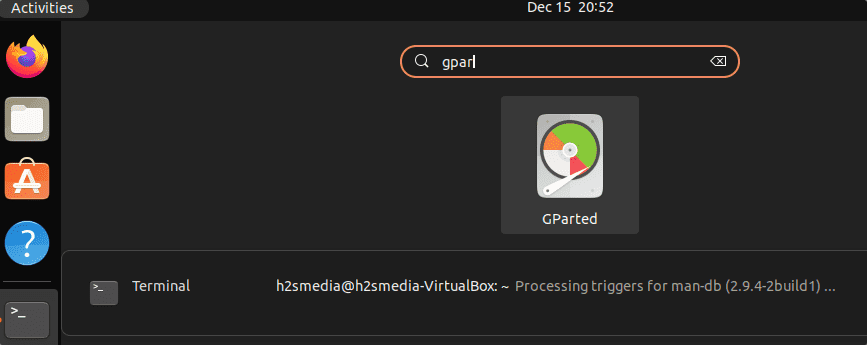
Alternatively, if you have installed GParted, you can start the program using the terminal with the following command:

4. GParted Menu
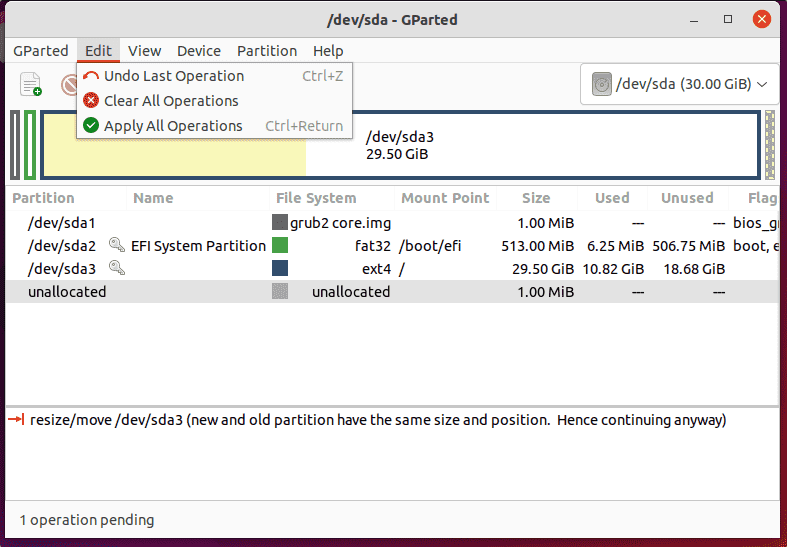
The use of GParted is relatively easy, as the program is operated completely via a window. In this window, you can see the division of the currently selected hard disk. All possible options and actions can be reached via the menu bar. Options or actions that are not available are automatically hidden by GParted.
In the menu “GParted” you can select the drive to be partitioned via the item “Devices” (if you have several hard drives), via “Refresh Devices” the currently connected drives are read in again. The menu item “View” “File system support” shows in a matrix which actions (enlarge, reduce, create, etc.) are possible with the different types of supported file systems.
The “Edit” item contains three actions: “Undo” can be used to undo the last actions performed, or “Clear” to delete all actions; the changes made are carried out on the selected partition via “Apply All Operations“.
GParted first saves all changes in a buffer and only executes them when you click on “Apply all operations“. Once “Apply all operations” has been carried out, the changes cannot be undone. Therefore “Apply all operations” should only be selected if you are sure of the changes. In the worst case, all data stored on the hard drive will be lost.
Other Tutorials: