- GPON Home Gateway Login: What You Need To Know?
- Brief Outline
- What You Need:
- Why Should You Login To The GPON Home Gateway?
- GPON Home Gateway Login Step-by-Step
- STEP 1: Connect Your Device To The Network
- STEP 2: Launch Your Web Browser
- STEP 3: Type The Default IP In The URL Bar
- STEP 4: Enter The GPON Home Gateway Login Details
- STEP 5: You Can Now Tweak Your Router Settings
- Basic Wireless Network Security Changes
- Change The GPON Home Gateway Admin Password
- Change The GPON Home Gateway WiFi Name And Password
- Final Words
- Настройка оборудования
- Блог о модемах, роутерах и GPON терминалах Ростелеком
- Настройка WiFi на роутере Huawei HG8245 и HG8247
- Как настроить WiFi на Huawei HG8245, HG8245T и HG8247
GPON Home Gateway Login: What You Need To Know?
In case you want to change any of your home network settings, you’ll need to learn how to login to your GPON Home Gateway. So, whether you want to change your network name into something really cool, or want a stronger WiFi password, or just want to explore all the options your wireless network can offer you need to login to the admin dashboard first.
If you are interested in this, you are at the right place. And now let’s take a quick look at what you are going to read in this article.
Brief Outline
The following article will explain the steps necessary for a successful GPON Home Gateway login. When we access the gateway it is recommended to make some changes in order to make it more secure. For example, simply changing the default admin router password, as well as the wireless network name and password, will make your network security much stronger.
What You Need:
- GPON Home Gateway
- Computer, tablet, smartphone
- Network access (over WiFi or the network cable)
- GPON Home Gateway Login details
Why Should You Login To The GPON Home Gateway?
Well, the key reason why you should login to your GPON HOME Gateway is network security. We all enjoy the benefits of our wireless network, and all our devices that have wireless connection capabilities are connected to it. And when there is something wrong with the connection we notice that immediately, and all those devices simply don’t function as they are supposed to without an internet connection.
So, things like changing the default login details and other default settings are the first step to securing the home network. Then we can implement changes like MAC filtering, enabling the firewall, keeping our router firmware up-to-date, disabling SSID broadcasting and so on. We can also create separate Guest networks, block websites or devices, enable port forwarding for gaming and so on. The options are great and they can only be available if we know how to login to our GPON Home Gateway. So, let’ s see how to do it properly.
GPON Home Gateway Login Step-by-Step
The following steps are easy to follow and the whole process should be completed in a few minutes if you have everything ready.
STEP 1: Connect Your Device To The Network
This step is vital. Depending on whether you are using a mobile device or a computer you can choose to connect to the network either over WiFi or with the network cable. If you don’t connect you won’t be able to complete the login successfully. So, this is the first thing you should do.
STEP 2: Launch Your Web Browser
After you have connected the device, launch a web browser you already have installed on it. The browser is used to access the router’s admin dashboard. It isn’t an external website so an active Internet connection is not necessary.
STEP 3: Type The Default IP In The URL Bar
If you haven’t changed it before, the default IP address for the GPON Home Gateway is 192.168.1.254.
Enter this IP in the browser’s URL bar and press Enter/Go on the keyboard. The GPON Home Gateway login page should appear.
If it doesn’t , check whether 192.168.1.254 is the default IP or whether your device is connected to the network.
STEP 4: Enter The GPON Home Gateway Login Details
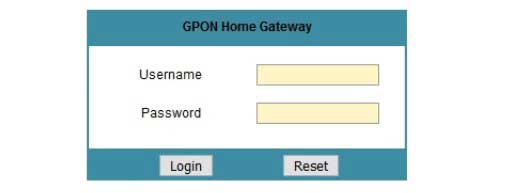
When asked, enter these default login details:
Password: password or random number that can be found in the product list
Then click on the Login button.
IMPORTANT: If you know the default username and password make sure to keep them somewhere safe, in case you need to reset the Gateway to factory settings. Also, if you have changed the default login details before, use the new ones to access the router settings.
STEP 5: You Can Now Tweak Your Router Settings
If you haven’t accessed your GPON Home Gateway settings before, you will be automatically offered to change the default admin password. After that you can access all the other settings we have mentioned earlier in this article.
Basic Wireless Network Security Changes
Change The GPON Home Gateway Admin Password
When you login to your GPON Home Gateway for the first time you will be asked to change the default admin password. This tells us how important it is to make this change. So, just fill in the required fields and you are good to go. Save the changes, log out of the router and then login pack again. Make sure to remember or write the new password down for the next time you want to access the router settings.
On the other hand, if you have changed the admin password before and want to change it again, you can find this option when you select Maintenance and then Password.
Complete the required fields and save the changes. Just as before, log out and then login with the new admin password.
IMPORTANT: If you forget the new password you will have to reset your GPON Home Gateway to factory default settings. Then you will be able to login again with the default username and password. Just make sure you have the correct ones.
Change The GPON Home Gateway WiFi Name And Password
The worst thing you can do for your network is to leave it open and unprotected. This means that anyone within your WiFi signal range can connect and use your internet connection, or even change your router settings making the entire network unusable. So, in order to avoid this we need to change the SSID and wireless password from time to time.
When you login to your GPON Home Gateway, select Network and then Wireless (2.4GHz).
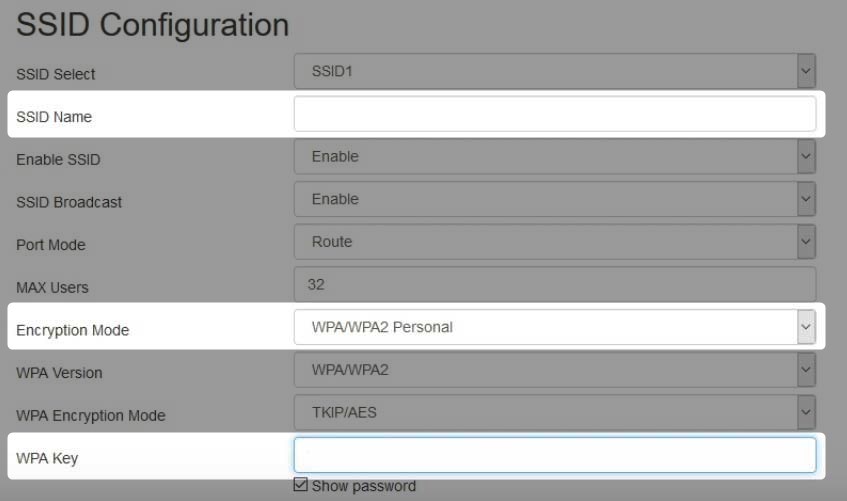
You can change the network name in the SSID field.
As for Encryption mode select WPA/WPA2-Personal.
And in the WPA Key you need to enter your new wireless network password.
Save the changes and connect your devices to the network again using the new login details.
NOTE: If your router offers 5GHz, make sure to change the settings there as well.
Final Words
As you can see, accessing and securing your GPON Home gateway is pretty simple when you have the correct login details. So when you login for the first time and make some changes, make sure to write down the login details and save them for the next time. It will be much easier and much faster for you.
As for the advantages of knowing how to login to and secure the router, we think we have said most of the things. It’s now up to you whether you want to take some steps and protect your network or not.

Hey, I’m David. I’ve been working as a wireless network engineer and a network administrator for 15 years. During my studies, I also worked as an ISP field technician – that’s when I met Jeremy.
I hold a bachelor’s degree in network engineering and a master’s degree in computer science and engineering. I’m also a Cisco-certified service provider.
In my professional career, I worked for router/modem manufacturers and internet providers. I like to think that I’m good at explaining network-related issues in simple terms. That’s exactly what I’m doing on this website – I’m making simple and easy-to-follow guides on how to install, set up, and troubleshoot your networking hardware. I also review new network equipment – modems, gateways, switches, routers, extenders, mesh systems, cables, etc.
My goal is to help regular users with their everyday network issues, educate them, and make them less scared of their equipment. In my articles, you can find tips on what to look for when buying new networking hardware, and how to adjust your network settings to get the most out of your wi-fi.
Since my work is closely related to computers, servers, and other network equipment, I like to spend most of my spare time outdoors. When I want to blow off some steam, I like to ride my bike. I also love hiking and swimming. When I need to calm down and clear my mind, my go-to activity is fishing.
- Brief Outline
- What You Need:
- Why Should You Login To The GPON Home Gateway?
- GPON Home Gateway Login Step-by-Step
- STEP 1: Connect Your Device To The Network
- STEP 2: Launch Your Web Browser
- STEP 3: Type The Default IP In The URL Bar
- STEP 4: Enter The GPON Home Gateway Login Details
- STEP 5: You Can Now Tweak Your Router Settings
- Change The GPON Home Gateway Admin Password
- Change The GPON Home Gateway WiFi Name And Password
Настройка оборудования
Блог о модемах, роутерах и GPON терминалах Ростелеком

Настройка WiFi на роутере Huawei HG8245 и HG8247

Настройка беспроводной сети WiFi на оптических модемах Huawei HG8245, HG8245T, HG8245R или HG8247 ничем не сложнее, а по некоторым параметрам — даже проще, чем на многих WiFi-роутерах, как для GPON, так и для FTTB. Благодаря тому, что все параметры беспроводной сети выведены на одну страницу, базовая конфигурация WiFi на терминалах Huawei займет всего лишь несколько минут. Проблемы могут возникнуть в другом. Дело в том, что в 99% случаев оптические модемы GPON ONT настраиваются удаленно с оборудования провайдера путем заливки соответствующей конфигурации на устройство. Соответственно, чтобы абонент не мог внести изменения в конфигурацию терминала пароль на пользователя telecomadmin и root меняется. В этом случае, для настройки WiFi Вам придется либо звонить оператору и уже с техподдержкой договариваться, либо сбрасывать параметры кнопкой reset и полностью настраивать роутер самостоятельно. Но тут проблема может возникнуть в том, что Вы не знаете параметров и идентификаторов Vlan ID, соответственно придется всё равно обращаться в техподдержку. В моем примере — доступ в веб-интерфейс терминалов доступен по стандартным паролям.
Как настроить WiFi на Huawei HG8245, HG8245T и HG8247
Для того, чтобы настроить беспроводную сеть WiFi на оптическом терминале GPON ONT Huawei, Вам нужно первым делом попасть в веб-интерфейс устройства. IP-адрес оптических модемов Huawei по умолчанию — 192.168.100.1, URL веб-интерфейса http://192.168.100.1 . Логин и пароль на доступ может быть следующим:
telecomadmin \ admintelecom
telecomadmin \ NWTF5x%RaK8mVbD
telecomadmin \ NWTF5x%
telecomadmin \ nE7jA%5m
root \ admin
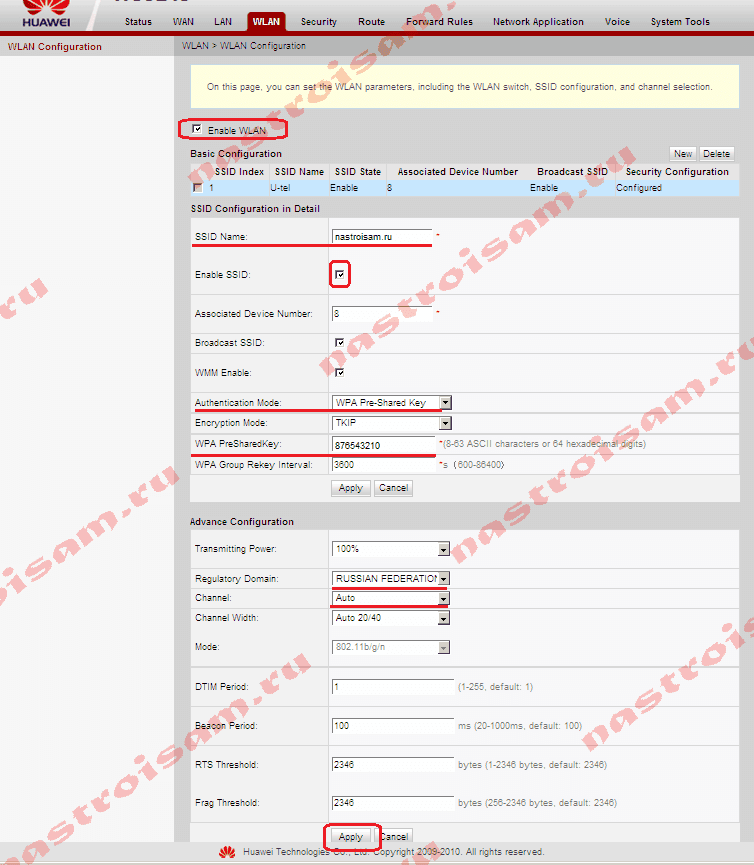
Попав в веб-интерфейс, в главном меню выбираем пункт WLAN:Проверяем чтобы стояла галочка «Enable WLAN».
В таблице «Basic configuration» ставим на существующих сетях галку и нажимаем кнопку Delete. Затем создаем новую беспроводную сеть — кнопка New.
Ниже, в поле «SSID Name» прописываем имя новой сети WiFi. Включаем её, поставив галку «Enable SSID».
В строку «Assotiated Device Number» указывается число клиентов, которые могут одновременно подключаться к WiFi сети роутера HG8245. Максимально можно указать 32 клиента.
Параметр «Broadcast SSID» в данном случае аналог параметра «Hidden SSID». Используется она для того, чтобы скрыть точку доступа WiFi. В большинстве случаев её можно не ставить.
Параметр «WMM Enable» используется для повышения приоритета мультикаст-трафика при передаче через сеть WiFi. Если Вы не планируете подключать IPTV через WiFi, то галку можно снять.
Тип аутентификации — «Authentication Type» — оптимальнее всего выбирать «WPA2 Preshared Key» или «WPA/WPA2 Preshared Key» и затем в поле «WPA PreSharedKey» ввести пароль. Пароль на WiFi настоятельно рекомендую делать в виде буквенно-цифирной последовательности не короче 8 символов.
В списке «Regulatory Domain» выбираем «RUSSIAN FEDERATION».
Используемый радио канал Вай-Фай — Channel — лучше всего ставить «Auto».
Режим работы беспроводного модуля Mode оптимальнее всего ставить смешанный — 802.11 b/g/n.
Нажимаем кнопку Apply для применения параметров.
Настройка беспроводной сети завершена.Примечание:
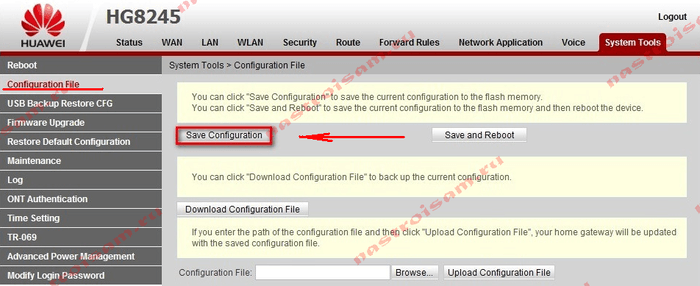
Не забудьте сохранить конфигурацию оптического модема Huawei HG8245.
Для этого надо зайти в раздел «System Tools» => «Configuration file»:Нажимаем кнопку «Save Configuration».