Настройка оборудования
Блог о модемах, роутерах и GPON терминалах Ростелеком

Как подключить роутер к оптическому терминалу ONT GPON

Гигабитные пассивные оптические сети — GPON — развиваются в геометрической прогрессии и захватывают все большую и большую долю рынка. В нашей области GPON прошел в качестве пилотного проекта в одном из районов и пока, к сожалению, развитие заглохло. Правда, думаю ненадолго. Тем не менее, ко мне все чаще и чаще обращаются пользователи, с просьбой объяснить как подключить роутер к оптическому ONT-терминалу или оптическому модему, как его ещё называют. Попробую ответить на этот вопрос наиболее просто и доступно.
Давайте сначала определимся, а зачем вообще подключать роутер к оптическому модему?! Дело в том, что у подавляющего большинства оптических ONT-терминалов, выдаваемых провайдерами при подключении, есть 4 LAN-порта (на некоторых даже гигабитные), есть 1 или 2 телефонных разъема под подключение SIP-телефонии. А вот Wi-Fi — нет.

Причем ONT с Wi-Fi есть. К примеру, рассмотрим два ONT-терминала Huawei HG8240 и HG8245. У HG8240 Wi-Fi нет, а у HG8245 — есть, но стоит эта модель дороже и соответственно провайдеры выдают HG8240. И если взглянуть глазами оператора связи — это вполне нормально. Провайдер заинтересован в наименьших затратах. К тому же и абоненты хотят чтобы подключение было максимально дешевым, а с дорогими железками это не получится. В итоге, абонентам часто приходится докупать беспроводную точку доступа либо Wi-Fi роутер.
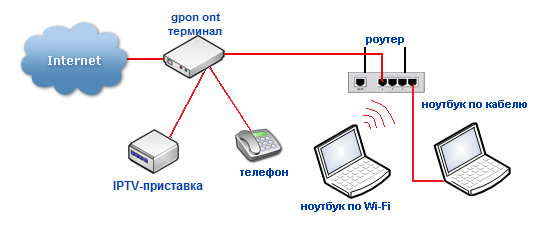
Рассмотрим два варианта подключения беспроводного устройства к оптическому терминалу. Для удобства опять же возьмем очень часто встречающийся Huawei HG8240. Если у Вас другой оптический терминал — не пугайтесь. Схемы подключения подойдут и для других ONT.
Оптический терминал ONT главный — роутер второстепенный
Такой вариант подключения самый простой — на оптическом терминале ONT ничего менять не нужно — он остается в режиме роутера . На HG8240 это выглядит так:
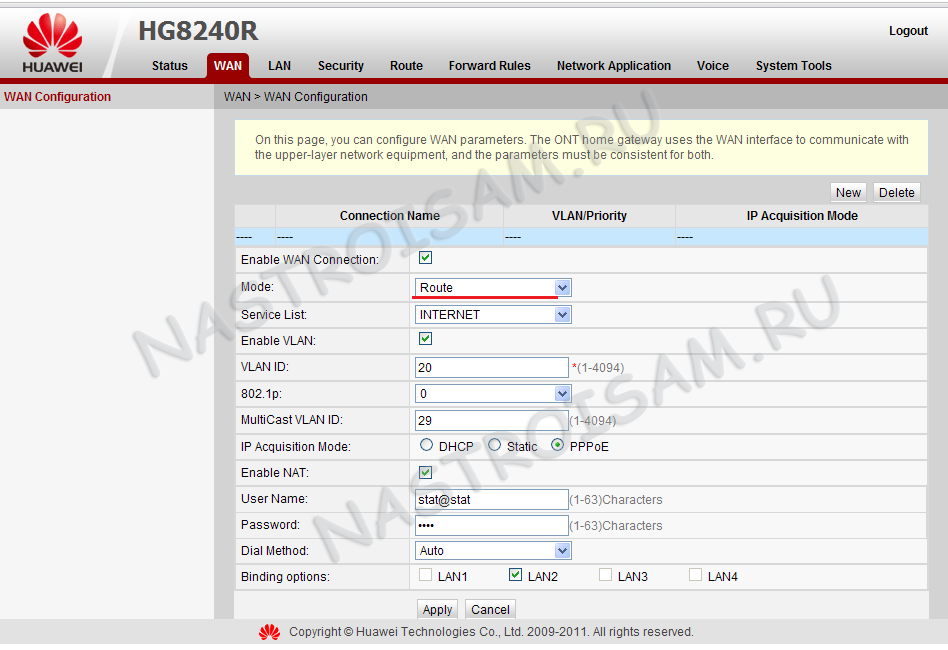
В один из LAN-портов оптического терминала включается точка доступа Wi-Fi и далее беспроводные устройства будут выходить в интернет через нее. Функционала простой дешевой точки доступа будет вполне достаточно, ведь основная нагрузка идет на ONT — она и сессию поднимает и интернет раздает. Если же Вы купили Wi-Fi маршрутизатор , а подключить его хотите именно в качестве простой точки доступа, то надо соединить патч-кордом LAN-порт оптического модема и любой из LAN-портов роутера (но не в WAN-порт !). Выглядеть это будет так:
В настройках роутера обязательно отключите DHCP-сервер в разделе LAN, так как он скорее всего включен на ONT-терминале и в итоге начнется путаница.
Так же, я бы рекомендовал изменить для удобства IP-адрес точки доступа или роутера со стандартного на любой другой, главное чтобы не совпадал с IP-адресом ONT-терминала .
ONT-терминал в режиме моста
В этом случае придется лезть в настройки ONT и для Интернет-соединения выбирать режим Моста — Bridge:
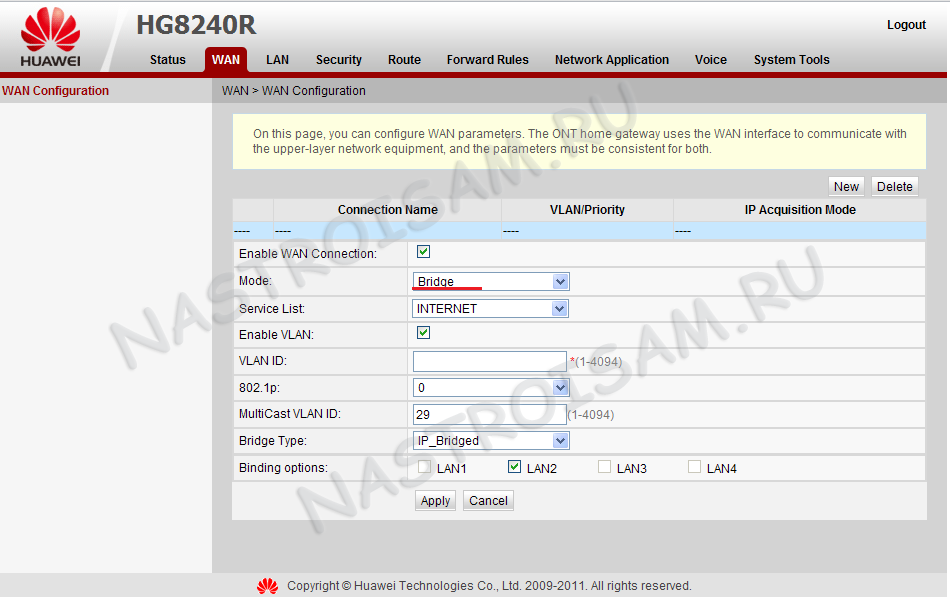
Как Вы можете видеть на картинке, в настройках оптического модема к интернет соединению привязан LAN-порт. Этот LAN-порт патч-кордом соединяем с WAN-портом роутера :

Логически Wi-Fi роутер смотрит напрямую в сеть провайдера через прозрачный мост в виде оптического терминала. Далее настраиваете на роутере Интернет-соединение которое использует Ваш провайдер — PPPoE, PPtP или L2TP и работаете. Wi-Fi роутер будет поднимать соединение и раздавать Интернет на все подключенные к нему устройства.
How to configure the internet access service on GPON OLT P1201?
![]()
Дата последнего обновления: 03-17-2022 07:32:04 AM 5535
Note: This Article Applies to TP-Link GPON OLT P1201 Ver.1;
All the service is based on the Data Plan, so before we start the configuration, we need to make a Data Plan first. The Data Plan is a table that describes all kinds of service provided. Here we will take the following Data Plan as an example to show how to configure the OLT device to provide the Internet access service.
Internet access service GEM Port ID:11
GPON ONT profiles include the DBA profile, line profile, service profile, traffic profile.
- DBA profie: A DBA profile describes GPON traffic parameters. A T-CONT is bound to a DBA profile for dynamic bandwidth allocation, improving upstream bandwidth utilization.
- Line profie: A line profile describes the binding between the T-CONT and the DBA profile, the QoS mode of the traffic stream, and the mapping between the GEM port and the ONT side service.
- Service profie: A service profile provides the service configuration channel for the ONT that is managed by using optical network terminal management and control interface (OMCI).
We will follow the below process to finish the configuration:

Step1. Create global vlans.
According to the data plan, we will need a vlan to transmit the Internet access services.
Step2. Configure the OLT uplink port.
The uplink port of the OLT is the one connected to the service provider. You need to add the uplink port to the VLAN we just created, and set the port type according to the requirement. Here we add GE9 port to the VLANs as the uplink port.
OLT(config)# interface ge 0/0
OLT(interface-ge)# vlan mode 9 hybrid
OLT(interface-ge)# vlan hybrid 9 tagged 100
Step3. Create the DBA profile.
Run the show dba-profile command to query existing DBA profiles in the system. If the existing DBA profiles in the system do not meet the requirements, run the dba-profile command to add a DBA profile.
Create the same DBA profile for different types of services. Set the profile ID to 10, profile type to type3, assured bandwidth to 8 Mbit/s, and maximum bandwidth to 20 Mbit/s.
OLT(config)# dba-profile profile-id 10
OLT(dba-profile-0)# type3 assure 8192 max 20480
Note: The DBA implementation is based on an ONT. Therefore, select a DBA profile of the proper bandwidth type and configure proper bandwidth according to the service types and total user count of the ONT. There are 5 kinds of dba-profile types, please refer to the User Guide to check the details.
Step4. Create ONT Line Profile.
The ont-lineprofile describes the binding relationship between the T-CONT and the DBA template, the QoS mode of the service flow, and the mapping between the GEM Port and the ONT side. It is mainly used to configure DBA, T-CONT, and GEM Port related information.
Create a GPON ONT line profile, ID is 10, and bind T-CONT 1 to the DBA profile 10 in this line profile. We map the gem port 11 to VLAN 100.
OLT(config)# ont-lineprofile profile-id 10
OLT(ont-lineprofile-10)# tcont 1 dba-profile-id 10
OLT(ont-lineprofile-10)# gem add 11 tcont 1
OLT(ont-lineprofile-10)# gem mapping 11 1 vlan-id 100
Step5. Create ONT Srvprofile.
Use the ont-srvprofile command to create and enter the GPON ONT service profile mode or enter the created GPON ONT service profile mode. The ONT service-related attributes are configured in the service template.
OLT(config)# ont-srvprofile profile-id 10
OLT(ont-srvprofile-10)# ont-port eth adaptive pots adaptive catv adaptive
Step6. Add the ONT to OLT.
Only when the ONT register to the OLT successfully, you can configure the service of the ONT. We connect the ONT to PON4 port, SN is DB1920223344. Bind it to ONT line profile 10 and ONT service profile 10.
OLT(config)# interface gpon 0/0
OLT(interface-gpon)# ont autofind 4 enable
OLT(interface-gpon)# show ont autofind 4 all
//Uses this command to display all the ONT connected on that PON port.
OLT(interface-gpon)# ont add 4 1 sn-auth DB1920223344 ont-lineprofile-id 10 ont-srvprofile-id 10
Add pon 4 onu 1 successfully.
Step7. Configure the service-port.
After registering to the OLT successfully, we need to configure the PON port. For example, if we connect the ONU at PON4, we also need to add the PON4 into the VLAN we just created.
OLT(config)# interface gpon 0/0
OLT(config-interface-gpon-0/0)# ont port native-vlan 4 1 eth 1 vlan 100
OLT(config)# service-port 3 vlan 100 gpon 0/0 port 4 ont 1 gemport 2 multi-service user-vlan 100 tag-action transparent
Step8. Save Configuration.
Remember to save the configuration we just made.
Please log in the EMS, and click Switch Control Card to open the switch management page. Then go to Port VLAN ManagementàVLAN list. After creating VLAN, we need to add the corresponding port into it. Here we add the uplink port into VLAN 100.

Then we need to change the port type. Go to Port VLAN Config. Click the Config to change the Port from Access to Hybrid.

Step2. Create the DBA profile.
Click the Pon Module to open Pon Card Management. Then go to DBA Profile Config. On the below page, click the Add to create a new profile. You need to choose one of the type and set the value as the requirement.

Step3. Create the Line profile.
Click the Line Profile Config to open the page below. After you add a new one, you need to go to the Detailed to configure the Tcont and Gem port.

Click Add to add a new Tcont.

Then go to Detailed to add the Gem port.

Then we need to map the Gem port with the VLAN. Go to Detailed. Add the mapping item to bind the VLAN to Gem port to provide service.

Step4. Create ONT Srvprofile.
Here we set all the eth port to adaptive, which means dynamic.

Step5. Add the ONT to OLT.
First, we need to enable the autofind function on PON3 port, then search the ONT device under PON3.

Then, go to OUN Auth List to auth the device. Choose the one you want to auth, click Auth. Bind it to Line Profile and Service Profile.

Step6. Configure the service-port.
Please go to Service Port and click the Service Port Config. Then add an item.

Step7. Configure ONU eth port.
Open the ONU Management page, go to ETH Port Information to change the Native VLAN of ETH1 to VLAN 100.

Till now, we have finished the configuration of internet access service on OLT side.
Был ли этот FAQ полезен?
Ваш отзыв поможет нам улучшить работу сайта.
Что вам не понравилось в этой статье?
- Недоволен продуктом
- Слишком сложно
- Неверный заголовок
- Не относится к моей проблеме
- Слишком туманное объяснение
- Другое
Как мы можем это улучшить?
Спасибо за обращение
Нажмите здесь, чтобы связаться с технической поддержкой TP-Link.
Подписаться на рассылку Мы с ответственностью относимся к вашим персональным данным. Полный текст положения об обработке персональных данных доступен здесь. С нашими условиями использования и программой улучшения пользовательского опыта можно ознакомиться здесь.