Dual booting Windows and Linux using UEFI
A quick rundown of setting up Linux and Windows to dual boot on the same machine, using the Unified Extensible Firmware Interface (UEFI).

Rather than doing a step-by-step how-to guide to configuring your system to dual boot, I’ll highlight the important points. As an example, I will refer to my new laptop that I purchased a few months ago. I first installed Ubuntu Linux onto the entire hard drive, which destroyed the pre-installed Windows 10 installation. After a few months, I decided to install a different Linux distribution, and so also decided to re-install Windows 10 alongside Fedora Linux in a dual boot configuration. I’ll highlight some essential facts to get started.
Firmware
Dual booting is not just a matter of software. Or, it is, but it involves changing your firmware, which among other things tells your machine how to begin the boot process. Here are some firmware-related issues to keep in mind.
UEFI vs. BIOS
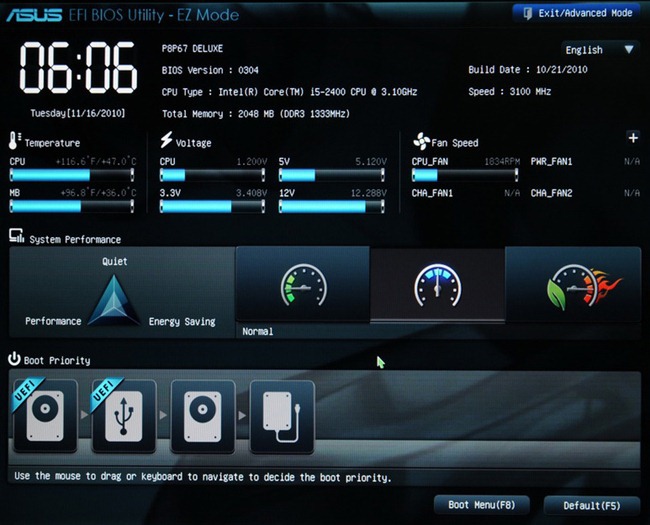
Before attempting to install, make sure your firmware configuration is optimal. Most computers sold today have a new type of firmware known as Unified Extensible Firmware Interface (UEFI), which has pretty much replaced the other firmware known as Basic Input Output System (BIOS), which is often included through the mode many providers call Legacy Boot.
I had no need for BIOS, so I chose UEFI mode.
Secure Boot
One other important setting is Secure Boot. This feature detects whether the boot path has been tampered with, and stops unapproved operating systems from booting. For now, I disabled this option to ensure that I could install Fedora Linux. According to the Fedora Project Wiki Features/Secure Boot Fedora Linux will work with it enabled. This may be different for other Linux distributions —I plan to revisit this setting in the future.
In short, if you find that you cannot install your Linux OS with this setting active, disable Secure Boot and try again.
Partitioning the boot drive
If you choose to dual boot and have both operating systems on the same drive, you have to break it into partitions. Even if you dual boot using two different drives, most Linux installations are best broken into a few basic partitions for a variety of reasons. Here are some options to consider.
GPT vs MBR
If you decide to manually partition your boot drive in advance, I recommend using the GUID Partition Table (GPT) rather than the older Master Boot Record (MBR). Among the reasons for this change, there are two specific limitations of MBR that GPT doesn’t have:
- MBR can hold up to 15 partitions, while GPT can hold up to 128.
- MBR only supports up to 2 terabytes, while GPT uses 64-bit addresses which allows it to support disks up to 8 million terabytes.
If you have shopped for hard drives recently, then you know that many of today’s drives exceed the 2 terabyte limit.
The EFI system partition
If you are doing a fresh installation or using a new drive, there are probably no partitions to begin with. In this case, the OS installer will create the first one, which is the EFI System Partition (ESP). If you choose to manually partition your drive using a tool such as gdisk, you will need to create this partition with several parameters. Based on the existing ESP, I set the size to around 500MB and assigned it the ef00 (EFI System) partition type. The UEFI specification requires the format to be FAT32/msdos, most likely because it is supportable by a wide range of operating systems.
Operating System Installation
Once you accomplish the first two tasks, you can install your operating systems. While I focus on Windows 10 and Fedora Linux here, the process is fairly similar when installing other combinations as well.
Windows 10
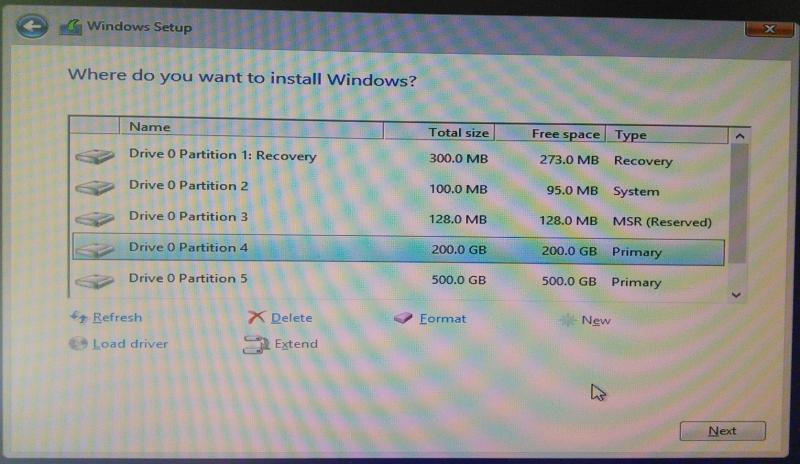
I started the Windows 10 installation and created a 20 Gigabyte Windows partition. Since I had previously installed Linux on my laptop, the drive had an ESP, which I chose to keep. I deleted all existing Linux and swap partitions to start fresh, and then started my Windows installation. The Windows installer automatically created another small partition—16 Megabytes—called the Microsoft Reserved Partition (MSR). Roughly 400 Gigabytes of unallocated space remained on the 512GB boot drive once this was finished.
I then proceeded with and completed the Windows 10 installation process. I then rebooted into Windows to make sure it was working, created my user account, set up wi-fi, and completed other tasks that need to be done on a first-time OS installation.
Fedora Linux
I next moved to install Linux. I started the process, and when it reached the disk configuration steps, I made sure not to change the Windows NTFS and MSR partitions. I also did not change the EPS, but I did set its mount point to /boot/efi. I then created the usual ext4 formatted partitions, / (root), /boot, and /home. The last partition I created was Linux swap.
As with Windows, I continued and completed the Linux installation, and then rebooted. To my delight, at boot time the GRand Unified Boot Loader (GRUB) menu provided the choice to select either Windows or Linux, which meant I did not have to do any additional configuration. I selected Linux and completed the usual steps such as creating my user account.
Conclusion
Overall, the process was painless. In past years, there has been some difficulty navigating the changes from UEFI to BIOS, plus the introduction of features such as Secure Boot. I believe that we have now made it past these hurdles and can reliably set up multi-boot systems.
Разбираемся с UEFI и GPT: установка Windows и Kubuntu на один диск
Помните те времена, когда BIOS был 16-битным с адресным пространством в 1 Мб, а вся информация о загрузчиках писалась в MBR? На смену уже давно пришли более гибкие технологии: UEFI (замена BIOS), и GPT (замена MBR).
Предыстория: Понадобилось мне недавно на свой домашний десктоп поставить 2 системы, чтобы разграничить окружение. Kubuntu для разработки на Ruby on Rails (ибо работаю удаленно), и Windows для всяких игрушек в свободное время. Хочу заметить, что несколько лет назад это было достаточно просто: один раздел для винды и один раздел для линукса, загрузчик записывался в MBR. Однако, технологии не стоят на месте, и оказалось, что настройка dual boot’а теперь несколько изменилась.
Итак, начнем.
Терминология
UEFI (Unified Extensible Firmware Interface, Единый расширяемый интерфейс прошивки) разрабатывался компанией Intel как замена BIOS (Basic Input Output System). В отличие от 16-битного BIOS’а UEFI работает в 32- или 64-битном режиме, что позволяет использовать намного больше памяти для сложных процессов. Кроме того, UEFI приятно выглядит и там есть поддержка мышки.
- Количество разделов: MBR поддерживает только 4 раздела. Можно и больше, но только через extended partition, что является просто хаком ограничений. GPT поддерживает до 128 разделов.
- Размер диска: MBR поддерживает диски до 2Тб, в то время как GPT — до 9.4 Зеттабайт (=9.4 × 10^21 байт, или условно 1000 Тб)
- Порядок загрузки: раньше BIOS загружал MBR, и в нем содержались адреса загрузчиков для каждого раздела диска. Теперь UEFI считывает GPT, находит в таблице все разделы типа efi (на них содержатся загрузчики), и подгружает их в память. Разберем это на примере немного позже.
Что делаем:
- Windows 8.1 x64. Windows поддерживает загрузку с GPT начиная с Windows 8 для 32 битной архитектуры и с Windows Server 2003 и Windows Vista для 64 бит (Источник).
- Kubuntu 15.04. По идее подойдет любой дистрибутив, который поддерживает Grub2, лично я предпочитаю Kubuntu.
Разбивка диска
Сначала устанавливаем Windows 8, т.к. она автоматически будет использовать GPT.
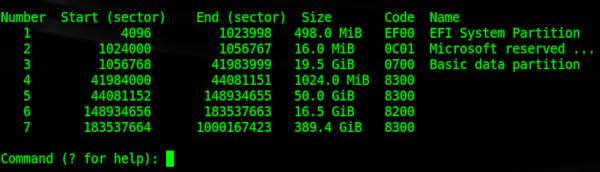
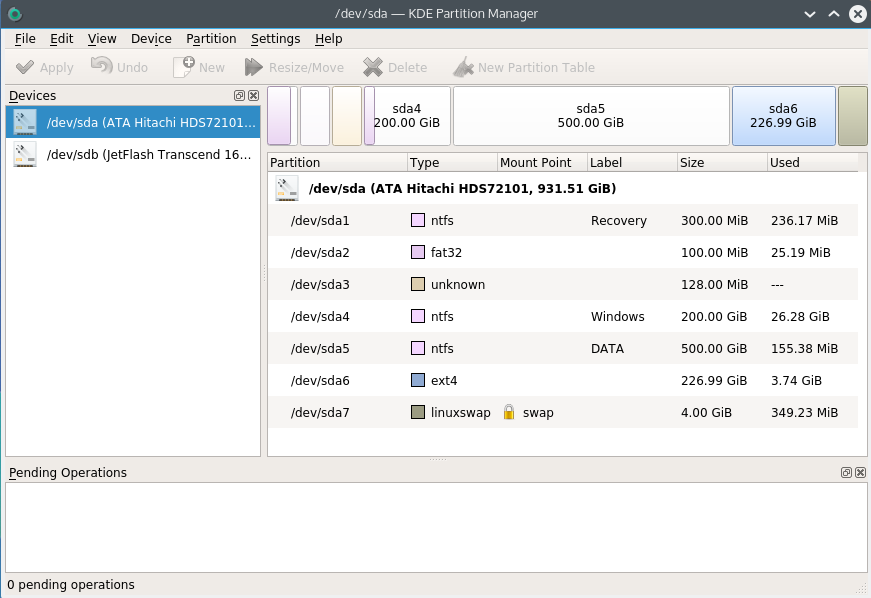
Разбивка будет выглядеть так (пардон за кривой снимок):
- Recovery (300Мб). Очевидно, что он используется для восстановления системы. Оставим как есть.
- EFI partition (100Мб). Помечается как system type (не любят в Майкрософте называть вещи своими техническими именами). Собственно сюда и пишутся загрузчики.
- MSR (128Мб, Microsoft Reserved Partition). Для меня остается загадкой, зачем он нужен. Данных там никаких нет, просто пустое место, зарезервированное для каких-то непонятных целей в будущем.
- Основной раздел. Мы его поделим на 3: 200 гигов под винду, 500 гигов для раздела под данные и остальное пространство пока оставим неразмеченным (отформатируем потом при установке Kubuntu).
Пропустим саму установку Windows, т.к. в ней все стандартно и понятно.
Теперь загрузимся с USB в Kubuntu Live.
kubuntu@kubuntu:~$ efibootmgr BootCurrent: 0003 Timeout: 0 seconds BootOrder: 0000,0003,0001 Boot0000* Windows Boot Manager Boot0001* Hard Drive Boot0003* UEFI: JetFlashTranscend 16GB Boot0000 — виндовый загрузчик
Boot0001 — дефолтный загрузчик
Boot0003 — флешка с Kubuntu Live
Обратите внимание, что список загрузчиков не привязан к одному физическому диску как в MBR. Он хранится в NVRAM.
Можем также сразу посмотреть, что же в этом разделе, подмонтировав его:
kubuntu@kubuntu:~$ sudo mkdir /media/efi kubuntu@kubuntu:~$ sudo mount /dev/sda2 /media/efi EFI |--Boot | |--bootx64.efi # дефолтный загрузчик |--Microsoft |--Boot |--bootmgfw.efi # основной виндовый загрузчик |--# много других файлов Убедились, что все хорошо. Теперь продолжаем разбивку диска (через KDE Partition Manager).
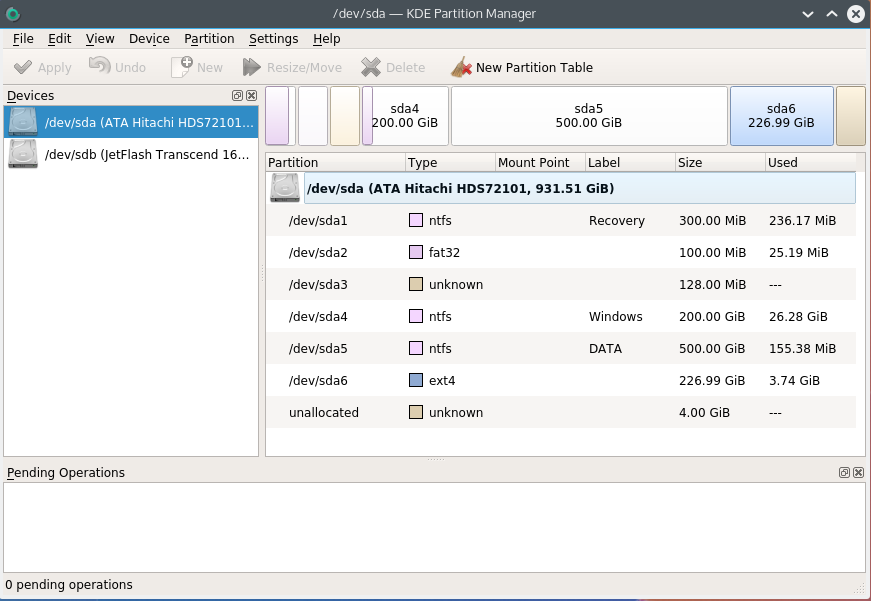
- sda2 определился как FAT32. Это практически верно, т.к. файловая система типа EFI основана на FAT, только с жесткими спецификациями.
- sda3 (MSR) не определился, т.к. файловой системы там так таковой нет.
Нам осталось только отформатировать раздел для Kubuntu в ext4, и выделить раздел под swap.
Несколько слов про swap. Рекомендуют на swap выделять от SQRT(RAM) до 2xRAM. Т.к. у меня 16 Гб RAM, то по минимуму мне надо 4 Гб свопа. Хотя я с трудом могу представить ситуации, при которых он будет использоваться: десктоп в hibernate я не перевожу, и сильно тяжелых программ, которые жрут больше 16 гигов, не использую.
P.S. При форматировании раздела в swap Partition Manager может выдать ошибки, которые связаны с тем, что Kubuntu автоматически монтирует в себя любой swap раздел, однако на результат эти ошибки не влияют.
Теперь самое главное для правильного dual boot’а. При установке Kubuntu важно выбрать, куда установить загрузчик:

Указываем, конечно же на раздел EFI.
После завершения установки Kubuntu, заходим в систему и проверяем, какие файлы появились на efi разделе (монтировать уже не нужно):
user@kubuntu:~$ sudo ls /boot/efi/EFI Boot Microsoft ubuntu user@kubuntu:~$ sudo ls /boot/efi/EFI/ubuntu grub.cfg grubx64.efi MokManager.efi shimx64.efi user@kubuntu:~$ efibootmgr -v BootCurrent: 0002 Timeout: 0 seconds BootOrder: 0002,0000,0003,0001 Boot0000* Windows Boot Manager HD(2,96800,32000,c4f37e07-0441-4967-a1ac-75fb5a36e4f3)File(\EFI\Microsoft\Boot\bootmgfw.efi) Boot0001* Hard Drive BIOS(2,0,00) Boot0002* ubuntu HD(2,96800,32000,c4f37e07-0441-4967-a1ac-75fb5a36e4f3)File(\EFI\ubuntu\shimx64.efi) Boot0003* ubuntu HD(2,96800,32000,c4f37e07-0441-4967-a1ac-75fb5a36e4f3)File(EFI\Ubuntu\grubx64.efi) Вот как это выглядит при загрузке:

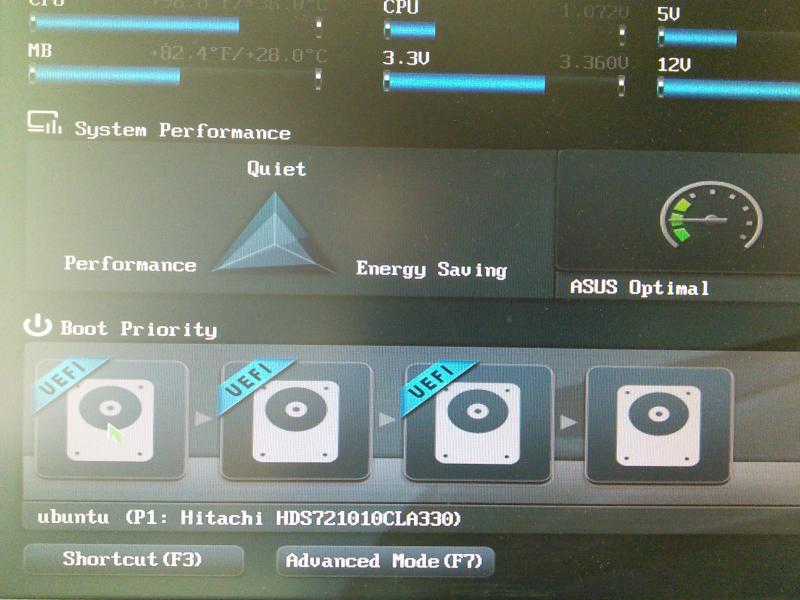
А еще эти загрузчики доступны сразу из UEFI (в старом BIOS’е такое было бы невозможно — там был выбор только диска, он просто не знал, что такое загрузчики):
Ну и напоследок: чтобы dual boot правильно работал, в Windows надо обязательно отключить fast boot. Это такая нехорошая фича, которая может привести к потере данных.

При выключении компьютера Windows сохраняет файловую структуру NTFS разделов в файл (видимо, потому что один файл прочитать быстрее, чем сканировать много разных файлов). Если записать файл на NTFS раздел через линукс, и потом загрузиться в Windows, то Windows просто не увидит файл. Источник
Если выключить комп через Windows, и потом попытаться загрузить Linux, то он просто не запустится из-за «ошибки» NTFS. Источник