- How to enable Nvidia fan control on Ubuntu 20.04. This is very easy.
- Saved searches
- Use saved searches to filter your results more quickly
- License
- mechnotech/nvidia_fan_control
- Name already in use
- Sign In Required
- Launching GitHub Desktop
- Launching GitHub Desktop
- Launching Xcode
- Launching Visual Studio Code
- Latest commit
- Git stats
- Files
- README.md
- About
How to enable Nvidia fan control on Ubuntu 20.04. This is very easy.
Setting the GPU fan speed on Linux is very important if a user wants to participate in gaming and not have a burning smell come from their GPU. I have found a way to get this working and it is very simple.
Run this command to create a basic Xorg configuration to enable the setting we require.
┌──[jason@192.168.1.2]─[~] └──╼ ╼ $ sudo nvidia-xconfig -a --cool-bits=28 --allow-empty-initial-configuration
┌──[[email protected]]─[~] └──╼ ╼ $ sudo nvidia-xconfig -a —cool-bits=28 —allow-empty-initial-configuration
This creates a new /etc/X11/xorg.conf file that contains the required settings.
Section "Screen" Identifier "Screen0" Device "Device0" Monitor "Monitor0" DefaultDepth 24 Option "AllowEmptyInitialConfiguration" "True" Option "Coolbits" "28" SubSection "Display" Depth 24 EndSubSection EndSection
Section «Screen» Identifier «Screen0» Device «Device0» Monitor «Monitor0» DefaultDepth 24 Option «AllowEmptyInitialConfiguration» «True» Option «Coolbits» «28» SubSection «Display» Depth 24 EndSubSection EndSection
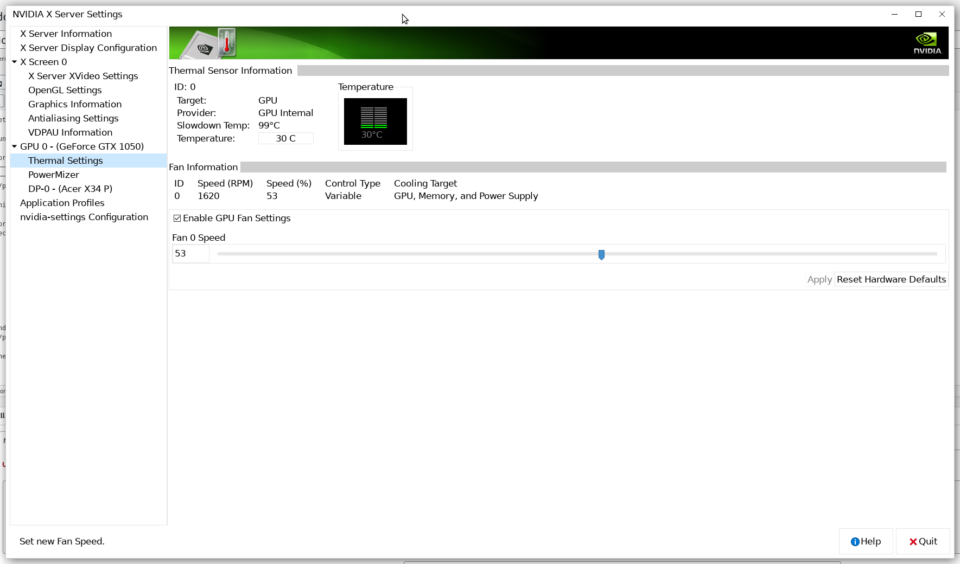
Then log out of the desktop session to GDM and then back in. Then the fan speed option should be available in Nvidia settings.
The above section of the xorg.conf has the Option «Coolbits» «28» option that will enable the Nvidia settings GUI to unlock the fan speed selection. Then set an appropriate fan speed for the GPU. 50% should be fine.
This is very simple and causes no issues. On Windows, you use MSI Afterburner to set the fan properties and monitor the temperature, but on Linux, you have Nvidia settings utility. So the ability to set the fan speed is necessary and it is very strange that this is not available unless you have configured a Xorg.conf file that is not even required anymore. But at least this setting works and allows a user to control something as simple as the speed of the GPU fan. The good thing about Linux is that there is always a good fix for a problem you encounter.
The fan speed of your Nvidia card may also be controlled with the command line. This is quick and easy to do.
┌──[jason@192.168.1.2]─[~/Documents] └──╼ ╼ $ nvidia-settings -a [fan:0]/GPUTargetFanSpeed=32 Attribute 'GPUTargetFanSpeed' (jason-desktop:1[fan:0]) assigned value 32.
┌──[[email protected]]─[~/Documents] └──╼ ╼ $ nvidia-settings -a [fan:0]/GPUTargetFanSpeed=32 Attribute ‘GPUTargetFanSpeed’ (jason-desktop:1[fan:0]) assigned value 32.
This command will return information about the GPU temperature. This is very useful to keep track of the temperature of the card whilst running intensive tasks using the GPU.
┌──[jason@192.168.1.2]─[~/Documents] └──╼ ╼ $ nvidia-smi -q -d temperature ==============NVSMI LOG============== Timestamp : Tue Dec 8 08:55:20 2020 Driver Version : 440.100 CUDA Version : 10.2 Attached GPUs : 1 GPU 00000000:04:00.0 Temperature GPU Current Temp : 31 C GPU Shutdown Temp : 102 C GPU Slowdown Temp : 99 C GPU Max Operating Temp : N/A Memory Current Temp : N/A Memory Max Operating Temp : N/A
┌──[[email protected]]─[~/Documents] └──╼ ╼ $ nvidia-smi -q -d temperature ==============NVSMI LOG============== Timestamp : Tue Dec 8 08:55:20 2020 Driver Version : 440.100 CUDA Version : 10.2 Attached GPUs : 1 GPU 00000000:04:00.0 Temperature GPU Current Temp : 31 C GPU Shutdown Temp : 102 C GPU Slowdown Temp : 99 C GPU Max Operating Temp : N/A Memory Current Temp : N/A Memory Max Operating Temp : N/A
This also shows the thermal throttling temperature and the critical shutdown temperature.
Another way to set the fan control is via the /usr/share/X11/xorg.conf.d/10-nvidia.conf file.
Section "OutputClass" Identifier "nvidia" MatchDriver "nvidia-drm" Driver "nvidia" Option "AllowEmptyInitialConfiguration" Option "Coolbits" "28" ModulePath "/usr/lib/x86_64-linux-gnu/nvidia/xorg" EndSection
Section «OutputClass» Identifier «nvidia» MatchDriver «nvidia-drm» Driver «nvidia» Option «AllowEmptyInitialConfiguration» Option «Coolbits» «28» ModulePath «/usr/lib/x86_64-linux-gnu/nvidia/xorg» EndSection
This might avoid the black screen error with Nvidia drivers as they are troublesome. Add the Option «Coolbits» «28» option here and see if this helps. On Ubuntu 20.04 with Nvidia Driver 470.63.01, you might use this instead.
Also, edit the /etc/X11/Xwrapper.config to look like this.
# Xwrapper.config (Debian X Window System server wrapper configuration file) # # This file was generated by the post-installation script of the # xserver-xorg-legacy package using values from the debconf database. # # See the Xwrapper.config(5) manual page for more information. # # This file is automatically updated on upgrades of the xserver-xorg-legacy # package *only* if it has not been modified since the last upgrade of that # package. # # If you have edited this file but would like it to be automatically updated # again, run the following command as root: # dpkg-reconfigure xserver-xorg-legacy #allowed_users=console allowed_users = anybody needs_root_rights = yes
# Xwrapper.config (Debian X Window System server wrapper configuration file) # # This file was generated by the post-installation script of the # xserver-xorg-legacy package using values from the debconf database. # # See the Xwrapper.config(5) manual page for more information. # # This file is automatically updated on upgrades of the xserver-xorg-legacy # package *only* if it has not been modified since the last upgrade of that # package. # # If you have edited this file but would like it to be automatically updated # again, run the following command as root: # dpkg-reconfigure xserver-xorg-legacy #allowed_users=console allowed_users = anybody needs_root_rights = yes
Then run this command to set the appropriate permissions.
sudo chmod 2644 /etc/X11/Xwrapper.config
sudo chmod 2644 /etc/X11/Xwrapper.config
Then reboot your Linux PC.
Another useful post. This contains a script that you may run with Startup Applications in the MATE desktop to get the fan running when you log in to your desktop.
#!/bin/bash nvidia-settings -a '[gpu:0]/GPUFanControlState=1' nvidia-settings -a '[fan]/GPUTargetFanSpeed=56'
#!/bin/bash nvidia-settings -a ‘[gpu:0]/GPUFanControlState=1’ nvidia-settings -a ‘[fan]/GPUTargetFanSpeed=56’
Add this to Startup Applications to use this script.
Saved searches
Use saved searches to filter your results more quickly
You signed in with another tab or window. Reload to refresh your session. You signed out in another tab or window. Reload to refresh your session. You switched accounts on another tab or window. Reload to refresh your session.
Control the fan speed of NVida graphics cards based on a user-defined curve for Linux.
License
mechnotech/nvidia_fan_control
This commit does not belong to any branch on this repository, and may belong to a fork outside of the repository.
Name already in use
A tag already exists with the provided branch name. Many Git commands accept both tag and branch names, so creating this branch may cause unexpected behavior. Are you sure you want to create this branch?
Sign In Required
Please sign in to use Codespaces.
Launching GitHub Desktop
If nothing happens, download GitHub Desktop and try again.
Launching GitHub Desktop
If nothing happens, download GitHub Desktop and try again.
Launching Xcode
If nothing happens, download Xcode and try again.
Launching Visual Studio Code
Your codespace will open once ready.
There was a problem preparing your codespace, please try again.
Latest commit
Git stats
Files
Failed to load latest commit information.
README.md
Control the fan speed of NVida graphics cards based on a user-defined curve for Linux.
There is no easy way to set up a temperature-fan speed curve on your own (like MSI Afterburner for Windows). As a result, under heavy load, the video card quickly warms up to a temperature of 86C (186F) and above. This is not the best mode for long device life.
A script that will monitor the temperature of each GPU, check the curve profile and translate the fans to the desired rotation speed.

Edit the temp_profile.json in profiles
< "GPUS": [ "0": 5, "20": 15, "40": 35, "60": 75, "80": 95, "100": 100> ], "GPU_FAN_MAP": "0": 1, "1": 0> >
The key is the GPU temperature and value is the desired fan speed.
The key is the GPU number (id) and the value is the fan ID (this works for me, maybe yours will be different)
Create virtual environment:
pip install -r requirements.txt
Run as .desktop application
Edit the path to the script in FanController.desktop. Copy to desktop and change file properties to allow execution.
About
Control the fan speed of NVida graphics cards based on a user-defined curve for Linux.