- How to create a GRE tunnel on Linux
- Support Xmodulo
- Настройка Linux для туннеля GRE
- Шаг 2 — Настройка туннеля
- Шаг 2.1 — Тест Ping
- Шаг 3 — Добавить новые маршруты
- Шаг 4 — Настройте NAT
- Шаг 5 — Порты пересылки
- Шаг 6 — Сделай постоянным
- Заключение
- Configure GRE Tunnel on Ubuntu 18
- Create GRE tunnel
- Enable IP packet forwarding and disable RP filter in Linux
- Redirect incoming packets from GRE tunnel to Squid
- Check WCCP works
How to create a GRE tunnel on Linux
Question: I want to connect to remote networks by using a GRE tunnel. How can I create a GRE tunnel between two end points on Linux?
GRE tunnels are IP-over-IP tunnels which can encapsulate IPv4/IPv6 and unicast/multicast traffic. To create a GRE tunnel on Linux, you need ip_gre kernel module, which is GRE over IPv4 tunneling driver.
So first make sure that ip_gre is loaded.
$ sudo modprobe ip_gre $ lsmod | grep gre
ip_gre 22432 0 gre 12989 1 ip_gre
Here, we assume that you want to create a GRE tunnel between two interfaces with the following IP addresses.
On host A, run the following command.
$ sudo ip tunnel add gre0 mode gre remote 172.168.10.25 local 192.168.233.204 ttl 255 $ sudo ip link set gre0 up $ sudo ip addr add 10.10.10.1/24 dev gre0
In the above, we create a GRE-type tunnel device called gre0 , and set its remote address to 172.168.10.25 . Tunneling packets will be originating from 192.168.233.204 (local IP address), and their TTL field will be set to 255 . The tunnel device is assigned IP address 10.10.10.1 with netmask 255.255.255.0 .
Now verify that route for the GRE tunnel is set up correctly:
default via 135.112.29.1 dev eth0 proto static 10.10.10.0/24 dev gre0 proto kernel scope link src 10.10.10.1
On host B, run similar commands as follows.
$ sudo ip tunnel add gre0 mode gre remote 192.168.233.204 local 172.168.10.25 ttl 255 $ sudo ip link set gre0 up $ sudo ip addr add 10.10.10.2/24 dev gre0
At this point, a GRE tunnel should be established between host A and host B.To verify that, from one tunneling end point, ping the other end point.
PING 10.10.10.2 (10.10.10.2) 56(84) bytes of data. 64 bytes from 10.10.10.2: icmp_req=1 ttl=64 time=0.619 ms 64 bytes from 10.10.10.2: icmp_req=2 ttl=64 time=0.496 ms 64 bytes from 10.10.10.2: icmp_req=3 ttl=64 time=0.587 ms
If you want to tear down the existing GRE tunnel, run the following command from either end.
$ sudo ip link set gre0 down $ sudo ip tunnel del gre0
Support Xmodulo
This website is made possible by minimal ads and your gracious donation via PayPal or credit card
Please note that this article is published by Xmodulo.com under a Creative Commons Attribution-ShareAlike 3.0 Unported License. If you would like to use the whole or any part of this article, you need to cite this web page at Xmodulo.com as the original source.
Настройка Linux для туннеля GRE
Если вы видите что-то еще, возможно, ваше ядро не поддерживает GRE.
Для пересылки всего трафика в туннель GRE и из него мы будем использовать iptables и iproute2, которые уже должны быть установлены во всех основных дистрибутивах Linux. Если они не установлены, используйте следующую команду
для дистрибутивов на основе Debian:
sudo apt install iptables iproute2sudo yum install iptables iproute2Шаг 2 — Настройка туннеля
Сначала мы должны настроить наш туннель.
На сервере A выполните этот код, чтобы включить пересылку ip:
sudo echo 'net.ipv4.ip_forward=1' >> /etc/sysctl.conf sudo sysctl -psudo ip tunnel add gre1 mode gre local 198.51.100.1 remote 203.0.113.1 ttl 255 sudo ip addr add 10.0.0.1/30 dev gre1 sudo ip link set gre1 upsudo ip tunnel add gre1 mode gre local 203.0.113.1 remote 198.51.100.1 ttl 255 sudo ip addr add 10.0.0.2/30 dev gre1 sudo ip link set gre1 upШаг 2.1 — Тест Ping
Шаг 3 — Добавить новые маршруты
Маршрут необходим для правильной обработки данных, поступающих через туннель GRE.
На сервере B выполните:
sudo echo '100 GRE' >> /etc/iproute2/rt_tables sudo ip rule add from 10.0.0.0/30 table GRE sudo ip route add default via 10.0.0.1 table GREШаг 4 — Настройте NAT
iptables -t nat -A POSTROUTING -s 10.0.0.0/30 ! -o gre+ -j SNAT --to-source 198.51.100.1Чтобы проверить исходящее соединение, выполните на сервере B следующие команды:
для дистрибутивов на основе Debian:
curl http://www.cpanel.net/showip.cgi --interface 10.0.0.2Шаг 5 — Порты пересылки
На сервере A выполните следующие команды, чтобы разрешить все данные, поступающие на сервер B и поступающие с него:
sudo iptables -A FORWARD -d 10.0.0.2 -m state --state NEW,ESTABLISHED,RELATED -j ACCEPT sudo iptables -A FORWARD -s 10.0.0.2 -m state --state NEW,ESTABLISHED,RELATED -j ACCEPTsudo iptables -t nat -A PREROUTING -d 198.51.100.1 -p PROTO -m PROTO --dport PORT -j DNAT --to-destination 10.0.0.2замена PROTO и PORT вашими фактическими.
Например, чтобы переслать все данные на веб-сервер (порт TCP 80), нам нужно выполнить:
sudo iptables -t nat -A PREROUTING -d 198.51.100.1 -p TCP -m TCP --dport 80 -j DNAT --to-destination 10.0.0.2Шаг 6 — Сделай постоянным
На сервере перезагрузите все, что мы сделали, будут уничтожены. Чтобы убедиться, что туннель GRE и все остальное будет работать после перезапуска, мы должны отредактировать файл /etc/rc.local и добавить все команды, которые мы сделали (кроме эхо!) Перед exit 0 .
Заключение
Теперь, если мы подключаемся к серверу A, используя настроенные порты (например, порт TCP 80), мы вместо этого собираемся подключиться к серверу B, не зная об этом.
Примечание: если вы используете CSF для управления iptables, вам, возможно, придется поместить все команды iptables в свой /etc/csf/csfpost.sh и вставить IP-адрес обоих серверов (также GRE) в свой /etc/csf/csf.allow
Configure GRE Tunnel on Ubuntu 18
Cisco ASA firewall will redirect intercepted HTTP and HTTPS traffic to proxy box using GRE tunnel. Each IP packet that comes from a workstation with destination the Internet will be wrapped into a GRE packet and diverted to the proxy box. Squid process on the proxy box will then intercept these packages, contact servers on the Internet, scan requests and responses using Web Safety and return scanned pages to the workstations.
Create GRE tunnel
GRE diverted packets will be originating from Router ID IP address which may or may not be equal to 192.168.6.1 IP address of the Cisco ASA on the internal network. In order to find out the Router ID type show wccp and look for Router Identifier address as indicated on the previous step.
To create the GRE tunnel on proxy box with IP address of 192.168.6.15, we would need to manually adjust some network settings. First, create a wccp0_up.sh script in /etc/networkd-dispatcher/routable.d folder with the following contents. The script will create GRE network tunnel automatically when ens160 network interface is activated.
Make the script executable by running chmod +x wccp0_up.sh and reset the owner of script to root by running chown root:root wccp0_up.sh . This is important otherwise the script will not be processed by the networkd-dispatcher module.
#!/bin/bash if [ "$IFACE" == "ens160" ]; then ip tunnel add wccp0 mode gre remote 192.168.178.10 local 192.168.6.15 dev ens160 ttl 255 ip link set wccp0 up fi
Please note how we use the Router ID 192.168.178.10 here in the GRE tunnel definition. Your Router ID will be different of course!
Next, create a wccp0_down.sh script in /etc/networkd-dispatcher/off.d folder with the following contents. The script will delete existing GRE network tunnel when ens160 network interface is deactivated.
Again make the script executable by running chmod +x wccp0_down.sh and reset the owner of script to root by running chown root:root wccp0_down.sh .
#!/bin/bash if [ "$IFACE" == "ens160" ]; then ip link set wccp0 down ip tunnel del wccp0 fi
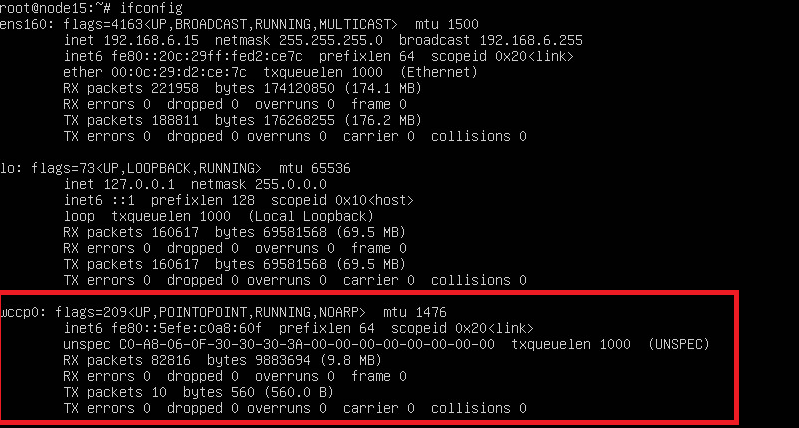
Reboot your proxy box now and after it comes back to life run ifconfig to check if GRE tunnel was indeed automatically configured. The output should look something like this:
Enable IP packet forwarding and disable RP filter in Linux
The GRE tunnel transports packets sourced from workstations with destination the Internet. By default Linux kernel will throw such packets away because none of the locally configured NICs have IP addresses of the Internet. This functionality is called IP Spoofing Protection and it is on by default. We must turn it off in order to continue.
Open /etc/sysctl.conf , find the settings for rp_filter and make them look like the following:
# Uncomment the next two lines to enable Spoof protection (reverse-path filter) # Turn on Source Address Verification in all interfaces to # prevent some spoofing attacks net.ipv4.conf.default.rp_filter=0 net.ipv4.conf.all.rp_filter=0
Also find the net.ipv4.ip_forward setting and make it look like the following (i.e. uncommented).
# Uncomment the next line to enable packet forwarding for IPv4 net.ipv4.ip_forward=1
Reboot the proxy now and after it comes back to life check the status of IP forwarding and RP filter settings by running the following commands. The 1 should only be shown for ip_forward, all other settings should be set to 0.
root@websafety:~# cat /proc/sys/net/ipv4/ip_forward 1 root@websafety:~# cat /proc/sys/net/ipv4/conf/default/rp_filter 0 root@websafety:~# cat /proc/sys/net/ipv4/conf/all/rp_filter 0 root@websafety:~# cat /proc/sys/net/ipv4/conf/ens160/rp_filter 0 root@websafety:~# cat /proc/sys/net/ipv4/conf/lo/rp_filter 0 root@websafety:~# cat /proc/sys/net/ipv4/conf/wccp0/rp_filter 0
Redirect incoming packets from GRE tunnel to Squid
One final step is to redirect the packes for ports 80 (HTTP) and 443 (HTTPS) to local Squid instance, configured as indicated on the step Configure WCCP protocol in Squid . Please note HTTP traffic is redirected to http_port 3126 and HTTPS traffic is redirected to https_port 3127 .
iptables -t nat -A PREROUTING -i wccp0 -p tcp -m tcp --dport 80 -j DNAT --to-destination 192.168.6.15:3126 iptables -t nat -A PREROUTING -i wccp0 -p tcp -m tcp --dport 443 -j DNAT --to-destination 192.168.6.15:3127
To save configured iptables between reboots run the following command (you might need to install the iptables-persistent package by running apt-get install iptables-persistent ).
Reboot your proxy box again and check the output of iptables -t nat -S command. It should look like:

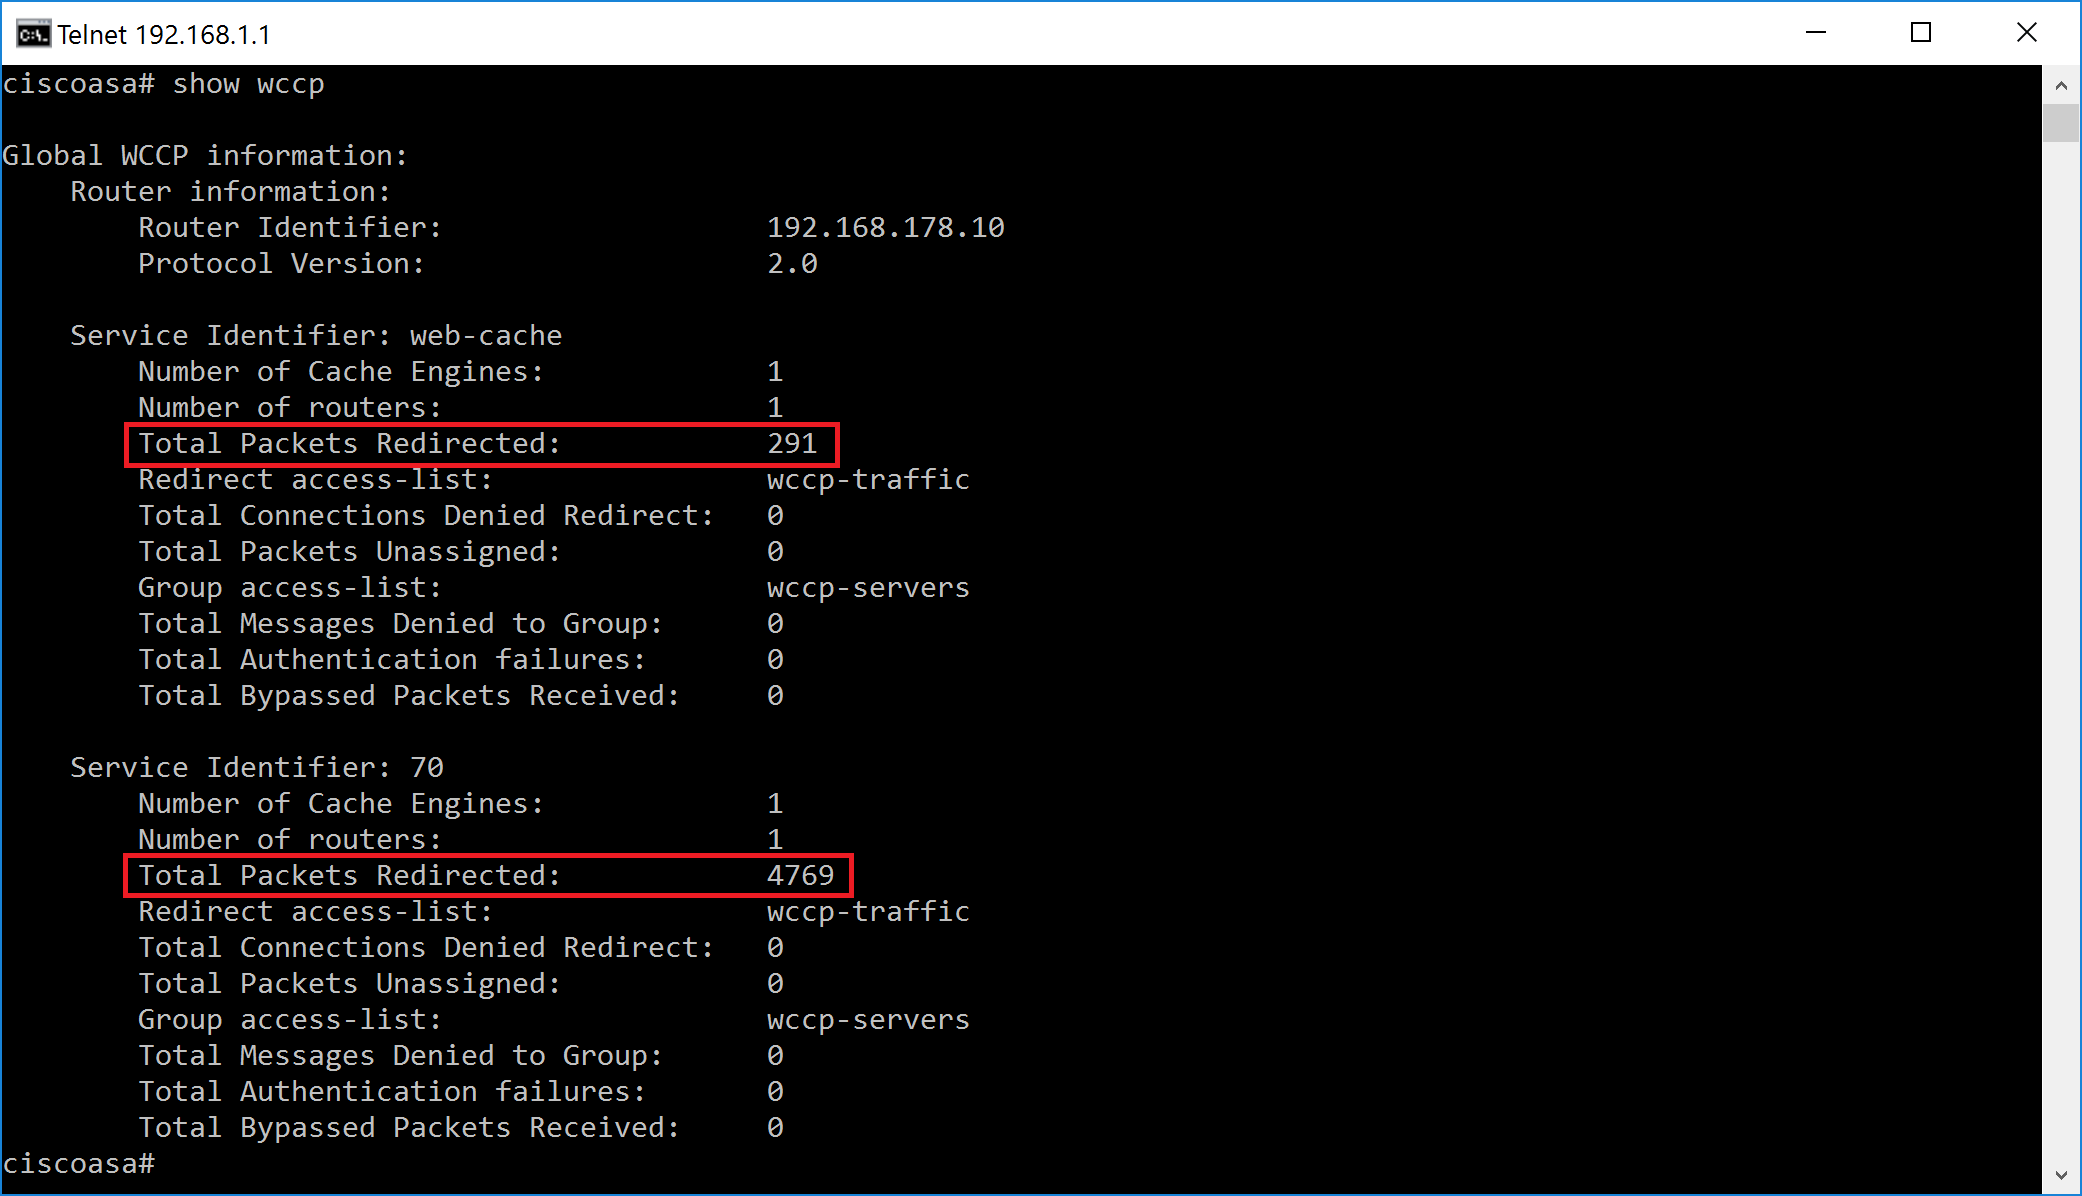
Check WCCP works
All configuration on the proxy side is now finished. Let’s wait until Squid is registered in Cisco ASA (approx 30 seconds by default) and try browsing HTTP and HTTPS sited from any workstation. The following screenshots indicate successful registration and packet redirection on the Cisco ASA.
The following screenshots indicate that both HTTP and HTTPS are filtered.


Here we have HTTPS filtering enabled in Web Safety as indicated in admin guide article Enable HTTPS Filtering in Admin UI and Root Certificate of Squid was installed too as described in article Install Trusted Certificates .