grub rescue – что делать?

В случае возникновения проблем с загрузчиком появляется надпись grub rescue. Чаще всего проблема появляется, когда на компьютере установлено сразу две операционные системы: Linux и Windows. Обычно установка производится в такой последовательности.
Сначала на жёсткий диск устанавливается Windows после чего на отдельный раздел производится установка Linux. При такой схеме в загрузочную область диска добавится загрузчик grub2 что позволяет выбирать в какую из систем производить запуск.
Но бывает так, что в таком состоянии компьютер работает длительное время. У Windows как известно разрастается реестр, и система начинает работать медленно. Тут вы приняли решение переустановить Винду, а заодно затёрли загрузчик Linux. Загрузочная область оказывается повреждена и при старте системы появляется сообщение на чёрном экране: grub rescue unknown filesystem .

Ещё вы могли что-нибудь нахимичить с файлом конфигурации grub.cfg в директории /boot/grub/ . Его вообще не рекомендуется править редакторами поскольку в будущем он всё равно окажется перезаписан автоматически. Вместо этого сконфигурируйте файл /etc/default/grub и выполните команду: sudo update-grub
grub rescue – что делать?
Итак, мы находимся консоли загрузчика. Она имеет небольшой командный интерпретатор наподобие bash. Список всех доступных команд можно получить, набрав:

Введите команду для просмотра существующих разделов:

В данном примере всего один раздел msdos1 на жёстком диске hd0.
Убедимся, что это нужный раздел. Для этого выводим список файлов загрузчика:
Находим файл grub.cfg значит всё в порядке, продолжаем. Если каталог не обнаружен, то перебираем остальные разделы дисков пока не найдём.

Следующая команда создаёт префикс для каталога загрузчика:
set prefix=(hd0, msdos1)/boot/grubУстановим раздел в качестве корневого:
set root=(hd0, msdos1)/boot/grubЗатем необходимо подключить ещё пару модулей и стартовать загрузку системы:
insmod ext2 insmod normal normal
После успешной загрузки в Linux не забудьте переустановить загрузчик командой:
(вместо «_» введите букву загрузочного жёсткого диска).
Далее выполните команду обновления конфигурации файла grub.cfg:
Обычно grub2 автоматически определяет установленные системы, в том числе Windows, и добавляет их в список загрузки.
Восстановление ubuntu с флешки
Если все проделанные выше действия не помогли, то придётся раздобыть загрузочную флешку.
Лучше подготовить USB или CD носитель с Ubuntu той же версии и разрядности что и восстанавливаемая система. Я покажу на примере системы Ubuntu 18.04 LTS x64. Загрузитесь в Live режиме и откройте терминал комбинацией Ctrl+Alt+T.
Для удобства сразу активируйте права суперпользователя root. Знак минус в конце команды означает перемещение в домашний каталог:

Теперь нужно посмотреть список дисков и разделов программой fdisk:

Обнаруживаем раздел с установленной системой Linux. В этом примере раздел /dev/sda1 единственный, он же корневой и загрузочный.
ВНИМАНИЕ
Выбирайте раздел аккуратно, буква диска может отличаться от моих примеров. Не потеряйте свои данные!
Смонтируем его в каталог /mnt/ :
Убедитесь, что каталог /boot/ находится на этом же разделе диска выполнив команду:
В случае отсутствия каталога, монтируйте его отдельно. Для этого нужно найти раздел в результате вывода утилиты fdisk (на скриншоте выше) и смонтировать командой:
X = номер вашего раздела с файлами каталога /boot/ .
Сейчас необходимо произвести логин в ту систему, которую будем чинить. Но перед этим смонтируем из Live системы несколько служебных разделов:
mount --bind /dev /mnt/dev && mount --bind /proc /mnt/proc && mount --bind /sys /mnt/sysДвойной амперсанд && между командами означает проверку выполнения предыдущей команды. Выполнение последующей команды происходит только при условии, что предыдущая завершена успешно.
Переходим в окружение chroot , то есть заходим под пользователем root в систему, установленную на жёстком диске:
Всё, мы в системе. Можно устанавливать загрузчик и обновлять его конфигурацию. Будьте внимательны, используется именно корневой раздел диска /dev/sda без цифры:
grub-install /dev/sda && update-grub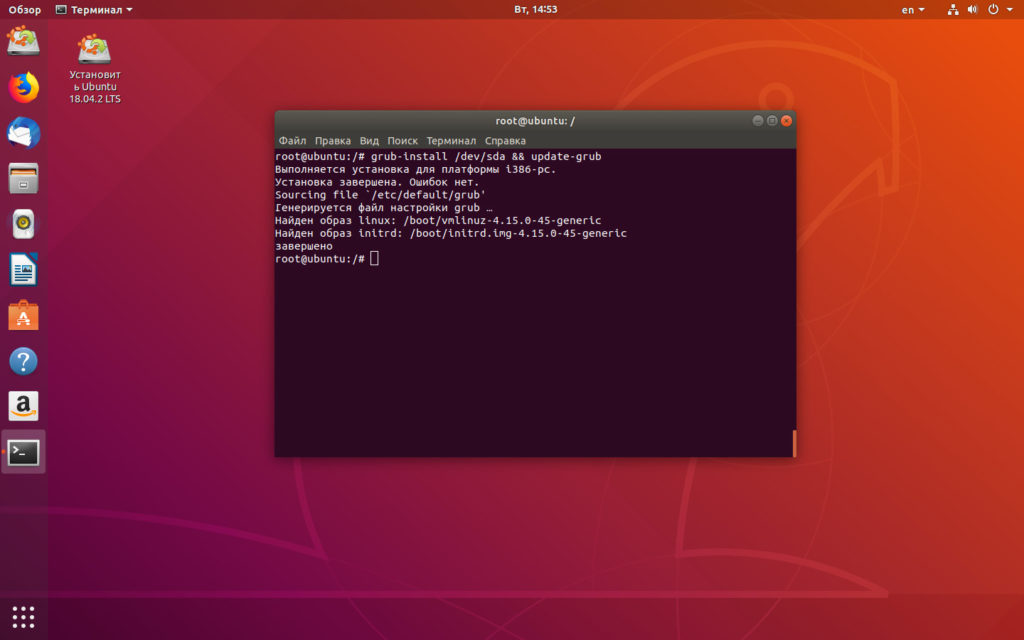
Посмотрите, чтобы не было ошибок в результате выполнения команд. Далее набираем один раз exit , или комбинацию Ctrl+D и выходим в консоль Live системы.
На всякий случай размонтируем корректно разделы и перезагружаемся:
Процедура восстановления загрузчика grub2 на этом завершена.
Видео

Classic SysAdmin: How to Rescue a Non-booting GRUB 2 on Linux
This is a classic article written by Carla Schroder from the Linux.com archives. For more great SysAdmin tips and techniques check out our free intro to Linux course.

Once upon a time we had legacy GRUB, the Grand Unified Linux Bootloader version 0.97. Legacy GRUB had many virtues, but it became old and its developers did yearn for more functionality, and thus did GRUB 2 come into the world.
GRUB 2 is a major rewrite with several significant differences. It boots removable media, and can be configured with an option to enter your system BIOS. It’s more complicated to configure with all kinds of scripts to wade through, and instead of having a nice fairly simple /boot/grub/menu.lst file with all configurations in one place, the default is /boot/grub/grub.cfg . Which you don’t edit directly, oh no, for this is not for mere humans to touch, but only other scripts. We lowly humans may edit /etc/default/grub , which controls mainly the appearance of the GRUB menu. We may also edit the scripts in /etc/grub.d/ . These are the scripts that boot your operating systems, control external applications such as memtest and os_prober , and theming. /boot/grub/grub.cfg is built from /etc/default/grub and /etc/grub.d/* when you run the update-grub command, which you must run every time you make changes.
The good news is that the update-grub script is reliable for finding kernels, boot files, and adding all operating systems to your GRUB boot menu, so you don’t have to do it manually.
We’re going to learn how to fix two of the more common failures. When you boot up your system and it stops at the grub> prompt, that is the full GRUB 2 command shell. That means GRUB 2 started normally and loaded the normal.mod module (and other modules which are located in /boot/grub/[arch]/ ), but it didn’t find your grub.cfg file. If you see grub rescue> that means it couldn’t find normal.mod , so it probably couldn’t find any of your boot files.
How does this happen? The kernel might have changed drive assignments or you moved your hard drives, you changed some partitions, or installed a new operating system and moved things around. In these scenarios your boot files are still there, but GRUB can’t find them. So you can look for your boot files at the GRUB prompt, set their locations, and then boot your system and fix your GRUB configuration.
GRUB 2 Command Shell
The GRUB 2 command shell is just as powerful as the shell in legacy GRUB. You can use it to discover boot images, kernels, and root filesystems. In fact, it gives you complete access to all filesystems on the local machine regardless of permissions or other protections. Which some might consider a security hole, but you know the old Unix dictum: whoever has physical access to the machine owns it.
When you’re at the grub> prompt, you have a lot of functionality similar to any command shell such as history and tab-completion. The grub rescue> mode is more limited, with no history and no tab-completion.
If you are practicing on a functioning system, press C when your GRUB boot menu appears to open the GRUB command shell. You can stop the bootup countdown by scrolling up and down your menu entries with the arrow keys. It is safe to experiment at the GRUB command line because nothing you do there is permanent. If you are already staring at the grub> or grub rescue> prompt then you’re ready to rock.
The next few commands work with both grub> and grub rescue> . The first command you should run invokes the pager, for paging long command outputs:
There must be no spaces on either side of the equals sign. Now let’s do a little exploring. Type ls to list all partitions that GRUB sees:
grub> ls (hd0) (hd0,msdos2) (hd0,msdos1)
What’s all this msdos stuff ? That means this system has the old-style MS-DOS partition table, rather than the shiny new Globally Unique Identifiers partition table (GPT). (See Using the New GUID Partition Table in Linux (Goodbye Ancient MBR). If you’re running GPT it will say (hd0,gpt1) . Now let’s snoop. Use the ls command to see what files are on your system:
grub> ls (hd0,1)/ lost+found/ bin/ boot/ cdrom/ dev/ etc/ home/ lib/ lib64/ media/ mnt/ opt/ proc/ root/ run/ sbin/ srv/ sys/ tmp/ usr/ var/ vmlinuz vmlinuz.old initrd.img initrd.img.old
Hurrah, we have found the root filesystem. You can omit the msdos and gpt labels. If you leave off the slash it will print information about the partition. You can read any file on the system with the cat command:
grub> cat (hd0,1)/etc/issue Ubuntu 14.04 LTS n l
Reading /etc/issue could be useful on a multi-boot system for identifying your various Linuxes.
Booting From grub>
This is how to set the boot files and boot the system from the grub> prompt. We know from running the ls command that there is a Linux root filesystem on (hd0,1) , and you can keep searching until you verify where /boot/grub is. Then run these commands, using your own root partition, kernel, and initrd image:
grub> set root=(hd0,1) grub> linux /boot/vmlinuz-3.13.0-29-generic root=/dev/sda1 grub> initrd /boot/initrd.img-3.13.0-29-generic grub> boot
The first line sets the partition that the root filesystem is on. The second line tells GRUB the location of the kernel you want to use. Start typing /boot/vmli , and then use tab-completion to fill in the rest. Type root=/dev/sdX to set the location of the root filesystem. Yes, this seems redundant, but if you leave this out you’ll get a kernel panic. How do you know the correct partition? hd0,1 = /dev/sda1. hd1,1 = /dev/sdb1. hd3,2 = /dev/sdd2. I think you can extrapolate the rest.
The third line sets the initrd file, which must be the same version number as the kernel.
The fourth line boots your system.
On some Linux systems the current kernels and initrds are symlinked into the top level of the root filesystem:
$ ls -l / vmlinuz -> boot/vmlinuz-3.13.0-29-generic initrd.img -> boot/initrd.img-3.13.0-29-generic
So you could boot from grub> like this:
grub> set root=(hd0,1) grub> linux /vmlinuz root=/dev/sda1 grub> initrd /initrd.img grub> boot
Booting From grub-rescue>
If you’re in the GRUB rescue shell the commands are different, and you have to load the normal.mod and linux.mod modules:
grub rescue> set prefix=(hd0,1)/boot/grub grub rescue> set root=(hd0,1) grub rescue> insmod normal grub rescue> normal grub rescue> insmod linux grub rescue> linux /boot/vmlinuz-3.13.0-29-generic root=/dev/sda1 grub rescue> initrd /boot/initrd.img-3.13.0-29-generic grub rescue> boot
Tab-completion should start working after you load both modules.
Making Permanent Repairs
When you have successfully booted your system, run these commands to fix GRUB permanently:
# update-grub Generating grub configuration file . Found background: /usr/share/images/grub/Apollo_17_The_Last_Moon_Shot_Edit1.tga Found background image: /usr/share/images/grub/Apollo_17_The_Last_Moon_Shot_Edit1.tga Found linux image: /boot/vmlinuz-3.13.0-29-generic Found initrd image: /boot/initrd.img-3.13.0-29-generic Found linux image: /boot/vmlinuz-3.13.0-27-generic Found initrd image: /boot/initrd.img-3.13.0-27-generic Found linux image: /boot/vmlinuz-3.13.0-24-generic Found initrd image: /boot/initrd.img-3.13.0-24-generic Found memtest86+ image: /boot/memtest86+.elf Found memtest86+ image: /boot/memtest86+.bin done # grub-install /dev/sda Installing for i386-pc platform. Installation finished. No error reported.
When you run grub-install remember you’re installing it to the boot sector of your hard drive and not to a partition, so do not use a partition number like /dev/sda1 .
But It Still Doesn’t Work
If your system is so messed up that none of this works, try the Super GRUB2 live rescue disk. The official GNU GRUB Manual 2.00 should also be helpful.
Advance your career with Linux system administration skills. Check out the Essentials of System Administration course from The Linux Foundation.