Classic SysAdmin: How to Rescue a Non-booting GRUB 2 on Linux
This is a classic article written by Carla Schroder from the Linux.com archives. For more great SysAdmin tips and techniques check out our free intro to Linux course.

Once upon a time we had legacy GRUB, the Grand Unified Linux Bootloader version 0.97. Legacy GRUB had many virtues, but it became old and its developers did yearn for more functionality, and thus did GRUB 2 come into the world.
GRUB 2 is a major rewrite with several significant differences. It boots removable media, and can be configured with an option to enter your system BIOS. It’s more complicated to configure with all kinds of scripts to wade through, and instead of having a nice fairly simple /boot/grub/menu.lst file with all configurations in one place, the default is /boot/grub/grub.cfg . Which you don’t edit directly, oh no, for this is not for mere humans to touch, but only other scripts. We lowly humans may edit /etc/default/grub , which controls mainly the appearance of the GRUB menu. We may also edit the scripts in /etc/grub.d/ . These are the scripts that boot your operating systems, control external applications such as memtest and os_prober , and theming. /boot/grub/grub.cfg is built from /etc/default/grub and /etc/grub.d/* when you run the update-grub command, which you must run every time you make changes.
The good news is that the update-grub script is reliable for finding kernels, boot files, and adding all operating systems to your GRUB boot menu, so you don’t have to do it manually.
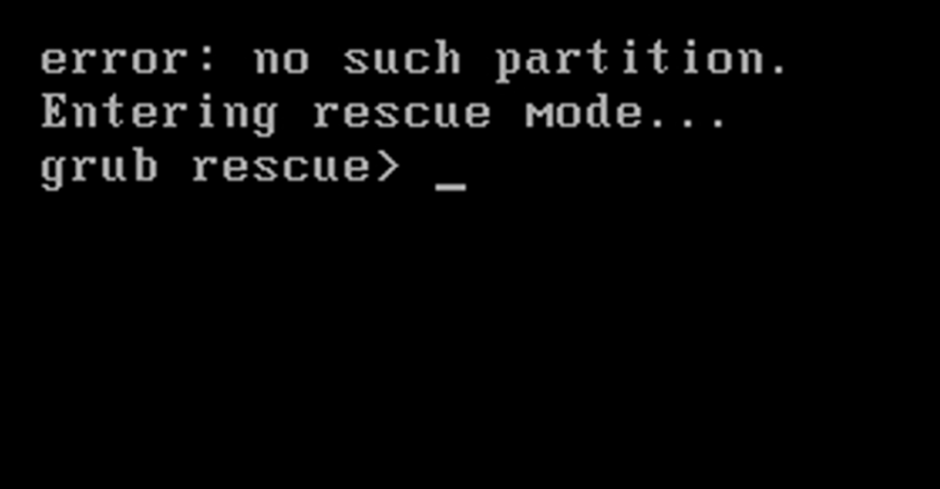
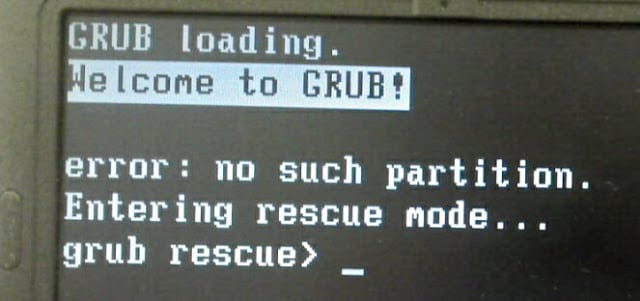
We’re going to learn how to fix two of the more common failures. When you boot up your system and it stops at the grub> prompt, that is the full GRUB 2 command shell. That means GRUB 2 started normally and loaded the normal.mod module (and other modules which are located in /boot/grub/[arch]/ ), but it didn’t find your grub.cfg file. If you see grub rescue> that means it couldn’t find normal.mod , so it probably couldn’t find any of your boot files.
How does this happen? The kernel might have changed drive assignments or you moved your hard drives, you changed some partitions, or installed a new operating system and moved things around. In these scenarios your boot files are still there, but GRUB can’t find them. So you can look for your boot files at the GRUB prompt, set their locations, and then boot your system and fix your GRUB configuration.
GRUB 2 Command Shell
The GRUB 2 command shell is just as powerful as the shell in legacy GRUB. You can use it to discover boot images, kernels, and root filesystems. In fact, it gives you complete access to all filesystems on the local machine regardless of permissions or other protections. Which some might consider a security hole, but you know the old Unix dictum: whoever has physical access to the machine owns it.
When you’re at the grub> prompt, you have a lot of functionality similar to any command shell such as history and tab-completion. The grub rescue> mode is more limited, with no history and no tab-completion.
If you are practicing on a functioning system, press C when your GRUB boot menu appears to open the GRUB command shell. You can stop the bootup countdown by scrolling up and down your menu entries with the arrow keys. It is safe to experiment at the GRUB command line because nothing you do there is permanent. If you are already staring at the grub> or grub rescue> prompt then you’re ready to rock.
The next few commands work with both grub> and grub rescue> . The first command you should run invokes the pager, for paging long command outputs:
There must be no spaces on either side of the equals sign. Now let’s do a little exploring. Type ls to list all partitions that GRUB sees:
grub> ls (hd0) (hd0,msdos2) (hd0,msdos1)
What’s all this msdos stuff ? That means this system has the old-style MS-DOS partition table, rather than the shiny new Globally Unique Identifiers partition table (GPT). (See Using the New GUID Partition Table in Linux (Goodbye Ancient MBR). If you’re running GPT it will say (hd0,gpt1) . Now let’s snoop. Use the ls command to see what files are on your system:
grub> ls (hd0,1)/ lost+found/ bin/ boot/ cdrom/ dev/ etc/ home/ lib/ lib64/ media/ mnt/ opt/ proc/ root/ run/ sbin/ srv/ sys/ tmp/ usr/ var/ vmlinuz vmlinuz.old initrd.img initrd.img.old
Hurrah, we have found the root filesystem. You can omit the msdos and gpt labels. If you leave off the slash it will print information about the partition. You can read any file on the system with the cat command:
grub> cat (hd0,1)/etc/issue Ubuntu 14.04 LTS n l
Reading /etc/issue could be useful on a multi-boot system for identifying your various Linuxes.
Booting From grub>
This is how to set the boot files and boot the system from the grub> prompt. We know from running the ls command that there is a Linux root filesystem on (hd0,1) , and you can keep searching until you verify where /boot/grub is. Then run these commands, using your own root partition, kernel, and initrd image:
grub> set root=(hd0,1) grub> linux /boot/vmlinuz-3.13.0-29-generic root=/dev/sda1 grub> initrd /boot/initrd.img-3.13.0-29-generic grub> boot
The first line sets the partition that the root filesystem is on. The second line tells GRUB the location of the kernel you want to use. Start typing /boot/vmli , and then use tab-completion to fill in the rest. Type root=/dev/sdX to set the location of the root filesystem. Yes, this seems redundant, but if you leave this out you’ll get a kernel panic. How do you know the correct partition? hd0,1 = /dev/sda1. hd1,1 = /dev/sdb1. hd3,2 = /dev/sdd2. I think you can extrapolate the rest.
The third line sets the initrd file, which must be the same version number as the kernel.
The fourth line boots your system.
On some Linux systems the current kernels and initrds are symlinked into the top level of the root filesystem:
$ ls -l / vmlinuz -> boot/vmlinuz-3.13.0-29-generic initrd.img -> boot/initrd.img-3.13.0-29-generic
So you could boot from grub> like this:
grub> set root=(hd0,1) grub> linux /vmlinuz root=/dev/sda1 grub> initrd /initrd.img grub> boot
Booting From grub-rescue>
If you’re in the GRUB rescue shell the commands are different, and you have to load the normal.mod and linux.mod modules:
grub rescue> set prefix=(hd0,1)/boot/grub grub rescue> set root=(hd0,1) grub rescue> insmod normal grub rescue> normal grub rescue> insmod linux grub rescue> linux /boot/vmlinuz-3.13.0-29-generic root=/dev/sda1 grub rescue> initrd /boot/initrd.img-3.13.0-29-generic grub rescue> boot
Tab-completion should start working after you load both modules.
Making Permanent Repairs
When you have successfully booted your system, run these commands to fix GRUB permanently:
# update-grub Generating grub configuration file . Found background: /usr/share/images/grub/Apollo_17_The_Last_Moon_Shot_Edit1.tga Found background image: /usr/share/images/grub/Apollo_17_The_Last_Moon_Shot_Edit1.tga Found linux image: /boot/vmlinuz-3.13.0-29-generic Found initrd image: /boot/initrd.img-3.13.0-29-generic Found linux image: /boot/vmlinuz-3.13.0-27-generic Found initrd image: /boot/initrd.img-3.13.0-27-generic Found linux image: /boot/vmlinuz-3.13.0-24-generic Found initrd image: /boot/initrd.img-3.13.0-24-generic Found memtest86+ image: /boot/memtest86+.elf Found memtest86+ image: /boot/memtest86+.bin done # grub-install /dev/sda Installing for i386-pc platform. Installation finished. No error reported.
When you run grub-install remember you’re installing it to the boot sector of your hard drive and not to a partition, so do not use a partition number like /dev/sda1 .
But It Still Doesn’t Work
If your system is so messed up that none of this works, try the Super GRUB2 live rescue disk. The official GNU GRUB Manual 2.00 should also be helpful.
Advance your career with Linux system administration skills. Check out the Essentials of System Administration course from The Linux Foundation.
Исправляем ошибку Grub rescue в Linux
Ошибка Grub Rescue чаще всего встречается на компьютерах с двойной загрузкой, когда на компьютер установлен сначала Linux, а потом Windows.
Windows при установке может стереть загрузчик Linux и при загрузке вместо меню с выборов ОС для загрузки появляется ошибка:
Error: unknown filesystem Entering rescue mode
И перед вами открывается консоль Grub rescue.
Консоль загрузчика grub поддерживает ряд простейших команд. Их список можно вывести, набрав:
Выведите список разделов на диске:

В нашем примере есть один диск hd0 с разделом msdos1.
Проверьте есть ли файлы загрузчика grub на этом разделе:
Проверьте, что в указанном каталоге есть файл grub.cfg. Если у вас больше разделов и дисков, проверьте их все.
![]()
Создайте префикс для каталога загрузчика:
set prefix=(hd0, msdos1)/boot/grub
set root=(hd0, msdos1)/boot/grub
Загрузите дополнительные модули и загрузите Linux:
insmod ext2
insmod normal
normal
После загрузки Linux нужно переустановить загрузчик:
Используйте свою букву загрузочного диска вместо sda.
Обновите конфигурацию загрузчика grub2 в файле grub.cfg:
Grub должен автоматически обнаружить установленные операционные системы и добавить их в автозагрузку.
Если вы не смогли восстановить загрузчик описанным выше способом, можно исправить grub с помощью загрузочной флешки.
Я загрузил компьютер с LiveCD образа Ubuntu.
Откройте терминал и выполните команду:
Выведите список дисков и разделов:
Найдите раздел с установленной Linux (sda1 в моем случае).
Смонтируйте этот раздел в каталог /mnt:
Проверьте, что на этом разделе есть каталог /boot/:
Если каталога boot нет, смонтируйте его отдельно:
Смонтируйте следующие разделы с Live образа:
mount —bind /dev /mnt/dev
mount —bind /proc /mnt/proc
mount —bind /sys /mnt/sys
Войдите в локальную систему на диске с помощью chroot:
Теперь можно переписать конфигурацию загрузчика на диске:
Отмонтируйте разделы и перезагрузите компьютер.
Теперь ваш заручик grub исправен и должен вывести меню выбора загрузки операционных систем.
Grub rescue linux что делать
Не загружается Linux? Grub rescue – это режим, когда GRUB 2 не может найти папку GRUB или ее содержимое отсутствует/повреждено. Папка GRUB 2 содержит меню, модули и сохраненные данные об окружающей среде.
Это может произойти после каких-либо операций с разделами на диске или при добавлении новых устройств. Причин может быть много. Но чаще всего проблема решается всего в несколько команд, которые представлены ниже.
Посмотрим какие диски и разделы у нас есть.
grub rescue> ls
(hd0) (hd0,msdos2) (hd0,msdos1)
Видим, что есть диск (hd0) и разделы msdos2 и msdos1. Посмотрим что на разделах.
grub rescue> ls (hd0,msdos2)/
boot etc initrd.img lib32 libx32 media opt root sbin srv tmp var vmlinuz.old
bin dev home initrd.img.old lib lib64 lost+found mnt proc run snap sys usr vmlinuz
grub rescue> ls (hd0,msdos1)/
config-4.19.0-11-amd64 config-4.19.0-14-amd64 initrd.img-4.19.0-11-amd64 initrd.img-4.19.0-14-amd64 System.map-4.19.0-11-amd64 System.map-4.19.0-14-amd64 vmlinuz-4.19.0-12-amd64
config-4.19.0-12-amd64 grub initrd.img-4.19.0-12-amd64 lost+found System.map-4.19.0-12-amd64 vmlinuz-4.19.0-11-amd64 vmlinuz-4.19.0-14-amd64
Мы видим, что msdos2 – это корневой раздел / где хранятся все файлы системы, а msdos1 – это раздел boot (потому что там нужная нам директория grub и ядро) который монтируется к /boot. Возможен другой вариант, когда раздел один и директория boot не монтируется отдельным разделом,тогда ее найти можно так:
grub rescue> ls (hd0,msdos1)/boot/
config-4.19.0-11-amd64 config-4.19.0-14-amd64 initrd.img-4.19.0-11-amd64 initrd.img-4.19.0-14-amd64 System.map-4.19.0-11-amd64 System.map-4.19.0-14-amd64 vmlinuz-4.19.0-12-amd64
config-4.19.0-12-amd64 grub initrd.img-4.19.0-12-amd64 lost+found System.map-4.19.0-12-amd64 vmlinuz-4.19.0-11-amd64 vmlinuz-4.19.0-14-amd64
grub rescue> set prefix=(hd0,msdos1)/grub
grub rescue> set root=(hd0,msdos2)
grub rescue> insmod normal
grub rescue> normal
А для второго варианта с одним разделом
grub rescue> set prefix=(hd0,msdos1)/boot/grub
grub rescue> set root=(hd0,msdos1)
grub rescue> insmod normal
grub rescue> normal
После того, как ОС загрузится, откройте терминал под суперпользователем и установите GRUB на свой диск заново.
# update-grub
# grub-install /dev/sda
Где /dev/sda – это Ваш системный диск.
Конечно, grub rescue не всегда так просто можно исправить. Например, если у Вас система LVM или GPT разметка, то потребуется чуть больше команд… Можете задавать вопросы в комментариях и делиться своим опытом исправления проблемы загрузки Linux.