- How to Log In to the AR Router Through the Web and CLI
- Ports for Logging In to the AR Router
- What Is the Default Password for Logging In to the AR Router?
- How to Log In to the AR Router Through the Console Port (CLI)
- Procedure
- How to Log In to the Router Through the Management Port (Web)
- Where Is the Management Port of the Router Located?
- How can I log in to my HUAWEI router’s web-based management page
- Вход в личный кабинет Huawei по 192.168.1.1
- Как зайти в Web-интерфейс
How to Log In to the AR Router Through the Web and CLI
This document describes how to log in to an access router (AR), including login through the console port, mini USB port, and web UI. This document also describes the ports for logging in to the AR router, the default password for each login mode, and what to do if the login password is forgotten.
Ports for Logging In to the AR Router
You can log in to the AR router through the console port, mini USB port, Ethernet port, and management port.
After the AR router is powered on, you can connect to the console port or mini USB port and enter the default user name and password to log in to the device through the CLI. Alternatively, you can connect to the management port and enter the default user name and password to log in to the device through the web.
After logging in to the device for the first time, you can configure Telnet or STelnet to connect to the Ethernet port for subsequent login through the CLI.
You can connect a user terminal serial port to the console port of the device or connect the user terminal USB port to the mini USB port of the device.
Generally, a console port is marked with the CONSOLE silkscreen, and a management port is marked with the MGMT or Management silkscreen.
The mini USB port and console port cannot be used together. By default, the console port works.
What Is the Default Password for Logging In to the AR Router?
The default username and password are available in AR Router Default Usernames and Passwords (Enterprise Network or Carrier). If you have not obtained the access permission of the document, see Help on the website to find out how to obtain it.
The password is case sensitive.
How to Log In to the AR Router Through the Console Port (CLI)
When an AR router is powered on for the first time, you can connect a PC to the console port of the device and enter the default user name and password to log in to and then configure and manage the device. The console port is provided on all device models.
Before performing the following operations, ensure that the device is powered on and is connected to a PC through the console cable.
Procedure
- Connect the DB9 female connector of the console cable to the COM port on the PC, and connect the RJ45 connector to the console port on the device, as shown in Figure 1-4. (No console cable is delivered with the AR100, AR120, AR150, AR160, AR200, AR100-S, AR110-S, AR120-S, AR150-S, AR160-S, AR200-S, AR500, and SRG500 series routers. You need to prepare console cables separately.)
By default, no flow control mode is configured on the device. Because RTS/CTS is selected in the software by default, you need to deselect RTS/CTS; otherwise, you cannot enter commands.
If you modify the serial port communication parameters on the device, you must make the same modifications on the PC and then create a connection again.
A PC may provide multiple serial ports with corresponding numbers. Ensure that the correct serial port is selected.
For details about how to modify device communication parameters, see (Optional) Configuring Attributes for the Console User Interface under «First Login to a Device» in «Basic Configuration Guide» in the configuration guide.
Login authentication Username:admin Password: Info: The entered password is the same as the default. You are advised to change it to ensure security.
How to Log In to the Router Through the Management Port (Web)
In V200R006C10 and later versions, the management IP address is configured and the web system is enabled in factory default settings for all models. The default management IP address is 192.168.1.1/24.
After connecting a PC to the management port of the device, you can enter the default user name and password on the HTTPS page to log in to the device.
No default management IP address is configured for AR1200-S, AR2200-S, and AR3200-S series routers running versions earlier than V200R005C20. You need to specify the management IP address before logging in to the web system.
No default management IP address is configured for AR1200, AR2200, AR3200, AR120-S, SRG1300, SRG2300, and SRG3300 series routers running versions earlier than V200R006C10. You need to specify the management IP address before logging in to the web system.
- Open the web browser on the PC, enter https://192.168.1.1 in the address box, and press Enter. The web system login page is displayed. To enhance security, if you enter http://192.168.1.1, the system automatically jumps to https://192.168.1.1. If the EasyOperation edition is supported, the login page shown in Figure 1-8 is displayed. If the EasyOperation edition is not supported, the login page shown in Figure 1-9 is displayed. After the IP address of the management port is changed, enter the corresponding URL in the address box. By default, the HTTPS session timeout interval is 10 minutes.
- AR100 series: AR109, AR109W, and AR109GW-L
- AR120 series: AR121, AR129, AR121W, AR129CV, AR129CVW, AR121GW-L, AR129GW-L, and AR129CGVW-L
- AR150 series: AR151, AR157, AR157G-HSPA+7, AR156, AR158E, AR158EVW, AR151W-P, AR151G-HSPA+7, AR157W, AR157VW, AR151G-C, and AR156W
- AR160 series: AR161, AR161W, AR161EW, AR161EW-M1, AR161G-L, AR161G-Lc, AR161G-U, AR161F, AR161F-DGP, AR161FW, AR161FV-1P, AR161FG-L, AR161FG-Lc, AR161FGW-L, AR161FGW-La, AR161FGW-Lc, AR161FW-P-M5, AR162F, AR168F, AR168F-4P, AR169, AR169EW, AR169G-L, AR169G-Lc, AR169EGW-L, AR169-P-M9, AR169W-P-M9, AR169RW-P-M9, AR169F, AR169BF, AR169FGVW-L AR169FVW, AR169FVW-8S, AR169FGW-L, AR169CVW, AR169CVW-4B4S, and AR169JFVW-4B4S
- AR200 series: AR201, AR206, AR207, AR207V, AR207V-P, AR208E, AR207G-HSPA+7, AR201VW-P, and AR207VW
- AR550 series: AR550-8FE-D-H, AR550-24FE-D-H, AR550C-4GE, AR550C-2C6GE, and AR550C-2C6GE-2D
- AREC series: AR111EC and AR161EC
- AR600 series (except AR651-X8 and AR651W-X4)
- AR300, AR700, AR6000 and AR6000-S series
You can use the web mode to configure voice services only when the device works in PBX mode.
If the device supports the voice self-service system, you can log in to the voice self-service system using either of the following methods:
- On the web platform, click Enter voice self-service system.
- Before logging in to the voice self-service system, run the self-service-http-server command in the voice view to access the self-service HTTP server configuration view, and then run the self-service http secure-server enable command to enable the self-service HTTPS server. You can enter https://ip address:1443/professional/user/login.html to access the voice self-service system. In the configuration view of the self-service HTTPS server, you can run the self-service http secure-server port command to change the port number of the self-service HTTPS server. The default port number is 1443.
Enter the web user name and password, and click Login or press Enter. The web system homepage is displayed. If you log in to the device for the first time, enter the default user name and password. In other situations, enter the user-defined web user name and password.
- If the login password expires, the system forcibly requires you to change the password.
- If you log in to the system for the first time after the password is changed by another user, the system forcibly requires you to change the password.
- If you log in to the system within the password expiration notification period, the system notifies you of the password expiration time and advises you to change the password. After changing the password, click OK. If the password is changed successfully, the system displays the message «Your password has been modified successfully». Click OK. The login page is displayed. If you do not change the password, click Cancel. The Device Information page is displayed.
Where Is the Management Port of the Router Located?
Generally, the management port is marked with the MGMT or Management silkscreen. After connecting a PC to the management port of the device, you can enter the default user name and password on the HTTPS page to log in to the device.
Table 1-1 lists the devices whose management port is not marked with the MGMT or Management silkscreen.
How can I log in to my HUAWEI router’s web-based management page
- Generally, the address of the web-based management page is on the nameplate at the bottom of the router for the default IP address. However, the address may vary for the carrier custom versions. Use the actual address printed on the nameplate on the bottom of the router or consult the carrier.
- The operation interface may vary depending on the router model and version of the App or configuration page. The actual interface prevails.
- If you are unsure of what the IP address of the secondary router has been modified to, you can determine it by following these steps: Connect your computer to the LAN port of the secondary router using an Ethernet cable, check the IP address of your computer and use the IP address segment of your computer to determine the IP address of the secondary router. For example, if your computer’s IP address is 192.168.4.x, you can determine that the IP address of the secondary router has been modified to 192.168.4.1.
- Connect your computer/phone to the router’s Wi-Fi, or connect the computer to the router’s LAN port using an Ethernet cable.
If the router features self-adaptive network ports, you do not need to distinguish the WAN port from the LAN port.
If your router is cascaded with another router as a secondary router and an IP address conflict occurs (that is, the IP address of the main router is also 192.168.3.1), the LAN IP of the main router will still be 192.168.3.1, but the IP address of the secondary router will be modified to 192.168.4.1 automatically.
Вход в личный кабинет Huawei по 192.168.1.1
![]()
Всем привет! Прежде чем мы начнем, давайте разъясним, что же такое личный кабинет. Просто мне постоянно приходят письма с вопросом – как войти в личный кабинет Huawei. И когда я им говорю: что это можно сделать на официальном сайте. Они мне отвечают: что имеют ввиду интерфейс для внутренних настроек. Теперь кратко:
- Личный кабинет – расположен на сайте shop.huawei.ru . Сверху вы можете увидеть две кнопки «Регистрация» и «Вход». Сначала регистрируемся, а потом заходим. Честно сказать, для чего он нужен – не знаю. Наверное, для быстрой покупки товаров.
- Web-интерфейс – предназначен для настройки вашего роутера или модема. Расположен внутри аппарата и зайти туда можно через любой браузер. Но это – не личный кабинет.
ПОМОЩЬ! Если у вас возникли вопросы при прочтении статьи – пишите их в комментариях.
Как зайти в Web-интерфейс
Зайти туда можно с любого браузера, на любом устройстве: телефон, планшет, компьютер, ноутбук или даже телевизор с Web OS. Самое главное перед этим к нему подключиться. Это можно сделать двумя способами:

- По кабелю – берём сетевой кабель и вставляем один конец в роутер или модем. Самое главное вставить кабель в один из LAN портов. Они обычно так и обозначаются.
- По Wi-Fi – просто включаем аппарат и ищем роутер с нужной сетью. Если вы ранее его не настраивали, то имя сети и пароль по умолчанию – будет на этикетке под интернет-центром.
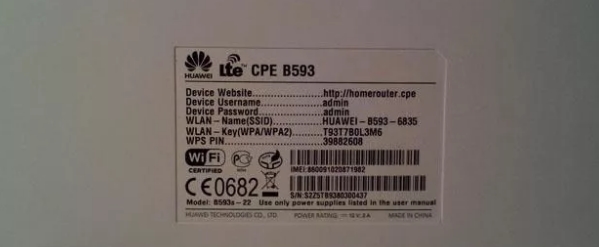
Пару слов об этикетке – там есть почти вся информация, которая может вам пригодиться. Например для подключения по WiFi смотрим две строчки: «WLAN – NAME (SSID)» – это имя сети; «WLAN – Key (WPA/WPA2)» – это пароль от неё.
Но некоторых моделях этой информации нет. Тогда зайти можно по-разному. Если вы подключаетесь с компьютера или ноутбука, то нужно заранее выставить нужные настройки сетевого модуля, чтобы комп и ноут видели роутер при подключении:
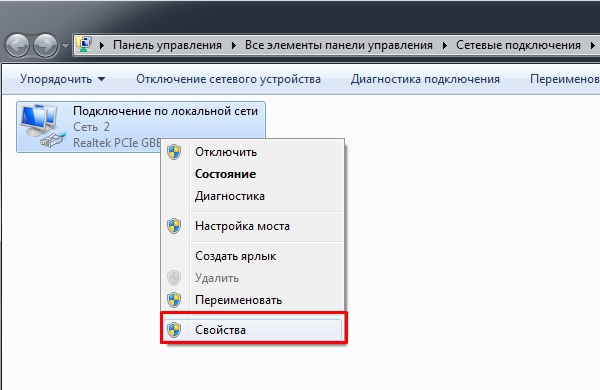
- Теперь очень важно выбрать именно то подключение, по которому вы подключены к маршрутизатору. Если у вас ноутбук, вы должны ещё увидеть беспроводное подключение. Выберите нужное, правой кнопкой и нажмите «Свойства».
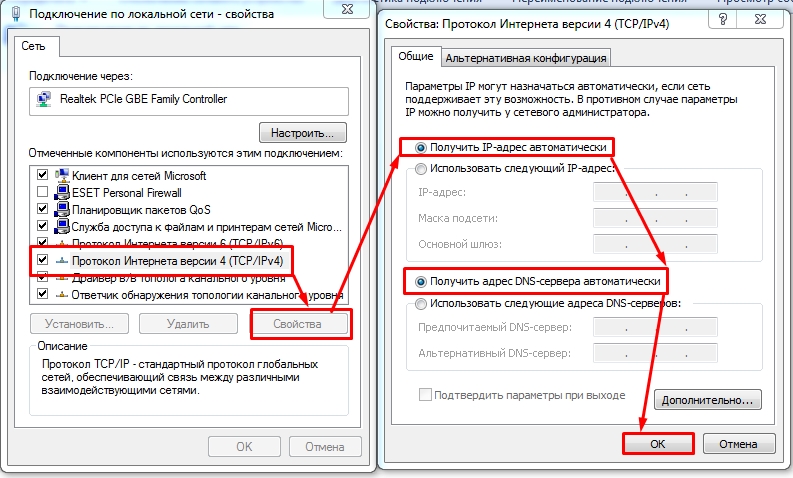
- Нажмите на 4 протокол и далее на «Свойства». Установите галочки как на скриншоте выше и нажмите «ОК».
Теперь надо открыть любой браузер и в адресную строку вбить IP или DNS адрес маршрутизатора, который вы нашли на корпусе. Если на корпусе на той самой бумажке ничего нет, то пробуем один из этих адресов:
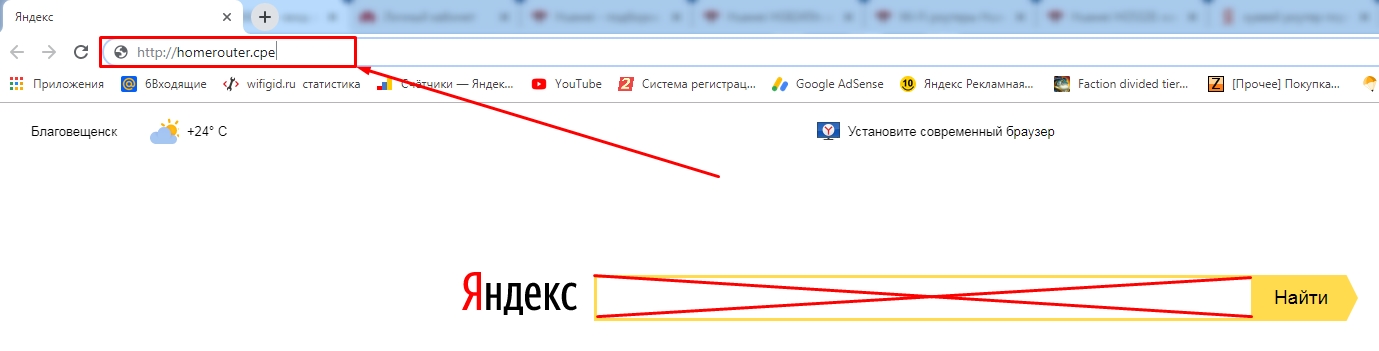
Не перепутайте, нужно вбить адрес именно в адресную строку, а не в поисковую, которая обычно находится ниже.
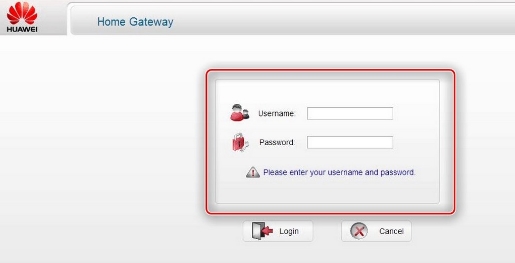
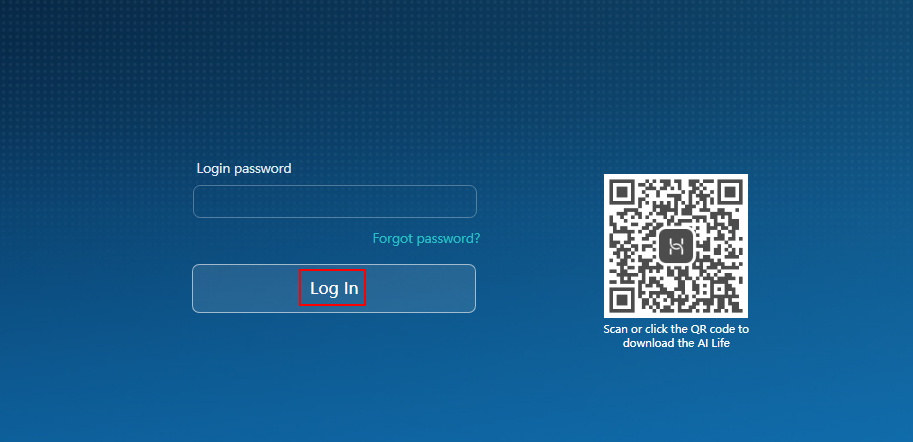
После этого вас попросят ввести логин и пароль от администраторской панели. По умолчанию это:
Если логин и пароль не подходит, то значит он уже ранее был изменен при первой настройке. Обычно его также меняют и работники провайдера, когда настраивают. Поэтому можно попробовать позвонить им и узнать, какой пароль они поставили. Также пароль и логин находится на той самой этикетке, про которую мы говорили ранее.
По настройке отдельных роутеров и модемов смотрите в нашем отдельном разделе «Huawei». Просто заходим туда и ищем свою модель, а далее читаем инструкцию, написанную нашими специалистами. Можно также воспользоваться и поиском на сайте – просто впишите полное название модели в поисковую строку.
