- Как настроить Nginx на Ubuntu 20.04
- Установка Nginx
- Настройка веб-сервера Nginx
- Важные директории и файлы настроек Nginx
- Install and configure Nginx
- What you’ll learn
- What you’ll need
- 2. Installing Nginx
- 3. Creating our own website
- 4. Setting up virtual host
- 5. Activating virtual host and testing results
- 6. That’s all!
- Further reading:
Как настроить Nginx на Ubuntu 20.04
Nginx является одним из самых распространённых инструментов создания веб-серверов, который в настоящее время активно используется для работы многими сайтами. Ниже, о том, как настроить Nginx на сервере Ubuntu 20.04.
Установка Nginx
Прежде чем настроить Nginx, его надо установить. Установку проще всего производить из репозиториев Ubuntu, а значит, для исталляции необходимо войти в систему учётной записью, имеющей привилегию на запуск команды sudo и последовательно выполнить следующие команды:
$sudo apt update$sudo apt install nginx
Первая инструкция выполняет обновление базы данных доступных для установки пакетов. Вторая выполняет установку элементов веб-сервера Nginx.
На этом всё, что касается установки Nginx. Переходим к его настройке.
Настройка веб-сервера Nginx
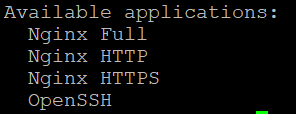
При настройке веб-сервера Nginx, первым делом следует уделить внимание брандмауэру, используемому операционной системой вашего сервера. Для защиты подключений к вашей системе, с точки зрения простоты использования и надёжности, наиболее оптимально подойдёт такой инструмент как Uncomplicated Firewall (UFW). Чтобы увидеть профили приложений, о которых знает UFW, используйте инструкцию:
Список этих приложений выглядит так:
Чтобы подключаться к Nginx используя HTTP, введите команду:
$ sudo ufw allow 'Nginx HTTP' Поскольку веб-сервер устанавливается как служба, проверить статус Nginx можно командой:
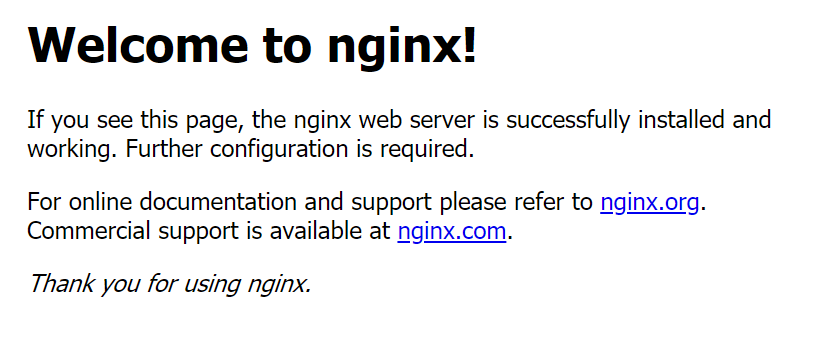
Теперь, когда вы убедились в том, что веб-сервер Nginx запущен, можно попробовать подключиться к нему через браузер набрав в нем IP-адрес вашего VPS. Если настройки выполнены корректно, браузер должен вывести такое сообщение:
Важные директории и файлы настроек Nginx
В заключении будет нелишним перечислить наиболее важные в части настройки и проведения анализа работы файлы и папки для настроенного веб-сервера Nginx.
- /var/www/html – директория, где распологается начальная страница Nginx (см. выше).
- /etc/nginx – директория, в которой находятся основные файлы настроек Nginx.
- /etc/nginx/nginx.conf – файл, содержащий главные настройки конфигурации Nginx.
- /etc/nginx/sites-enabled – в данной папке находятся активные виртуальные блоки веб-сервера Nginx.
- /etc/nginx/sites-available – директория, в которой находятся файлы виртуальных блоков для каждого из сайтов, ссылка на них должна быть в каталоге /etc/nginx/sites-enabled .
- /etc/nginx/snippets – каталог, содержащий так называемые сниппеты, которые можно при необходимости подключать к основной конфигурации сервера Nginx.
- /var/log/nginx – директория, которая содержит журналы событий работы Nginx.
Install and configure Nginx
Nginx (pronounced as “Engine-X”) is an open source web server that is often used as reverse proxy or HTTP cache. It is available for Linux for free.
In this tutorial we’ll install Nginx and set up a basic site.
What you’ll learn
What you’ll need
Originally authored by Marcin Mikołajczak
2. Installing Nginx
To install Nginx, use following command:
sudo apt update sudo apt install nginx After installing it, you already have everything you need.
You can point your browser to your server IP address. You should see this page:
If you see this page, you have successfully installed Nginx on your web server.
3. Creating our own website
Default page is placed in /var/www/html/ location. You can place your static pages here, or use virtual host and place it other location.
Virtual host is a method of hosting multiple domain names on the same server.
Let’s create simple HTML page in /var/www/tutorial/ (it can be anything you want). Create index.html file in this location.
cd /var/www sudo mkdir tutorial cd tutorial sudo "$" index.html Paste the following to the index.html file:
Hello, Nginx!
We have just configured our Nginx web server on Ubuntu Server!
Save this file. In next step we are going to set up virtual host to make Nginx use pages from this location.
4. Setting up virtual host
To set up virtual host, we need to create file in /etc/nginx/sites-enabled/ directory.
For this tutorial, we will make our site available on 81 port, not the standard 80 port. You can change it if you would like to.
cd /etc/nginx/sites-enabled sudo "$" tutorial root is a directory where we have placed our .html file. index is used to specify file available when visiting root directory of site. server_name can be anything you want, because you aren’t pointing it to any real domain by now.
5. Activating virtual host and testing results
To make our site working, simply restart Nginx service.
sudo service nginx restart Let’s check if everything works as it should. Open our newly created site in web browser. Remember that we used :81 port.
Congratulations! Everything works as it should. We have just configured Nginx web server.
6. That’s all!
I hope that this tutorial explained you the basics of working with Nginx. Of course, it’s much more powerful tool. You can find more in official resources, available on Nginx site.
If you need more guidance on using Nginx, help is always at hand:


