Hello world in Linux x86-64 assembly
A “hello world” program writes to stdout (calling write ) then exits (calling exit ). The assembly program hello.s below does that on Linux x86-64.
global _start section .text _start: mov rax, 1 ; write( mov rdi, 1 ; STDOUT_FILENO, mov rsi, msg ; "Hello, world!\n", mov rdx, msglen ; sizeof("Hello, world!\n") syscall ; ); mov rax, 60 ; exit( mov rdi, 0 ; EXIT_SUCCESS syscall ; ); section .rodata msg: db "Hello, world!", 10 msglen: equ $ - msg $ nasm -f elf64 -o hello.o hello.s $ ld -o hello hello.o $ ./hello Hello, world! The first important document is the x86-64 ABI specification, maintained by Intel. (Weirdly, the official location for the ABI specification is some random dude’s personal GitHub account. Welcome to the sketchy world of assembly.) The ABI specification describes system calls in the abstract, as it applies to any operating system. Importantly:
- The system call number is put in rax .
- Arguments are put in the registers rdi , rsi , rdx , rcx , r8 and r9 , in that order.
- The system is called with the syscall instruction.
- The return value of the system call is in rax . An error is signalled by returning -errno .
The second document is the Linux 64-bit system call table. This specifies the system call number for each Linux system call. For our example, the write system call is 1 and exit is 60 .
Finally, you want the man pages for the system calls, which tell you their signature, e.g.:
#include ssize_t write(int fd, const void *buf, size_t count); Armed with this, we know to:
- put the system call number 1 in rax
- put the fd argument in rdi
- put the buf argument in rsi
- put the count argument in rdx
- finally, call syscall
What can computers do? What are the limits of mathematics? And just how busy can a busy beaver be? This year, I’m writing Busy Beavers, a unique interactive book on computability theory. You and I will take a practical and modern approach to answering these questions — or at least learning why some questions are unanswerable!
It’s only $19, and you can get 50% off if you find the discount code . Not quite. Hackers use the console!
After months of secret toil, I and Andrew Carr released Everyday Data Science, a unique interactive online course! You’ll make the perfect glass of lemonade using Thompson sampling. You’ll lose weight with differential equations. And you might just qualify for the Olympics with a bit of statistics!
It’s $29, but you can get 50% off if you find the discount code . Not quite. Hackers use the console!
More by Jim
- Your syntax highlighter is wrong
- Granddad died today
- The Three Ts of Time, Thought and Typing: measuring cost on the web
- I hate telephones
- The sorry state of OpenSSL usability
- The dots do matter: how to scam a Gmail user
- My parents are Flat-Earthers
- How Hacker News stays interesting
- Project C-43: the lost origins of asymmetric crypto
- The hacker hype cycle
- The inception bar: a new phishing method
- Time is running out to catch COVID-19
- A probabilistic pub quiz for nerds
- Smear phishing: a new Android vulnerability
Tagged #programming, #unix, #assembly. All content copyright James Fisher 2018. This post is not associated with my employer. Found an error? Edit this page.
Hello World Program C
![]()
When you start with any programming language, you may try to implement the most basic syntax examples for the particular language. The same will be applied to the C language when you want to learn and implement it on some Linux distribution like Ubuntu 20.04 system. The printing of some text is said to be the most basic example in C programming. Therefore, we have decided to use the most basic program of the C language that displays the simple “Hello World” string on the Ubuntu 20.04 shell.
So, let’s start with login and then the launch of its Terminal application with “Ctrl+Alt+T”. Get started with the formation of a new C-type file first. This is necessary as we have to perform the codes within a file and the Linux shell doesn’t compile the C code itself. Thus, we will be using the Ubuntu 20.04 Linux console shell to make a new C file using its touch instruction. This document will be formed in the home folder or directory of the Linux system. If you want to just open it within the text editor, open the file explorer and double tap on the file name. Otherwise, we recommend you to open it within the GNU nano editor using the shown-below “nano” instruction on the shell screen.

Example 01:
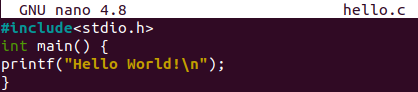
We will be taking a look at the syntax of a simple program statement in C to display the string “Hello World” on the Ubuntu 20.04 shell. For this, you must utilize the “printf” statement of C language in the code. As you can see in the attached image below, we have opened the file and added a printf statement. It is more like a printf function as it contains the parenthesis. Within its parenthesis, we have used inverted commas to add a “Hello World!” string. After this statement, you have to add the “;” semicolon to make it executable. This is the most basic syntax for the “Hello World” program. Let’s execute the code to see its output.

Now, we need the C compiler in Ubuntu 20.04 to compile the code. For that, make use of the “gcc” compiler in the shell and execute the shown below instruction. You will get an error saying that the declaration has been missing for the “printf” statement.

Let us make you know that the C and C++ program execution always starts from its main() method. Without the main() function, our program will never get executed. So, we have added the printf statement containing the string “Hello World” within the main() function of the C file after opening the same C file. Let’s save the below-shown updated code and execute it.

While the compilation of this updated C code, we have got another warning showing that the printf statement is lacking its implicit declaration within the code which is its header library i.e., “stdio.h”. So, we want to add the library in C code before compiling it.

Thus, we have opened the file once again and added the “stdio.h” header library using the “#include” keyword before it. This header must be placed at the start of this C file as shown. Along with that, we have added the “\n” sign within the “Hello World” string of the printf statement to add the end line after it. If we don’t add that, our output and next instruction line will be displayed at the same line on the shell screen.
Let’s save the updated code C file once again and make it compiled on the shell. Using the gcc compiler of C language, we have compiled the code and it got successful as the below-shown image demonstrates. After that, when we executed our compiled C code, it shows the “Hello World” string on the shell output screen.

Example 02:
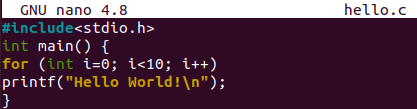
The first example was the most basic one to start from. Let’s move a little forward to enhance our level of knowledge and expertise in the C language. Within this example, we will try to display the “Hello World” string more than 1 time. For this, we must practice the C “for” loop in the code. So, we have opened the same C file add updated its main() method. At the start of a main() function, we have initialized a “for” loop starting from 0 and ending before reaching 10. The loop value is used to increment by 1 at each iteration to move towards the next. On each iteration, the “Hello World” string will be printed out. The main() function got completed here and the code ends. Let’s save this code and see the output for this code.
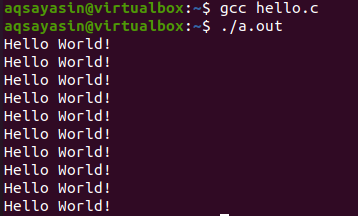
The gcc compiler has been utilized to update this example code file i.e., “hello.c”. After the successful compilation of our updated C code, we have executed it with the “./a.out” instruction. In return, the “Hello World” string has been displayed 10 times on the shell as we have used the “for” loop starting from 0 to 10. The use of “\n” is adding a line break after each “Hello Wolrd” string on the output screen as below.
Example 03:
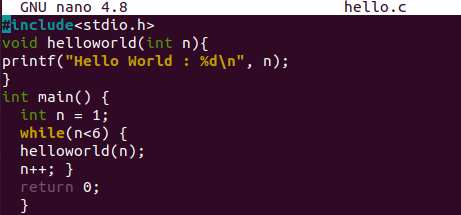
We have taken a look at the simplest examples to display “Hello World” on the shell with and without the “for” loop. Now, it’s time to take a look at another loop to display the “Hello World” string i.e., while loop. This program will be quite different from both the above examples with a bit of similarity. We are consuming the same C code file. Within this file, we have updated the code and used two different methods. One is the ever known main() function from where the carrying out starts and the other is the user-defined “HelloWorld()” function. The execution starts from the main() method and the integer variable “n” is initialized to 1.
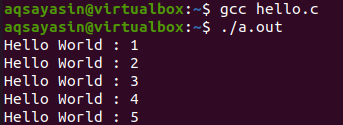
Here comes the “while” loop that will continue to execute until the value of “n” doesn’t reach out to 6. Within this loop, we have been calling the “helloworld” function and passing “n” as an argument to it. After the helloworld() function execution, the value of “n” will be incremented by 1. Within the helloworld() function, the “Hello World” string will be printed out with the printf statement along with the current increment value of loop i.e., “n”. When the “n” variable reached 5, the while loop will be ended and the main() function as well.
After saving this newly made C code with Ctrl+S, we have compiled it using Ubuntu’s gcc compiler. It was a successful process of compilation. After that, the execution has been performed and the “Hello World” string has been displayed 5 times along with its iteration number i.e. 1, 2, 3, 4, 5.
Conclusion
Finally! We have completed this simple C tutorial to implement the “Hello World” Program in Ubuntu 20.04 Linux operating system. We have started from the basic one and gradually increased the level of difficulty in our examples to make it more understandable for Linux users. For that, we have tried to use the “for” and “while” loops in different examples.
About the author
Aqsa Yasin
I am a self-motivated information technology professional with a passion for writing. I am a technical writer and love to write for all Linux flavors and Windows.
Bash Script — Hello World Example
In this tutorial, we learn how to create and run a simple Bash script which prints out “Hello World”.
What is Shebang (#!)
Every shell script starts with the Shebang #! symbols. This is declared at the first line of the script and basically tells the shell which interpreter will be used to run the script.
Hello World Bash Script
Now, we’re going to create a bash script that prints out the words “Hello World” in a terminal.
First create a file called hello_world.sh . Using the terminal we write:
Next, open the file in your favorite editor; I’m using nano, so it would be:
Once the hello_world.sh is open in your editor, type in the following commands:
Execute Shell Script
Now to print out the hello world , we need to execute the shell script we created.
There are a number of ways to execute the shell script
$ sh ./hello_world.sh ## incorrect $ ./hello_world.sh ## correct $ bash ./hello_world.sh ## correct The first method is incorrect, because you are telling the shell to use the shell interpreter not the bash interpreter.
The second method is correct because we just run the script which will use the defined interpreter in the file, the first line in the script which is #!/bin/bash .
The third method is also correct because in this case, we are saying to use the bash interpreter which is the same as the one defined in the file.
Permission Denied When Executing Shell Script
If you try to run your script using:
$ ./hello_world.sh -bash: ./hello_world.sh: Permission denied you will see a permissions denied error. This is because the script doesn’t have execute permission.
You can grant the script an execute permission by using:
Now, if you run the script again, you will see the “Hello World” printed out:
$ ./hello_world.sh Hello World