A High Gain Yagi Wifi Antenna
Build this wifi antenna when you want results FAST and have just a few inexpensive tools and supplies available. It will greatly extend your ability to reach wifi access points — well beyond the limits of the dipoles supplied with most routers and some wireless adapters. When connected to a typical USB wireless adapter, the performance is excellent. When connected to a high powered wifi adapter, the performance is astounding! Forget about building those overly hyped wifi cantennas — they don’t perform anywhere close to the yagi antennas depicted here. This antenna works best when connected to a wifi adapter, and it works very well as a single router antenna (to extend the range of an access point). Read more below for instructions and a narrative of how they were designed.
If your goal is to get wireless internet from another building and use it indoors, you should instead consider using a wireless bridge. If you want to provde strong wireless internet coverage to an area, but cannot provide a fiber optic or ethernet cable to your wireless router, again consider using a wireless bridge to substitute for the unavailable cable, and connect the bridge to the router. A wireless bridge is a better solution for situations such as:
Wireless bridges work like a long run of ethernet without cable.
- Providing internet connectivity from one building to users in a remote house or office.
- Providing internet connectivity from one highrise building to another across town.
- Providing internet connectivity from an onshore location to users on an island.
- Sharing connectivity between two locations which can’t be linked by cable.
If you are interested in building a high gain wifi yagi antenna, continue reading below for the details.
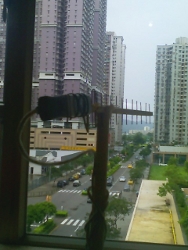
Reach hotspots via window mounting.
Connect through concrete walls!
The 15 element yagi wifi Antenna
dimensions in the W9CF java applet.
The antenna modeler also
lists element lengths and positions.
The yagi wifi antenna design depicted here can be built in just an hour or two, and it works great! It is computer designed, made of wood and wire, and provides high gain and directivity. It is directional — favoring wi-fi signals in one direction and rejecting interference from the sides or behind the antenna. The 15 element wi-fi antenna provides over 15 dB of gain (multiplying your effective radiated power by 31), while the larger 20 element wifi antenna provides over 17 dB of gain (multiplying your effective radiated power power by 51). Front to back ratio for both antennas is about 22 dB.
Make sure, when you use a powerful combination of antenna and wireless adapter, that the computer running them has the best drivers installed. Linux users should use a fresh kernel or install the backports (formerly «compat-wireless») package.
Yagi wifi antennas can be rather difficult to build, but it can be done if you measure precisely and cut precisely. The hard mathematical design work for the wifi antennas shown here was accomplished elegantly using a yagi antenna modeler, created by Kevin Schmidt (W9CF) and Michael Lee.
The on-line antenna modeler initially starts with several examples tailored for operation in the amateur radio bands. One of the best designs is the classic K1FO yagi. By following a few steps, the antenna can be scaled for the 2.4 Ghz wifi 802.11 b/g/n frequencies:
- Start with the 15 or 20 element K1FO 70cm example.
- In the «units» menu, select «Radians.»
- In the «conductivity» menu, select «Copper»
- In the «frequency» field, enter 2450 (MHz) for the center of the wifi networking band.
- For «Element Diameter», enter 0.08729 (radians).
- Click the «calculate» button.
- In the «units» menu, select «millimeters.»
- Note that the element diameter perfectly matches 14 gauge wire!
- In the file menu, select «list elements.»
The elements list will show each antenna element, from the reflector (element 1, position zero mm), to the last director. Do not use a different metal or a different diameter of metal for the elements, or performance will suffer. Changes in element diameter, metal type, or design frequency will need recalculation and the generation of a new elements list. These dimensions work quite well:
Element data for the 15 Element Yagi Wifi Antenna.| Element | Length (mm) | Position (mm) |
| 1 (Reflector) | 59.61 | 0.00 |
| 2 (Driven Element) | 58.55 | 18.34 |
| 3 (Director) | 55.20 | 25.75 |
| 4 (Director) | 53.62 | 39.51 |
| 5 (Director) | 52.38 | 58.55 |
| 6 (Director) | 51.68 | 82.19 |
| 7 (Director) | 50.97 | 109.70 |
| 8 (Director) | 50.62 | 140.74 |
| 9 (Director) | 50.26 | 174.60 |
| 10 (Director) | 49.91 | 210.94 |
| 11 (Director) | 49.56 | 249.38 |
| 12 (Director) | 49.21 | 289.60 |
| 13 (Director) | 48.85 | 331.39 |
| 14 (Director) | 48.68 | 374.25 |
| 15 (Director) | 48.50 | 418.52 |
| Element | Length (mm) | Position (mm) |
| 1 (Reflector) | 59.96 | 0.00 |
| 2 (Driven Element) | 58.91 | 18.34 |
| 3 (Director) | 55.56 | 25.75 |
| 4 (Director) | 53.97 | 39.51 |
| 5 (Director) | 52.73 | 58.55 |
| 6 (Director) | 52.03 | 82.19 |
| 7 (Director) | 51.32 | 109.70 |
| 8 (Director) | 50.97 | 140.74 |
| 9 (Director) | 50.61 | 174.60 |
| 10 (Director) | 50.26 | 210.94 |
| 11 (Director) | 49.91 | 249.38 |
| 12 (Director) | 49.56 | 289.60 |
| 13 (Director) | 49.21 | 331.39 |
| 14 (Director) | 49.03 | 374.25 |
| 15 (Director) | 48.85 | 418.52 |
| 16 (Director) | 48.68 | 463.67 |
| 17 (Director) | 48.50 | 509.70 |
| 18 (Director) | 48.32 | 556.26 |
| 19 (Director) | 48.15 | 603.53 |
| 20 (Director) | 47.97 | 651.32 |
Below is a graphic, meticulously adapted by AB9IL from the modeler, which shows element lengths and positions along the boom, measured from the reflector (location zero millimeters). Note that the driven element is depicted in green, and for the wifi yagi project, will be a folded dipole. Why a folded dipole? It provides a good impedance match to coaxial cable when used as the yagi wifi antenna’s driven element. In free space, a folded dipole has a 300 ohm impedance at resonance, but the impedance drops drastically when parasitic elements are brought into close proximity.
This high gain wifi antenna can be constructed in a couple of hours and requires some measuring, cutting, bending, and bolting of metal. Use caution around the sharp edges. When finished, put it up and enjoy a very durable antenna that provides outstanding wifi performance.
YAGI Wifi ANTENNA PARTS LIST:
- A 1.2 meter length of 14 AWG bare, solid copper wire.
- One wooden square, 1 cm per side, 50 cm long (70 cm for the 20 element antenna).
- Wire cutters.
- Metric ruler.
- Drill, with 1.6 mm (1/16″) bit.
- Printed or written template with antenna dimensions.
- Ball point pen or fine felt tipped marker.
YAGI Wifi ANTENNA CONSTRUCTION:
Assemble the yagi wifi antenna following the steps below, starting with preparation of the boom, followed by mounting the elements. After the elements are mounted, a suitable connector is added, and the antenna is tested over-the-air. Keep in mind that it can be connected to most usb wireless adapters by cutting the circuit board antenna trace and patching in a pigtail feeding the antenna.
- Draw a line as accurately as possible down the center of one side of the wooden boom.
- Mark the boom centerline 5 cm from one end. This is the «zero location,» where the director element will be mounted.
- Continue down the boom, carefully marking the locations of each element on the centerline.
- Carefully drill through the boom at each element’s location. Make sure to drill straight through the boom, emerging on the other side still centered and perpendicular.
- For a no-drill alternative, carefully cut a perpendicular groove across the boom, to a depth of 2 mm.
- Cut one element at a time, carefully measuring each element before and after cutting, trimming as necessary for proper length. File the wire ends and make sure the lengths are as accurate as possible!
- Press elements through the boom, centering each before moving to the next element.
- If you cut grooves for the elements instead of drilling holes, press the elements into the grooves, and make sure each is straight and centered. Affix them permanently with epoxy.
Element positions marked
on the yagi wifi antenna boom.
The reflector element
after mounting.
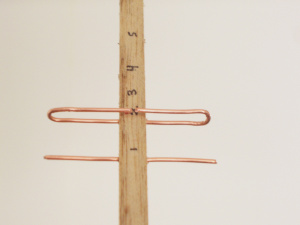
- For the driven element, cut a 130 mm length of wire, and make a 180 degree bend 30 mm from one end. Mount in boom, then make a bend 30 mm from other end. Adjust as necessary to create a folded dipole just under 59 mm in length with 5 mm spacing.
- Double check all elements, making sure all are centered and parallel.
- Attach a pigtail (or connector) to open ends of folded dipole.
Folded dipole prior
to mounting in antenna boom.
The driven element
before the last bend.
Two yagi wifi antenna
elements mounted in boom.
After all of the elements are measured, cut, and mounted, the antenna should resemble the finished yagi pictured below. Connect the pigtail or connector to the driven element. Then connect the wifi adapter or wireless router to the antenna and start checking over-the-air signal strengths. Note that the antenna may be sensitive to polarization: when the antenna seems to bring in the best signal, rotate it to find the best polarization. Mounting the antenna is possible using commonly available hardware, such as 90 degree angle brackets, U bolts, or even velcro.
Closeup of the wifi yagi feedpoint.
Keep the leads short!
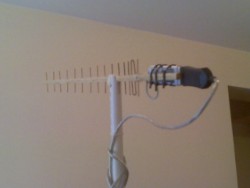
The completed wifi yagi antenna.
YAGI WIFI ANTENNA TESTING:
For the most practical method of signal checking, consider using a wifi auditing utility such as Kismet or Slitaz Aircrack-ng. Either of these will produce a rapidly updated received signal strength indication that is useful for comparing or aiming wifi directional antennas. Make a set of measurements for any desired wi fi access points on the original antenna, then make a new set for the yagi wifi booster antenna. I have built a bunch of these over the years, and they sure work well.
If you are enjoying these wifi antennas which will boost your connectivity, have a look at my wifi dish antenna (for extreme gain, but large) and wifi helical antenna, which is lightweight, durable, and good when getting signals through rain and multipath (reflections from buildings).
Good luck building the yagi wifi antenna, and may you enjoy solid long range connections!