- How to Set A Custom Screen Resolution in Ubuntu Desktop
- Changing the Resolution or Orientation of the Screen Using Displays
- Changing the Resolution or Orientation of the Screen Using Xrandr
- Set Screen Resolution in Ubuntu
- How to Add Missing or Set Custom Display Resolution Using xrandr
- How to Set A Custom Screen Resolution in Ubuntu Desktop
- Ji m
- 47 responses to How to Set A Custom Screen Resolution in Ubuntu Desktop
How to Set A Custom Screen Resolution in Ubuntu Desktop
Is your screen (or external monitor) resolution is low? thus making the items on your screen look larger and less clear? Or do you want to simply increase the current maximum resolution or add a custom resolution?
In this article, we will show how to add missing or set custom display resolution in Ubuntu and its derivatives such as Linux Mint. By the end of this article, you will be able to set to a higher resolution, making content on your screen appear sharper and clearer.
Changing the Resolution or Orientation of the Screen Using Displays
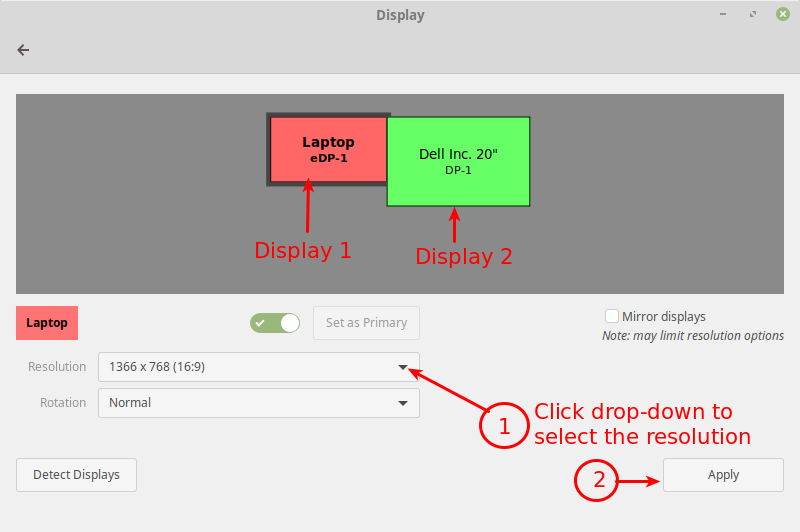
Normally, to change the resolution or orientation of the screen, you can use the Displays graphical user interface tool (open the Activities overview and type Displays, click to open it or System Menu then type Displays and open it).
Note: In case you have multiple displays connected to your computer (as shown in the following image), if they are not mirrored, you can have different settings on each display. To change the settings for a display device, select it in the preview area.
Next, select the resolution or scale you want to use, and choose the orientation then click Apply. Then select Keep This Configuration.
Changing the Resolution or Orientation of the Screen Using Xrandr
Alternatively, you can also use the powerful xrandr tool (a command-line interface to RandR (Resize and Rotate) X Window System extension) which is used to set the size, orientation and/or reflection of the outputs for a screen.
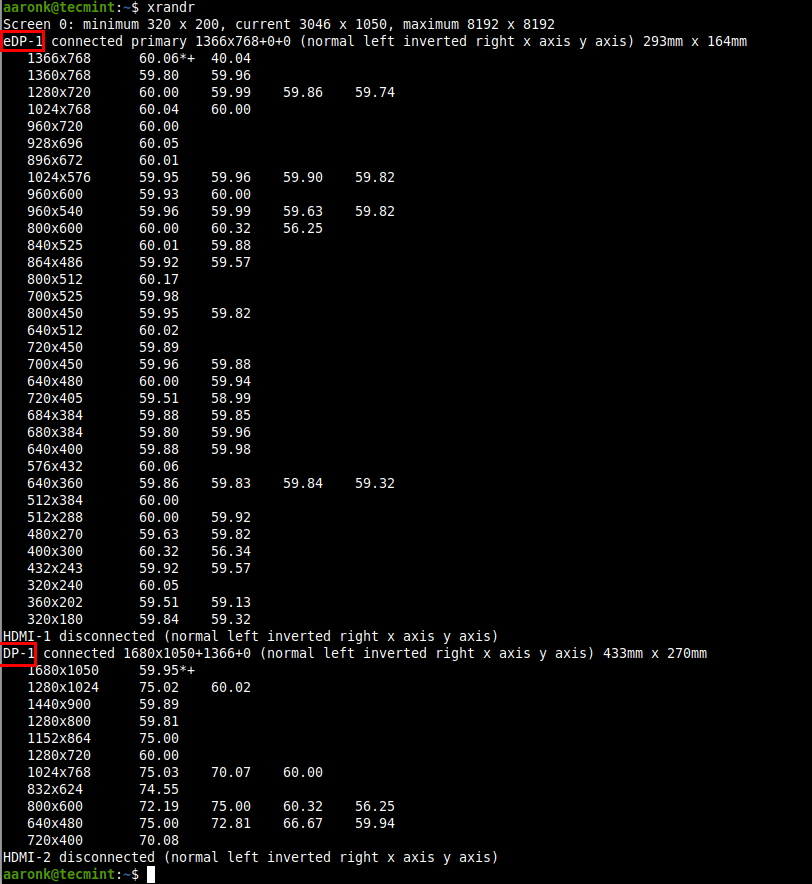
You can also use it to set the screen size or list all active monitors as shown.
$ xrandr --listactivemonitors

To show the names of different outputs available on your system and resolutions available on each, run xrandr without any arguments.
Set Screen Resolution in Ubuntu
To set the resolution for a screen for an external monitor named DP-1 to 1680×1050, use the —mode flag as shown.
$ xrandr --output DP-1 --mode 1680x1050
You can also set the refresh rate using the —rate flag as shown.
$ xrandr --output DP-1 --mode 1680x1050 --rate 75
You can also use the —left-of , —right-of , —above , —below , and —same-as options to arrange your screens either relatively to each other.
For example, I want my external monitor (DP-1) to be positioned left of the Laptop screen (eDP-1) in correspondence to the actual physical positioning:
$ xrandr --output DP-1 --left-of eDP-1
Keep in mind that any changes made using xrandr will only last until you log out or restart the system. To make xrandr changes persistently, use the xorg.conf configuration files for Xorg X server (run man xorg.conf for details on how to create a xorg.conf file) – this is the most effective method.
You can also use the ~/.xprofile file (add xrandr commands in it), however, there are some disadvantages of using this method, one is that this script is read fairly late in the startup process, thus it will not alter the resolution of the display manager (if you use one e.g lightdm).
How to Add Missing or Set Custom Display Resolution Using xrandr
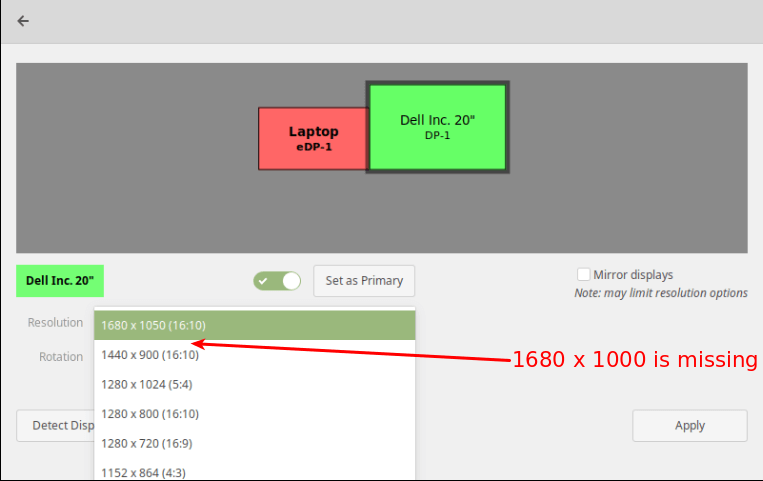
It is possible to add a missing or custom display resolution e.g 1680 x 1000 to Displays panel, for a specific display device (DP-1), as explained below.
To add a missing or custom display resolution, you need to calculate the VESA Coordinated Video Timing (CVT) modes for it. You can do this using the cvt utility as follows.
For example, if you need a horizontal and vertical resolution of 1680 x 1000, run the following command.
Next, copy the Modeline (“1680x1000_60.00″ 139.25 1680 1784 1960 2240 1000 1003 1013 1038 -hsync +vsync) from the output of the cvt command and use it to create a new mode using the xrandr as shown.
$ xrandr --newmode "1680x1000_60.00" 139.25 1680 1784 1960 2240 1000 1003 1013 1038 -hsync +vsync
Then add the new mode to the display.
$ xrandr --addmode DP-1 "1680x1000_60.00"

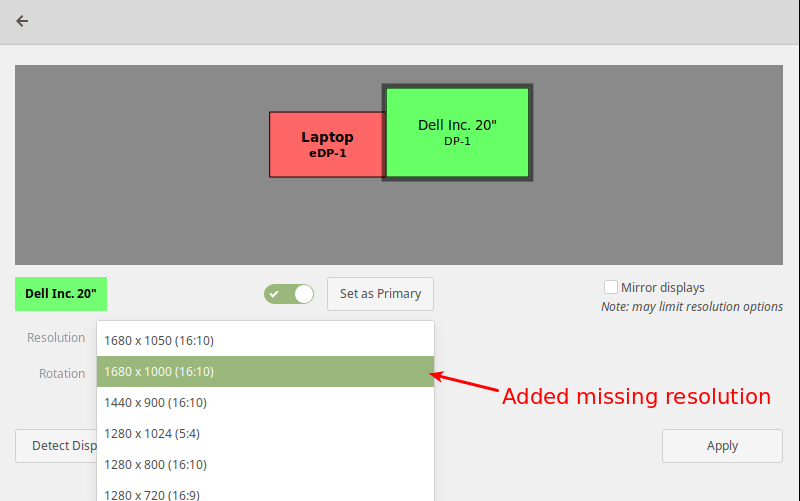
Now open the Displays and check if the new resolution has been added.
The above changes are only temporary and work for the current session (they last until you log out or restart the system).
To add the resolution permanently, create a script called external_monitor_resolution.sh in the directory /etc/profile.d/.
$ sudo vim /etc/profile.d/external_monitor_resol.sh
Then add the following lines in the file:
xrandr --newmode "1680x1000_60.00" 139.25 1680 1784 1960 2240 1000 1003 1013 1038 -hsync +vsync xrandr --addmode DP-1 "1680x1000_60.00"
Save the changes and exit the file.
For more information on how xrandr works and how to use it, read its man page:
That brings us to the end of this article. If you have any thoughts to share or queries, reach us via the feedback form below.
How to Set A Custom Screen Resolution in Ubuntu Desktop
This tutorial works for Ubuntu on Xorg. Since Ubuntu 21.04 uses Wayland as default, See another way works on both Xorg and Wayland.
Your preferred screen resolution is not available in the Display settings? Well, here I’m going to show you how to add a custom screen resolution in Ubuntu 17.04 (Work on all current Ubuntu releases).
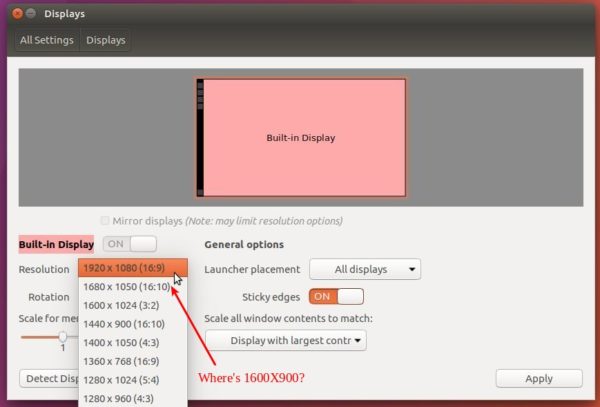
On my Ubuntu 17.04 Desktop, the default 1920X1080 (16:9) resolution is kinda high for me. Though there are options to scale for menu, title bars, and text, I prefer 1600X900 (16:9) which is available in Ubuntu 16.04 LTS by default.
To get my screen resolution, I did the following steps:
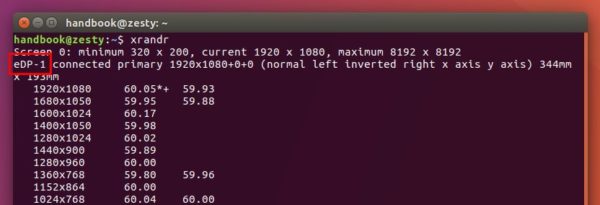
1. Open terminal via Ctrl+Alt+T or by searching for “Terminal” from dash. When it opens, run command:
It outputs current screen resolution as well as all available solutions. ALL I need here is the display device name, in my case, it’s eDP-1.
2. Run command to calculate VESA CVT mode lines by given resolution:
Replace 1600 900 (1600X900 in my case) in the command to your desired screen resolution.
3. Copy the Modeline (words with red underline, see previous picture), and run command to add new mode:
sudo xrandr --newmode "1600x900_60.00" 118.25 1600 1696 1856 2112 900 903 908 934 -hsync +vsync UPDATE: For Ubuntu 17.10 Wayland, run xhost si:localuser:root command first in the terminal window to avoid sudo failure “No protocol specified Can’t open display 0:”
NOTE the command section after —newmode are COPIED from previous step output.
4. Now add the new created mode for your display device:
sudo xrandr --addmode eDP-1 "1600x900_60.00" Replace eDP-1 (see step1) and «1600x900_60.00» (Step 2 or 3) in the command.
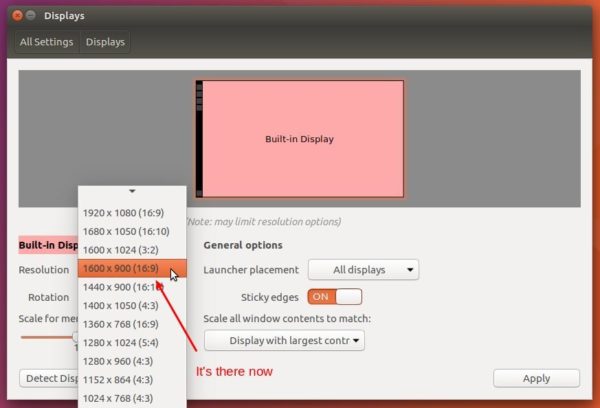
Finally Apply the new resolution in the Display settings:
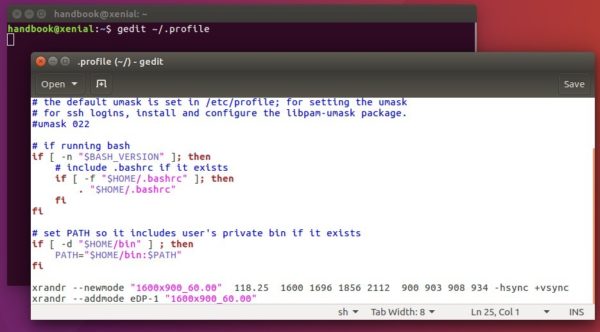
IMPORTANT: To make Ubuntu remember the new created screen resolution at next start, you have to edit the .profile via command:
add the last 2 commands to the end, commands in step 3 and 4, and save the file.

Ji m
I’m a freelance blogger who started using Ubuntu in 2007 and wishes to share my experiences and some useful tips with Ubuntu beginners and lovers. Please comment to remind me outdated tutorial! And, notify me if you find any typo/grammar/language mistakes. English is not my native language. Contact me via [email protected] Buy me a coffee: https://ko-fi.com/ubuntuhandbook1
47 responses to How to Set A Custom Screen Resolution in Ubuntu Desktop
A very cool tip! I now can use a notebook with physical 1280 x 800 resolution with 1638 x 1024 🙂 Thank you!
I’m getting the following error message. Any chance on helping me make it right? $ sudo xrandr –addmode eDP1 “1600x900_60.00”
X Error of failed request: BadMatch (invalid parameter attributes)
Major opcode of failed request: 140 (RANDR)
Minor opcode of failed request: 18 (RRAddOutputMode)
Serial number of failed request: 45
Current serial number in output stream: 46
After changing your screen resolution, it’s xy alignment may overlap or gap your other screens. Move them around, based on left,top origin 0,0 xrandr —output eDP-1 —pos 1600×0
Nice to see this technique laid out neatly – you don’t need to place the “cvt” command in your profile file though. That is only used to give you the format for placing in the –newmode xrandr command. It won’t do any harm there, but it won’t actually do anything 🙂
I get an error when doing this command: sudo xrandr –newmode “1920x1080_60.00” 173.00 1920 2048 2248 2576 1080 1083 1088 1120 -hsync +vsync X Error of failed request: BadName (named color or font does not exist)
Major opcode of failed request: 140 (RANDR)
Minor opcode of failed request: 16 (RRCreateMode)
Serial number of failed request: 41
Current serial number in output stream: 41
Thank you – not only is your English perfect, your guidance on screen resolution is also clear and precise. I’ve been trying to sort this problem out for weeks. Excellent…
Does not work at all. Xrander not found. Whye the HELL do you have to do these things in some little DOS box in Linux? Can’t they catch up with other operating systems where you do not have to use this little MS DOS box, and set things in a GUI?
And it should be forgiving of your spelling and or typing. I typed Xrander and it gave an error! Unbelievable. It should work spelled either way.
Then, the thing does not say anything about edp-1 so that does not work. I don’t know what else would. I got this…..
xrandr
Screen 0: minimum 320 x 200, current 1024 x 768, maximum 16384 x 16384
HDMI-0 disconnected (normal left inverted right x axis y axis)
DVI-0 disconnected (normal left inverted right x axis y axis)
VGA-0 connected 1024×768+0+0 (normal left inverted right x axis y axis) 0mm x 0mm
1024×768 60.00*
800×600 60.32 56.25
848×480 60.00
640×480 59.94
[email protected]:~$ 1600 x 1200 / 75 Hz
1600: command not found
[email protected]:~$ cvt 1600 900
# 1600×900 59.95 Hz (CVT 1.44M9) hsync: 55.99 kHz; pclk: 118.25 MHz
Modeline “1600x900_60.00” 118.25 1600 1696 1856 2112 900 903 908 934 -hsync +vsync…..
THEN you notice, “command not found 1600! WHAT THE HELL. Why would you have to put in ANOTHER command? OK so then the cvt thing. …. xrander –newmode “1600x900_60.00” 118.25 1600 1696 1856 2112 900 903 908 934 -hsync +vsync
No command ‘xrander’ found, did you mean:
Command ‘xrandr’ from package ‘x11-xserver-utils’ (main)
xrander: command not found
[email protected]:~$ sudo xrandr –newmode “1600x900_60.00” 118.25 1600 1696 1856 2112 900 903 908 934 -hsync +vsync
and AGAIN command not found. I HATE MS DOS. …
thern to top it all off I finally get this. ….
xrandr –newmode “1600x900_60.00” 118.25 1600 1696 1856 2112 900 903 908 934 -hsync +vsync
X Error of failed request: BadName (named color or font does not exist)
Major opcode of failed request: 140 (RANDR)
Minor opcode of failed request: 16 (RRCreateMode)
Serial number of failed request: 33
Current serial number in output stream: 33
[email protected]:~$ sudo xrandr –addmode eDP-1 “1600x900_60.00”
xrandr: cannot find output “eDP-1″….
AND it simply does not work. Can’t someone write a damn display thingy that you can click on the numbers you want, picking displays from a list (mine is a Dell UltraScan P1110 – CRT monitor – 21″… which last I checked Window XP had listed, and I used.) Nothing showing up, you cannot select anything from the dropdown. AND I REFUSE to get a new monitor, this one is much better than those flat screen crap ones they now sell with the stupid widescreen, which I never saw the need for! Also it’s native resolution is 1800X1440, which I can’t seem to find in the dropdown. It only wants to let me set some widescreen thing , 1024X768 OR the old fashioned 800X600 which Windows 95 used. I think Linux is about 20 years behind the times on this one.