- Saved searches
- Use saved searches to filter your results more quickly
- dominikberse/homeassistant-bluetooth-mesh
- Name already in use
- Sign In Required
- Launching GitHub Desktop
- Launching GitHub Desktop
- Launching Xcode
- Launching Visual Studio Code
- Latest commit
- Git stats
- Files
- README.md
- About
- Docker часть 10: Bluetooth
- Установка зависимостей Bluetooth
- Настройка Home Assistant
- Список всех частей
- Home Assistant Container Part 11: Bluetooth support
- The ESPHome method 
- The built-in Bluetooth method 
- BTHome 
Saved searches
Use saved searches to filter your results more quickly
You signed in with another tab or window. Reload to refresh your session. You signed out in another tab or window. Reload to refresh your session. You switched accounts on another tab or window. Reload to refresh your session.
Allows to use bluetooth mesh devices directly from homeassistant
dominikberse/homeassistant-bluetooth-mesh
This commit does not belong to any branch on this repository, and may belong to a fork outside of the repository.
Name already in use
A tag already exists with the provided branch name. Many Git commands accept both tag and branch names, so creating this branch may cause unexpected behavior. Are you sure you want to create this branch?
Sign In Required
Please sign in to use Codespaces.
Launching GitHub Desktop
If nothing happens, download GitHub Desktop and try again.
Launching GitHub Desktop
If nothing happens, download GitHub Desktop and try again.
Launching Xcode
If nothing happens, download Xcode and try again.
Launching Visual Studio Code
Your codespace will open once ready.
There was a problem preparing your codespace, please try again.
Latest commit
Git stats
Files
Failed to load latest commit information.
README.md
Bluetooth Mesh for Home Assistant
This project aims to integrate Bluetooth Mesh devices into Home Assistant directly.
The project is in a development state. The current approach is to use the Home Assistant MQTT integration on the Home Assistant side. Then for every Bluetooth Mesh device type a bridge class is implemented, that maps the node’s functionality to a Home Assistant device class.
The basic requirements for this setup are already implemented:
- MQTT integration using asyncio_mqtt
- Bluetooth Mesh integration using bluetooth_mesh
- Mechanisms to allow easy communication between both ends
Additionally a command line interface for easy scanning and provisioning is available.
Currently the following bridges are implemented:
- Generic Light Bridge: Maps a basic Bluetooth Mesh light to a Home Assistant Light. Supports on / off, brightness and color temperature. Since I do not have Bluetooth Mesh RGB Leds at hand, I do not plan on supporting them. The implementation should basically follow the color temperature though.
- Check relay setup
- (done) Dockerize application
- Provide as HACS integration
- Extend README
The repository provides a docker container, that will setup BlueZ with mesh support and run the gateway. However, due to the use of the bluetooth hardware, I can not guarantee that it is working everywhere. For now I tested it on a Raspberry Pi 4 with Raspberry Pi OS 2022-09-22 (bullseye). If you are able to run it on other hardware just notify me as I will try to keep track of compatible setups.
- If you have a blank Raspberry Pi you need to install docker and git first.
- Clone the repository and create a config.yaml file under docker/config/ :
mqtt: broker: [username: ] [password: ] node_id: mqtt_mesh mesh: : uuid: name: type: light # thats it for now [relay: ] # whether this node should act as relay . - It is very important to disable bluetooth on the host system! This is neccessary, because the bluetooth-mesh service needs exclusive access to the bluetooth device.
sudo systemctl stop bluetooth sudo systemctl disable bluetooth - Start the container using docker compose and grab a coffee. This took one and a half hours for me to complete on a Raspberry Pi 4. It might seem stuck when compiling numpy, but this actually takes half an hour.
docker compose build docker compose up -d Note that the container currently runs /bin/bash in the foreground, because the gateway exits if no nodes are provisioned. This will change in the future (I plan on implementing a simple web interface for provisioning). Also, there might be an error message on the very first startup. It should be gone on the second try.
Using the command line within docker
Since the web interface is not yet available, you need to use the command line to scan and provision devices. With the container running, you can access the command line inside the docker container from the host system using:
docker compose exec app /bin/bash From there, it might be neccessary to stop the running python process.
I placed the configuration files in /config , so you need to add —basedir /config to every command. So for example the scan command would look like this:
python3 gateway.py --basedir /config scan Once you are done, switch back to the host system (simply exit ) and restart the container for the changes to take effect.
If you do not want to use the docker image or for some reason it is not compatible, you can try to setup everything manually. However, this can be a little tricky.
After cloning the repository, the easy part is to install the Python requirements using pip3 install -r requirements.txt (probably inside a virtual environment). The hard part is the get the bluetooth-mesh service running. This usually requires to build BlueZ from scratch and replace the available BlueZ installation. Have a look at the docker installation scripts, they should be a good starting point on what you need to do.
Once you get it running, it might be neccessary to stop the default bluetooth service first and ensure that your bluetooth device (probably hci0 ) is not locked. Place the configuration file (see docker installation) inside the main folder and name it config.yaml .
With that available, you should be able to run the application from the gateway folder (try python3 gateway.py scan first).
Calling python3 gateway.py without further arguments will start the MQTT gateway and keep it alive. All provisioned devices should be discovered by Home Assistant and become available. If not, check the Home Assistant MQTT integration. If no devices are provisioned, the application will exit.
Make sure you know how to reset your device in case something goes wrong here. Also it might be neccessary to edit the store.yaml by hand in case something fails.
Remember that you need to add the —basedir /config switch after gateway.py if you are using the command line within docker.
- Scan for unprovisioned devices with python3 gateway.py scan .
- Create an entry for the device(s) you want to add in the config.yaml .
- Provision the device with python3 gateway.py prov —uuid add .
- Configure the device with python3 gateway.py prov —uuid config . Do not skip this step, otherwise the device is not part of the application network and it will not respond properly.
- To list all provisioned devices use python3 gateway.py prov list .
- You can remove and reset a device with python3 gateway.py prov —uuid reset .
About
Allows to use bluetooth mesh devices directly from homeassistant
Docker часть 10: Bluetooth

Этот метод полезен, когда система, в которой вы используете Home Assistant, имеет встроенный чип или вы используете USB-приемник Bluetooth. Если отсутствует встроенный приемник, то можно использовать ESPHome в качестве Bluetooth Proxy.
Если вы хотите использовать приемник, обязательно ознакомьтесь с документацией интеграции для получения списка известных работающих адаптеров. Но как правило работаю почти все адаптеры представленные на рынке. В примере будет работа с адаптером TP-Link UB500.
Устройств умного дома, которые передают данные через Bluetooth большое количество. И иметь у себя в системе этот протокол просто необходимо.
Установка зависимостей Bluetooth
- Установите пакет брокера DBus sudo apt install dbus-broker
- Включить системную службу sudo systemctl enable dbus-broker.service
- Установите пакет BlueZ sudo apt install bluez
Настройка Home Assistant
Перейдите в docker-compese.yaml и в секции homeassistant добавьте новое хранилище
volumes: - ./homeassistant/config:/config - /etc/localtime:/etc/localtime:ro - /run/dbus:/run/dbus:ro # После чего перенастройте контейнер с Home Assistant, запустив обновление контейнера
docker compose up -d homeassistant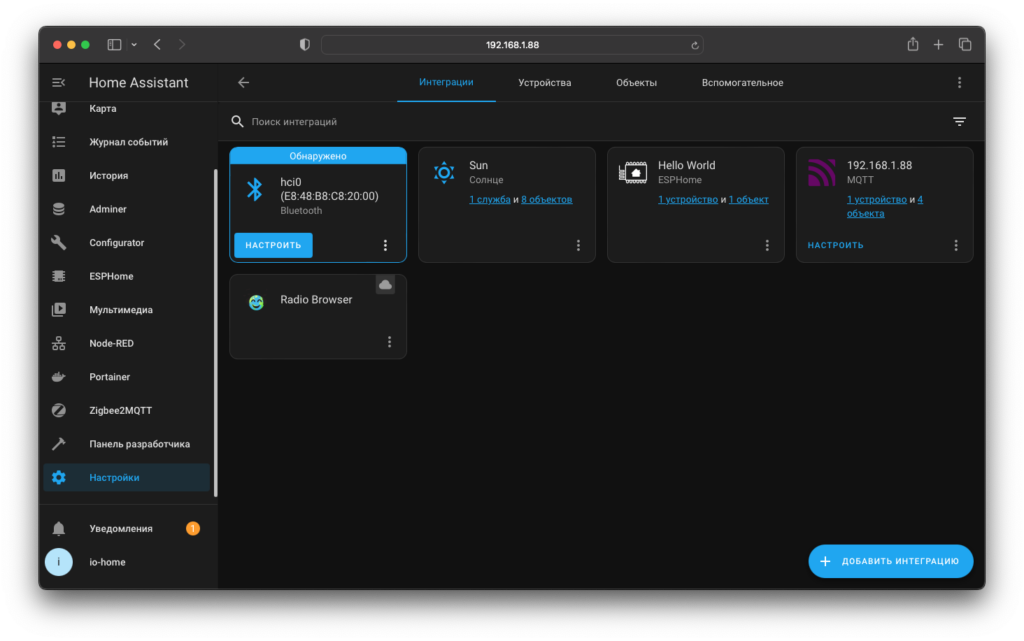
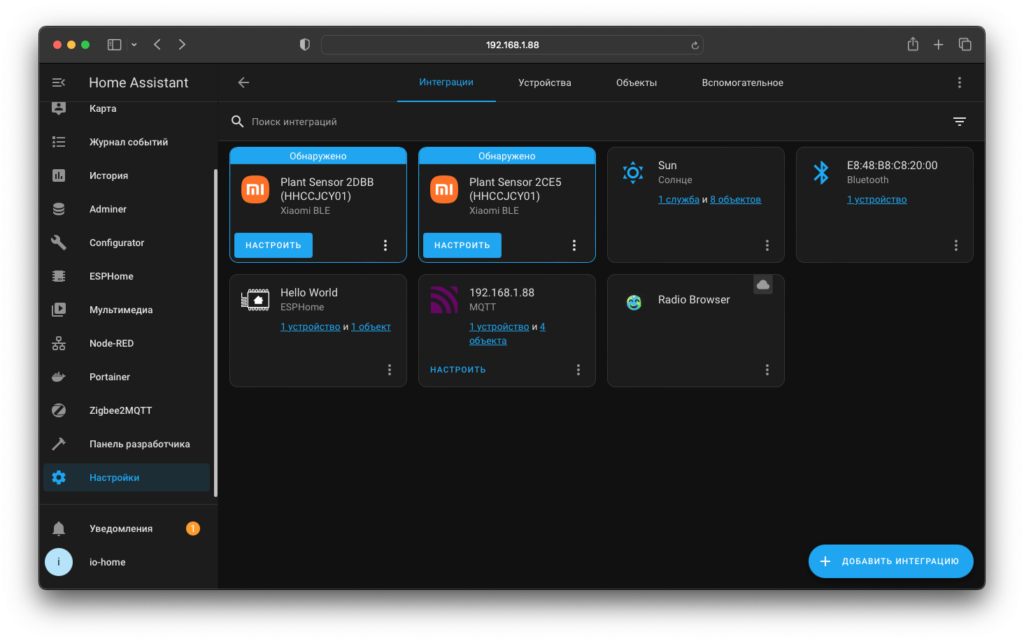
Если у вас есть устройства с Bluetooth, то после настройки интеграции они начнут появляться в Home Assistant. На это потребуется определенное время. Важным фактором является поддержка самим HA. Если по какой-то причине то или иное устройство не захочет подключаться, то всегда можно сделать свой BLE адаптер с помощью ESPHome.
Список всех частей
- Часть 1: Установка Debian
- Часть 2: Docker и Portainer
- Часть 3: Home Assistant Container
- Часть 4: File Editor
- Часть 5: MariaDB
- Часть 6: Mosquitto MQTT
- Часть 7: Zigbee2MQTT
- Часть 8: ESPHome
- Часть 9: Node Red
- Часть 10: Bluetooth
Home Assistant Container Part 11: Bluetooth support
You may have purchases some Xiaomi temperature and humidity sensors after reading my blog post from a while back.
Since then, Nabu Casa (the organisation behind Home Assistant) has somewhat taken over the ESPHome project and have been doing their best to incorporate the best of both worlds. One feature that’s of particular relevance is this story, is the native support for Bluetooth LE devices within HA and the addition of the Bluetooth Proxy component to ESPHome.
So from now on, you no longer need to add keys etc. for your Xiaomi BLE sensors to your ESPHome config. You can connect directly from your Home Assistant system, provided it has a bluetooth chip, or sprinkle some ESP32 (configured as BLE proxy) around.
The ESPHome method 
If you already have some ESP32 around the house, maybe because you were using the method of my old blog post, this is by far the easiest solution.
In your ESP32 you probably had a section looking like this:
esp32_ble_tracker: sensor: # LYWSD03MMC - Advertising Type: Mi Like - platform: xiaomi_lywsd03mmc mac_address: "XX:XX:XX:XX:XX:XX" # Replace with MAC Address of sensor bindkey: "xxxxxxxxxxxxxxxxxxxxxxxxxxxxxxxxx" # Replace with bind key, use a dummy value when flashed with custom firmware temperature: name: "$ - Temperature" humidity: name: "$ - Humidity" battery_level: name: "$ - Battery Level" All of this can be removed from the ESPHome config and be replaced by:
esp32_ble_tracker: bluetooth_proxy: active: false # Default Bluetooth devices will now appear as new integrations in Home Assistant. You may need to enter the bindkey from your old ESPHome config when adding the devices to HA, so Home Assistant can decrypt the bluetooth packages.
The built-in Bluetooth method 
This method is useful for when the system you’re running Home Assistant on has a built-in Bluetooth chip or you’re using a Bluetooth USB dongle. If you want to use a Bluetooth dongle, make sure you check the Bluetooth Integration documentation for the list of known-working adapters.
To then get Home Assistant to recognize your Bluetooth chip/adapter, follow these steps:
- Install DBus-broker package sudo apt install dbus-broker
- Enable system service sudo systemctl enable dbus-broker.service
- Install BlueZ package sudo apt install bluez
- Forward the Dbus socket to HA container by mapping it as a volume in your docker-compose.yaml .
volumes: - /opt/homeassistant/config:/config - /etc/localtime:/etc/localtime:ro - /run/dbus:/run/dbus:ro # Once Home Assistant has rebooted, it’ll show a new integration for your Bluetooth adapter. After adding that integration, it’ll start discovering BLE devices and showing them as discovered integrations.

This update to ESPHome and Home Assistant has made it even easier to work with Bluetooth sensors.
BTHome 
Ideally, you’d also flash the sensors so they would communicate/advertise using the BTHome open standard.
BTHome is an open standard for broadcasting sensor data and button presses over Bluetooth LE
Home Assistant supports it out of the box, and the process for flashing your Xiaomi sensors is the same but it uses an updated Telink Flasher.