- Presence detection with Raspberry Pi, Home Assistant and Monitor
- How to enable SSH access?
- How to enable the WiFi?
- Install Mosquitto on Raspberry Pi Zero W
- Install Monitor on Raspberry Pi Zero W
- Edit MQTT preferences
- Add devices to track with Monitor
- Start the Monitor script
- Monitor on several Raspberries (Credits to Andrew)
- Presence Detection with Raspberry Pi, Home Assistant and Monitor
- Home Assistant MQTT integration
- Add MQTT sensors in Home Assistant
- Home Assistant Automation using the MQTT sensors
- Test the Home Assistant automations for Presence detection
- Support my Work!
- Включаем блютуз в HASSOS под управлением Home Assistant.
Presence detection with Raspberry Pi, Home Assistant and Monitor
In this article we will see how to easily start presence detection with Raspberry Pi, Home Assistant and and free software called Monitor. We will also use some help from Mosquitto MQTT Broker to enable MQTT communication between all involved components.
Accurate presence detection is crucial for any Smart Home. Base on it you can activate automations when someone enter or leave your home or even when change rooms.
So Raspberry Pi, Home Assistant, Monitor and little MQTT communication. Coming up…
Then select your SD card and click on Write button.
After the writing and verification processes finished – just unplug and plug again your SD card as we have to create two files there.
How to enable SSH access?
We will enable SSH to access our Raspberry Pi over the network without having to attach any display or peripherals to it. To enable the SSH just create an empty file inside the boot/root partition of the SD card called ssh. The file must be without any extension (like .txt or .md) or content.
If you are using macOS type the following in Terminal:
For Linux/Windows you can use any text editor or you can copy/paste and rename one of the existing text files inside the boot partition of the SD card.
How to enable the WiFi?
To setup the Wi-Fi of the Raspberry we have to create one more file called wpa_supplicant.conf file in boot/root directory, and to add Wi-Fi details inside. Below is an example of the wpa_supplicant.conf file content:
country=US ctrl_interface=DIR=/var/run/wpa_supplicant GROUP=netdev update_config=1 network=
You may wish to change the ssid with your WiFi name and psk with your WiFi password and optionally the country abbreviation ;-).
When you are ready with creation of ssh and wpa_supplicant.conf files in your SD card, unplug it from your computer and plug it in the Raspberry Pi and power on the Pi.
Install Mosquitto on Raspberry Pi Zero W
Okay, we have our Raspberry Pi Zero W up and running and ready to work. We are not going to make the Raspberry waiting too much, because we will install Mosquitto.
Mosquitto is one of the most popular MQTT brokers available. It is needed for the Monitor script to communicate with the rest of the world and to announce who’s home and who’s not. Let’s install it.
Connect to the Raspberry Pi using SSH:
The above is valid for Linux/macOS. For Windows use the Putty SSH client. Default user is pi and default password is raspberry. To find the Raspberry IP check your router interface for the connected clients.
Update and upgrade your Raspberry OS by executing the following:
sudo apt-get update && sudo apt-get upgrade -y && sudo apt-get dist-upgrade -y && sudo reboot The above commands will be executed one-by-one and finally you Raspberry will reboot. Log in again and install Mosquitto by executing this:
# get Mosquitto repo key wget http://repo.mosquitto.org/debian/mosquitto-repo.gpg.key #add the repo sudo apt-key add mosquitto-repo.gpg.key #download appropriate lists file cd /etc/apt/sources.list.d/ sudo wget http://repo.mosquitto.org/debian/mosquitto-buster.list #update caches and install apt-cache search mosquitto sudo apt-get update sudo apt-get install -f libmosquitto-dev mosquitto mosquitto-clients libmosquitto1Woohoo you now have the most popular MQTT Broker installed. Cheers 🥂
Install Monitor on Raspberry Pi Zero W
I think we have everything needed for the Monitor script installation. Let’s install that Monitor on the Raspberry Pi Zero W.
We need a git client to clone the Monitor repo, let’s start with that:
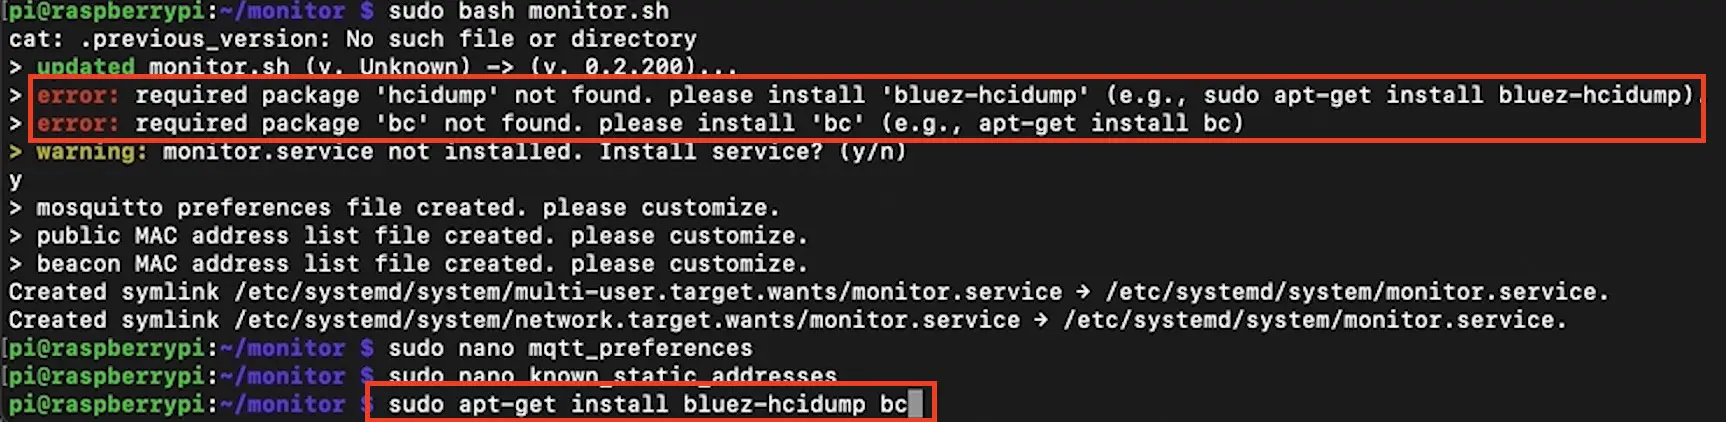
#install git client cd ~ sudo apt-get install git #clone the Monitor repo git clone https://github.com/andrewjfreyer/monitor #enter in `monitor` directory cd monitor/Start the Monitor script and watch for errors (missing packages):
If you found any missing packages, install them using sudo apt-get install package_name. I had to install additionally only two packages (bluez-hcidumb and bc), but this may change over time (Hey there reader from the future, why don’t you subscribe for my newsletter?).
Edit MQTT preferences
In the mqtt_preferences file are stored all of the needed settings for the MQTT Broker and we can edit them with nano text editor
sudo nano mqtt_preferences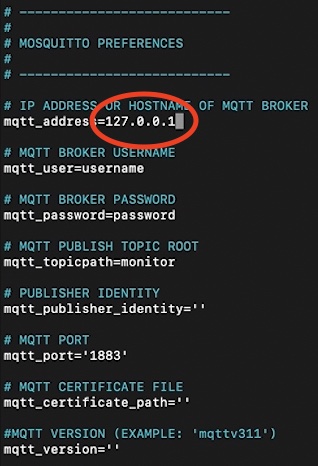
Change the mqtt_address from 0.0.0.0 to 127.0.0.1
This is needed for the Monitor script to connect to the MQTT Broker. All other settings may stay as they are, although is good idea to enable authentication and to create a dedicated user in Mosquitto to harden the security.
Add devices to track with Monitor
We can now add our devices that we want to monitor with Monitor (clever ah?). We just have to edit the known_static_addresses file in the Monitor configuration.
sudo nano known_static_addressesIn the file you have to add the Bluetooth MAC address of the device that you want to track and an alias e.g. 00:11:22:33:44:55 alias
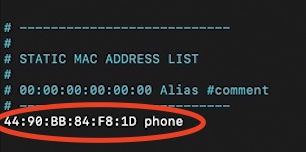
Don’t forget that you need the Bluetooth MAC address and not the WiFI MAC.
Start the Monitor script
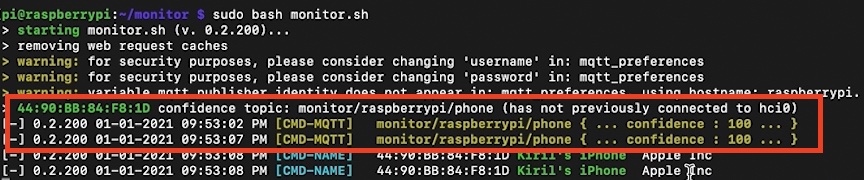
Start again the Monitor script with:
My advice here is to try start and stop (Ctrl+C) the Monitor script until you see something similar: A MQTT topic, MAC addresses and confidence points:
Monitor on several Raspberries (Credits to Andrew)
You can use Monitor script on several Raspberry Pi devices to track your movement within your home more accurately. This is well explained by Andrew which is the author of the Monitor script on his GitHub page.
Hats down, Andrew you did a wonderful job with Monitor! Just keep up!
You can find the Monitor GitHub link on many places in this article, but here it is again 👉 LINK
Presence Detection with Raspberry Pi, Home Assistant and Monitor
It is time to join Home Assistant into our Raspberry Pi and Monitor Party!
We are going to add MQTT sensors in Home Assistant. The output from these sensors will give us an accurate numerical occupancy confidence data that we are going to use in Home Assistant automations.
Home Assistant MQTT integration
You have to add the MQTT (remember the Mosquitto installed on the Raspberry?) Integration to Home Assistant.
Go to Home Assistant > Configuration > Integrations > Add Integration and search for MQTT.
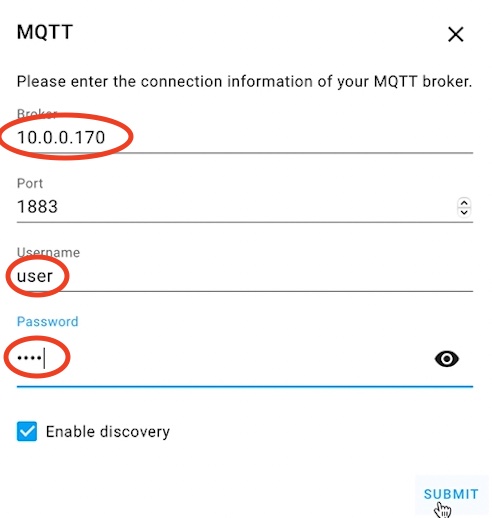
Add your Raspberry Pi – IP address, and any username and password.
Add MQTT sensors in Home Assistant
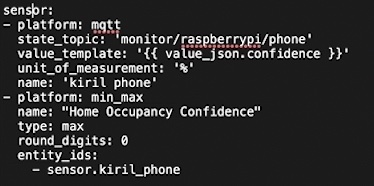
To add the MQTT sensors that are going to use the device tracking information from Monitor, we have to edit the Home Assistant configuration a bit. The changes should be under sensor: section in your configuration.yaml file. If you don’t have such section just create one.
Open the configuration.yaml file with text editor or any suitable Home Assistant add-on and add the following.
- platform: mqtt state_topic: 'monitor/YOUR_MQTT_TOPIC/YOUR_ALIAS' value_template: '>' unit_of_measurement: '%' name: 'NAME_OF_THE_SENSOR'- Change the monitor/YOUR_MQTT_TOPIC/YOUR_ALIAS with yours (grab it from the Monitor screen).
- Change the NAME_OF_THE_SENSOR with anything you want.
- Create similar sensor for every device that you want to track.
After that we can create one more sensor which is useful if you track many devices and you want to quickly understand if any of these device is currently detected (is anybody home?)
- platform: min_max name: "Home Occupancy Confidence" type: max round_digits: 0 entity_ids: - sensor.YOUR_SENSOR_NAME_1 - sensor.YOUR_SENSOR_NAME_2 At the end you should have something like that in your configuration.yaml file.
Next, we will need an input boolean or helper. To create one you can add some YAML code in configuration.yaml as I will show here or you can use the Home Assistant GUI as I’m showing in my video.
Open the configuration.yaml and paste the following:
# Example configuration.yaml entry input_boolean: occupancy: name: Occupancy icon: mdi:beachSave the configuration.yaml file, check your configuration and restart Home Assistant.
After Home Assistant reboot, you can expose the new sensors on your Home Assistant Lovelace. That is very easy to do and if you have difficulties doing it just watch my video and don’t forget to leave a like there 👍
Home Assistant Automation using the MQTT sensors
We have our sensors in Home Assistant that are using MQTT platform to receive data from our Raspberry Pi with Monitor installed. We can use these sensors however we want, let’s see one very simple automation.
And very similar to the input boolean/helper creating I will say: To create the automation, you can add some YAML code in automations.yaml as I will show here or you can use the Home Assistant GUI as I’m showing in my video.
Open the automations.yaml and paste the following:
- alias: Occupancy On trigger: - platform: numeric_state entity_id: sensor.home_occupancy_confidence above: 10 action: - service: input_boolean.turn_on data: entity_id: input_boolean.occupancy - alias: Occupancy Off trigger: - platform: numeric_state entity_id: sensor.home_occupancy_confidence below: 10 action: - service: input_boolean.turn_off data: entity_id: input_boolean.occupancySave the file and reload your automations.
Test the Home Assistant automations for Presence detection
To test if everything is working you can simulate that your tracked by Monitor devices are not in Home by turn them off or by activating the flight mode. As result you should see the following:
- The Monitor script will decrease the presence detection confidence from 100 to 0 in about a minute or so,
- Your MQTT sensors in Home Assistant will start displaying 0%,
- Your input boolean / helper will be turned off.
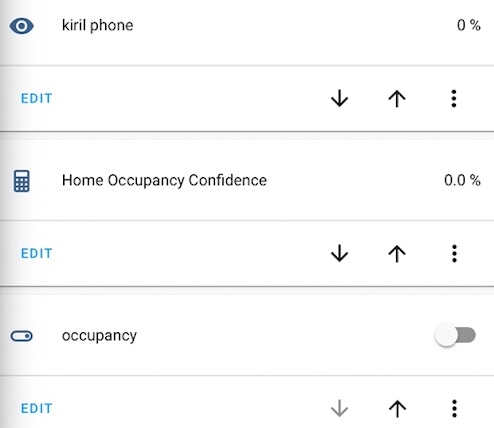
MQTT sensor, Home Occupancy Confidence sensor and occupancy helper are detecting that the tracked device is not at Home.
And vice versa if you turn on or deactivate flight mode your tracked device(s) – the sensors above will show 100% and the occupancy helper will also turn on.
Support my Work!
I really hope that you find this information useful and you now know more about how to use Presence detection with Raspberry Pi Zero W, Home Assistant and Monitor script.
If you want to secure this blog existence you can become one of my supporters. You can see exactly how in this section of my site.
I can’t thank enough to all wonderful guys that are supporting my work already – you are amazing!
Any other sort of engagement on this site and my YouTube channel does really help out a lot with the Google & YouTube algorithms, so make sure you hit the subscribe, as well as the Like and Bell buttons.
If you are just entering the Smart Home world you could also buy my digital product called: Smart Home – Getting Started Actionable Guide 👉 LINK
Also feel free to add me on Twitter by searching for @KPeyanski. You can find me on my Discord server as well.
Stay safe and don’t forget – Home Smart, But Not Hard!
Включаем блютуз в HASSOS под управлением Home Assistant.
Мы уже разбирали в данной статье как подключить по блютузу датчики температуры и влажности от компании Xiaomi. Но там способ описан специфический и подходящий только для некоторых устройств, конкретно от фирмы xiaomi.
В данной же статье я расскажу как включить блютуз и отслеживать обычные блютуз устройства, которые не имеют шифрования.
На самом деле все довольно просто и включается парой команд. Для этого в Configuration.yaml нужно добавить следующее:
device_tracker: - platform: bluetooth_tracker
Все, после этого необходимо перезапустить север зайдя в Настройки->Сервер->Перезапустить и после перезагрузки начнется сканирование блютуз устройств и записывание их в файл “known_devices.yaml” ( Если конечно же на вашем сервере имеется блютуз. В моем случае HassOS установлена на raspberry pi 4, у нее с этим нет проблем.
Выглядеть файл “known_devices.yaml” будет следующим образом после нахождения неких устройств:
oneplus_5: name: OnePlus 5 mac: BT_94:65:2D:A8:36:27 icon: picture: track: true desktop_820q8e3: name: DESKTOP-820Q8E3 mac: BT_B4:6B:FC:C3:46:56 icon: picture: track: true
В данном случае нашел несколько устройств, а именно мой смартфон и ноутбук. Как видите, здесь указано имя найденного устройства, а также его мак адрес. Эти данные нам могут послужить при добавлении данных устройств.
Например бывают устройства как телевизор Sony Bravia он может управляться в Home Assistant какраз по Bluetooth. И в этом случае нам какраз и понадобится данный способ сканирования устройств.