- User Groups and Permissions in Linux
- Introduction
- Prerequisites
- Table of contents
- File permissions
- User accounts
- Create a user
- Delete a user
- User groups
- Add user to a group
- Delete user from a group
- Delete a group
- Conclusion
- Further reading
- Linux Home Directory
- What Is the Linux Home Directory?
- Advantages of the Linux Home Directory or Partition:
- Enter Your Home Directory With Just a Command:
- The Home Directory Permissions:
- Conclusion:
- About the author
- David Adams
- What are the default permissions of directories in home (Desktop, Downloads, etc.)
- 3 Answers 3
User Groups and Permissions in Linux
From smartphones to cars, supercomputers and home appliances, home desktops to enterprise servers, the Linux operating system is everywhere.
Introduction
To create a secure environment in Linux, you need to learn about user groups and permissions. For example, if you work in a company and you want the finance department to read a file but not make any modification to it, then you need to use permissions in Linux. It is a must for every programmer working with Linux nowadays.
Prerequisites
To follow along with this tutorial, you should have:
Table of contents
File permissions
Let’s start by talking about the ownership of Linux files.
- User: the owner of the file (person who created the file).
- Group: the group can contain multiple users. Therefore, all users in that group will have the same permissions. It makes things easier than assign permission for every user you want.
- Other: any person has access to that file, that person has neither created the file, nor are they in any group which has access to that file.
When you perform the following command:
Then you will see the file’s permissions, like the following:

We will work with this part “-rw-r–r–”.

As we see above, the empty first part means that it is a file. If it were a directory then it will be the letter “d” instead. The second part means that the user “Home” has read and write permissions but he does not have the execute one. The group and others have only the read permission.
Let’s change the permissions using the chmod command.
This command will add the write permission for other users to my text file “section.txt”.
Now if you try to execute ls -l then you will see -rw-r—rw- .
“o” refers to others, “g” for the group, “u” for the user, and “a” for all.
Now let’s add the execute permission to the user with:
The permissions will be -rwxr—rw- .
If you want to remove the permission, you can use the same method but with “-” instead of “+”. For example, let’s remove the execute permission from the user by:
And the permissions now are: -rw-r—rw- .
Also, you can use Symbolic Mode to modify permissions like the following:
| Number | Permission |
|---|---|
| 0 | No permission |
| 1 | Execute |
| 2 | Write |
| 3 | Execute and Write |
| 4 | Read |
| 5 | Read and Execute |
| 6 | Read and Write |
| 7 | Read, Write and Execute |
For example, let’s give every permission for all with:

Then the permissions will be: -rwxrwxrwx .
Let’s remove the execute from the group and the write from other by:
The permissions will be: -rwxrw-r-x .
User accounts
Create a user
We can create a new user account by issuing the following command:
We can make sure that the user has been created in two ways:
And the output will be something like this:
uid=1007(testuser) gid=1009(testuser) groups=1009(testuser) This will show the user id and the groups that the user is currently in, usually, a new group with the same username is assigned to the user.
So we can issue cat /etc/passwd and we will see the new user that has been created.
After creating the user using the command above, you notice that no user directories have been created inside /home directory, which is not good since the user cannot log in to his account.
To create a new user with its directories, we can issue:
sudo useradd -m -s /bin/bash testuser If you navigate to the /home directory, you notice that a new directory with the name testuser is created.
Afterwards, you need to set a new password to the testuser by:
We noticed that creating a new user takes a lot of commands to accomplish, so there is a command that automates everything:
After creating a new user and setting a password to it, you can log in in two ways:
Delete a user
Like the process of adding users, there are two commands that delete a user.
If you try that command, you will notice that the user directory has not been deleted and you need to delete it by yourself.
You can use this automated command to do everything for you:
sudo deluser --remove-home testuser User groups
A group is a collection of users. The primary purpose of the groups is to define a set of privileges like read, write, or execute permission for a given resource that can be shared among the users within the group.
Create a group
You can see all of the groups you have by opening the following file:
Let’s create a group with the name of section by:
Add user to a group
We will add the testuser user to the section group by:
sudo usermod -aG section testuser Delete user from a group
You can delete the testuser from the group with:
sudo gpasswd -d testuser section Delete a group
Let’s delete the previous group by:
Conclusion
Linux is one of the most secure systems because it allows an admin to create multiple users with different permissions in the same hardware.
And now you know exactly how to do it!✨
Further reading
Peer Review Contributions by: Odhiambo Paul
Linux Home Directory
![]()
In this article, you will learn both theoretical and practical information on the Linux Home directory, which stores all information related to the users.
After reading this tutorial, you will know what a Home Directory is, the permissions structure, and application scenarios. This is useful for Linux distributions and other Unix-based operating systems like BSD.
Practical instructions in this tutorial include screenshots, making it easy for any Linux user to follow them.
What Is the Linux Home Directory?
Contrary to Microsoft Windows, Linux was designed to be a multiuser and multitasking operating system. This means that Linux is optimized to be used by different users. This is also useful to interact within networks securely.
Linux systems include a universal directory named Home, whose parent directory is the root (/) directory as a multiuser operating system.
In other words, the Linux Home Directory or partition stores personal directories of each user, which is restricted only to the homeowner and root user.
Let’s say you have a user named linuxhint in your system and another user named systemuser, then the path for each user’s personal directory will be:
Where “/” is the root directory, home is the general directory or partition storing all personal account directories (e.g. linuxhint or systemuser).
The exception to this rule is the root personal directory, which is not located under the /home/ partition/directory but under the root system location (/root/).
Home Directories are followed by a tilde slash (~), as shown below:
Advantages of the Linux Home Directory or Partition:
As said previously, the Home of a user isolates or restricts access to user files. This includes customization settings. Here, you can store configuration files that will affect only the Homeowner.
As you can imagine, this includes executable files stored only under a user’s Home Directory, which can be executed only within the user environment specifically. This also prevents malicious code from infecting the entire system.
This is one of the main reasons Linux is a more secure operating system than Windows. Linux was natively created under the premise, while Windows, developed for personal use, patched its operating system to implement a similar feature. In contrast, Linux was developed to grant privacy and security to different users.
Like other operating systems, this directory is created automatically when installing your system. During the Linux installation process, you can assign the Home directory an exclusive partition. This will ease your backup and restoration tasks and just save them.
Enter Your Home Directory With Just a Command:
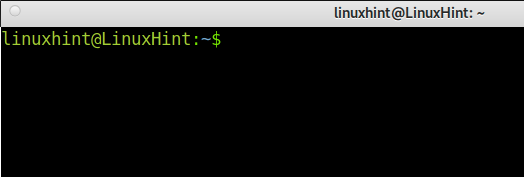
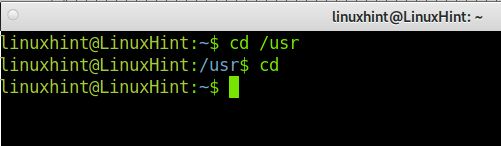
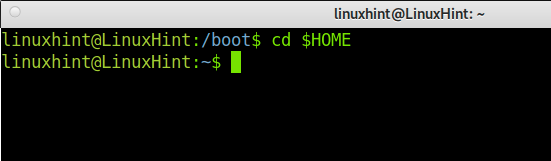
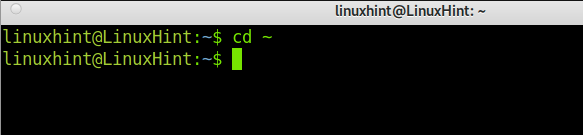
There are different commands to access your Home Directory immediately: cd, tile slash (~), and cd $Home.
A cd command example, where the user changes the current directory from the /usr to /home/username directory.
A cd $HOME command example, where the user changes the current directory from /boot to /home/username directory.
A cd ~ command example, where the user changes the current directory from /boot to /home/username directory.
You can use the pwd command example to show the current directory to learn if you are in your /home.
Note: you can move to other directories by typing cd /, such as cd /user and cd /boot. To access files and directories when the current path isn’t the /home directory, always add the /home/ path as the parent directory in the path.
The Home Directory Permissions:
Default permissions of the /home directory are drwxr-xr-x (755), allowing the user group to execute and read files and others to execute files within the Home Directory.
You can check your Home Directory permission as shown in the following image:

If you are looking for better security and privacy, you can change the default permissions to 750.
Below you can see the command execution and result:
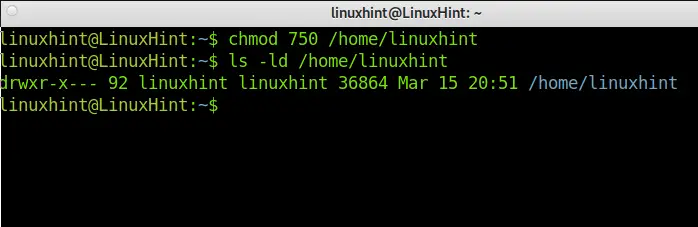
As you can see, others can’t read or execute files now. The owner keeps full rights, and the group read and execution permissions.
The /home directory is a formidable way to manage the users’ files. This allows users to manage users’ privacy, to move an entire user dedicated directory storing one’s files, for example, for backup purposes.
The root user is the only one allowed to access all users’ Home Directories with full permissions. Use the privileged user (root) to change permissions globally in your system. Yet, other users have global rights when reading files. You can change specific directory permissions by running the last command explained in this tutorial. It is recommended to increase your privacy, changing permissions to a more private policy.
Learning Linux permissions will allow you to customize your file access, as shown previously. You can get additional information on changing Linux permissions here. Understanding the home directory theoretic is useful to deal with other operating systems aside from Linux, like the BSD-based systems. In Macintosh, users, the equivalent to the /home directory is /users/, where users directories are /users/username.
Conclusion:
The Home Directory, as a separate component of your system filesystem, shows Linux as the superior structure of this operating system over others; even over other systems, which didn’t include the multiuser feature natively, patching it later. Learning Linux permissions will allow you to customize your file access, as shown previously.
Thank you for reading this Linux tutorial about the /home directory. I hope it was helpful for you to understand more about Linux. Keep following Linux Hint for more Linux professional articles.
About the author
David Adams
David Adams is a System Admin and writer that is focused on open source technologies, security software, and computer systems.
What are the default permissions of directories in home (Desktop, Downloads, etc.)
I accidentally ran chmod 777 * in my home folder and it changed all the directory permissions (but not for the files). How can I undo this?
This discusses one specific error, but also has the suggested defaults. help.ubuntu.com/community/dmrcErrors But often better just to use sudo chmod -R a+rwX,o-w /home/$USER
3 Answers 3
sudo chmod -R a+rwX,o-w /home/$USER All directories will be 775. All files will be 664 except those that were set as executable to begin with. $USER is your name which normally is a system variable.
This discusses one specific error, but also has the suggested defaults.
Ubuntu Home directories were created with 755 permissions but will be dropped to 750 with 21.04, now to prevent new home directories from being readable by other users on the system.
sudo chmod -R a+rwX,o-rw /home/$USER Example showing one file, default in 20.04, change to similar to 21.04 & change back:
fred@z170-focal-k:~$ touch temp.txt fred@z170-focal-k:~$ ll *.txt -rw-rw-r-- 1 fred fred 0 May 19 09:11 temp.txt fred@z170-focal-k:~$ sudo chmod sudo chmod -R a+rwX,o-rw /home/$USERa+rwX,o-rw /home/$USER/temp.txt [sudo] password for fred: fred@z170-focal-k:~$ ll *.txtsudo chmod -R a+rwX,o-rw /home/$USER -rw-rw---- 1 fred fred 0 May 19 09:11 temp.txt fred@z170-focal-k:~$ sudo chmod a+rwX,o-w /home/$USER/temp.txt fred@z170-focal-k:~$ ll *.txt -rw-rw-r-- 1 fred fred 0 May 19 09:11 temp.txt sudo chmod -R a+rwX,o-rw /home/$USER