- How can we change root password?
- 3 Answers 3
- Without Rebooting
- Reboot Required
- Other Ways
- How to Reset or Change the Root Password in Linux
- Changing Your Root Password in Ubuntu
- Step 1: Open a Terminal Window
- Step 2: Change Your Root Password
- Resetting a Root Password in Ubuntu
- Step 1: Boot to Recovery Mode
- Step 2: Drop Out to Root Shell
- Step 3: Remount the File System with Write-Permissions
- Step 4: Change the Password
- Changing the Root Password in CentOS
- Step 1: Access the Command Line (Terminal)
- Step 2: Change the Password
- Reset Root Password in CentOS
- Step 1: Access Boot Menu
- Step 2: Edit Boot Options
- Step 3: Remount the Drive
- Step 4: Changing the Password
- Step 5: Restart
- How to Change Root Password in Ubuntu Linux
- Introduction
- Temporary Switching to root
- Changing Root Password
- Conclusion
How can we change root password?
If we don’t know the root password and don’t have root access to the machine, how can we change the root password?
3 Answers 3
Here are a few ways I can think of, from the least intrusive to the most intrusive.
Without Rebooting
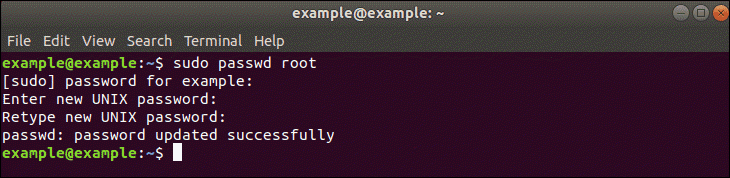
With sudo: if you have sudo permissions to run passwd , you can do:
Enter your password, then enter a new password for root twice. Done.
Editing files: this works in the unlikely case you don’t have full sudo access, but you do have access to edit /etc/ . Open /etc/shadow , either with sudoedit /etc/shadow , or with sudo $EDITOR /etc/shadow . Replace root’s password field (all the random characters between the second and third colons : ) with your own user’s password field. Save. The local has the same password as you. Log in and change the password to something else.
Reboot Required
Single User mode: This was just explained by Renan. It works if you can get to GRUB (or your boot loader) and you can edit the Linux command line. It doesn’t work if you use Debian, Ubuntu, and some others. Some boot loader configurations require a password to do so, and you must know that to proceed. Without further ado:
- Reboot.
- Enter boot-time password, if any.
- Enter your boot loader’s menu.
- If single user mode is available, select that (Debian calls it ‘Recovery mode’).
- If not, and you run GRUB:
- Highlight your normal boot option.
- Press e to enter edit mode. You may be asked for a GRUB password there.
- Highlight the line starting with kernel or linux .
- Press e .
- Add the word ‘single’ at the end. (don’t forget to prepend a space!)
- Press Enter and boot the edited stanza. Some GRUBs use Ctrl — X , some use b . It says which one it is at the bottom of the screen.
Your system will boot up in single user mode. Some distributions won’t ask you for a root password at this point (Debian and Debian-based ones do). You’re root now. Change your password:
mount / -o remount,rw passwd # Enter your new password twice at the prompts mount / -o remount,ro sync # some people sync multiple times. Do what pleases you. rebootand reboot , or, if you know your normal runlevel, say telinit 2 (or whatever it is).
Replacing init : superficially similar to the single user mode trick, with largely the same instructions, but requires much more prowess with the command line. You boot your kernel as above, but instead of single , you add init=/bin/sh . This will run /bin/sh in place of init , and will give you a very early shell with almost no amenities. At this point your aim is to:
- Mount the root volume.
- Get passwd running.
- Change your password with the passwd command.
Depending on your particular setup, these may be trivial (identical to the instructions for single user mode), or highly non-trivial: loading modules, initialising software RAID, opening encrypted volumes, starting LVM, et cetera. Without init , you aren’t running dæmons or any other processes but /bin/sh and its children, so you’re pretty literally on your own. You also don’t have job control, so be careful what you type. One misplaced cat and you may have to reboot if you can’t get out of it.
Rescue Disk: this one’s easy. Boot a rescue disk of your choice. Mount your root filesystem. The process depends on how your volumes are layered, but eventually boils down to:
# do some stuff to make your root volume available. # The rescue disk may, or may not do it automatically. mkdir /tmp/my-root mount /dev/$SOME_ROOT_DEV /tmp/my-root $EDITOR /tmp/my-root/etc/shadow # Follow the `/etc/shadow` editing instructions near the top cd / umount /tmp/my-root rebootObviously, $SOME_ROOT_DEV is whatever block device name is assigned to your root filesystem by the rescue disk and $EDITOR is your favourite editor (which may have to be vi on the rescue system). After the reboot , allow the machine to boot normally; root’s password will be that of your own user. Log in as root and change it immediately.
Other Ways
Obviously, there are countless variations to the above. They all boil down to two steps:
- Get root access to the computer (catch-22 — and the real trick)
- Change root’s password somehow.
How to Reset or Change the Root Password in Linux
In Linux, root privileges (or root access) refers to a user account that has full access to all files, applications, and system functions.
Most basic Linux user accounts run with limited privileges. This keeps users from making mistakes or accidentally exposing the system to vulnerabilities.
To use protected operating system features, a Linux user has to temporarily elevate their privileges using a command like sudo . The sudo command tells the system to run a command as a superuser, or root user. When you run a function using sudo , you’ll usually have to enter your password.
Some versions of Linux will elevate your user privileges for a set amount of time around (15 minutes) before reverting. Other versions only perform a single task with elevated privileges.
It’s a good idea to change your passwords regularly and consider using enterprise password management software.
This guide will help you change your Linux root password in Ubuntu or CentOS, or reset the password.

Changing Your Root Password in Ubuntu
Step 1: Open a Terminal Window
Right-click the desktop, then left-click Open in terminal.
Alternately, you can click Menu > Applications > Accessories > Terminal.
Step 2: Change Your Root Password
In the terminal window, type the following:
The system will prompt you to enter your password – this is the same password you use to log in to the system.
Next, the system will prompt you to enter a new password. Do so, and then re-enter it exactly the same when the system prompts you to retype the password. This double-entry confirms that you have typed the password correctly.

Resetting a Root Password in Ubuntu
In some situations, you may need to access an account for which you’ve lost or forgotten a password.
Step 1: Boot to Recovery Mode
Restart your system. Once you see the splash screen for the computer manufacturer, hold down the shift key. The system should come up with a black and white GRUB, or boot menu, with different Linux kernel versions displayed.
Select the second one from the top – the highest revision, followed by (recovery mode). Press Enter.
Step 2: Drop Out to Root Shell
The system should display a menu with different boot options. Use the arrow keys to navigate to the option labeled root and press Enter.
The system should respond by giving you a command-line interface with a prompt.
Step 3: Remount the File System with Write-Permissions
Right now, your system only has read-only access to your system. That means it can look at the data, but cannot make any changes. But we need write-access to change the password, so we’ll need to remount the drive with the appropriate permissions.
Press Enter. This should allow you to make changes to the data on the hard drive.
Step 4: Change the Password
Substitute the name of the user for username, then press Enter. The system asks you to type a new UNIX password and then to retype it.
Once you’ve entered and confirmed the new password, reboot the system by entering the following:
Hit Enter, and your system should restart. Don’t press any keys, let the system come up to the login screen, and test to make sure the new password works.
Note: Learn how to use the chpasswd command. Chpasswd is helpful for managing multiple passwords and making multiple changes.
Changing the Root Password in CentOS
Changing a password in CentOS is almost identical to changing it in Ubuntu.
Step 1: Access the Command Line (Terminal)
Right-click the desktop, then left-click Open in Terminal. Or, click Menu > Applications > Utilities > Terminal.
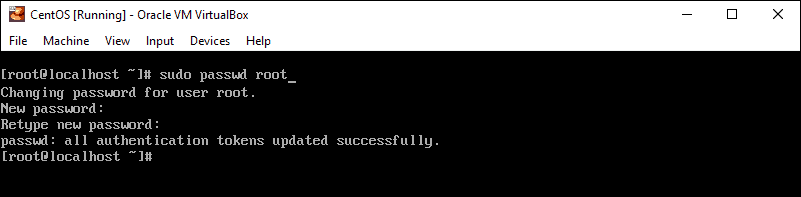
Step 2: Change the Password
At the prompt, type the following, then press Enter:
The system should prompt you to enter your existing password. Do so, then follow the prompts to enter and confirm a new root password.

Reset Root Password in CentOS
This is a similar process as in Ubuntu, with a couple of variations.
Step 1: Access Boot Menu
Restart the system, then tap the Esc key about once per second to launch the GRUB menu.
Step 2: Edit Boot Options
Use the arrows to highlight the version of Linux you boot into, then press e.
Use the arrows to highlight the line that starts with kernel or Linux.
At the end of the line, add a space then type single. Press Enter, then boot into single-user mode by pressing Ctrl-X or B. (The system will display the command to use.)
Step 3: Remount the Drive
You should have a command line, and you’ll have root privileges. To enable read/write access on your hard drive, type the following:
Step 4: Changing the Password
Press Enter, and the system should prompt you to enter and confirm a new password.
Step 5: Restart
Type the following, pressing enter after each line:
Your system should restart. Confirm that your new password works by logging in.
Note: If you ever come across a Linux boot failure, be sure to save our guide on using GRUB rescue to troubleshoot it.
If you already have access to your user account, resetting or changing your password in Linux is simple.
It can be more challenging if you’ve lost or forgotten a password, but with a little creative restarting and editing, you shouldn’t find it too hard.
Sofija Simic is an experienced Technical Writer. Alongside her educational background in teaching and writing, she has had a lifelong passion for information technology. She is committed to unscrambling confusing IT concepts and streamlining intricate software installations.
In Linux, special tools were developed for managing applications. Application software for Linux typically.
The find command is a useful command-line tool in Linux. It allows you to use the terminal to search for a .
There’s a reason that tech support asks you if you’ve rebooted your Linux server. It’s cliched but true.
This guide is for users who have already configured a CentOS server and installed the Apache HTTP services.
How to Change Root Password in Ubuntu Linux
In this tutorial, we will show you how to switch to the root user account and set the root password on Ubuntu systems.

Introduction
On all Linux and Unix-like systems, the root user (or superuser) is a special user account. It has complete and unrestricted access to all commands and resources on the system.
If you’re switching from another Linux distribution to Ubuntu, you might be wondering what the default root password is and how to change it. The root user account is deactivated by default in Ubuntu for security concerns.
In this tutorial, we will show you how to switch to the root user account and set the root password on Ubuntu systems.
Temporary Switching to root
Granting sudo capabilities to regular users encourage Ubuntu users to do system administration duties. Authorized users can run programs as another account, usually, the root user, using sudo .
The sudo group is already a member of the account established by the Ubuntu installer. It’s likely that the user you’re now logged in as has administrative access.
Run the following command, prefixed with sudo , to temporarily boost root user privileges:
You’ll be prompted for the user password the first time you use sudo in a session.
You can use the sudo su or sudo -i commands and input the user password to temporarily switch to the root account in the current login session:
To ensure that the user has been changed, use the whoami command:
Changing Root Password
Although the root user has been disabled, this does not imply that the root account has been deleted. Because the root account has no password, logging in as root is not feasible.
If you need to enable the root account for some reason, all you have to do is set a password for the root user. The passwd command in Ubuntu allows you to set or update a user account’s password.
Run the following command as a sudo user to change the root user’s password in Ubuntu:
The new root password will be required to be entered and confirmed.
Make sure you use a strong and unique password when creating the password. The most critical part of your account’s security is having a strong password. A strong password often consists of at least 16 characters, one uppercase letter, one lowercase letter, one number, and one special character.
When you type the password, it does not appear on the screen.
Output Enter new UNIX password: Retype new UNIX password: passwd: password updated successfullyThat’s it. The password for the root account has been updated.
You can now use the new password to log in to your Ubuntu system as root.
Conclusion
The root account in Ubuntu has no password by default. To run commands with root capabilities, the sudo command is advised.
You’ll need to set the root password before you can log in as root.
If you have any queries, please leave a comment below and we’ll be happy to respond to them.