- The Ultimate Guide to Linux — Creating a Sudo User
- How to Create a New User
- Use adduser or useradd to add a new user
- Use passwd to update the new user’s password
- Give the New User Sudo Permissions
- On Debian systems (Ubuntu / Linux Mint / ElementryOS), add users to the sudo group
- On RHEL based systems (Fedora / CentOS), add users to the wheel group
- How to Delete a User
- Debian based systems (Ubuntu / Linux Mint / ElementryOS)
- RHEL based systems (Fedora / CentOS)
- How To Add User To Sudoers & Add User To Sudo Group on Ubuntu
- Steps to Add Sudo User on Ubuntu
- Step 1: Create New User
- Step 2: Add User to Sudo Group
- Step 3: Verify User Belongs to Sudo Group
- Step 4: Verify Sudo Access
- How To Create a New Sudo-enabled User on Ubuntu 18.04 [Quickstart]
- Step 1 — Logging Into Your Server
- Step 2 — Adding a New User to the System
- Step 3 — Adding the User to the sudo Group
- Step 4 — Testing sudo Access
- Conclusion
- How To Create A New Sudo Enabled User on Ubuntu 22.04 [Quickstart]
- Step 1 — Logging Into Your Server
- Step 2 — Adding a New User to the System
- Step 3 — Adding the User to the sudo Group
- Step 4 — Testing sudo Access
- Conclusion
The Ultimate Guide to Linux — Creating a Sudo User

sudo stands for either «superuser do» or «switch user do», and sudo users can execute commands with root/administrative permissions, even malicious ones. Be careful who you grant sudo permissions to – you are quite literally handing them the key your house.
Before creating a new sudo user, you must first create a new user.
How to Create a New User
Use adduser or useradd to add a new user
Be sure to replace username with the user that you want to create. Also, note that to create a new user, you must also be a sudo user yourself.
Use passwd to update the new user’s password
A strong password is highly recommended!
Give the New User Sudo Permissions
After creating a new user, add them to the appropriate group using the usermod command.
On Debian systems (Ubuntu / Linux Mint / ElementryOS), add users to the sudo group
sudo usermod -aG sudo usernameOn RHEL based systems (Fedora / CentOS), add users to the wheel group
sudo usermod -aG wheel usernameHow to Delete a User
To delete a user, use the following commands.
Debian based systems (Ubuntu / Linux Mint / ElementryOS)
RHEL based systems (Fedora / CentOS)
That’s all you need to know about creating a new sudo user in Linux. And remember, «With great power comes great responsibility.»
If this article was helpful, tweet it .
Learn to code for free. freeCodeCamp’s open source curriculum has helped more than 40,000 people get jobs as developers. Get started
freeCodeCamp is a donor-supported tax-exempt 501(c)(3) charity organization (United States Federal Tax Identification Number: 82-0779546)
Our mission: to help people learn to code for free. We accomplish this by creating thousands of videos, articles, and interactive coding lessons — all freely available to the public. We also have thousands of freeCodeCamp study groups around the world.
Donations to freeCodeCamp go toward our education initiatives, and help pay for servers, services, and staff.
How To Add User To Sudoers & Add User To Sudo Group on Ubuntu
The sudo command is the preferred means to handle elevated permissions. In supported versions of Ubuntu, using the sudo command will grant elevated permissions for 15 minutes.
Standard user accounts are restricted from performing sensitive tasks, such as viewing the contents of the /root directory. This prevents the accidental use of commands with massive consequences. It also makes it more difficult for intruders to compromise a system. However, sometimes you need to run an administrative command. Sudo – or Super User Do – grants you privileges to run sensitive tasks.
This simple tutorial will show you how to add a new user on Ubuntu and provide sudo access.

- A system running a supported version of Ubuntu
- Access to a root user account or another account with sudo privileges
- Access to a terminal window/command line (Ctrl–Alt–T)
Note: Linux Sudo Command tutorials also available for CentOS and Debian.
Steps to Add Sudo User on Ubuntu
Step 1: Create New User
1. Log into the system with a root user or an account with sudo privileges.
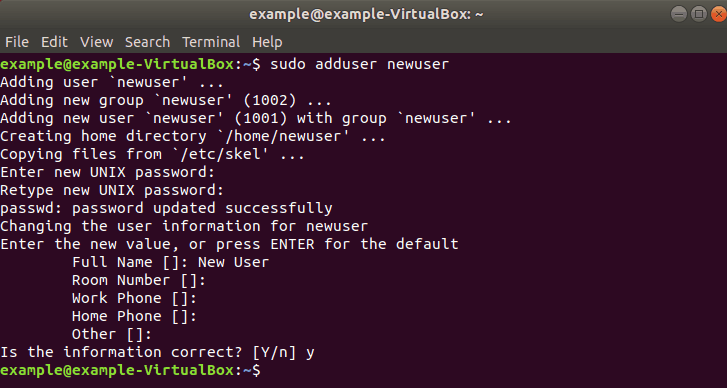
2. Open a terminal window and add a new user with the command:
The adduser command creates a new user, plus a group and home directory for that user.
You may get an error message that you have insufficient privileges. (This typically only happens for non-root users.) Get around it by entering:
3. You can replace newuser with any username you wish. The system will add the new user; then prompt you to enter a password. Enter a great secure password, then retype it to confirm.
4. The system will prompt you to enter additional information about the user. This includes a name, phone numbers, etc. – these fields are optional, and can be skipped by pressing Enter.
Step 2: Add User to Sudo Group
Most Linux systems, including Ubuntu, have a user group for sudo users. To grant the new user elevated privileges, add them to the sudo group.
In a terminal, enter the command:
Replace newuser with the username that you entered in Step 1.
Again, if you get an error, run the command with sudo as follows:
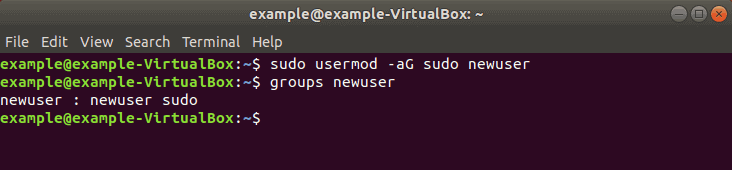
sudo usermod -aG sudo newuserThe -aG option tells the system to append the user to the specified group. (The -a option is only used with G .)
Note: Usermod command is a useful tool for user management. To learn more about its options, refer to our guide How To Use The Usermod Command In Linux.
Step 3: Verify User Belongs to Sudo Group
Enter the following to view the groups a user belongs to:
The system will respond by listing the username and all groups it belongs to, for example: newuser : newuser sudo
Step 4: Verify Sudo Access
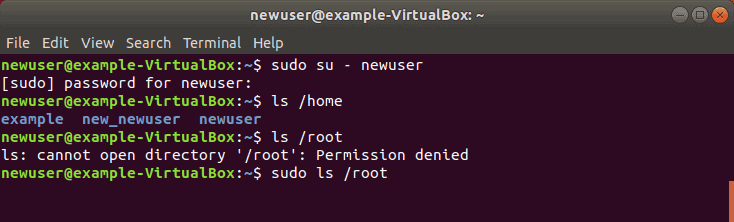
Replace newuser with the username you entered in Step 1. Enter your password when prompted. You can run commands as normal, just by typing them.
However, some commands or locations require elevated privileges. If you try to list the contents of the /root directory, you’ll get an access denied error: ls /root
The command can be executed with:
The system will prompt for your password. Use the same password you set in Step 1. You should now see the contents of the /root directory.
Now you know how to add and create a user with sudo privileges on Ubuntu.
Before sudo, users would log in to their systems with full permissions over the entire system with the su command. This was risky as users could be exploited by tricking them into entering malicious commands. These vulnerabilities were solved by limiting account privileges. However, administrators still had to log out of their account and into an admin account to perform routine tasks.
The sudo command in Ubuntu strikes a balance – protecting user accounts from malicious or inadvertent damage while allowing a privileged user to run administrative tasks. To learn more about the difference between these commands, check out Sudo vs. Su.
How To Create a New Sudo-enabled User on Ubuntu 18.04 [Quickstart]
![How To Create a New Sudo-enabled User on Ubuntu 18.04 [Quickstart]](https://www.digitalocean.com/_next/static/media/intro-to-cloud.d49bc5f7.jpeg)
The sudo command provides a mechanism for granting administrator privileges — ordinarily only available to the root user — to normal users. This guide will show you how to create a new user with sudo access on Ubuntu 18.04, without having to modify your server’s /etc/sudoers file. If you want to configure sudo for an existing user, skip to step 3.
Step 1 — Logging Into Your Server
SSH in to your server as the root user:
Step 2 — Adding a New User to the System
Use the adduser command to add a new user to your system:
Be sure to replace sammy with the user name that you want to create. You will be prompted to create and verify a password for the user:
OutputEnter new UNIX password: Retype new UNIX password: passwd: password updated successfully Next you’ll be asked to fill in some information about the new user. It is fine to accept the defaults and leave all of this information blank:
OutputChanging the user information for sammy Enter the new value, or press ENTER for the default Full Name []: Room Number []: Work Phone []: Home Phone []: Other []: Is the information correct? [Y/n] Step 3 — Adding the User to the sudo Group
Use the usermod command to add the user to the sudo group:
Again, be sure to replace sammy with the username you just added. By default, on Ubuntu, all members of the sudo group have full sudo privileges.
Step 4 — Testing sudo Access
To test that the new sudo permissions are working, first use the su command to switch to the new user account:
As the new user, verify that you can use sudo by prepending sudo to the command that you want to run with superuser privileges:
For example, you can list the contents of the /root directory, which is normally only accessible to the root user:
The first time you use sudo in a session, you will be prompted for the password of that users account. Enter the password to proceed:
Output:[sudo] password for sammy: Note: This is not asking for the root password! Enter the password of the sudo-enabled user, not a root password.
If your user is in the proper group and you entered the password correctly, the command that you issued with sudo will run with root privileges.
Conclusion
In this quickstart tutorial we created a new user account and added it to the sudo group to enable sudo access. For more detailed information on setting up an Ubuntu 18.04 server, please read our Initial Server Setup with Ubuntu 18.04 tutorial.
Thanks for learning with the DigitalOcean Community. Check out our offerings for compute, storage, networking, and managed databases.
How To Create A New Sudo Enabled User on Ubuntu 22.04 [Quickstart]
When managing a server, you’ll sometimes want to allow users to execute commands as “root,” the administrator-level user. The sudo command provides system administrators with a way to grant administrator privileges — ordinarily only available to the root user — to normal users.
In this tutorial, you’ll learn how to create a new user with sudo access on Ubuntu 22.04 without having to modify your server’s /etc/sudoers file.
Note: If you want to configure sudo for an existing user, skip to step 3.
Step 1 — Logging Into Your Server
SSH in to your server as the root user:
Step 2 — Adding a New User to the System
Use the adduser command to add a new user to your system:
Be sure to replace sammy with the username that you want to create. You will be prompted to create and verify a password for the user:
OutputEnter new UNIX password: Retype new UNIX password: passwd: password updated successfully Next, you’ll be asked to fill in some information about the new user. It is fine to accept the defaults and leave this information blank:
OutputChanging the user information for sammy Enter the new value, or press ENTER for the default Full Name []: Room Number []: Work Phone []: Home Phone []: Other []: Is the information correct? [Y/n] Step 3 — Adding the User to the sudo Group
Use the usermod command to add the user to the sudo group:
Again, be sure to replace sammy with the username you just added. By default on Ubuntu, all members of the sudo group have full sudo privileges.
Step 4 — Testing sudo Access
To test that the new sudo permissions are working, first use the su command to switch to the new user account:
As the new user, verify that you can use sudo by prepending sudo to the command that you want to run with superuser privileges:
For example, you can list the contents of the /root directory, which is normally only accessible to the root user:
The first time you use sudo in a session, you will be prompted for the password of that user’s account. Enter the password to proceed:
Output:[sudo] password for sammy: Note: This is not asking for the root password! Enter the password of the sudo-enabled user you just created.
If your user is in the proper group and you entered the password correctly, the command that you issued with sudo will run with root privileges.
Conclusion
In this quickstart tutorial, we created a new user account and added it to the sudo group to enable sudo access.
For your new user to be granted external access, please follow our section on Enabling External Access for Your Regular User.
If you need more detailed information on setting up an Ubuntu 22.04 server, please read our Initial Server Setup with Ubuntu 22.04 tutorial.
Thanks for learning with the DigitalOcean Community. Check out our offerings for compute, storage, networking, and managed databases.