- How to Manage Users and Groups on Ubuntu 22.04
- A Quick Overview
- 1. Create a new user
- 2. Understanding the /etc/passwd file
- 3. Change the login name of a user
- 4. Change the user ID of a user
- 5. Change the group of a user
- 6. Add a user to the sudoers group
- 7. Change the password of a user
- 8. Delete a user
- 9. Delete a home directory of a user
- 10. Add a new group
- 11. Understanding /etc/group file
- 12. Create a system group
- 13. Add a new group with specific GID
- 14. Remove a user from the group
- 15. Delete a group
- Conclusion
- Managing Users and Groups in Linux
- 1. Overview
- 2. List All Users
- 3. See User and Group IDs
- 4. Create a New User
- 5. Add/Change User Password
- 6. Modify User
- 6.1. Change Primary Group
- 6.2. Change UID
- 6.3. Change Login Name
- 7. Delete a User
- 8. Add User to Group
- 9. Remove User From Group
- 10. Create a New Group
- 11. Modify Group
- 11.1. Change GID
- 11.2. Change Group Name
- 12. Delete a Group
- 13. Conclusion
How to Manage Users and Groups on Ubuntu 22.04
Linux is a multi-user and multi-tasking operating system. User and group management are the two most important tasks to be performed by Linux administrators.
In Linux, each user has their own login name and a home directory. Every user belongs to a primary group, and users can be added to multiple secondary groups. All users in the group will have the same group permission on files and folders. This makes it easier to provide permission for multiple users.
This tutorial will demonstrate how to manage users and groups in the Linux system.
A Quick Overview
The command-line tools to manage the users and groups in Linux are:
adduser / useradd : To add a user
addgroup / groupadd : To add a group
usermod : To modify a user account
deluser / userdel : To delete a user
delgroup / groupdel : To delete a group
passwd : To change the user’s password
We will cover the practical examples of all commands in this article. To follow the tutorial, you will need to switch to the root user or any user with sudo privileges.
1. Create a new user
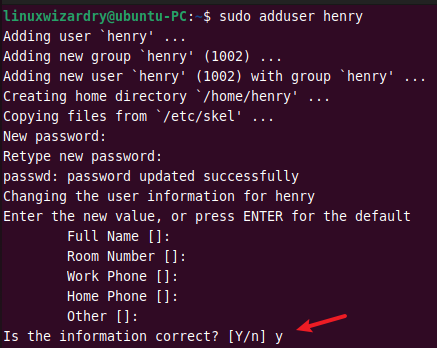
You can add a new user to the system using the adduser command. The following command creates a new user henry in the system.
It will prompt you to enter the password for the new user and other user details.
To verify the user, you can try to log in as a new user.
2. Understanding the /etc/passwd file
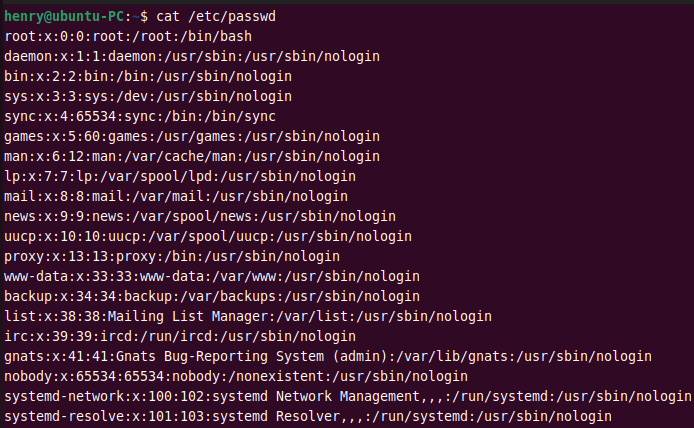
The /etc/passwd is a plain text file that stores the user account information in Linux. You can use the cat command to view the content of /etc/passwd .
Each user has one entry per line. The fields are separated by a colon : symbol and contains the following information.
username:password:UID:GID:GECOS:home_directory:shell
The new entries are saved at the end of a file. To find a user henry , you can see the last entries. Alternatively, you can use the grep command.
3. Change the login name of a user
You can use the usermod command to change a user’s login name in Linux. This command renames the user henry to james .
$ sudo usermod -l james henry
As you can see, the username is changed to james .
4. Change the user ID of a user
By default, the system automatically sets the next available UID when creating a user. The usermod command with -u flag can be used to change the UID of a user.
The following command changes the user ID of james to 4567 .
$ sudo usermod -u 4567 james
5. Change the group of a user
The -g option with usermod command changes the primary group of a user. For example, to change the primary group of a user james to linuxwizardry , you can run this command.
$ sudo usermod -g linuxwizardry james
The specified group must already exist in the system.
In Linux, a user can have only one primary group. But you can assign a user to multiple secondary groups. The -G flag allows you to specify the secondary group for a user.
The following command adds a user james to the group ubuntu .
$ sudo usermod -G ubuntu james
6. Add a user to the sudoers group
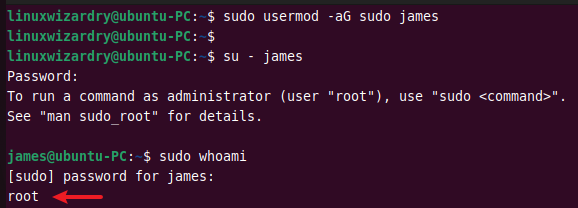
You can add a user to the sudoers group and provide sudo privileges to that user. This command adds a user james to the sudo group.
$ sudo usermod -aG sudo james
The -a option adds a user to the group without removing the current group.
Next, log in as a user james and run the sudo command to confirm.
7. Change the password of a user
The passwd command is used to change the user’s password in Linux. The following command changes the password of a user james .
8. Delete a user
When the user account is not needed, you might want to delete it from the system. The userdel command helps to remove a user in Linux.
The below command deletes a user james from the system.
9. Delete a home directory of a user
The usedel command without any flags only removes a user. It does not delete the home directory of a user in the /home directory.
To delete a user along with its home directory, you can use:
10. Add a new group
You can add a new group to the system using the groupadd or addgroup command. The following example creates a new group computer on the system.
11. Understanding /etc/group file
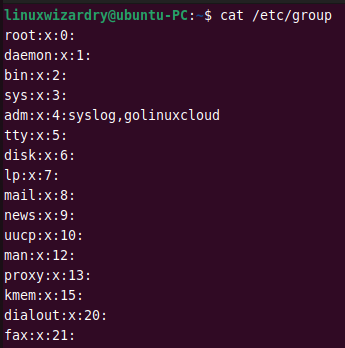
The /etc/group file stores the group details in a list. Each entry contains the following group information for each group.
group_name:group_pwd:group_id:group_list
You can display the entries in /etc/group file with the cat command.
12. Create a system group
If you need to add a new system group, you can use the -r flag with the groupadd command. This command creates a new system group sysmin .
Output:
13. Add a new group with specific GID
When creating a new group, the system assigns the next available group ID by default. You can change this behavior and specify a GID for a new group with the -g flag.
The following command creates a new group bank with a custom group ID 644 .
Output:
14. Remove a user from the group
Sometimes you might need to remove a user from the secondary groups. You can do it by specifying the username and group to the deluser command.
The below command removes a user rohan from the group ubuntu .
$ sudo deluser rohan ubuntu
Output:
15. Delete a group
You can remove a group from the system using the delgroup or groupdel command.
To delete a group ubuntu , run the following command.
Output:
If the specified group is the primary group of any user, it cannot be deleted. You must first change the primary group of a user.
Conclusion
Managing users and groups is one of the essential skills for every Linux administrator. You have learned the different examples of user and group management commands in Linux. Now you know how to perform the tasks like creating new users and groups, adding users to groups, changing the username and password, deleting users and groups, and much more.
We hope you found this article helpful. Please let us know if you have any confusion about any examples in the comment section below.
Managing Users and Groups in Linux
The Kubernetes ecosystem is huge and quite complex, so it’s easy to forget about costs when trying out all of the exciting tools.
To avoid overspending on your Kubernetes cluster, definitely have a look at the free K8s cost monitoring tool from the automation platform CAST AI. You can view your costs in real time, allocate them, calculate burn rates for projects, spot anomalies or spikes, and get insightful reports you can share with your team.
Connect your cluster and start monitoring your K8s costs right away:
1. Overview
In this tutorial, we’re going to learn how to create, modify, and delete users and groups in Linux using the terminal. In addition, we’ll learn how to add a user to a group, how to remove one from a group, how to list all users, and how to get more information about the existing users on a Linux machine.
2. List All Users
The file /etc/passwd contains all registered users as well as information about them:
$ cat /etc/passwd root:x:0:0:root:/root:/bin/bash daemon:x:1:1:daemon:/usr/sbin:/usr/sbin/nologin bin:x:2:2:bin:/bin:/usr/sbin/nologin sys:x:3:3:sys:/dev:/usr/sbin/nologin . daemon. /var/run/pulse:/usr/sbin/nologin systemd-coredump:x:999:999:systemd Core Dumper:/:/usr/sbin/nologin baeldung:x:1000:1000. /home/baeldung:/bin/bash/etc/passwd lists users in this format:
username:x:user id: group id: , , , :/home/username:/bin/bash
Each user has its own UID. 0 is root. 1 to 999 are system users, and from 1000 onward are local users.
3. See User and Group IDs
Linux has a command, id, that prints user and group IDs for the specified user:
$ id baeldung uid=1000(baeldung) gid=1000(baeldung) groups=1000(baeldung),27(sudo)We can see what groups the specified user is in.
4. Create a New User
To create a new user in Linux, we can use the useradd command:
$ sudo useradd --create-home new_userIn addition, we can add the –create-home option to create a home directory for the new user.
5. Add/Change User Password
We can use passwd to make a new password for a user or to change a user’s password:
$ sudo passwd new_user [sudo] password for baeldung: New password: Retype new password: passwd: password updated successfullyThe new user that we created didn’t have a password. As a result, passwd made one for it.
6. Modify User
usermod can modify a user account.
6.1. Change Primary Group
We can add the -g option to change the main group of a user account:
$ id new_user uid=2027(new_user) gid=2027(new_user) groups=2027(new_user) $ sudo usermod -g baeldung new_user $ id new_user uid=2027(new_user) gid=1000(baeldung) groups=1000(baeldung)The new group replaces the previous group.
6.2. Change UID
We can add the -u option to change the user ID of an existing user account:
$ id new_user uid=2027(new_user) gid=1000(baeldung) groups=1000(baeldung) $ sudo usermod -u 2030 new_user $ id new_user uid=2030(new_user) gid=1000(baeldung) groups=1000(baeldung)The command has changed the UID from 2027 to 2030.
6.3. Change Login Name
The -l option helps us change the login name of an existing user account:
$ id new_user uid=2030(new_user) gid=1000(baeldung) groups=1000(baeldung) $ sudo usermod -l new_name new_user $ id new_name uid=2030(new_name) gid=1000(baeldung) groups=1000(baeldung)The command has changed the login name from new_user to new_name.
7. Delete a User
We can use userdel to delete an existing user. Adding the -r option will make userdel delete the user’s home directory along with its contents, as well as the user’s mail spool:
$ sudo userdel -r new_user [sudo] password for baeldung: userdel: new_user mail spool (/var/mail/new_user) not found userdel: new_user home directory (/home/new_user) not foundThis user didn’t have a mail spool or a home directory defined for it. So, -r was unnecessary.
8. Add User to Group
To add a user to a group, we can use gpasswd -a:
$ id new_user uid=2027(new_user) gid=2027(new_user) groups=2027(new_user) $ sudo gpasswd -a new_user baeldung Adding user new_user to group baeldung $ id new_user uid=2027(new_user) gid=2027(new_user) groups=2027(new_user),1000(baeldung)The command has appended the specified group to new_user‘s groups.
9. Remove User From Group
We can use gpasswd -d to remove a user from a group:
$ id new_user uid=2027(new_user) gid=2027(new_user) groups=2027(new_user),1000(baeldung) $ sudo gpasswd -d new_user baeldung Removing user new_user from group baeldung $ id new_user uid=2027(new_user) gid=2027(new_user) groups=2027(new_user)The command has removed new_user from the specified group.
10. Create a New Group
We can use groupadd to create a new group:
$ sudo groupadd new_group $ cat /etc/group | grep new_group new_group:x:2028:The command has created a new group, and its group ID is 2028.
11. Modify Group
We can use groupmod to modify a group.
11.1. Change GID
We can add the -g option to change the group ID of an existing group:
$ cat /etc/group | grep new_group new_group:x:2028: $ sudo groupmod -g 2040 new_group $ cat /etc/group | grep new_group new_group:x:2040:The command has changed the group ID from 2028 to 2040.
11.2. Change Group Name
To change a group’s name, we can add the -n option:
$ cat /etc/group | grep new_group new_group:x:2040: $ sudo groupmod -n new_name new_group $ cat /etc/group | grep new_name new_name:x:2040:The command has changed the group’s name from new_group to new_name.
12. Delete a Group
To remove an existing group, we can use groupdel:
13. Conclusion
To sum up, we learned how to manage users and groups, as well as how to get more information about users on a Linux machine.


