- Applying Patches To The Linux Kernel
- What is a patch?
- How do I apply or revert a patch?
- How do I feed a patch/diff file to patch ?
- Common errors when patching
- Are there any alternatives to patch ?
- Where can I download the patches?
- How to Run “patch” Command in Linux?
- Syntax:
- Creating a Patch File Using “diff”:
- Source Code File 1:
- Source Code File 2:
- Checking Difference:
- Applying the Patch File:
- Take a Backup Before Applying Patch:
- Setting Backup File Version
- Validate Patch Files
- Reverse/Undo a Patch
- Conclusion:
- About the author
- Aqsa Maqbool
Applying Patches To The Linux Kernel
This document is obsolete. In most cases, rather than using patch manually, you’ll almost certainly want to look at using Git instead.
A frequently asked question on the Linux Kernel Mailing List is how to apply a patch to the kernel or, more specifically, what base kernel a patch for one of the many trees/branches should be applied to. Hopefully this document will explain this to you.
In addition to explaining how to apply and revert patches, a brief description of the different kernel trees (and examples of how to apply their specific patches) is also provided.
What is a patch?
A patch is a small text document containing a delta of changes between two different versions of a source tree. Patches are created with the diff program.
To correctly apply a patch you need to know what base it was generated from and what new version the patch will change the source tree into. These should both be present in the patch file metadata or be possible to deduce from the filename.
How do I apply or revert a patch?
You apply a patch with the patch program. The patch program reads a diff (or patch) file and makes the changes to the source tree described in it.
Patches for the Linux kernel are generated relative to the parent directory holding the kernel source dir.
This means that paths to files inside the patch file contain the name of the kernel source directories it was generated against (or some other directory names like “a/” and “b/”).
Since this is unlikely to match the name of the kernel source dir on your local machine (but is often useful info to see what version an otherwise unlabeled patch was generated against) you should change into your kernel source directory and then strip the first element of the path from filenames in the patch file when applying it (the -p1 argument to patch does this).
To revert a previously applied patch, use the -R argument to patch. So, if you applied a patch like this:
You can revert (undo) it like this:
How do I feed a patch/diff file to patch ?
This (as usual with Linux and other UNIX like operating systems) can be done in several different ways.
In all the examples below I feed the file (in uncompressed form) to patch via stdin using the following syntax:
If you just want to be able to follow the examples below and don’t want to know of more than one way to use patch, then you can stop reading this section here.
Patch can also get the name of the file to use via the -i argument, like this:
patch -p1 -i path/to/patch-x.y.z
If your patch file is compressed with gzip or xz and you don’t want to uncompress it before applying it, then you can feed it to patch like this instead:
xzcat path/to/patch-x.y.z.xz | patch -p1 bzcat path/to/patch-x.y.z.gz | patch -p1
If you wish to uncompress the patch file by hand first before applying it (what I assume you’ve done in the examples below), then you simply run gunzip or xz on the file – like this:
gunzip patch-x.y.z.gz xz -d patch-x.y.z.xz
Which will leave you with a plain text patch-x.y.z file that you can feed to patch via stdin or the -i argument, as you prefer.
A few other nice arguments for patch are -s which causes patch to be silent except for errors which is nice to prevent errors from scrolling out of the screen too fast, and —dry-run which causes patch to just print a listing of what would happen, but doesn’t actually make any changes. Finally —verbose tells patch to print more information about the work being done.
Common errors when patching
When patch applies a patch file it attempts to verify the sanity of the file in different ways.
Checking that the file looks like a valid patch file and checking the code around the bits being modified matches the context provided in the patch are just two of the basic sanity checks patch does.
If patch encounters something that doesn’t look quite right it has two options. It can either refuse to apply the changes and abort or it can try to find a way to make the patch apply with a few minor changes.
One example of something that’s not ‘quite right’ that patch will attempt to fix up is if all the context matches, the lines being changed match, but the line numbers are different. This can happen, for example, if the patch makes a change in the middle of the file but for some reasons a few lines have been added or removed near the beginning of the file. In that case everything looks good it has just moved up or down a bit, and patch will usually adjust the line numbers and apply the patch.
Whenever patch applies a patch that it had to modify a bit to make it fit it’ll tell you about it by saying the patch applied with fuzz. You should be wary of such changes since even though patch probably got it right it doesn’t /always/ get it right, and the result will sometimes be wrong.
When patch encounters a change that it can’t fix up with fuzz it rejects it outright and leaves a file with a .rej extension (a reject file). You can read this file to see exactly what change couldn’t be applied, so you can go fix it up by hand if you wish.
If you don’t have any third-party patches applied to your kernel source, but only patches from kernel.org and you apply the patches in the correct order, and have made no modifications yourself to the source files, then you should never see a fuzz or reject message from patch. If you do see such messages anyway, then there’s a high risk that either your local source tree or the patch file is corrupted in some way. In that case you should probably try re-downloading the patch and if things are still not OK then you’d be advised to start with a fresh tree downloaded in full from kernel.org.
Let’s look a bit more at some of the messages patch can produce.
If patch stops and presents a File to patch: prompt, then patch could not find a file to be patched. Most likely you forgot to specify -p1 or you are in the wrong directory. Less often, you’ll find patches that need to be applied with -p0 instead of -p1 (reading the patch file should reveal if this is the case – if so, then this is an error by the person who created the patch but is not fatal).
If you get Hunk #2 succeeded at 1887 with fuzz 2 (offset 7 lines). or a message similar to that, then it means that patch had to adjust the location of the change (in this example it needed to move 7 lines from where it expected to make the change to make it fit).
The resulting file may or may not be OK, depending on the reason the file was different than expected.
This often happens if you try to apply a patch that was generated against a different kernel version than the one you are trying to patch.
If you get a message like Hunk #3 FAILED at 2387. , then it means that the patch could not be applied correctly and the patch program was unable to fuzz its way through. This will generate a .rej file with the change that caused the patch to fail and also a .orig file showing you the original content that couldn’t be changed.
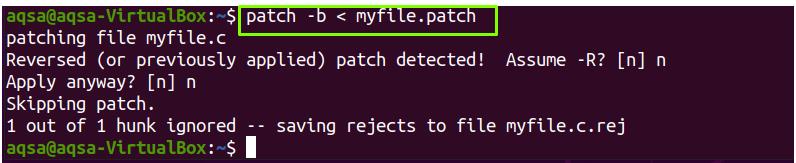
If you get Reversed (or previously applied) patch detected! Assume -R? [n] then patch detected that the change contained in the patch seems to have already been made.
If you actually did apply this patch previously and you just re-applied it in error, then just say [n]o and abort this patch. If you applied this patch previously and actually intended to revert it, but forgot to specify -R, then you can say [y]es here to make patch revert it for you.
This can also happen if the creator of the patch reversed the source and destination directories when creating the patch, and in that case reverting the patch will in fact apply it.
A message similar to patch: **** unexpected end of file in patch or patch unexpectedly ends in middle of line means that patch could make no sense of the file you fed to it. Either your download is broken, you tried to feed patch a compressed patch file without uncompressing it first, or the patch file that you are using has been mangled by a mail client or mail transfer agent along the way somewhere, e.g., by splitting a long line into two lines. Often these warnings can easily be fixed by joining (concatenating) the two lines that had been split.
As I already mentioned above, these errors should never happen if you apply a patch from kernel.org to the correct version of an unmodified source tree. So if you get these errors with kernel.org patches then you should probably assume that either your patch file or your tree is broken and I’d advise you to start over with a fresh download of a full kernel tree and the patch you wish to apply.
Are there any alternatives to patch ?
Yes there are alternatives.
You can use the interdiff program (http://cyberelk.net/tim/patchutils/) to generate a patch representing the differences between two patches and then apply the result.
This will let you move from something like 4.7.2 to 4.7.3 in a single step. The -z flag to interdiff will even let you feed it patches in gzip or bzip2 compressed form directly without the use of zcat or bzcat or manual decompression.
Here’s how you’d go from 4.7.2 to 4.7.3 in a single step:
interdiff -z ../patch-4.7.2.gz ../patch-4.7.3.gz | patch -p1
Although interdiff may save you a step or two you are generally advised to do the additional steps since interdiff can get things wrong in some cases.
Another alternative is ketchup , which is a python script for automatic downloading and applying of patches (http://www.selenic.com/ketchup/).
Other nice tools are diffstat, which shows a summary of changes made by a patch; lsdiff, which displays a short listing of affected files in a patch file, along with (optionally) the line numbers of the start of each patch; and grepdiff, which displays a list of the files modified by a patch where the patch contains a given regular expression.
Where can I download the patches?
The patches are available at http://kernel.org/ Most recent patches are linked from the front page, but they also have specific homes.
The 4.x.y (-stable) and 4.x patches live at
How to Run “patch” Command in Linux?
![]()
The “patch” is a command for adding patch files to source code or text files. It takes input as a patch file and applies differences to original files. We use the “diff” tool to get the difference.
The “diff” is abbreviated as “differences” and is used to compare the content of two files and list the changes in standard output.
A set of source codes makes up a piece of software. Developers build the source code that evolves over time. Getting a new file for each update is unrealistic or time-consuming. Therefore, the safest method is to distribute improvements only. The modifications are made to the old file, and then a new or patched file is created for the new software version.
This guide shows you how to use the “diff” command to generate a patch file and then apply it with the “patch” command.
Syntax:
The syntax of the “patch” command is as follows:
$ patch [ options ] [ originalfile [ patchfile ] ]
Creating a Patch File Using “diff”:
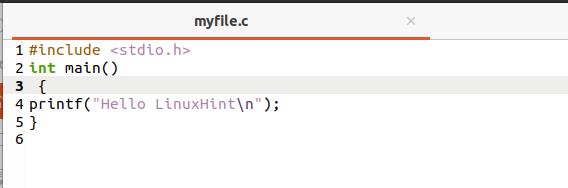
Source Code File 1:
Firstly, two different versions of a source code are required to create a patch file. The source code file I have created is named as “myfile.c”:s
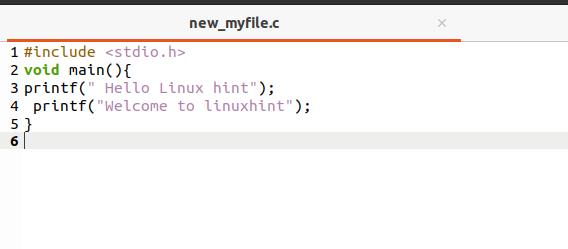
Source Code File 2:
Now, copy the content of myfile.c in the new_myfile.c, using:
Make some changes in the newly-created file:
Checking Difference:
Let’s create a patch file named as myfile.patch:

You can print the patch file by executing the command below:

Applying the Patch File:

Ensure that the patch file is in the directory where the source code file is placed.
Take a Backup Before Applying Patch:
Use “-b” option to build a backup of the patch file:
Setting Backup File Version
If you need multiple backups of a single backup file, then use the “-V” option. It sets the version number of each backup file. Execute the command given below:

Validate Patch Files
If you want to verify or observe the outcome of patching, then use “–dry-run” option. It does not make any modification to the original file:

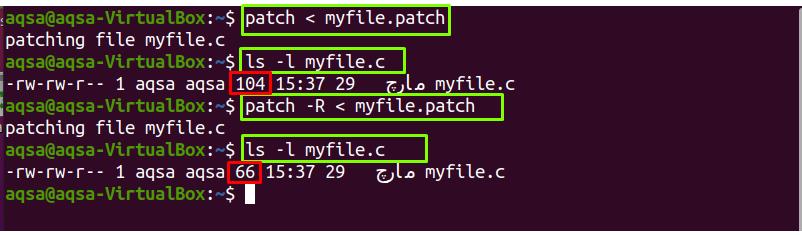
Reverse/Undo a Patch
The “-R” option is used to reverse or undo a patch that has already been applied.
Conclusion:
In Linux operating system, “patch” is a command that allows us to apply patch files to the source codes or configuration files. The patch file is used for software updating purposes. The difference between the original and new files is held in patch files and the “diff” command is used to get the difference or patch. We discussed the usage of the “diff” and the “patch” commands with a number of options such as making backups, dry-running, and reversing the applied patch.
About the author
Aqsa Maqbool
As a Software engineer, I am passionate to write about various IT related
articles but have deep interest in Linux. I spend most of my time reading Linux related blogs and IT related books. I want to serve the world with my writing skills.