- How to Zip Files and Directories in Linux
- zip Command #
- Install zip on Ubuntu and Debian #
- Install zip on CentOS and Fedora #
- How to ZIP Files and Directories #
- Compression Methods and Levels #
- Creating a Password Protected ZIP file #
- Creating Split Zip File #
- zip command Examples #
- Conclusion #
- How to tar a Folder in Linux?
- How to tar a Folder in Linux?
- Append a tar Folder in Linux
- View a tar Folder in Linux
- Extract a tar Folder in Linux
- Conclusion
- How to Tar a Directory and Subdirectories in Linux
- Expert Q&A
- You Might Also Like
How to Zip Files and Directories in Linux
Zip is the most widely used archive file format that supports lossless data compression.
A Zip file is a data container containing one or more compressed files or directories. Compressed (zipped) files take up less disk space and can be transferred from one to another machine more quickly than uncompressed files. Zip files can be easily extracted in Windows, macOS, and Linux using the utilities available for all operating systems.
This tutorial will show you how to Zip (compress) files and directories in Linux using the zip command.
zip Command #
zip is a command-line utility that helps you create Zip archives.
The zip command takes the following syntax form:
zip OPTIONS ARCHIVE_NAME FILES To create a Zip archive in a specific directory, the user needs to have write permissions on that directory.
Zip files do not support Linux-style ownership information. The extracted files are owned by the user that runs the command. To preserve the file ownership and permissions, use the tar command.
The zip utility is not installed by default in most Linux distributions, but you can easily install it using your distribution package manager.
Install zip on Ubuntu and Debian #
Install zip on CentOS and Fedora #
How to ZIP Files and Directories #
To zip one or more files, specify the files you want to add to the archive separated by space, as shown below:
zip archivename.zip filename1 filename2 filename3adding: filename1 (deflated 63%) adding: filename2 (stored 0%) adding: filename3 (deflated 38%) By default, the zip command prints the names of the files added to the archive and the compression method. We’ll explain the compression methods and levels later in this guide.
If the archive name doesn’t end with .zip , the extension is added automatically unless the archive name contains a dot. zip archivename.zip filename will create an archive with the same name as would zip archivename filename .
To suppress the output of the zip command, use the -q option:
zip -q archivename.zip filename1 filename2 filename3Often, you’ll create a zip archive of a directory including the content of subdirectories. The -r option allows you to traverse the whole directory structure recursively:
zip -r archivename.zip directory_nameYou can also add multiple files and directories in the same archive:
zip -r archivename.zip directory_name1 directory_name2 file1 file1Compression Methods and Levels #
The default compression method of Zip is deflate. If the zip utility determines that a file cannot be compressed, it simply stores the file in the archive without compressing it using the store method. In most Linux distributions, the zip utility also supports the bzip2 compression method.
To specify a compression method, use the -Z option.
zip -r -Z bzip2 archivename.zip directory_name. adding: sub_dir/ (stored 0%) adding: sub_dir/file1 (bzipped 52%) adding: sub_dir/file2 (bzipped 79%) The zip command allows you to specify a compression level using a number prefixed with a dash from 0 to 9. The default compression level is -6 . When using -0 , all files will be stored without compression. -9 will force the zip command to use an optimal compression for all files.
For example, to use the compression level -9 , you would type something like this:
zip -9 -r archivename.zip directory_nameThe higher the compression level, the more CPU-intensive the zip process is, and it will take more time to complete.
Creating a Password Protected ZIP file #
If you have sensitive information that needs to be stored in the archive, you can encrypt it using the -e option:
zip -e archivename.zip directory_nameThe command will be prompted to enter and verify the archive password:
Enter password: Verify password: Creating Split Zip File #
Imagine you want to store the Zip archive on a file hosting service that has a file size upload limit of 1GB, and your Zip archive is 5GB.
You can create a new split Zip file using the -s option followed by a specified size. The multiplier can be k (kilobytes), m (megabytes), g (gigabytes), or t (terabytes).
zip -s 1g -r archivename.zip directory_nameThe command above will keep creating new archives in a set after it reaches the specified size limit.
archivename.zip archivename.z01 archivename.z02 archivename.z03 archivename.z04 zip command Examples #
Create a Zip archive named archivename.zip containing all the files in the current directory.
Same as above, including the hidden files (files starting with a dot):
Create a Zip archive named archivename.zip containing all MP3 files in the current directory without compressing the files.
Conclusion #
In Linux, you can create Zip archives with the zip command.
To extract a ZIP archive on a Linux system, you can use the unzip command .
If you want to learn more about the zip command, visit the Zip Man page.
If you have any questions or feedback, feel free to leave a comment.
How to tar a Folder in Linux?
![]()
Linux offers a pre-installed ‘tar (tape archive)’ command utility tool. It is used for the compression and extraction of “.xz”, “gz”, “.tbz”, and “.bz2” extensions. It is beneficial to compress large folders and files into an archive file. The compressed folders take less storage to transfer from one system to another.
This post pens down brief details to tar a folder in Linux with the following highlights:
How to tar a Folder in Linux?
The creation of a tar folder depends on its basic syntax which is defined below:
The syntax contains the following parameters:
- tar: Represents the “tar” command line utility.
- c: Creates the required tar file.
- f: Specifies the created archive file name.
- tar: Identifies the compressed tar archive.
- Directory/Folder to Archive: Shows folder name that needs to be compressed.
By following the above syntax, tar the “Extra” directory having the following files and subdirectories:
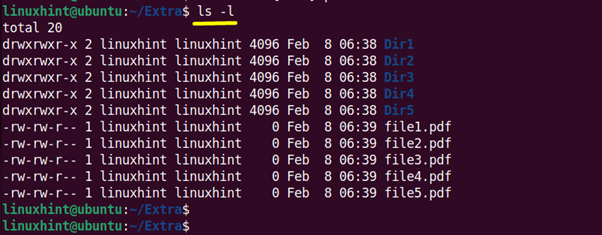
Example 1: Create a “.tar” Folder
Create the “ComExtra.tar” simple compressed tar archive of “Extra” directory using the above “tar” command syntax:
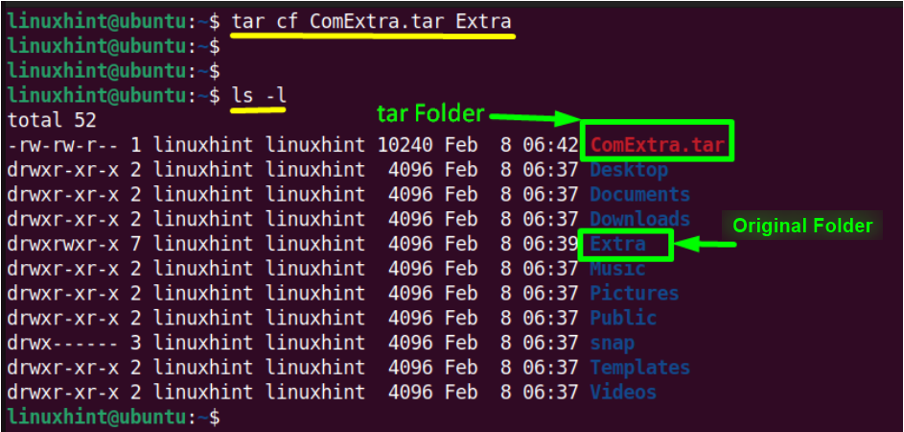
The “Extra” has been successfully compressed into a “ComExtra.tar” file.
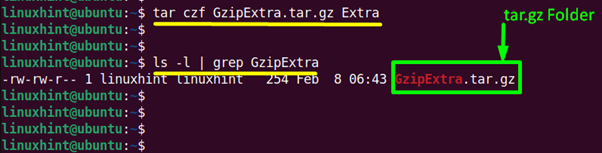
Example 2: Create a “tar.gz” Folder
The “tar” command also supports the commonly used gzip compression format having “tar.gz”, “tgz”, and “tar.gzip” extensions. For this purpose, “tar” offers the “-z (gzip format)” flag.
Now we compressed the “Extra” folder into the “tar.gz” compression format using the command defined below:
Append a tar Folder in Linux
Once the “tar” folder is created, it can easily be customized or extended without extraction.
Use the “r(append)” flag of the “tar” command to append the “Extra.tar” folder by adding three files on its end:
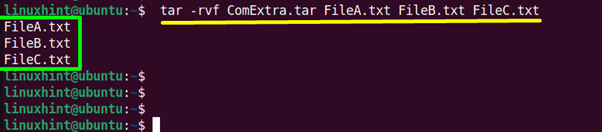
The “three” desired files have been added into the “ComExtra.tar” folder that can be seen using the “-v(verbose)” flag.
View a tar Folder in Linux
All the tar files and folders can be displayed in the terminal by using the “-t(list tar content)” flag in this way:
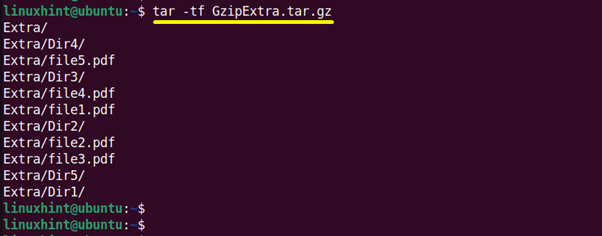
The output is the same as the output from the “-v” flag.
Extract a tar Folder in Linux
The “tar” command also supports the extraction of “tar” files/folders into the current working directory or the specific directory.
The basic syntax to extract the “tar” file is written here:
The “x” flag denotes the extraction of the tar archive.
Example 1: Extract “.tar” Folder in PWD
To extract the “tar” folder in the current working directory simply utilize the above syntax and specify the compressed “ComExtra.tar” folder in the terminal:

The compressed “ComExtra.tar” folder has been extracted.
Example 2: Extract the “tar.gz” Folder in a Specific Directory
The “-C(–directory)” flag is beneficial to extract the desired tar folder in the particular location where the user wants.
In this example, the “GzipExtra.tar.gz” compressed archive located in the “Home” is extracted into the “Sample” directory in this way:
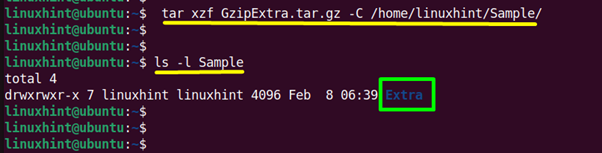
The output verifies that “GzipExtra.tar.gz” has been completely extracted into the “Sample” directory.
Example 3: Extract Specific File From “tar” Folder
Simple type the name of the specified file/subdirectory that you want to extract from the “tar” folder with the “tar” utility in the following way:
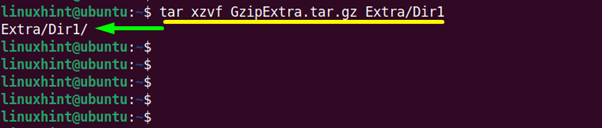
The “Dir1” directory has been extracted from the “GzipExtra.tar.gz” compressed file.
Conclusion
To tar a folder in Linux, users can execute the “tar cf [File_name.tar] [Directory/Folder to Archive]” command. Using this, you can compress and decompress the tar folder. Additionally, users can append, view, and extract a tar Folder in Linux. This post has demonstrated a set of practical examples that illustrates the creation and extraction of a tar folder in Linux.
How to Tar a Directory and Subdirectories in Linux
wikiHow is a “wiki,” similar to Wikipedia, which means that many of our articles are co-written by multiple authors. To create this article, 11 people, some anonymous, worked to edit and improve it over time.
This article has been viewed 107,629 times.
The most common way to deliver a batch of files from a Linux system to another user is by using the tar command. When you tar a directory, you can easily roll up a group of files into a single file that’s easy to share. The tar file, also known as a tarball, can then be transferred, stored, or compressed to reduce its size.
- To tar a directory on Linux, use tar -cvf filename.tar /path/to/directory.
- All subdirectories will be included in the tarball.
- To tar multiple directories into a single tarball, append other directory names to the command after a space.

- The tar command will only archive the files. It will not perform any compression, so the archive will be the same size as the original files. You can compress the .tar file using gzip or bzip2 , resulting in a .tar.gz or .tar.bz2 extension. This will be covered at the end of the article.

Create a tarball from a single directory. There are several parts to the tar command when you are creating a tarball from a directory. Below is an example tar command:
tar -cvf tarName.tar /path/to/directory
- tar — This invokes the tar archiving program.
- c — This flag signals the «creation» of the .tar file. It should always come first.
- v — This indicates that the process is «verbose». This will display a readout of all the files that get added to the .tar file as it is being created. This is an optional flag.
- f — This flag signifies that the next part will be the new .tar file’s file name. It should always be the last flag.
- tarName.tar — You can choose any name that you’d like. Just make sure that you include the .tar extension at the end. You can add a path to the file name if you want to create the tarball in a different directory than your current working one.
- /path/to/directory — Enter in the path of the directory that you want to create the .tar file from. The path is relative to your current working directory. For example, if the full path is ~/home/user/Pictures , and you’re currently in the /home directory, you would enter user/Pictures . Note that all subdirectories will be included as well.

Create a tarball that includes multiple directories. Adding multiple directories is pretty much as simple as adding all the paths to the end of the tar command:
tar -cvf tarName.tar /etc/directory1 /var/www/directory2

Add files or directories to an existing tarball. You can continue to add files and directories to your .tar archive files by using the «append» flag: [1] X Research source
tar -rvf tarName.tar textfile.txt path/to/another/directory

Compress an existing .tar file. You can use «gzip» to quickly compress your .tar archive file. If you need more compression (smaller output file), you can use «bzip2» instead. bzip2 will take longer to compress the file than gzip.
gzip tarName.tar bzip2 tarName.tar
- gzip will add the .gz extension to the file name: tarName.tar.gz
- bzip2 will add the .bz2 extension to the file name: tarName.tar.bz2

Compress the tarball when you create it. You can use the commands in the step above to compress existing tarballs, but you can also compress them as you are creating them by using the right flags:
tar -czvf tarName.tar.gz /path/to/directory tar -cjvf tarName.tar.bz2 /path/to/directory
- z — This flag will compress the new .tar file using gzip. Make sure to include the .gz extension at the end of the file name.
- j — This flag will compress the new .tar file using bzip2. Make sure to include the .bz2 extension at the end of the file name. [2] X Research source
Expert Q&A
A detailed explanation of all of the «Tar» parameters can be obtained at any time by typing «tar —help.»

You Might Also Like


Can Linux Run .exe Files? How to Run Windows Software on Linux


How to Open Linux Firewall Ports: Ubuntu, Debian, & More


How to Run an INSTALL.sh Script on Linux in 4 Easy Steps

Use Ping in Linux: Tutorial, Examples, & Interpreting Results


How to Delete Read-Only Files in Linux


How to Install Linux on Your Computer

How to Install Software on Linux: Packages, Compiling, & More