- How to Backup Linux Server with Veeam Agent
- Veeam Agent Installation
- Veeam Agent Configuration
- How To Back Up A Linux Server
- #Backing Up The Server With The Tar Method
- #Tar Command for Creating Backup
- #Tar Command for Extraction
- #Backing up the Server with Bera Backup
- #Features of Bera Backup
- #Bera Backup Properties
- #The Command for Creating Backup
- #The command for Restoring Backup
- #Conclusion
- Marius Rimkus
- Join Cherry Servers Community
How to Backup Linux Server with Veeam Agent
In our example we will use Ubuntu 20.04 OS. So you need to download the Veeam agent software from here Veeam Software for Enterprise and copy the deb file your ubuntu machine where you plan to install the agent.
Veeam Agent Installation
Go to the directory where you have saved the veeam-release package and install the package with the following commands for Debian / Ubuntu
And just run the package installation
After installation finishes just run
and veeam agent gui will launch.
Veeam Agent Configuration
Backing up with Veeam Agent for Linux is very easy. There aren’t too many options to choose from, so you can check them out for yourself. In our case I will make a full backup of the whole system and move it to samba share.
So lets create a task to backup our server to our storage using smb.
We are immediately prompted to specify the license file. Since we don’t have a license, we refuse. We are greeted by the main window of the program.
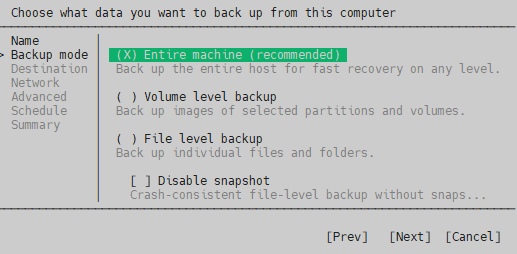
Press C (configure) to setup a backup job. We give it a name for the job and then choose that we want to backup entire machine.
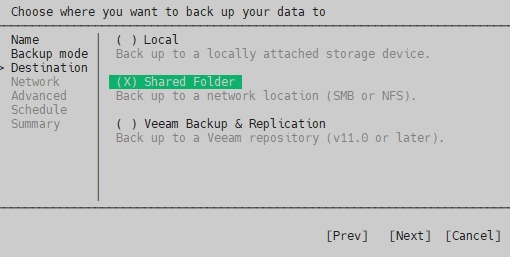
As a destination for the system backup, we select Shared Folder.
Next, you will need to enter access parameters to the backup location. In my example I’ve shared a folder on a Windows server, so I’ve chosen SMB share.
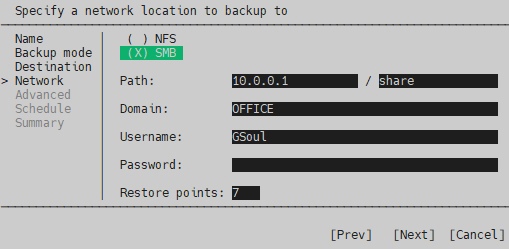
The Restore Points item specifies the depth of the archive. That’s the number of copies you want to keep on the server. If you make a backup every day and specify 14, the system backups for the last 14 days will be preserved. If you backup every other day, then 28 days, and so on.
You can create several tasks with different backup depths. For example: every day 7 backups, once a week 4, and once a month 12. This way you will always have the last 7 backups of the system for that week. Then one backup per week for the last month and 12 backups per month for the last year. Press Enter to continue
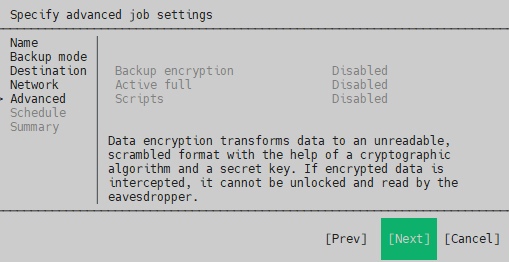
Advanced options disabled by default for free version, but if you have a license I recommend to encrypt the backup.
Press enter to continue and see the backup schedule, in free version you cannot edit this also.
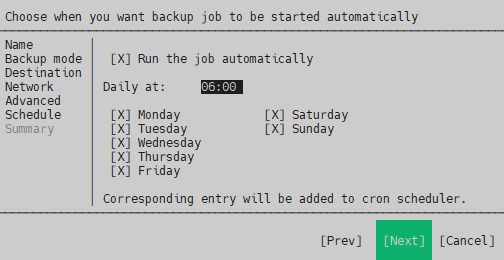
Press enter and fishish.
The backup will start ASAP. If you get an error:
The current system does not support cifs. Please install the cifs client package.
Install the cifs client package:
Restart veeam and continue.
Now you have started the backup process. You can monitor its progress.
If you get an error that snapshot creation failed
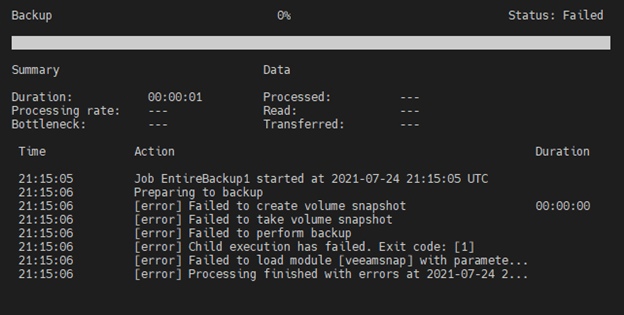
We need to get deeper to the root cause so we go to the Backup log folder of VEEAM /var/log/veeam/Backup
Navigate to the job log and open it with text editor, for example nano.
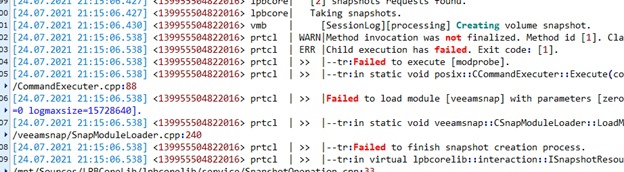
We found that modeprobe failed to load module veeamsnap
For this we need to install linux-headers first, just check your kernel version :

And install the right linux-headers
And now we need to load veeamsnap:
Run veeam again and press S. It should work now
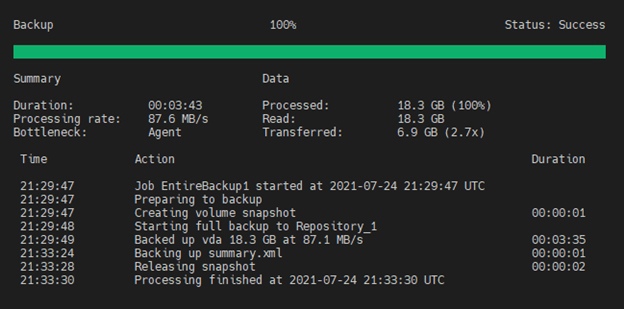
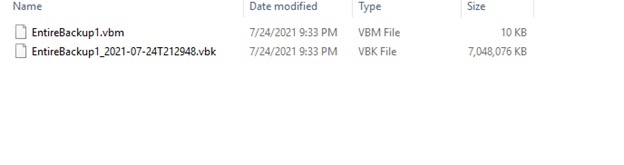
After completing a system backup, you can check the contents of your shared drive by accessing it directly from the Windows.
This completes the configuration of a full server backup. The system backup is now in a safe place.
How To Back Up A Linux Server

With the growth of public cloud infrastructures, Linux has risen in importance as the most compatible open-sourced operating system that takes full advantage of what the cloud has to offer by stretching its capabilities.
Linux servers are known for providing high-end security, and that’s why many developers use these to keep backups of their sites. Just like conventional open-sourced Linux systems, these servers are chosen for their stability, security, and flexibility advantages.
Backups are important because they help prevent permanent loss of valuable data, making it imperative for system admins to know all their Linux server backup options. This is even more critical for people who work with enterprise-level data.
However, with security and flexibility as its attributes, backing up a Linux server is not easy. Several utilities and software can be used, and we’ll show you how to make backups using two of the easiest methods: the ‘Tar’ approach and the ‘Bera’ backup method.
#Backing Up The Server With The Tar Method
For this tutorial, we opt for an Ubuntu operating system, one of the more popular Linux-based servers used.
#Tar Command for Creating Backup
sudo tar –cvpzf backup.tar.gz –exclude=/home/server/backup.tar.gz –one-file-system This is a simple tar command that initiates backup. It will archive all the files you have on your server into a g-zipped compressed format. We’ve chosen backup.tar as the name for your backup and wrote -exclude to not ‘include’ this backup into a backup created earlier.
This command will also create a new directory for you to back up your Linux server as file permissions are preserved. This makes it easier to not only restore your server but save time configuring files and folders the way you opted initially.
After you’ve typed the code mentioned above, hit Enter .
You’ll see the system beginning to archive all the files on your server system. By backing up the root directory, it tends to recourse itself back into other previous directories.
Make sure your server is not performing maintenance procedures. Otherwise, the backup will take hours.
#Tar Command for Extraction
sudo tar –xvpzf /home/server/backup.tar.gz –C / --numeric-owner The system will start un-archiving as it overwrites all the files you backed up before and rewrite the files that were installed before if you had a functioning system.
In case of a complete system re-installation, all the files will be restored to how they were.
The -f option is for the name of the drive you used to store your backup. In this case, since it was Home-Back-Server chosen as the location and it was a root backup, try restoring it to the same folder to avoid confusions and simultaneously uncompressing the files too.
Once the extraction is finished, just reboot and your system will be restored to the way it was when you backed it up.
Note: You can also make backups and store them onto a USB drive, but it is not recommended if it is a massive backup, and the speed of the transfer will be slower as compared to a system-root/server location.
#Backing up the Server with Bera Backup
Bera Backup is a tool that can help make comprehensive Linux server backups and allows more file extensions than the normal Tar method.
This way, you can save a lot of time in case of server migration. The process is also more straightforward compared to the Tar method.
#Features of Bera Backup
You can migrate an entire server in less than ten minutes. The simplicity of the Bera backup tool makes it a much easier to understand method for backing up your server.
You can include tabs, folders, and receive periodic notifications during backups. Since Bera is based on RSync, the process is more secure than the conventional ‘Tar’ method.
#Bera Backup Properties
File Backups – For the important files and folders to include them in the backup
System Configurations – For Files like iptables, crontabs, users and all installed packages
#The Command for Creating Backup
./bera-backup.sh _path_config_backup Hit Enter and Bera will start with the backup process. You’ll see the program execute the following:
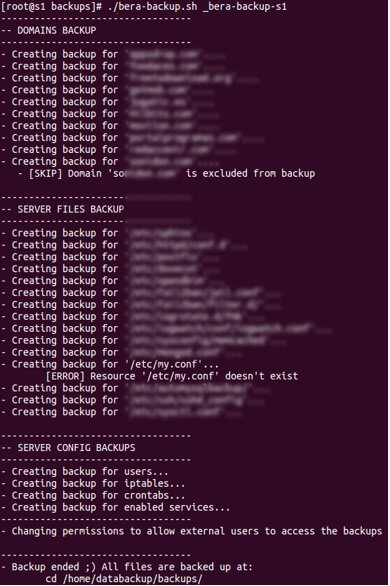
Note: It is highly recommended to have root permissions enabled before starting with the backup, to remove any permission problems that may occur during and after restoring the backup of your Linux server.
#The command for Restoring Backup
Type the following command:
./bera-restore.sh _path_config_restore Don’t forget the path you chose before you made the backup; this will replace ‘_path’ to extract the backup from the location.
While defining the backup, you can take your pick from several configurable parameters for server commands for Bera Restoration Procedure, these are highlighted below:
| Parameters | Description |
|---|---|
| backupOrigin | Indicates ‘local’ if the backup is on the server itself, or ‘ssh’ for download from another location |
| backupLocalDir | Local directory where the backup is (or where it will be downloaded via SSH). |
| backupRemoteUser | User for the SSH connection to the server where the backup is |
| backupremoteserver | Remote SSH server where the backup is |
| backupRemotePort | SSH server port |
| backupRemoteDir | Remote directory where the backup is |
#Conclusion
You should have website backups just for the peace of mind that your content is safe at all times.
Backups also help ensure that your website remains available to your visitors at all times, even if something terrible has happened.
Creating backups for your Linux server might seem complicated, but you can get the job done in a variety of ways. In addition to the methods mentioned above, also try Linux server backup tools such as Rsync Commands or Bacula and NAKIVO Hyper-V Backup for users using Hyper-V virtualized environments
While making backups is not difficult, choosing the right path and the right configurations is what gets challenging. It is also important to ensure that you don’t choose a cheap hosting service for your website.
If you’d like more information about using Linux Servers to their full potential or backing them up properly, get in touch with us today. Our Linux Server specialists are here to help you 24/7.

Marius Rimkus
I’m a keen technology enthusiast with strong interest in GPU computing and DevOps culture. I believe Agile development helps companies reach utmost customer satisfaction and makes their services stand out in the market.
Join Cherry Servers Community
Get monthly practical guides about building more secure, efficient and easier to scale systems on an open cloud ecosystem.