- RootUsers
- Guides, tutorials, reviews and news for System Administrators.
- How To Change Hostname In Linux
- Before you begin
- How to change the hostname in RHEL/CentOS based Linux distributions
- How to change the hostname in Debian based Linux distributions
- Summary
- Share this:
- How to change your hostname in Linux
- Great Linux resources
- Background
- Working with hostnames
- GNOME tip
- Wrapping up
- How to Change Hostname on Ubuntu 20.04
- How to Check Current Hostname on Ubuntu 20.04
- Temporarily Change Hostname on Ubuntu 20.04
- Change Hostname on Ubuntu 20.04 (No Reboot Required)
- Step 1: Use set-hostname to Change the Hostname
- Step 2: Use hostnamectl to Confirm the Change
- Step 3: Change the Pretty Hostname (Optional)
- Change Hostname on Ubuntu 20.04 – Alternative Method (Reboot Required)
- Step 1: Open /etc/hostname and Change the Hostname
- Step 2: Open /etc/hosts and Change the Hostname
- Step 3: Reboot the System
- Change Hostname on Ubuntu 20.04 Using GUI
RootUsers
Guides, tutorials, reviews and news for System Administrators.
How To Change Hostname In Linux
In Linux you may want to change the hostname of your server or desktop PC from time to time. A common example is if you’re re-purposing a server or you made a typo when installing the operating system and want to reset the hostname.
Here we will cover how the hostname can be edited in Red Hat Enterprise Linux (RHEL)/CentOS and Debian flavors of Linux, the process generally differs slightly depending on the distribution of Linux in use.
Before you begin
This information applies regardless of Linux distribution covered below.
- Only root has the permissions required to change the hostname.
- Running the ‘hostname’ command by itself will display the current hostname.
- Running the ‘hostname name‘ command will temporarily rename the running systems hostname to what ever is specified as the first aguement, in this instance ‘name‘. This will not persist over reboot however, to persist over a reboot a file on disk will need to be modified.
How to change the hostname in RHEL/CentOS based Linux distributions
This process differs slightly between RHEL/CentOS 6 and 7 as the process in 7 has been greatly simplified, steps for both are provided below.
RHEL/CentOS 6
- Edit the /etc/sysconfig/network file with your favourite text editor. This file contains the hostname of the server after the ‘HOSTNAME=’ variable. Simply replace the old hostname with the new hostname and save the file.
- Edit the /etc/hosts file so that the local hostname will resolve to the localhost IP address. Just add the hostname on the end of the 127.0.0.1 and ::1 lines, if you have any other IP addresses here referring to the old hostname update these to the new hostname.
- Run the ‘hostname name‘ command, replacing name with your new hostname.
- Next you can either take the easy way out and simply reboot the system to apply the changes, or alternatively run the below command. Note that running this command will briefly interrupt network connectivity, however this process should be faster than rebooting the system.
RHEL/CentOS 7
- Run the ‘hostnamectl set-hostname name‘ command, where name is the new hostname for the system. You can now either run the traditional ‘hostname’ command to view the hostname, or run the newer ‘hostnamectl status’ command which will display additional information. No reboot or network restart should be required.
- Edit the /etc/hosts file so that the local hostname will resolve to the localhost IP address. Just add the hostname on the end of the 127.0.0.1 and ::1 lines, if you have any other IP addresses here referring to the old hostname update these to the new hostname.
- Don’t forget to update any other specific references of the old hostname to the new hostname, for instance DNS and any other application specific configuration which may exist on your system.
You can find further information regarding the use of hostnamectl here.
How to change the hostname in Debian based Linux distributions
- Edit the /etc/hostname file with your favorite text editor. This is the file that contains the hostname of the server, simply edit the current hostname to the new one and save the file.
- Edit the /etc/hosts file so that the local hostname will resolve to the localhost IP address. By default there should already be an entry with your current hostname so just edit this to the new hostname.
- Next you can either take the easy way out and simply reboot the system to apply the changes, or alternatively run the below commands. Note that running these commands will briefly interrupt network connectivity, however this process should be faster than rebooting the system.
invoke-rc.d hostname.sh start invoke-rc.d networking force-reload invoke-rc.d network-manager force-reload
Summary
As shown setting the hostname in Linux is quite simple. Just be aware that over time the hostname may have inserted itself into many places throughout the system such as various configuration files and DNS settings, all of which should also be updated appropriately.
Share this:
How to change your hostname in Linux
What’s in a name, you ask? Everything. It’s how other systems, services, and users «see» your system.

Great Linux resources
Your hostname is a vital piece of system information that you need to keep track of as a system administrator. Hostnames are the designations by which we separate systems into easily recognizable assets. This information is especially important to make a note of when working on a remotely managed system. I have experienced multiple instances of companies changing the hostnames or IPs of storage servers and then wondering why their data replication broke. There are many ways to change your hostname in Linux; however, in this article, I’ll focus on changing your name as viewed by the network (specifically in Red Hat Enterprise Linux and Fedora).
Background
A quick bit of background. Before the invention of DNS, your computer’s hostname was managed through the HOSTS file located at /etc/hosts . Anytime that a new computer was connected to your local network, all other computers on the network needed to add the new machine into the /etc/hosts file in order to communicate over the network. As this method did not scale with the transition into the world wide web era, DNS was a clear way forward. With DNS configured, your systems are smart enough to translate unique IPs into hostnames and back again, ensuring that there is little confusion in web communications.
Modern Linux systems have three different types of hostnames configured. To minimize confusion, I list them here and provide basic information on each as well as a personal best practice:
- Transient hostname: How the network views your system.
- Static hostname: Set by the kernel.
- Pretty hostname: The user-defined hostname.
It is recommended to pick a pretty hostname that is unique and not easily confused with other systems. Allow the transient and static names to be variations on the pretty, and you will be good to go in most circumstances.
Working with hostnames
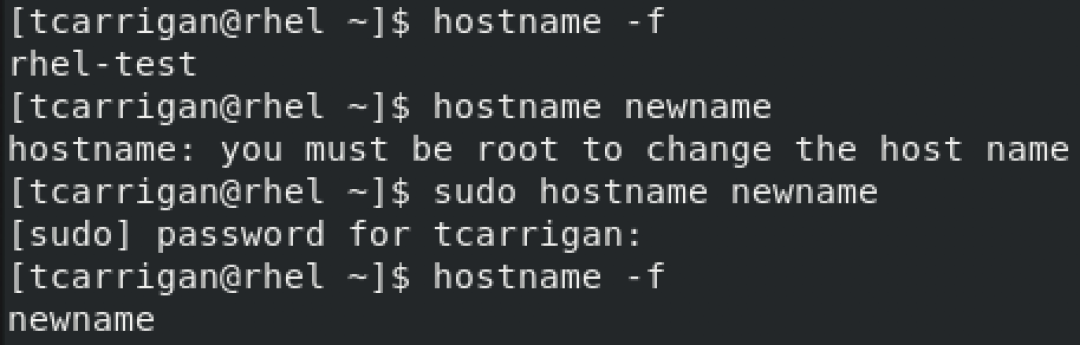
Now, let’s look at how to view your current hostname. The most basic command used to see this information is hostname -f . This command displays the system’s fully qualified domain name (FQDN). To relate back to the three types of hostnames, this is your transient hostname. A better way, at least in terms of the information provided, is to use the systemd command hostnamectl to view your transient hostname and other system information:

Before moving on from the hostname command, I’ll show you how to use it to change your transient hostname. Using hostname (where x is the new hostname), you can change your network name quickly, but be careful. I once changed the hostname of a customer’s server by accident while trying to view it. That was a small but painful error that I overlooked for several hours. You can see that process below:
It is also possible to use the hostnamectl command to change your hostname. This command, in conjunction with the right flags, can be used to alter all three types of hostnames. As stated previously, for the purposes of this article, our focus is on the transient hostname. The command and its output look something like this:

The final method to look at is the sysctl command. This command allows you to change the kernel parameter for your transient name without having to reboot the system. That method looks something like this:

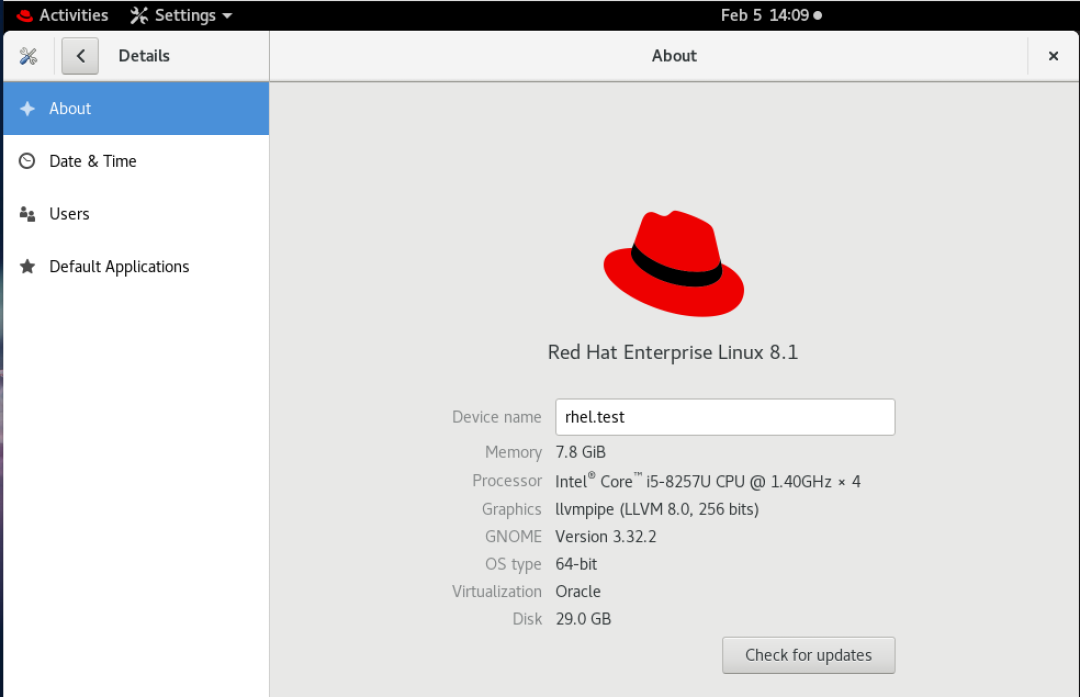
GNOME tip
Using GNOME, you can go to Settings -> Details to view and change the static and pretty hostnames. See below:
Wrapping up
I hope that you found this information useful as a quick and easy way to manipulate your machine’s network-visible hostname. Remember to always be careful when changing system hostnames, especially in enterprise environments, and to document changes as they are made.
Want to try out Red Hat Enterprise Linux? Download it now for free.
How to Change Hostname on Ubuntu 20.04
A hostname is a user-generated custom name which identifies a computer system in a network. In Ubuntu 20.04, users assign a hostname to the machine during OS setup.
You may decide to change your computer’s hostname for several reasons. For example, no two computers on a network can have the same hostname and, if you find yourself in this situation, you will have to change the hostname to avoid a network conflict.
In this tutorial, you will learn how to change a hostname on Ubuntu 20.04 using the Linux command line or GUI.

- Ubuntu 20.04 installed
- An account with sudo privileges
- Access to the command line for non-GUI methods
How to Check Current Hostname on Ubuntu 20.04
To check the current hostname of your Ubuntu system, use one of two available commands.

- The other command, hostnamectl , displays additional information about your computer system.
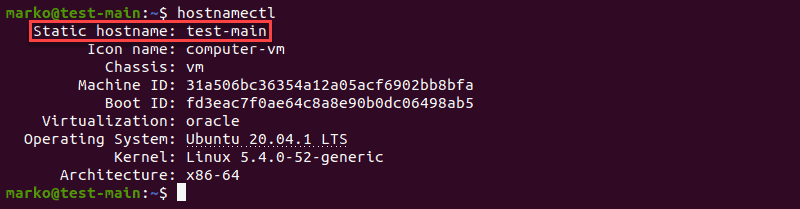
The Static hostname line displays your machine’s hostname.
Note: Valid hostnames are between 2 and 64 characters in length. They can contain only letters, numbers, periods, and hyphens, but must begin and end with letters and numbers only.
Temporarily Change Hostname on Ubuntu 20.04
Use the hostname command to make a temporary change to your computer’s hostname.
In the terminal, type the following, replacing new-hostname with the name you choose:
sudo hostname new-hostnameIf successful, this step will not provide any output. To confirm the result of the process, check the current system hostname:

Change Hostname on Ubuntu 20.04 (No Reboot Required)
If you wish to permanently change the hostname without rebooting your computer, use the hostnamectl command.
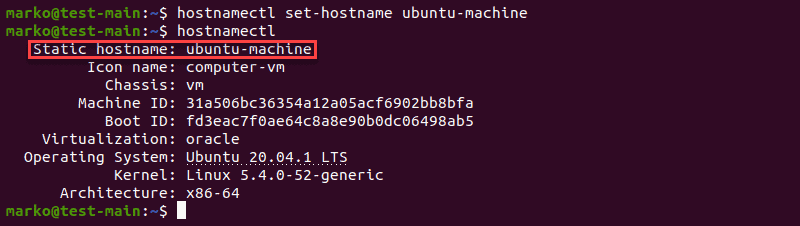
Step 1: Use set-hostname to Change the Hostname
Type the following command:
hostnamectl set-hostname new-hostnameUse your own hostname choice instead of new-hostname .
Step 2: Use hostnamectl to Confirm the Change
Just like the hostname command, if successful, hostnamectl set-hostname does not produce any output. Therefore, use hostnamectl to check the result.
Step 3: Change the Pretty Hostname (Optional)
A “pretty” hostname is the hostname presented to the user, not to another computer on a network. A computer system identifies another computer only by its static hostname.
Note: The pretty hostname does not have the naming limitations of its static counterpart – any UTF-8 value is permitted.
To change a machine’s “pretty” hostname, use the same hostnamectl command with the —pretty option:
hostnamectl set-hostname "new-hostname" --prettyReplace new-hostname with your own UTF-8 value.
After checking the result with hostnamectl , you will notice an additional line in the output, listing the computer’s “pretty” hostname.
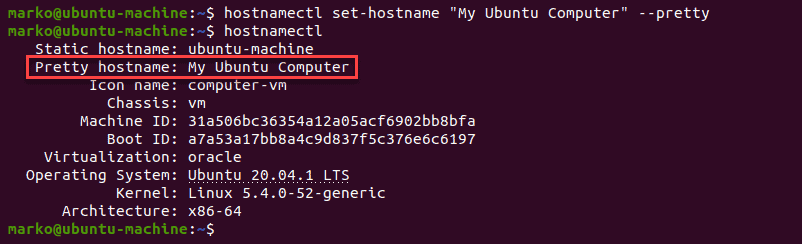
Note: The “pretty” hostname is stored in /etc/machine-info. Updating this file is another way to perform this optional step.
Change Hostname on Ubuntu 20.04 – Alternative Method (Reboot Required)
Another way to permanently change the hostname is by editing two configuration files:
The changes take effect immediately after system reboot.
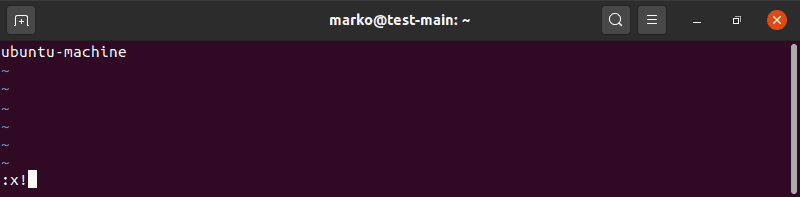
Step 1: Open /etc/hostname and Change the Hostname
Edit the file with a text editor of your choice. In this example, we will be using the Vim editor:
The /etc/hostname file contains only the current hostname. Replace it with your new choice.
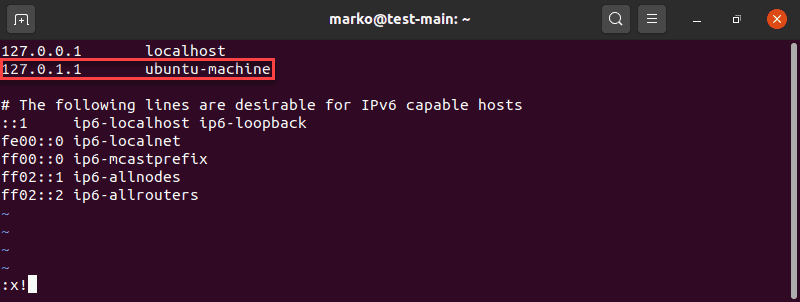
Step 2: Open /etc/hosts and Change the Hostname
Now edit the /etc/hosts file in the same way.
The file /etc/hosts maps hostnames to IP addresses. Look for the hostname you wish to change and simply replace it with your new choice.
Step 3: Reboot the System
Reboot your computer to apply the changes:
Note: If you use the Cloud-Init package ( cloud-init ) to run a cloud instance of Ubuntu, you need to perform another step before rebooting. Go to /etc/cloud/cloud.cfg file and make sure the line preserve_hostname is set to TRUE .
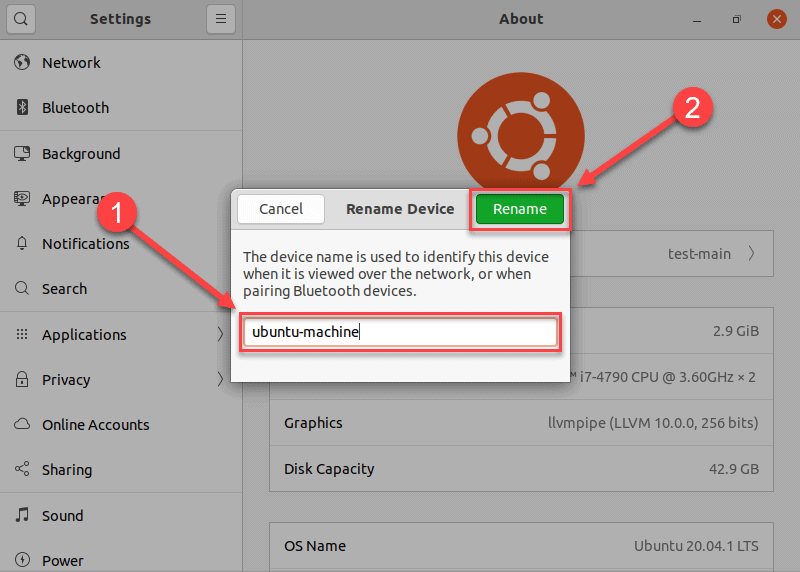
Change Hostname on Ubuntu 20.04 Using GUI
The Ubuntu GUI also provides a way to edit the system hostname:
1. First, navigate to Settings > About.

2. Now, locate the Device Name field.
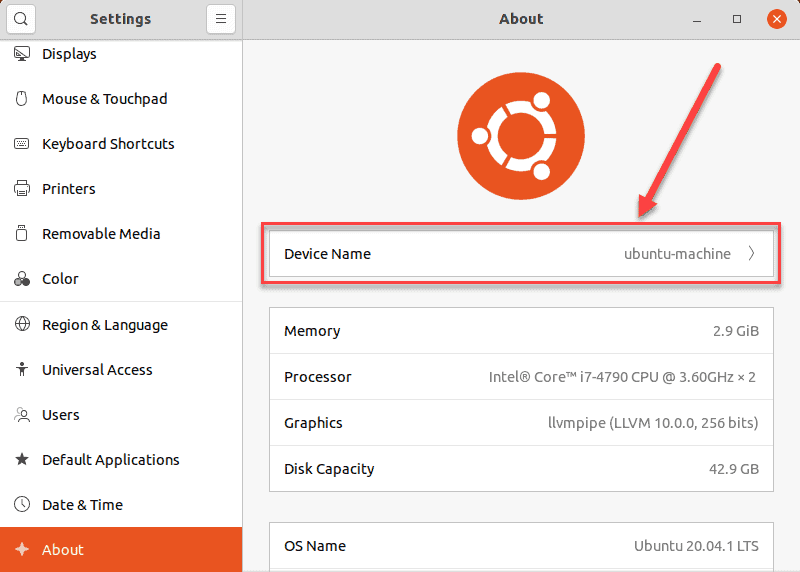
3 Clicking the Device Name field opens the Rename Device dialogue box.
4. In the Rename Device dialogue box, replace the current hostname with a new one and confirm your choice by clicking the Rename button. This action permanently changes the hostname.
This article presented three methods in which you can change the hostname on your Ubuntu 20.04 machine, using the command line or GUI. All the methods are simple and straightforward, so you can choose whichever one fits your use case best.