- How to connect Kali Linux to a wireless network?
- Method to connect Kali Linux to the wireless network
- Method 1
- Method 2
- Conclusion
- About the author
- Kalsoom Bibi
- How to Connect to Wi-Fi on Kali Linux
- Connecting to Wi-Fi on Kali (Graphical Mode):
- Connecting to Wi-Fi With Kali (Text Mode):
- Connecting to Wi-Fi With Kali Using nmcli:
- Connecting to Wi-Fi With Kali Using nmtui:
- Troubleshooting Commands:
- Conclusion:
- About the author
- David Adams
How to connect Kali Linux to a wireless network?
![]()
Today, wireless networks are more common in open areas and major corporations, requiring security enhancements to govern authenticity and confidentiality. A wireless network enables participants to stay connected to the network while roaming without the need for wires. Because access points amplify Wi-Fi signals, a machine can be far away from a router and still be connected to the network. You connect to that institution’s wireless network when you link to a Wi-Fi hotspot in a cafe or other public venue. Radio Frequency (RF) technology operates wireless networks, a frequency related to radio wave transmission within the electromagnetic spectrum. Whenever an RF current is sent into an antenna, it creates an electromagnetic field that can travel over space. Most people are aware of the wireless icon sign on a laptop or phone that signifies a healthy wireless LAN connection, but few are acquainted with the antiquity of Wi-Fi technology. Surprisingly, Wi-Fi was created as a marketing term to promote and facilitate interoperability across various wireless LAN systems rather than the technology itself. Wi-Fi was never intended to be a shorter wireless communication version; it was simply a play on the phrase hi-fi (high fidelity), a nod to large audio technology. Because wireless networks transfer data over the air, data leakage is always a possibility. When compared to copper cable, wireless networks have a larger risk of data leakage and tampering. As a result, in wireless networks, increased concentrations of data encryption are a must. A Wireless network’s device capacity can be raised without the need for extra cabling. Additional copper wiring is necessary for cabled LAN networks to expand the number of workers. We can run Kali Linux wirelessly after we adjust our wireless network. We can have all of the freedoms of a typical PC in a legitimate, ethical penetration test because we don’t need an Ethernet wire.
Method to connect Kali Linux to the wireless network
The goal of this tutorial is to illustrate how to allow and stop Wi-Fi on Kali Linux. This can be done through a GUI or the command line, and we will teach you how to accomplish both in this tutorial.
This will come in handy if you are having problems accessing a wireless router or intend to use Aircrack-ng to do some WiFi monitoring and cracking.
Method 1
The first method is related to the implementation of the Kali Linux terminal. Start a terminal and type the IP an instruction to see your WiFi adapter’s label and connection facts and supposing you are already linked to a WiFi network.
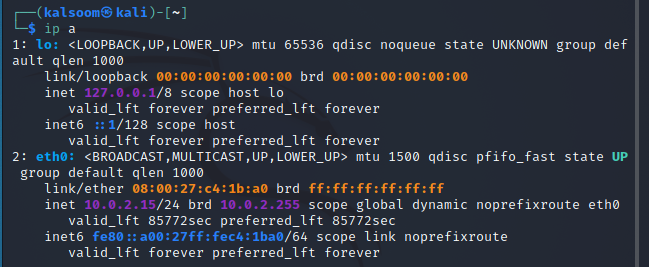
The identifier of our WiFi connection in this example is eth0. Enter the following affixed command to turn off the WiFi connection.

Type the following attached command to reboot the device and activate WiFi. We also run the “IP a” command subsequently to see if the link is up or down.

Method 2
The Network Manager Text User Interface (nmtui) program gives you a text interface to handle Network Manager and configure your Kali Linux network. Because the nmtui tool controls Network Manager, we must first ensure that the NetworkManager service is present on our Kali Linux system.
Run the below-mentioned instruction on the terminal of Kali Linux.

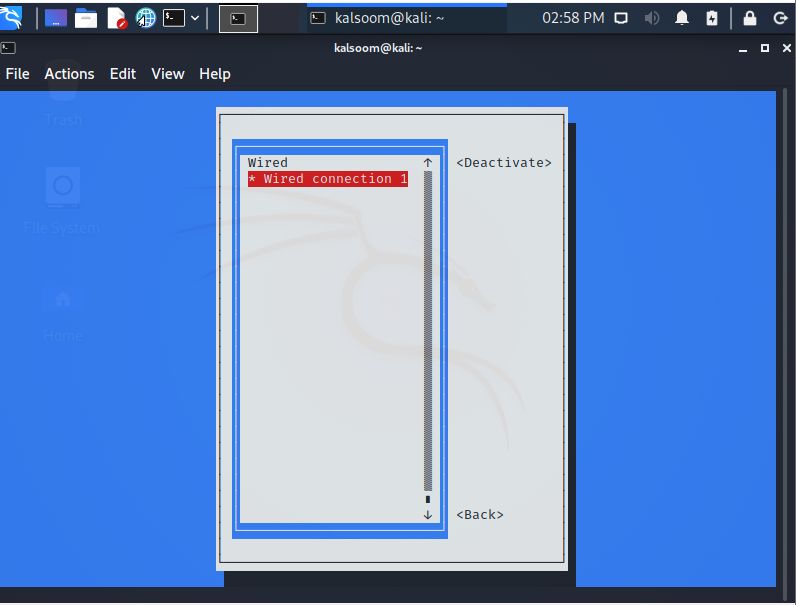
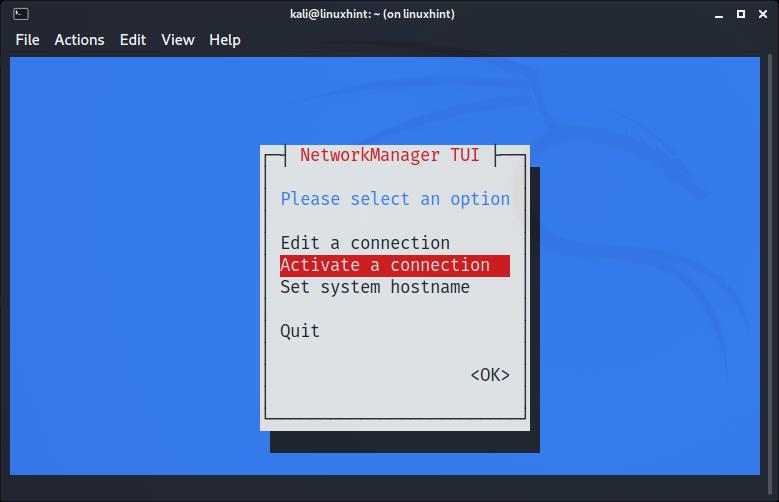
As soon as the execution of the above-listed command ends, a graphical user interface will appear on your kali Linux window which shows these three options:
Press “OK” after selecting “Activate a connection.”

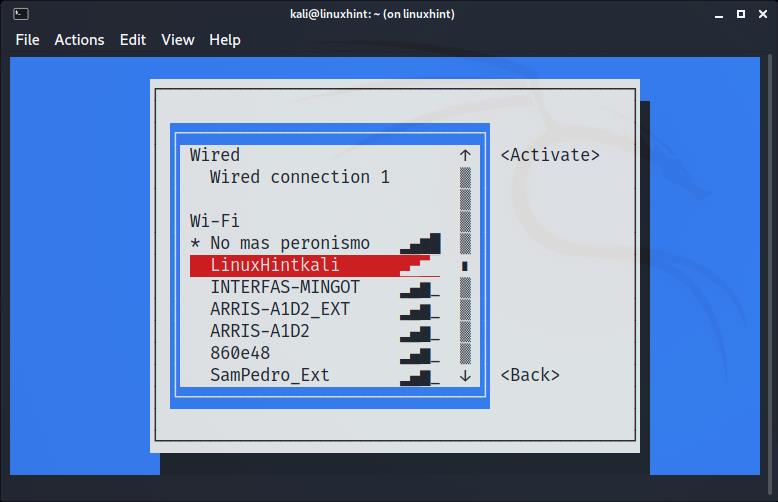
As soon as you select the “Activate a connection” option, you will view another screen. From here, you can build a wireless network.
Conclusion
This tutorial taught us how to permit and restrict Wi-Fi in Kali Linux using the GUI and command line. When your computer does not connect to a Wi-Fi network or doesn’t have access to the internet, use this as a troubleshooting option. I hope you find this article simple to follow on your Kali Linux system.
About the author
Kalsoom Bibi
Hello, I am a freelance writer and usually write for Linux and other technology related content
How to Connect to Wi-Fi on Kali Linux
![]()
After reading this tutorial, you’ll know how to connect to your wireless network from your graphical environment and the console using both nmtui and mncli tools.
Connecting to Wi-Fi on Kali (Graphical Mode):
Connecting to Wi-Fi from Kali Linux is the same as connecting from any other Linux distribution. Some users may find their wireless card disabled.

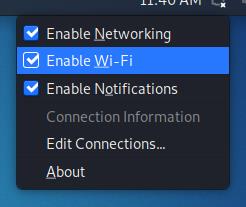
To begin, identify the network icon on your taskbar, which is displayed as:

As you can see, the network icon is located next to the clock. Once identified, right-click on it to show all available options, including Enable Wi-Fi, as shown in the image below. Make sure the option Enable Wi-Fi is marked:
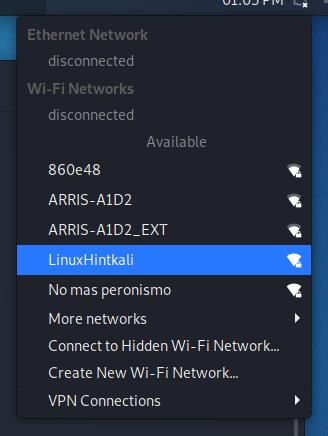
Once enabled, left-click the network icon again, and you’ll see all available networks for connection. Then, press the one you want to connect to:
After clicking on your network, you should connect without problems.
Connecting to Wi-Fi With Kali (Text Mode):
Before connecting to a network using the terminal, let’s see how to detect all available networks. To scan for networks, you can use the iwlist command followed by your wireless device and the function scan below:
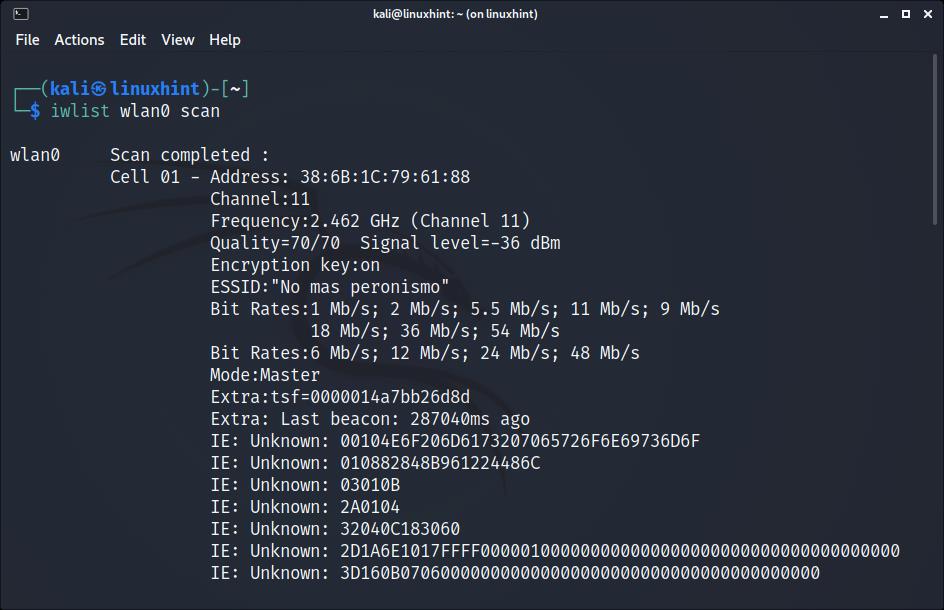
As you can see, depending on the quantity of available networks, the output will display a long list of data belonging to each network, but we are only interested in the ESSID.
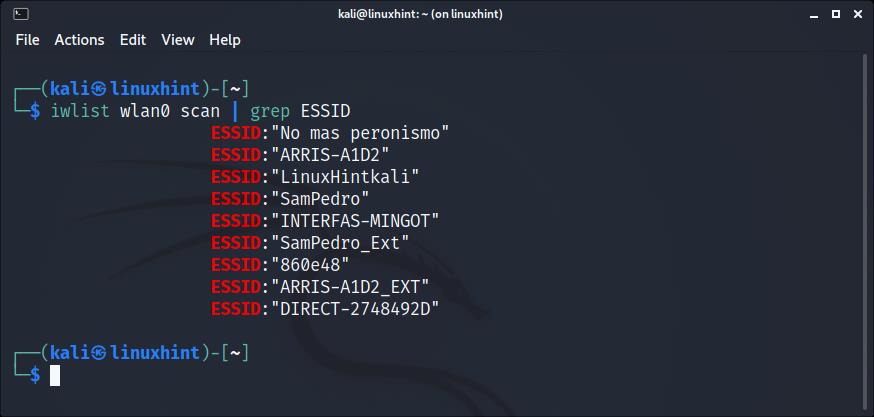
You can get a more human-friendly output by implementing grep as shown below; in this manner, iwlist will only print the networks ESSID:
Once you scanned all networks and identified the one you want to connect to, you can use different text-mode methods to establish a connection.
Connecting to Wi-Fi With Kali Using nmcli:
The nmcli command allows us to control the NetworkManager from the command line and using it is pretty simple. The following example shows how to connect to a network named LinuxHintkali, whose password is linuxhintpass.
After scanning and identifying your network with the iwlist command explained previously, run the command below, replacing LinuxHintkali with the ESSID of the network you want to connect to, and replacing linuxhintpass with its password:
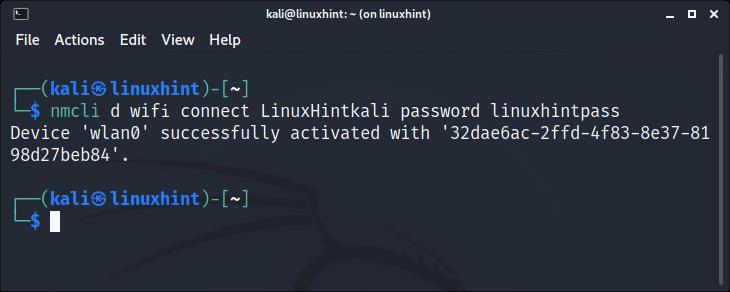
As you can see, the connection was established properly.
You can get additional information on nmcli at its man page https://linux.die.net/man/1/nmcli.
Connecting to Wi-Fi With Kali Using nmtui:
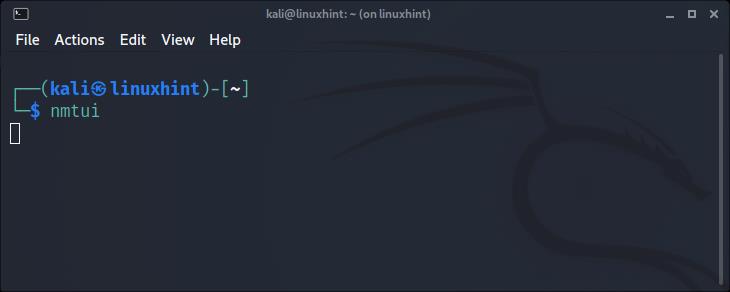
The nmtui command is a curses-based tool that allows you to control NetworkManager in an interactive mode.
To run it, simply execute the command below:
The following menu will show up. Use your keyboard arrows to select “Activate a connection” and press ENTER:
The next screen will show all available networks. Again, use your keyboard arrows to select the network you want to connect to and press ENTER:
The connection will be established. You already must have internet access:

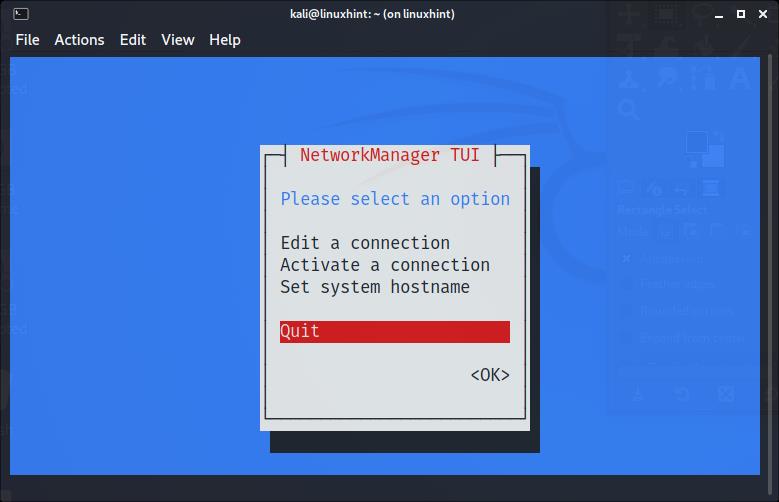
Once connected, select Back and press ENTER:

Move to Quit, and press Enter to leave nmtui:
Troubleshooting Commands:
The following commands were not tested because my network card was properly detected. The first command shown below may be useful in case your Wi-Fi device’s drivers weren’t properly detected. This is not a common scenario when using Kali:
More probably than the command shown above to install drivers, your wireless card may be down. To set it up, first identify your network device name:
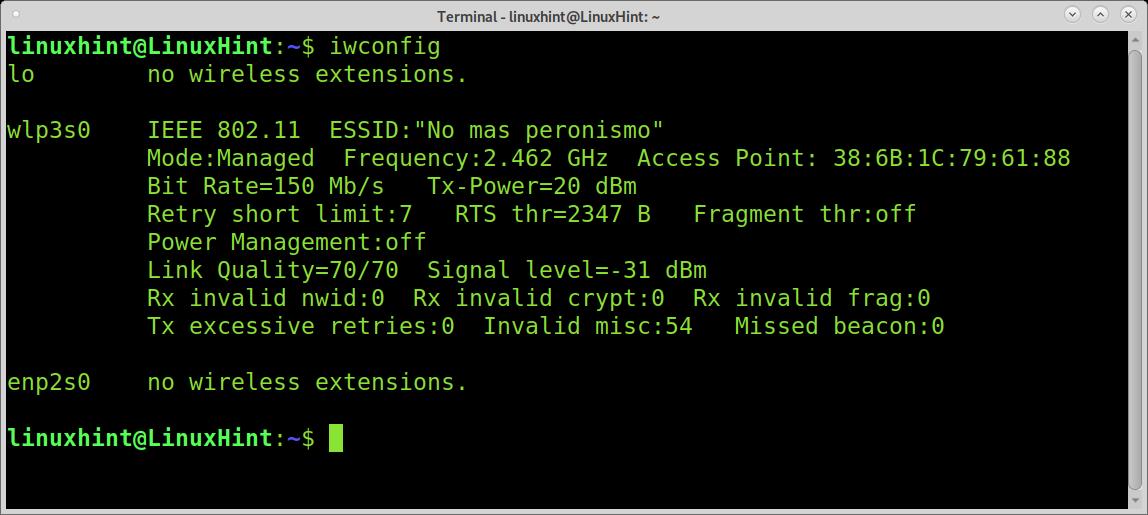
As you can see in the output above, my network device is named wlp3s0. To set it up, I run the following command:
Remember to replace wlp3s0 for your wireless card name.
Conclusion:
As you can see, connecting to Wi-Fi on Kali Linux should not be a problem even for basic Linux users. Linux, not only Kali, offers a variety of methods to establish connection. This tutorial was written after finding many Kali users report problems connecting. In most cases, their Wi-Fi adapter was disabled and enabling it from the taskbar, as shown in the first steps of this tutorial, solved the problem. Learning the text mode techniques explained in this article is especially important because they are almost universal for all Linux distributions and independent of their graphical environment.
Thank you for reading this tutorial explaining how to connect to Wi-Fi on Kali Linux, keep following us for more Linux tips and tutorials.
About the author
David Adams
David Adams is a System Admin and writer that is focused on open source technologies, security software, and computer systems.