How to Use the Linux ftp Command
FTP (File Transfer Protocol) is a network protocol used for transferring files from one computer system to another. Even though the safety of FTP tends to spark a lot of discussion, it is still an effective method of transferring files within a secure network.
In this tutorial, we will show you how to use the ftp command to connect to a remote system, transfer files, and manage files and directories.
- Access to a local system and a remote FTP server (learn how to install an FTP server on Ubuntu, CentOS 7, or Raspberry Pi).
- A working Internet connection.
- Access to the terminal window.
IMPORTANT: FTP traffic is not encrypted and is thus considered unsafe. It is not recommended to transfer files over the Internet using FTP. To learn more about secure alternatives to FTP, have a look at our articles on SFTP and TSL vs. SSL.
Linux ftp Command Syntax
The Linux ftp command uses the following basic syntax:
The IP is the IP address of the system you are connecting to.
The options available for the ftp command are:
| FTP Command Options | Description |
|---|---|
| -4 | Use only IPv4. |
| -6 | Use only IPv6. |
| -e | Disables command editing and history support. |
| -p | Uses passive mode for data transfers, allowing you to use FTP despite a firewall that might prevent it. |
| -i | Turns off interactive prompting during multiple file transfers. |
| -n | Disables auto-login attempts on initial connection. |
| -g | Disables file name globbing. |
| -v | Enables verbose output. |
| -d | Enables debugging. |
The ftp command connects you to a remote system and initiates the FTP interface. The FTP interface uses the following commands to manage and transfer files to the remote system:
| Command | Description |
|---|---|
| ! | Temporarily escape to the local shell. |
| $ | Execute a macro. |
| ? | Display help text. |
| account | Supply a password for the remote system. |
| append | Append a local file to a file on the remote system. |
| ascii | Set the file transfer type to network ASCII (default type). |
| bell | Enable a sound alert after each transfer is complete. |
| binary | Set the file transfer type to binary image transfer. |
| bye | Exit the FTP interface. |
| case | Toggle upper/lower case sensitivity when ID mapping during the mget command. |
| cd | Change the current working directory on the remote system. |
| cdup | Change to the parent of the current working directory on the remote system. |
| chmod | Change file permissions on the remote system. |
| close | Exit the FTP interface. |
| cr | Toggle carriage return stripping on ASCII file transfers. |
| debug | Toggle debugging mode. |
| delete | Delete a file from the remote system. |
| dir | List the contents of a directory on the remote system. |
| disconnect | Terminate the FTP session. |
| exit | Terminate the FTP session and exit the FTP interface. |
| form | Set the file transfer format. |
| get | Transfer a file from the remote system to the local machine. |
| glob | Toggle meta character expansion of local file names. |
| hash | Toggle displaying the hash sign («#«) for each transferred data block. |
| help | Display help text. |
| idle | Set an inactivity timer for the remote system. |
| image | Set the file transfer type to binary image transfer. |
| ipany | Allow any type of IP address. |
| ipv4 | Only allow IPv4 addresses. |
| ipv6 | Only allow IPv6 addresses. |
| lcd | Change the current working directory on the local machine. |
| ls | List the contents of a directory on the remote system. |
| macdef | Define a macro. |
| mdelete | Delete multiple files on the remote system. |
| mdir | List the contents of multiple directories on the remote system. |
| mget | Transfer multiple files from the remote system to the local machine. |
| mkdir | Create a directory on the remote system. |
| mls | List the contents of multiple directories on the remote system. |
| mode | Set the file transfer mode. |
| modtime | Show the last time a file on the remote system was modified. |
| mput | Transfer multiple files from the local machine to the remote system. |
| newer | Transfer a file from the remote system to the local machine only if the modification time of the remote file is more recent than that of the local file (if a local version of the file doesn’t exist, the remote file is automatically considered newer). |
| nlist | List the contents of a directory on the remote system. |
| nmap | Set templates for default file name mapping. |
| ntrans | Set translation table for default file name mapping. |
| open | Establish a connection with an FTP server. |
| passive | Enable passive transfer mode. |
| prompt | Force interactive prompts when transferring multiple files. |
| proxy | Execute command on an alternate (proxy) connection. |
| put | Transfer a file from the local machine to the remote system. |
| pwd | Display the current working directory on the remote system. |
| qc | Toggle displaying a control character («?«) in the output of ASCII type commands. |
| quit | Terminate the FTP session and exit the FTP interface. |
| quote | Specify a command as an argument and send it to the FTP server. |
| recv | Transfer a file from the remote system to the local machine. |
| reget | Transfer a file from the remote system to the local machine if the local file is smaller than the remote file. The transfer starts at the end of the local file. If there is no local version of the file, the command doesn’t execute. |
| rename | Rename a file on the remote system. |
| reset | Clear queued command replies. |
| restart | Restart a file transfer command at a set marker. |
| rhelp | Display help text for the remote system. |
| rmdir | Remove a directory on the remote system. |
| rstatus | Show the status of the remote system. |
| runique | Toggle storing files on the local machine with unique filenames. |
| send | Transfer a file from the local machine to the remote system. |
| sendport | Toggle the use of PORT commands. |
| site | Specify a command as an argument and send it to the FTP server as a SITE command. |
| size | Display the size of a file on the remote system. |
| status | Show the status of the FTP interface. |
| struct | Set the file transfer structure. |
| sunique | Toggle storing files on the remote system with unique filenames. |
| system | Show the operating system on the remote system. |
| tenex | Set the file transfer type to allow connecting to TENEX machines. |
| tick | Toggle printing byte counter during transfers. |
| trace | Toggle packet tracing. |
| type | Set a file transfer type. |
| umask | Set a default permissions mask for the local machine. |
| user | Provide username and password for the remote FTP server. |
| verbose | Toggle verbose output. |
How to Use ftp Command in Linux
The ftp command connects a computer system to a remote server using the FTP protocol. Once connected, it also lets users transfer files between the local machine and the remote system, and manage files and directories on the remote system.
Establish an FTP Connection
To establish an FTP connection to a remote system, use the ftp command with the remote system’s IP address:
For instance, connecting to a remote server with the IP address 192.168.100.9:
Как подключиться к FTP-серверу
FTP (File Transfer Protocol) представляет собой протокол удаленной передачи файлов. С его помощью можно загрузить на сервер и скачивать с него же данные любого типа и размера, создавать или удалять файлы и папки.
В Windows, Linux и macOS подключиться к FTP-серверу можно с помощью встроенных средств и сторонних программ разного назначения. Полноценная работа со всеми средствами возможна только через специальные приложения, называемые FTP-клиентами. Теперь подробнее расскажем обо всех этих способах.
Данные для доступа к FTP-серверу
При подключении к FTP-серверу очень важно вводить правильные данные. Возьмем в качестве примера Timeweb. После регистрации на почту приходят два письма. Письмо с данными выглядит вот так:
Теперь о том, какие данные необходимо иметь под рукой:
- логин,
- пароль,
- ссылка на FTP-сервер (указывается в том же письме),
- порт (по умолчанию устанавливается значение 21).
Как подключится к FTP через Проводник Windows
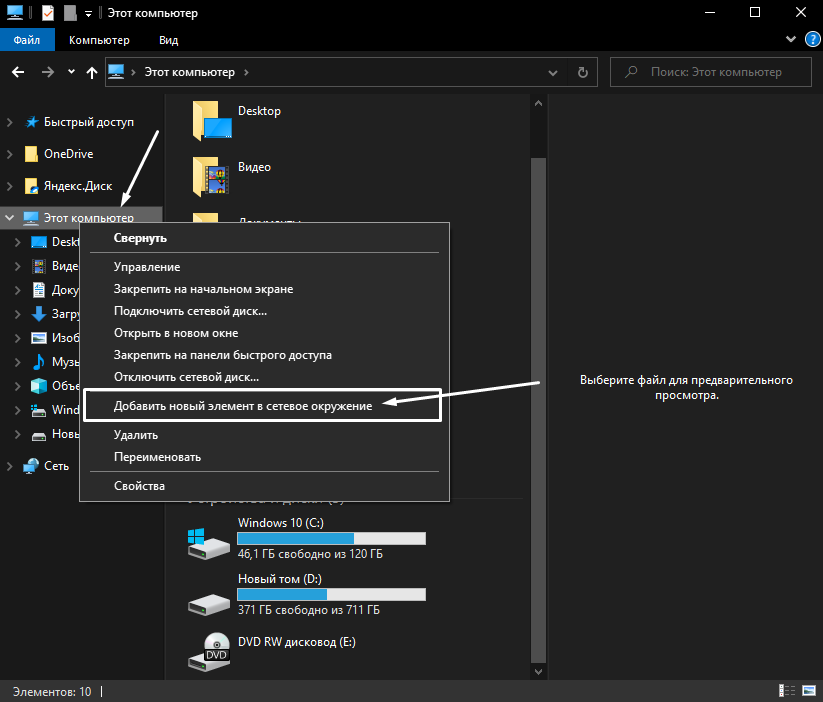
Сначала рассмотрим, как подключиться к FTP-серверу через программу «Проводник» в Windows 10. Здесь ничего дополнительно устанавливать не надо, просто открываем системный файловый менеджер. В левой панели находим значок «Этот компьютер» и жмем по нему правой кнопкой мыши для вывода контекстного меню. В списке выбираем элемент «Добавить новый элемент в сетевое окружение».
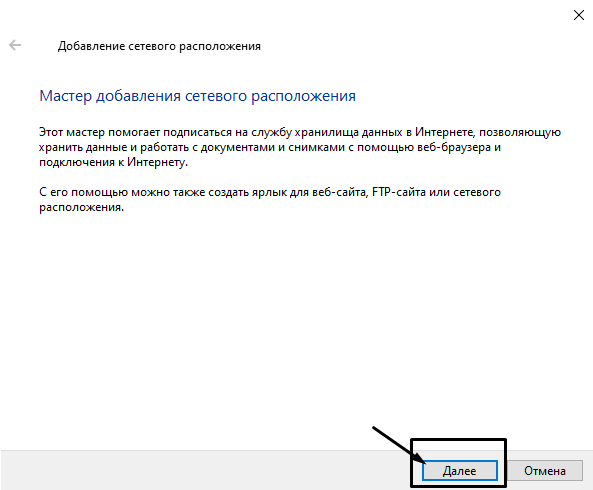
В результате откроется окно мастера добавления сетевого расположения. В начальном окне просто нажимаем «Далее».
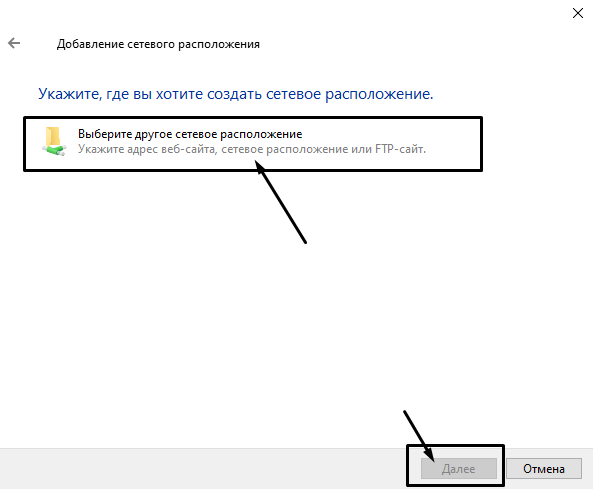
Следом надо выбрать его дальнейшее местоположение, но в этом окне нам доступен только один вариант. Для продолжения снова нажимаем на кнопку «Далее».
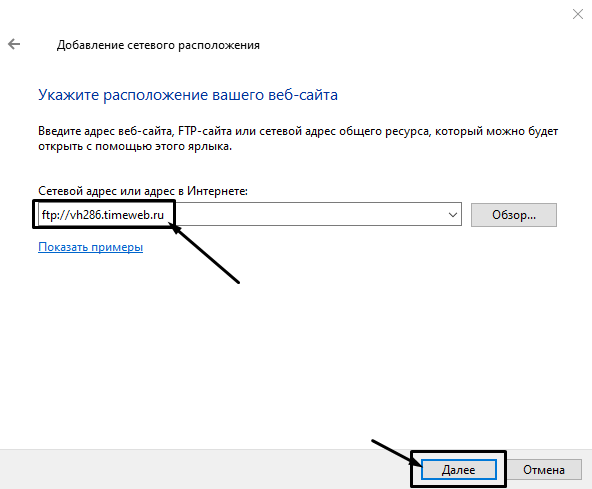
В этом окне понадобится указать ссылку на сетевой ресурс, к которому планируется провести подсоединение. Важно соблюдать предписанный формат (чуть ниже есть несколько примеров). В поле вводим адрес/ссылку и вновь идем дальше.
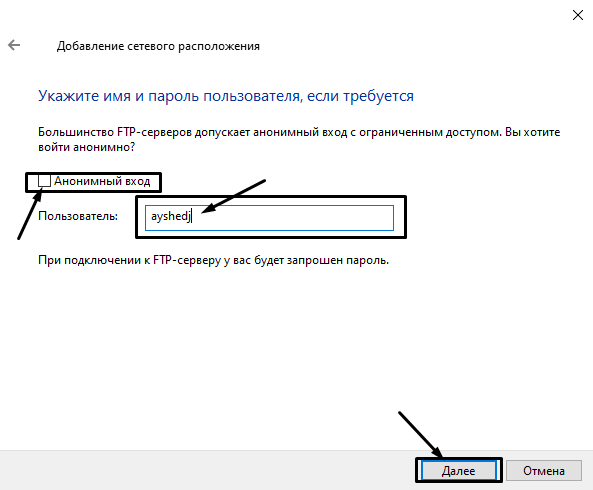
Теперь понадобится ввести в поле имя пользователя. Пароль заранее вводить не нужно, он будет запрашиваться только при подключении. Если на вашем хосте есть такая возможность, вход можно осуществить анонимно, отметив соответствующую галочку.
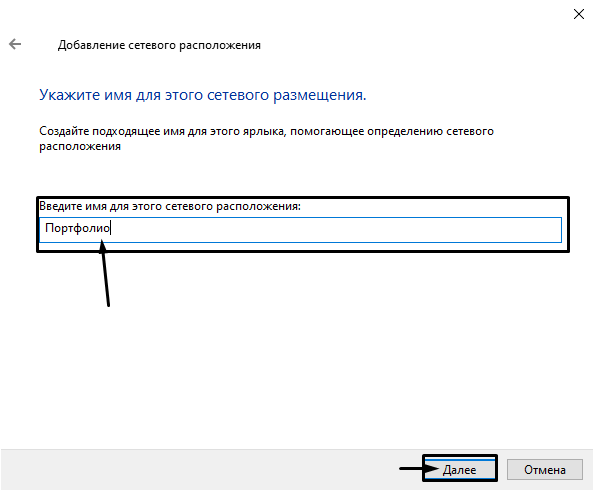
В самом конце даем название новому сетевому окружению.
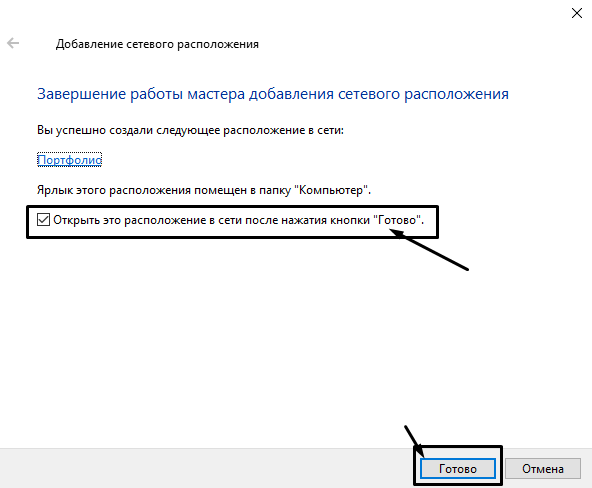
На этом настройка завершена. При необходимости можно поставить галочку, чтобы сразу после нажатия на кнопку «Готово» открыть указанный сервер и приступить к работе.
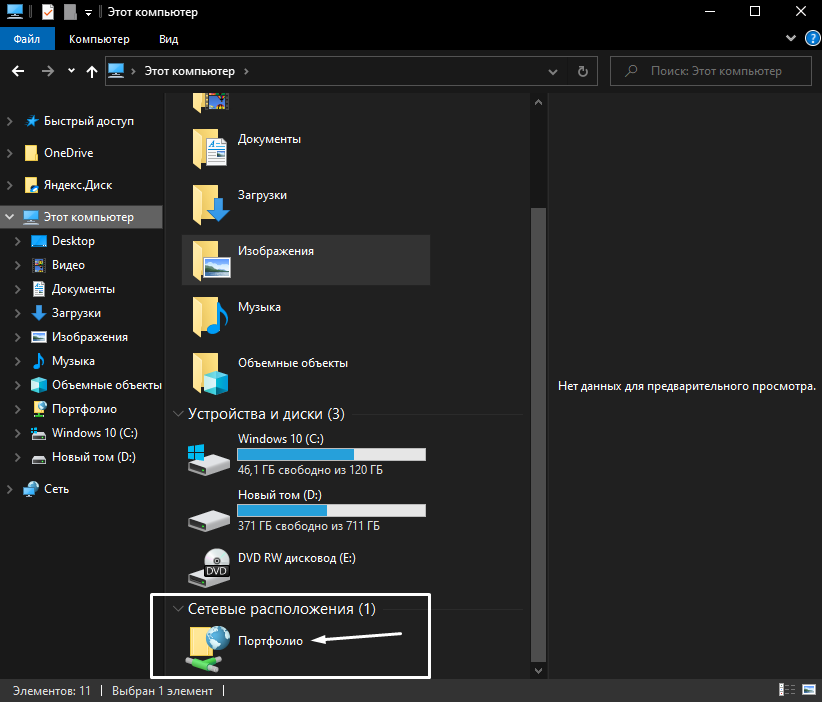
Новое подключение теперь находится в «Сетевых расположениях» в разделе «Этот компьютер».
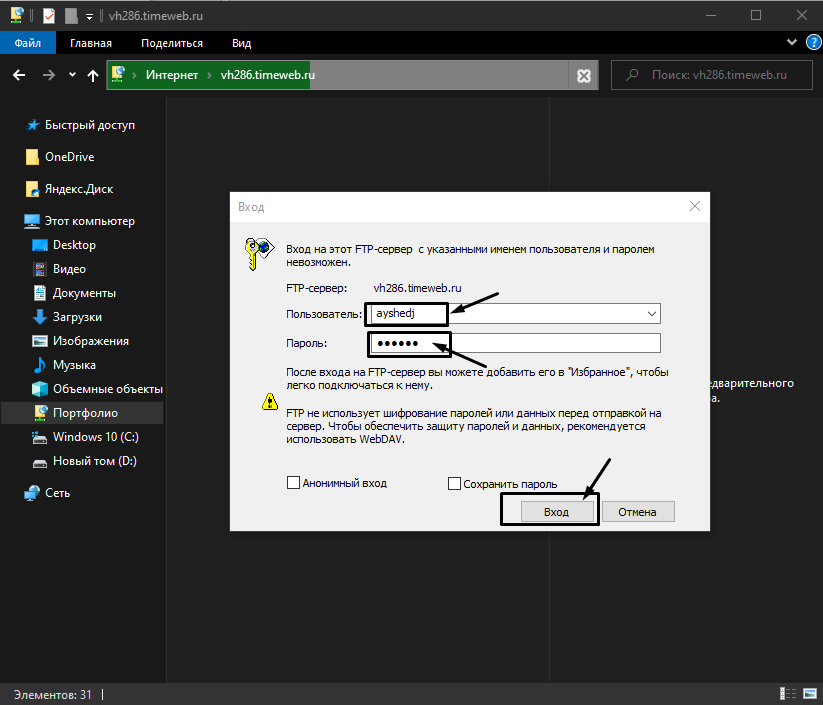
Теперь подключаемся – открываем только что созданное соединение. Открывается маленькое окошко, где мы вводим пароль, затем жмем на кнопку «Вход».
Если все данные введены успешно, откроется папка сервера. Можно приступать к работе.


