- Connect Your Android Phone To Another Wi-Fi Network
- How Do I Connect My Android Phone To Another Wi-Fi Network?
- How To Connect My Android Phone To Another Wi-Fi Network
- Applies To: Galaxy S20+,Samsung Galaxy Z Flip,Samsung Galaxy Z Flip 5G,Samsung Galaxy Z Fold,Samsung Galaxy Z Fold 2,Samsung Galaxy S7,Samsung Galaxy S7 edge,Samsung Galaxy S7 Active,Samsung Galaxy S8,Samsung Galaxy S8+,Samsung Galaxy S9,Samsung Galaxy S9+,Samsung Galaxy S10,Samsung Galaxy S10+,Samsung Galaxy S10e,Samsung Galaxy S10 5g,Samsung Galaxy S20,Samsung Galaxy S10,Samsung Galaxy S9,Samsung Galaxy S20,Google Pixel 3,Google Pixel 4,Google Pixel 4a,Google Pixel 3a,Google Pixel 5,Samsung Galaxy Note 8,Samsung Galaxy Note 9,Samsung Galaxy Note 10,Samsung Galaxy Note 20,OnePlus 8,OnePlus 6,OnePlus 6T,OnePlus 7,OnePlus 7 Pro,OnePlus 7T,OnePlus 7T Pro,OnePlus 8 Pro,Microsoft Surface Duo
- Pro Tips
- How to Connect Your Android Device to a Wi-Fi Network or WPS Router
- Connecting to a Wi-Fi network
- Connecting to a WPS router
- 4 Ways to Transfer Files between Android Devices via WiFi
- Option 1: Transfer Files between Android Devices via WiFi with Assistant for Android
- Option 2: How to Wirelessly Transfer Files from Android to Android with Wi-Fi Direct
- Option 3: How to Transfer Data from Android to Android via WiFi with Messaging Apps
- Option 4: How to Share Files from Android to Android over WiFi via ES File Manager
- Final Thoughts
- How to connect to wifi on an Android phone
Connect Your Android Phone To Another Wi-Fi Network
Sometimes a Wi-Fi network just doesn’t work, or maybe it’s causing problems with your Android device. Switching to a different wireless network can help you get your phone connected to the Internet, or it can help you get faster network speeds!
How Do I Connect My Android Phone To Another Wi-Fi Network?
How To Connect My Android Phone To Another Wi-Fi Network
- Swipe down from the top of your screen and tap the Gear icon to get into your settings.
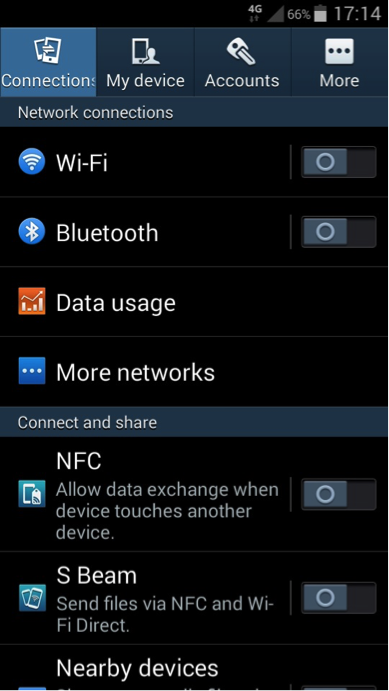
- Tap Network settings or Connections to access your wireless network options.
- Tap Wi-Fi
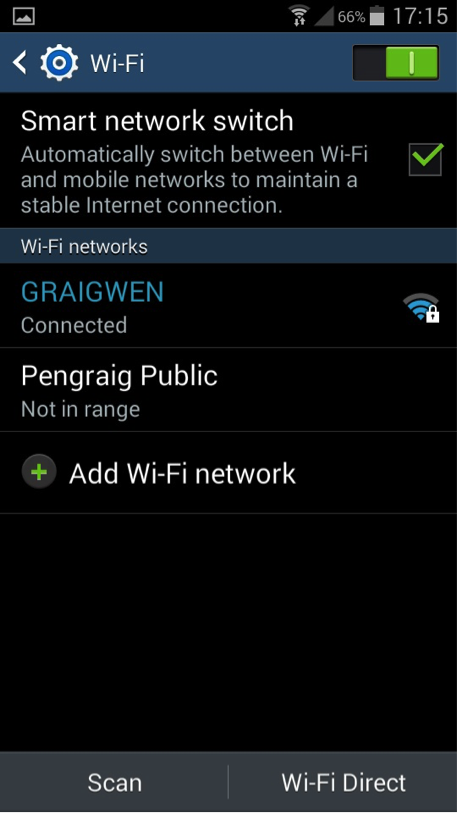
- On this screen you will see a list of networks. Select one from the list that you aren’t currently using to switch to it.
- If the network is secured, make sure you know the correct login information.
Applies To: Galaxy S20+,Samsung Galaxy Z Flip,Samsung Galaxy Z Flip 5G,Samsung Galaxy Z Fold,Samsung Galaxy Z Fold 2,Samsung Galaxy S7,Samsung Galaxy S7 edge,Samsung Galaxy S7 Active,Samsung Galaxy S8,Samsung Galaxy S8+,Samsung Galaxy S9,Samsung Galaxy S9+,Samsung Galaxy S10,Samsung Galaxy S10+,Samsung Galaxy S10e,Samsung Galaxy S10 5g,Samsung Galaxy S20,Samsung Galaxy S10,Samsung Galaxy S9,Samsung Galaxy S20,Google Pixel 3,Google Pixel 4,Google Pixel 4a,Google Pixel 3a,Google Pixel 5,Samsung Galaxy Note 8,Samsung Galaxy Note 9,Samsung Galaxy Note 10,Samsung Galaxy Note 20,OnePlus 8,OnePlus 6,OnePlus 6T,OnePlus 7,OnePlus 7 Pro,OnePlus 7T,OnePlus 7T Pro,OnePlus 8 Pro,Microsoft Surface Duo
Pro Tips
- Connecting to secured networks that require a password is always safer than public connections. Public connections can put your device and your privacy at risk.
- Getting slow network speeds on your home router? Try looking for another wireless connection that has the same name as the regular network, but has 5G at the end! This will provide you better speeds if your phone is capable of using that network.
How to Connect Your Android Device to a Wi-Fi Network or WPS Router

It’s handy to know how to connect your Android phone to a Wi-Fi network and a WPS router. Here’s how.
Connecting to a Wi-Fi network
- Visit the Wi-Fi screen in the Settings app.
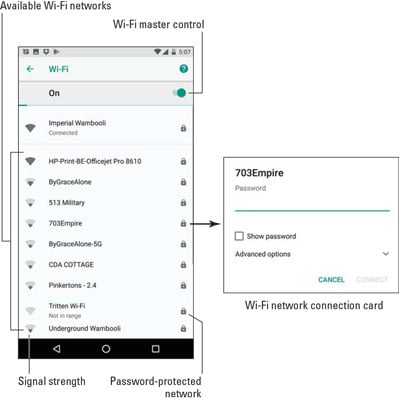
- Select a wireless network from the list. Available Wi-Fi networks appear on the screen, similar to what’s shown in the figure. When no wireless networks are listed, you’re out of luck regarding wireless access from your current location.
- If prompted, type the network password. Tap the Show Password check box so that you can see what you’re typing; some of those network passwords can be long.
Hunting down a wireless network
While your Android is connected to a wireless network, the Wi-Fi Connected status icon, which looks like a tiny fan, appears at the top of the touchscreen (see the figure above). This icon indicates that the Wi-Fi function is on and the device is connected and communicating with a Wi-Fi network.
- Some public networks require that you sign in to their web pages after connecting. The sign-in page may appear automatically. If not, open the web browser app and visit any page to be redirected to the sign-in page. Heed the directions there to gain network access.
- A wireless network without a password is considered unsecure. The absence of security makes it easier for people to do bad things on the network. My advice is to use the connection but avoid sending sensitive information over a nonsecured public network.
- The Wi-Fi connection works best when you plan on being in a specific location for an extended time. That’s because the Wi-Fi signal goes only so far. If you wander too far away, the signal — and your connection — are lost.
- The Wi-Fi connection stays active until you wander out of range. To deliberately disconnect from a Wi-Fi network, turn off the device’s Wi-Fi function.
Connecting to a WPS router
4 Ways to Transfer Files between Android Devices via WiFi

Just imagine, you wish to transfer data between two Android phones. What kind of tools or services will you use when there is no USB OTG cable available? Bluetooth or cloud services? Frankly, some regular Android users probably know that Bluetooth is almost one of the slowest tools to copy data across. Cloud services also do poorly in transfer efficiency and have the risk of personal privacy leakage. Thus, many people may tend to transfer files between Android devices via WiFi. Well, do you know how to wirelessly transfer files in a quick manner? Just read on to get the answer to the question in the following.
Option 1: Transfer Files between Android Devices via WiFi with Assistant for Android
If you are inconvenient to use a USB cord to connect your Android phone to a computer but want to use WiFi to move various items on your phone, MobiKin Assistant for Android (Win and Mac) is definitely your preferred helper. As a professional 3rd-party software, it is safe and easy to use, performing tasks rapidly and promising you lossless transfer outcomes.
Major Features of MobiKin Assistant for Android:
- Offer a secure way to transfer files between Android devices via WiFi.
- Transfer data from Android to computer, and vicec versa.
- The supported data types: contacts, call logs, SMS, music, photos, videos, books, user apps, etc.
- Copy data via WiFi or USB between Android devices and PCs/Macs.
- Back up and restore Android devices in one click.
- Edit and manage Android content on your computer directly.
- Work well with almost all Android phones and tablets, such as Samsung, Huawei, Xiaomi, Motorola, Sony, LG, Google, OPPO, Vivo, etc.
- Let you process Android data without privacy leakage.


How to transfer data over WiFi between Android devices via MobiKin Assistant for Android?
Step 1. Launch Assistant for Android on your computer
Connect your source Android device to a stable WiFi network. Start the installed program on your computer and head to the upper-left corner of its interface to choose «Connect via WIFI».
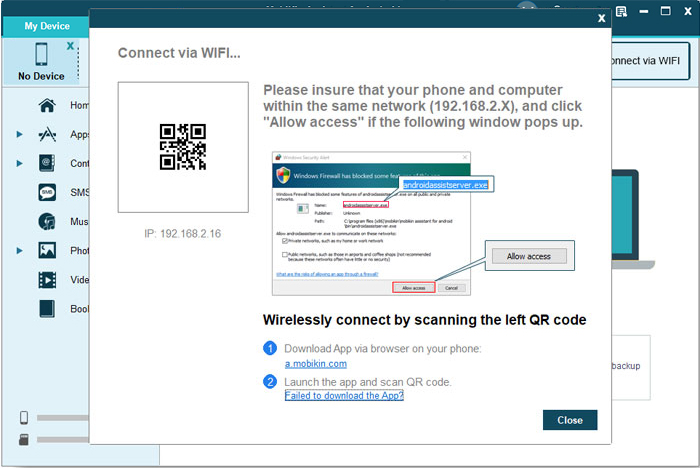
Step 2. Connect your source Android phone via WiFi
Download the Android version of the program and install it on the source device. Open the APK file on the phone and click «Scan QR Code» to scan the code on the software on your PC. Then, your phone will be successfully connected to this PC.
Note: Ensure your Android phone and computer are within the same WiFi network. (Here are more details on how to connect my Android phone via Wi-Fi?)
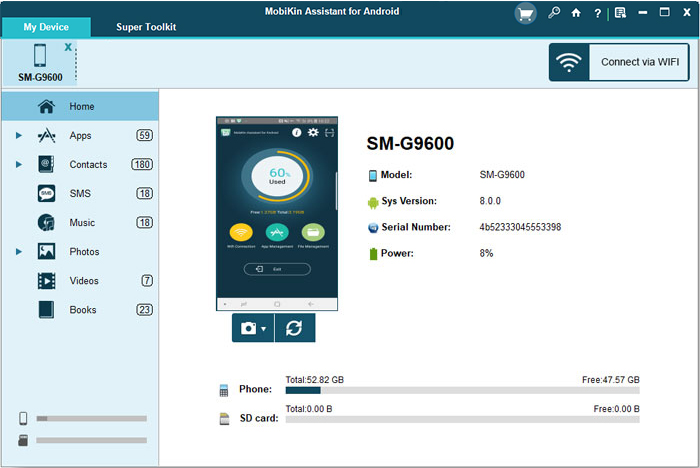
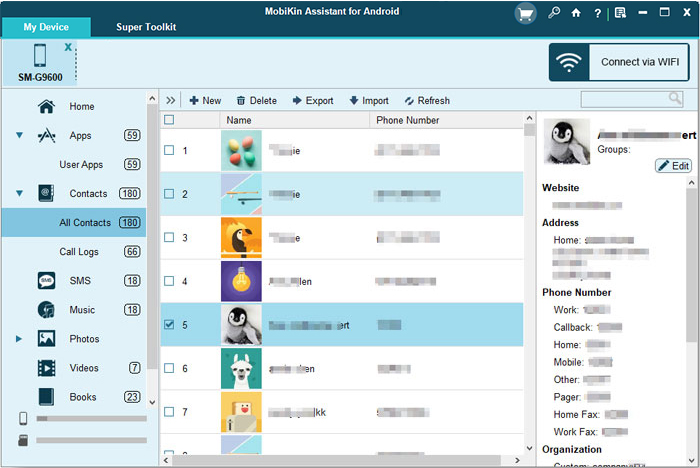
Step 3. Transfer files from Android device to computer via WiFi
After the connection, choose the data types from the left panel of the software. Next, preview and mark your desired items and click «Export» to transfer them to this computer.
Step 4. Transfer files from computer to Android device over WiFi
Follow the drill above to have the target device connected to the program via WiFi. Select the data types and click «New», » Add», or «Import». Then browse the wanted files from your computer and press «Open» to transfer files to the linked Android device.
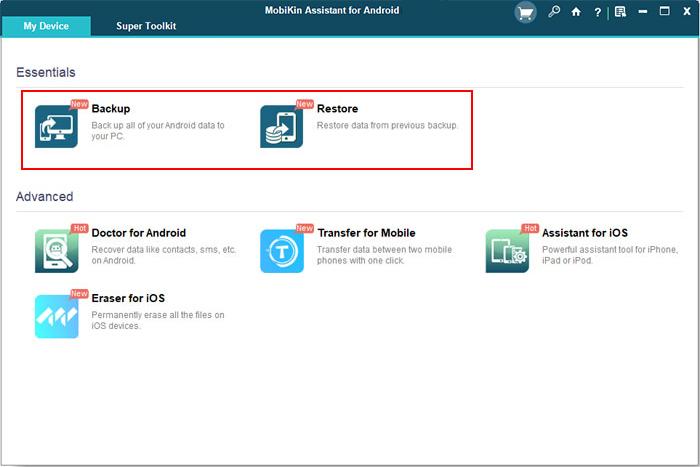
After your phone is recognized by this tool, you can also go to Super Toolkit > Backup (and then Restore). to bulk transfer files between Android devices via WiFi (get into the page: top 5 ways to transfer data from Android to Android for more specifics).
You May Also Like:
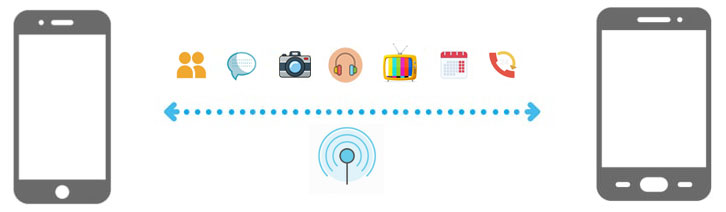
Option 2: How to Wirelessly Transfer Files from Android to Android with Wi-Fi Direct
Wi-Fi Direct transfer is often activated in the Share/Action menu on Android phones, the same place you choose Email, Bluetooth, and other options to migrate files. It enables you to select and transfer multimedia files like photos, videos, and audio.
To carry out the job smoothly, you need to attach importance to some prerequisites in advance:
- Place two Android phones close to each other.
- You may need to input the given transfer key to receive the incoming files on the target phone. And it will expire in 10 minutes.
- You can also use the built-in QR code scanner to scan the code displaying in the transfer app on the sending device instead of entering the transfer key.
How to make WiFi file transfer from Android to Android with Wi-Fi Direct?
- On your source Android phone, head to its Settings > Wi-Fi > Wi-Fi Direct.
- It will then automatically start searching for devices with Wi-Fi Direct within its range.
- Click the destination phone you want to connect with.
- An invitation will then be sent to your target device.
- Accept the invitation to create a Wi-Fi Direct connection between the two phones.
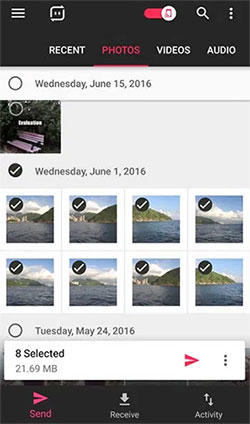
- Select the files you want to transfer from your source Android phone.
- Tap «Send» to get the items out.
- Touch «Receive» to accept the transfer request on the other Android device.
Option 3: How to Transfer Data from Android to Android via WiFi with Messaging Apps
This option is based on messaging apps. If your two Android (or iPhone) devices are running the apps like Facebook Messenger, WhatsApp, Viber, Line, Kik, etc., it’s an easy way to move the content over through any of them. Yet note that most messaging apps only do Android file transfer via WiFi for limited data types like pictures and videos.
How to transfer files from phone to phone over WiFi?
- Make sure your Android phones are connecting with the Internet (either via Wi-Fi or mobile data).
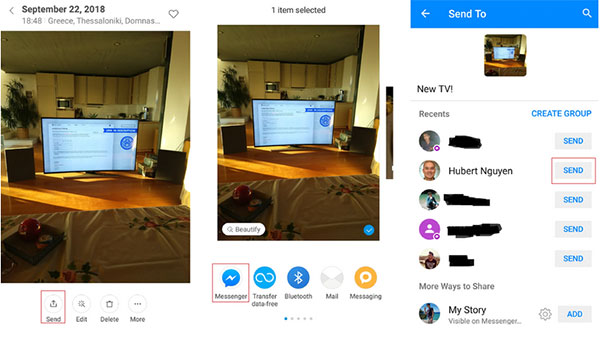
- Find the file you wish to transfer from the old phone.
- Open the sharing menu.
- Choose the Messenger app like Messenger, Viber, WhatsApp, etc.
- Look for the contact you intend to send the file to.
- Tap the receiver and then press «SEND».
Further Reading:
Option 4: How to Share Files from Android to Android over WiFi via ES File Manager
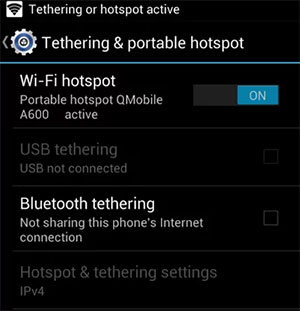
To carry out the task with this method, you should download ES File Manager from Google Play Store and install it on both Android devices. Before proceeding with any further steps, it’s essential to create a personal hotspot from where you want your files to be transferred.
How to transfer files over WiFi from Android to Android via ES File Manager?
- Go to your source phone’s Settings > Wireless & Networks > More Options.
- Tap Tethering & Portable Hotspot > Wi-Fi Hotspot.
Final Thoughts
On the whole, we came up with the four fastest ways to transfer files between Android phones and tablets. Here, note that Wi-Fi Direct, messaging apps, and ES File Manager largely contribute to multimedia transfer between Android devices via WiFi.
In contrast, MobiKin Assistant for Android makes it quick to transfer all the content between Android devices via WiFi or USB. And during use, it also provides you with an opportunity to keep a copy of the files on your computer for safe long-term preservation.
Related Articles:
How to connect to wifi on an Android phone
1. Swipe down from the top of your phone and tap on the wifi button. Alternatively, from the Home page, go to Apps > Settings and tap on the button next to wifi so that it turns green with a line down the middle.
Step 2: Tap on ‘wifi’ to see the list of available networks. It may take a moment for all available networks to show up. You can force your device to check for networks by tapping on ‘Scan’.
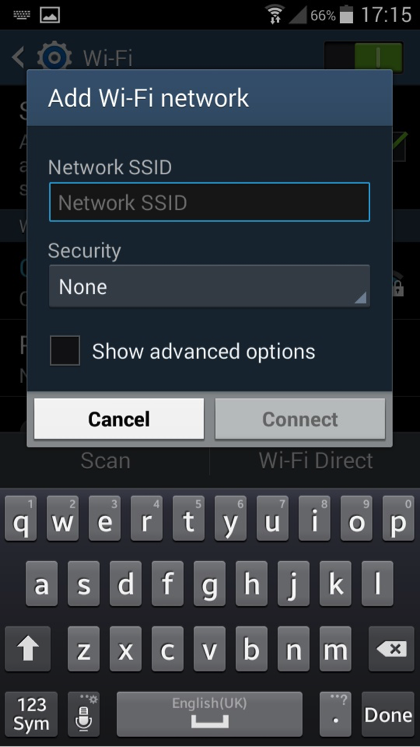
Step 3: If you would like to join a hidden network, tap on ‘Add Wi-Fi Network’ and type in the network SSID, making sure you have the correct spelling. Check with your network administrator if you’re unsure of the name of the wifi network you want to use.
Step 4: Select the network you would like to use. If this is an open wifi connection, you will automatically connect without any further action needed, but be aware that this will not be secure.
Step 5: If you are trying to connect to a secure network, you will need to enter the correct password. This may be found on the back of your router, but if you do not have the password, ask your network administrator.
Step 6: Once you have connected to a network, your phone will automatically remember the details so you don’t have to re-enter the password in future when you’re in range and your wifi is switched on.
Step 7: If you want to switch off your wifi connection, either swipe down from the top of the screen and tap on the wifi button to turn it off or go to Apps > Settings and tap on the wifi button to disconnect. The button will turn grey with a blue circle.

Now we should be able to go into an Android phone’s settings and set up wifi. We know how to switch it on and off from both the home screen and the settings page. We also know how to join open, secure and hidden wifi networks.
From here, you might like to learn more about how to use your Android phone to get the most out of your wifi connection to browse the internet or quickly download apps to your device.