- Dynamic Host Configuration Protocol (DHCP)
- Installation
- Configuration
- Start and stop service
- dhcp3-server and multiple interfaces
- How to Install and Configure DHCP on Linux
- Introduction to DHCP and DHCP Allocation Methods
- Step-By-Step Guide on How to Configure DHCP Server on Ubuntu
- Step 1: Ensure that Your Systems Meet All the Specifications
- Step 2: Install DHCP Server
- Step 3: Start Your DHCP Service
- Step 4: Configure the DHCP Service
- Step 5: Configure the DHCP Server for Static IP Address Assignment to Clients
- Step 6: Configure Your DHCP Client Instance to Obtain a Static IP Address
- Step 7: Configure Your DHCP Client Instance to Obtain a Dynamic IP Address
- Conclusion
- About the author
- Kennedy Brian
Dynamic Host Configuration Protocol (DHCP)
The Dynamic Host Configuration Protocol (DHCP) is a network service that enables host computers to be automatically assigned settings from a server as opposed to manually configuring each network host. Computers configured to be DHCP clients have no control over the settings they receive from the DHCP server, and the configuration is transparent to the computer’s user.
note: this package was called dhcp3-server in versions prior to precise 12.04 LTS.
Installation
At a terminal prompt, enter the following command to install dhcpd:
sudo apt-get install isc-dhcp-server
You will probably need to change the default configuration by editing /etc/dhcp3/dhcpd.conf to suit your needs and particular configuration.
You also need to edit /etc/default/isc-dhcp-server to specify the interfaces dhcpd should listen to. By default it listens to eth0.
Also, you have to assign a static ip to the interface that you will use for dhcp. If you will use eth0 for providing addresses in the 192.168.1.x subnet then you should assign for instance ip 192.168.1.1 to the eth0 interface using NetworkManager. Without this step you will get an error from dhcpd when starting the service.
Configuration
The error message the installation ends with might be a little confusing, but the following steps will help you configure the service:
Most commonly, what you want to do is assign an IP address randomly. This can be done with settings as follows:
# Sample /etc/dhcpd.conf # (add your comments here) default-lease-time 600; max-lease-time 7200; option subnet-mask 255.255.255.0; option broadcast-address 192.168.1.255; option routers 192.168.1.254; option domain-name-servers 192.168.1.1, 192.168.1.2; option domain-name "mydomain.example"; subnet 192.168.1.0 netmask 255.255.255.0 range 192.168.1.10 192.168.1.100; range 192.168.1.150 192.168.1.200; >
This will result in the DHCP server giving a client an IP address from the range 192.168.1.10-192.168.1.100 or 192.168.1.150-192.168.1.200. It will lease an IP address for 600 seconds if the client doesn’t ask for a specific time frame. Otherwise the maximum (allowed) lease will be 7200 seconds. The server will also «advise» the client that it should use 255.255.255.0 as its subnet mask, 192.168.1.255 as its broadcast address, 192.168.1.254 as the router/gateway and 192.168.1.1 and 192.168.1.2 as its DNS servers.
If you need to specify a WINS server for your Windows clients, you will need to include the netbios-name-servers option, e.g.
option netbios-name-servers 192.168.1.1;
Start and stop service
sudo service isc-dhcp-server restart sudo service isc-dhcp-server start sudo service isc-dhcp-server stop
dhcp3-server and multiple interfaces
How to Install and Configure DHCP on Linux
Any system or network administrator working in large, busy computing environments will often find it hectic to set up new clients and assign them IP addresses and an array of other configuration parameters. This is where DHCP or Dynamic Host Configuration Protocol comes in handy.
DHCP or Dynamic Host Configuration Protocol is a client-server protocol that automatically and dynamically assigns IP addresses and other configuration parameters to devices within your network.
This tutorial explains how to configure a DHCP server and set it up for your network. This guide will also illustrate how to configure the DHCP client system. Note that this guide is specific to Ubuntu 20:04 and not on any other operating systems.
Introduction to DHCP and DHCP Allocation Methods
While our previous article introduced DHCP and elaborately discussed how it works, it is still vital to introduce it here and explain the various allocation options you can use.
The operational mechanism of DHCP is pretty simple. Many computers do not have IP addresses when they boot up—unless they have a dedicated static IP address.
After booting, a machine will use the automatic DHCP Discover component to send a broadcast. The DHCP server will respond to the request or broadcast and contact the client using the DHCP Offer unicast traffic. The DHCP Offer traffic carries the designated IP Address assigned to the client. It also contains the server’s DNS IP address and the Default IP Address for the Gateway.
The client will consequently send a DHCP Request to the server acknowledging receipt and acceptance of the configuration parameters. The servers will keep records of all assigned addresses to prevent IP address collisions or double assignments. For local networks, there must only be a single server.
The following are the critical allocation methods.
- Manual Allocation– you will base your distribution of IP addresses on MAC (Media Access Control) Addresses. This allocation system gives each machine a fixed IP address and the DHCP server will consistently send the device a fixed configuration based on its MAC Address.
- Automatic Allocation– The server will use a first come, first serve method to assign IP addresses automatically and dynamically. The addresses assigned can either have Fixed Lease Time or Infinite Lease Time. IP addresses with fixed lease time will expire after some time. On the other hand, IP addresses with infinite lease time will stay permanently for the client.
Step-By-Step Guide on How to Configure DHCP Server on Ubuntu
You need to follow these steps to configure a DHCP server to your Linux system:
Step 1: Ensure that Your Systems Meet All the Specifications
First off, ensure that your system meets all the necessary prerequisites. They include:
- You have two computer systems, both running Ubuntu 20:04
- Privilege to access your network as a root user with the ability to use the sudo command
Step 2: Install DHCP Server
On your designated DHCP server machine, install the DHCP server. Notably, the DHCP server package comes in the Ubuntu default depository. You will use the following command to implement the installation:
Step 3: Start Your DHCP Service
Start your DHCP service to enable it to start at system reboot. You can accomplish this using the following commands:
Step 4: Configure the DHCP Service
The DHCP configuration file is available at /etc/default/isc-dhcp-server. You can edit the file with the correct details to specify your network interface. The below command will help you achieve this:
You can specify your network using this command:
Proceed to save and close the file once finished. The next step is to edit the configuration (/etc/dhcp/dhcpd.conf) file to define your DHCP lease. The below command should be used:
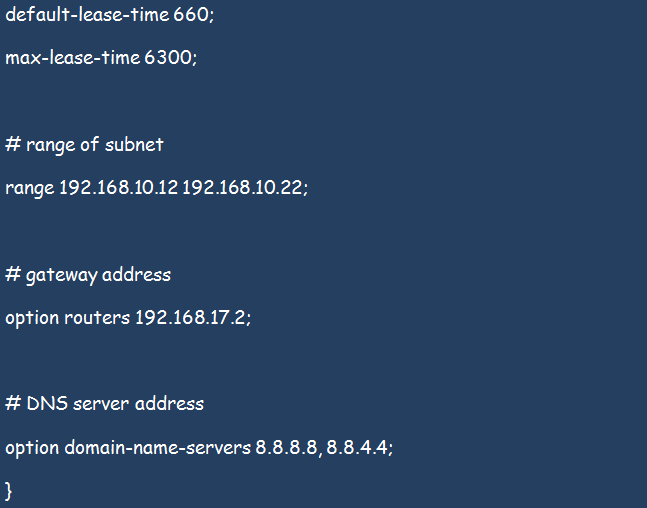
The final step when configuring your server is to change the lines below appropriately:
Save and close this file once you finish editing everything.
Step 5: Configure the DHCP Server for Static IP Address Assignment to Clients
The DHCP server has a default configuration to assign dynamic IP addresses to clients within the network. However, you need to configure your server to give static IP addresses to DHCP clients based on each client’s MAC address.
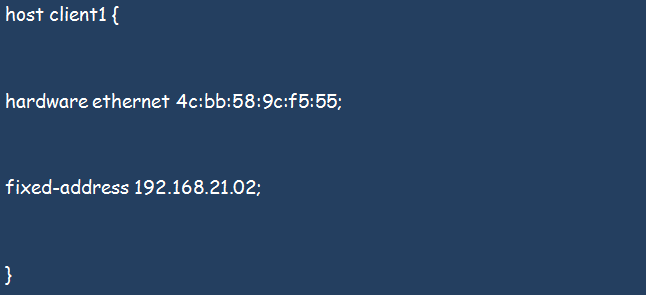
For instance, we can assign 192.168.21.02 to a client with the 4c:bb:58:9c:f5:55 MAC address. Edit your /etc/dhcp/dhcpd.conf file using the nano command as shown below to achieve this.
You should add the following lines to the file:
Save the changes and close the file.
It is time to restart your DHCP service to implement the changes. You can use the below command to restart the service:
Proceed to verify the status of your DHCP service with the command below:
Step 6: Configure Your DHCP Client Instance to Obtain a Static IP Address
Once you set up your server, you will also need to set up your client instance. The first setup procedure is to ensure that your client can obtain a static IP address from the server.
To achieve this, open your client machine. We assume your client machine has the 4c:bb:58:9c:f5:55 MAC address. Once at the device, edit its network interface using the command below:
You can edit the interface by striking off the following default lines:
Save the changes and close the file. Now, to ensure that you apply the relevant changes n the new file, you can restart your Network Manager service using the command below:
The next step is to run the command below on the client machine:
The output should be as follows:
Sometimes, you may fail to get the IP address from your DHCP server. If that is the case, you can obtain it by running the command below:
You can verify the IP address by running the command below:
Step 7: Configure Your DHCP Client Instance to Obtain a Dynamic IP Address
You can also configure your other client machine to obtain a dynamic IP address from your DHCP server. You can begin this process by first editing your network interface file using the command below:
Add the below lines to the file:
You can save and close the file. Now, to ensure that you implement the changes on the interface, proceed to restart your Network Manager using the below command:
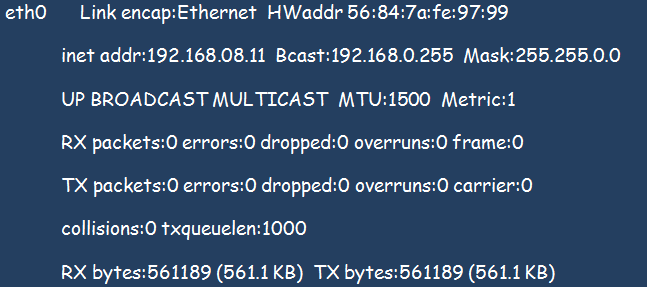
Verify the dynamic IP address assigned to your DHCP client by running the following command:
The output should be similar to what is in the illustration below:
Conclusion
The article discusses the entire process beginning with installing and configuring the DHCP server on Ubuntu. We also discussed configuring the client instance to obtain both dynamic and static IP addresses.
About the author
Kennedy Brian
Brian is a computer scientist with a bias for software development, programming, and technical content development. He has been in the profession since 2015. He reads novels, jogs, or plays table tennis whenever not on gadgets. He is an expert in Python, SQL, Java, and data and network security.


