- How to do backups in linux
- How to do Backup and Restore in Linux
- Compression and Archiving
- Tar
- Cpio
- DD (Disk to Disk)
- Step 1: To take the backup:
- Step 2: To recovery:
- SCP (Secure copy)
- How to Back Up and Restore Your Linux System Using the Rsync Utility
- What Is the Rsync Tool?
- Basic Syntax
- How to Make a Local Backup Using the Rsync Tool
- Unmount, Format, and Remount the External Device
- Verify the Device is Mounted
- Test Run the Backup
- Run the Actual Backup and Restore Backup to Other PCs
- How to Restore the Backup
- Conclusion
How to do backups in linux
How to do Backup and Restore in Linux
- In information technology, a backup or the process of backing up is making copies of data that may be used to restore the original after a data loss event.
- Backups have two distinct purposes.
1. The primary purpose is to recover data after its loss, be it by data deletion or corruption. Data loss is a very common experience for computer users. 67% of internet users have suffered serious data loss.
2. The secondary purpose of backups is to recover data from an earlier time, according to a user-defined data retention policy, typically configured within a backup application for how long copies of data are required.
- Backup is the most important job of a system administrator as a system admin it is your duty to take a backup of the data every day.
- Many companies have gone out of the market because of poor backup planning.
- The easiest way to back up your first is just copying. But if you have too many files to backup, copying and restoring may take a too long time and it is not convenient. If there is a tool that can put many files into one file, the world will be better, fortunately, ‘tar’ is used to create archive files.
Compression and Archiving
- As you will learn when you become a system administrator, backups are the number one priority.
- If something should crash or become corrupt and you can’t restore it because you aren’t keeping up with your backups or you just don’t keep any, you may be looking for a new job. Although we don’t address backup programs here, this is a good lead into archiving and compression.
Tar
- It is used for compressing and archiving files and directories
- A more common use for tar is to simply combine a few files into a single file, for easy storage distribution.
Syn: tar [options] [FILE]
Step 1: Create some random blank files:
#touch file 1 file 2 files 3 another _file
Step 2: create a simple archive containing these files:
#tar –cvf sample.tar file1 file2 file3 another –file
When an archive is created, you can also apply compression to reduce the amount of space the archive files takes up. Although multiple types of compression are supported with the use of tar we look only at gunzip (.gz) and bzip2 (bz2) here.
Step 3: Let’s re-create the archive using the gunzip compression:
#tar -cvzf sample.tar.gz file1 file2 file3 another-file
Step 4: view the current directory to see the two current archive files:
Step 5: To see all the contents within the build file:
Step 6: Now extract this build file verbosely:
Step 7: To extract files on a different location
#tar – xvf sample.tar -c /root/desktop
| Read these latest Linux Interview Questions that help you grab high-paying jobs |
Cpio
cpio is a tool for creating and extracting archives or copying files from one place to another.
——>It handles a number of cpio formats as well as reading and writing tar files.
——>Cpio like tar but can read input from the “find” command
:find –name file/cpio [options] [contraoller]
Options: -o (out) Controllers: O (or) > -out
Step 1: To take the backup files
#ls file * /cpio -acvf >/root/backup.cpio
Step 2: To see the backup content:
#cpio -it -I /root/backup .cpio
Step 3: To restore the backup file:
O ——> Reads the standard input
i ——> Extract files from the standard input
c ——> Read or write header information in ASCII character
d ——> Creates directories as needed
u ——> Copy unconditionally (older file will not replace a new file)
DD (Disk to Disk)
Used to take the backup of one partition to another, here source partition should be given to “if” destination partition should be passed to “of”
Step 1: To take the backup:
Step 2: To recovery:
SCP (Secure copy)
——>SCP is used to copy data from one Unix or Linux system to another Unix or Linux server.
——>SCP uses a secured shell (ssh) to transfer the data between the remote hosts.
- Copies files within the same machine
- Copies files from the local machine to the remote machine
- Copies files from the remote machine to the local machine
- Copies files between two different remote servers.
Syn: SCP [options] [user from_Host: source_file]
-q ——> Progress bar not displayed
-p ——> copy files using the specified port number.
——>Copy file from local host to remote server:
——>Copy files from the remote host to the local server:
——>Copying a directory:
——>Improving the performance of SCP command:
Using Blowfish or Arcfour encryption will improve the performance of the SCP command
#SCP -c blowfish filename root@server254.example.com.com:
——> Specifying the port number:
For an in-depth understanding of Linux click on
How to Back Up and Restore Your Linux System Using the Rsync Utility
It’s easy to take for granted the importance of having a server backup — until you experience a system failure, a natural disaster, or a malware attack. This can potentially paralyze your business through the loss of vital records such as financial and customer data. Your ability to recover will only be as good as your last backup.
Server backups provide the much-needed confidence that data is not lost and can be recovered in case of any eventuality. However, each operating system has a different way to handle this, and while some provide built-in utilities to accomplish this, others must be established from the ground up. Like many other areas of management, Linux operating systems have more options, but require more knowledge to set them up successfully.
Like brushing your teeth, backing up your server regularly is an essential task that every Linux user should undertake. In addition to restoring from a major failure or attack, backups can save you time when you want to migrate data from one Linux system to another. Backups should always be encrypted and have the appropriate physical security controls in place for access if they are stored on premises.
There are multiple backup solutions available to Linux users. You could use a backup software that automatically backs up your system at predefined times. Alternatively, you could manually back up your server to an external hard drive, RAID array, or another remote server.
One of the handiest and reliable backup tools you can use to back up your server is the rsync utility.
What Is the Rsync Tool?
The rsync tool, short for remote sync, is a file synchronization tool that intelligently backs up data locally or remotely. It compares the source and destination location and only transfers the portions of data that have changed. It’s an incremental backup tool that saves your time when huge backups are involved.
In this guide, we explore how you can back up and restore your Linux system using the rsync utility. We will demonstrate how you can back up your Linux system on an external drive.
Basic Syntax
The rsync syntax is pretty straightforward and quite similar to the cp or the scp (secure copy).
To demonstrate how rsync works, we will start by creating two separate directories:
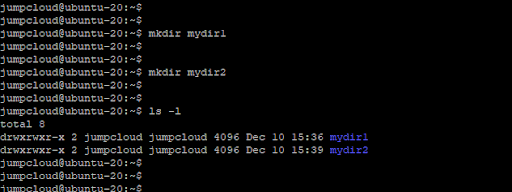
Next, we are going to create a few text files in the first directory.
To confirm the files exist, we will run the command:

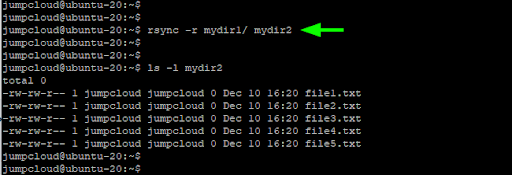
Next, we will sync all the files in mydir1 directory to mydir2 as follows.
The -r option stands for recursive. This implies that it takes into consideration all of the directory’s contents.
Additionally, you could use the -a option instead. This option not only syncs recursively, but also preserves attributes such as symbolic links, file ownerships, permissions, and modification times. In most cases, this option is preferred to the -r option.
Take note of the following:
In both commands, there is a trailing slash ( / ) after the first argument — which is mydir1. This specifies that only the contents of the directory, and not the directory itself in its entirety, is to be copied.
Without the trailing slash, the entire mydir1 directory would be placed into mydir2 directory.

The -v option prints out the syncing process in verbose.

Now that you have a basic understanding of how rsync works, let’s now switch gears and explore how you can back up and restore a Linux system using the utility.
How to Make a Local Backup Using the Rsync Tool
Disclaimer: This method is recommended for standalone systems that are not accessed by other users or processes in the network since some data will constantly change with each passing minute and interfere with the backup process.
The rsync command-line tool is the most preferred backup tool in Linux systems for multiple reasons. It allows you to make incremental backups including the entire directory tree, both locally and on a remote server. Better yet, you can automate the backups using shell scripts and cron jobs.
In this section, we are going to demonstrate how you can back up your system on an external drive. You can also learn how to back up your system to another remote Linux system if you’d prefer in a different tutorial.
Keep reading to learn how to make a local backup.
Unmount, Format, and Remount the External Device
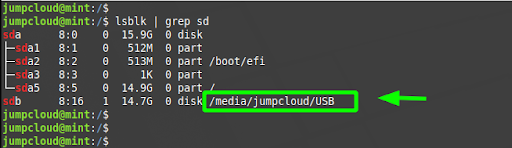
First, insert your external USB drive and take note of its SCSI ID. This can be done with different external devices as well. In the output, we can see it is labelled sdb .The complete SCSI ID for the device is /dev/sdb/ and it is currently mounted on the /media/jumpcloud/USB mount point.
To use the USB drive as a backup destination, we need to format it to the ext4 filesystem. To achieve this, we will first unmount it.
Once unmounted, format the external drive to ext4 filesystem using the mkfs command as follows:
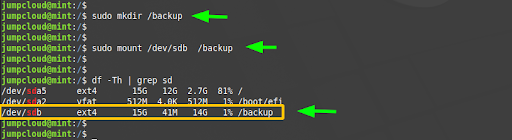
Next, we are going to mount it back so the Linux system can detect it. To do so, we will create a mount point called /backup as follows. This is simply an arbitrary name and you are free to name it as you wish.
Then mount the external drive to the mount point created.
Verify the Device is Mounted
You can verify the drive is mounted using the df command as follows:
Test Run the Backup
At this juncture, we are ready to begin the backup. It’s always recommended to test the backup before running the real backup. Remember, an untested backup is as good as no backup at all.
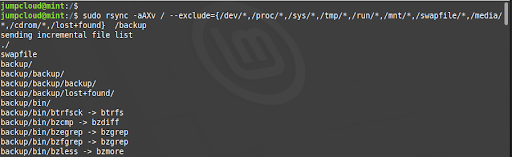
To carry out a test run, navigate to the root ( / ) directory.
Let us quickly go over the command options:

sudo – This allows you to execute the command as the root user or superuser.
rsync – This is the backup program itself.
-A – This preserves the Access Control List.
-X – This preserves all extended file attributes of the files.
The last three options allow you to preserve all of your files’ attributes. During the backup process, no permissions or ownership attributes will be defined.
-v – This is the verbose option. It prints the backup process on the terminal.
–delete – This option enables you to make an incremental backup. In simple terms, with exception of the first backup, it only backs up the difference existing between the source and the destination backup drive. It only backs up new and modified files as well as deletes all the files in the backup location which have been deleted.
–dry-run – This is the option that simulates the backup process.
–exclude – As the name suggests, it excludes specific folders and files from being backed up. The files and folders to be excluded are defined between the double curly braces < >.
Run the Actual Backup and Restore Backup to Other PCs
Once the test run is complete, now run the actual backup command:
The backup process takes quite some time, depending on the data on the directories you are backing up.
How to Restore the Backup
Once the backup is complete, you can easily restore it on another PC. First, create directories for both the USB drive and the file system:
Next, mount your external device.
$ sudo mount /dev/sdb /mnt/drive
And the filesystem as well.
$ sudo mount /dev/sda5 /mnt/system
In our case, /dev/sda5 is currently mounted on root ( / ). For your case, it might be something like /dev/sda1 if all the partitions fall under the root directory.
Next, perform the backup as shown.
$ sudo rsync -aAXv –delete /mnt/drive /mnt/system
Again, this will take a bit of time.
Conclusion
Rsync is a versatile and useful open source tool you can conveniently use to create a backup copy of your system and restore it. If you’d like to learn more about other ways to help manage the security of your Linux system, check out one of these Linux tutorials: