- How to use «grep» command to find text including subdirectories
- 12 Answers 12
- How Do I Use Grep to Search a File on Linux?
- Syntax
- Prerequisites
- Grep Installation
- Grep Manual
- Show all Files
- File Creation if not Already Exists
- Search File by Sorting a Word
- Search File using “-l”
- Search File by File Extension
- Search File by Using “-e”
- Search Data of a Single File
- Search Data through more than a Single File
- Show Word Existence in File
- Conclusion
- About the author
- Aqsa Yasin
- Grep Command Tutorial – How to Search for a File in Linux and Unix with Recursive Find
- How to use grep
- Options used with grep
- 1. -n (—line-number) — list line numbers
- 2. -c (—count) — prints the number of lines of matches
- 3. -v (—invert-match) — prints the lines that do not match the specified pattern
- 4. -i (—ignore-case) — used for case insensitivity
- 5. -l (—files-with-matches) — print file names that match a pattern
- 7. -o (—only-matching) — print only the matched pattern
- 8. -A (—after-context) and -B (—before-context) — print the lines after and before (respectively) the matched pattern
- 9. -R (—dereference-recursive) — recursive search
- Regular expressions for patterns
- 1. ^pattern — start of a line
- 2. pattern$ — end of a line
- Wrap up
How to use «grep» command to find text including subdirectories
I want to find all files which contain a specific string of text. The grep command works, but I don’t know how to use it for every directory (I can only do it for my current directory). I tried reading man grep , but it didn’t yield any help.
grep -RIn
Use the find and grep combination to recursively search files for a string in current and all sub directories. Check this wilddiary.com/find-files-containing-my-text
12 Answers 12
It would be better to use
- -r (or —recursive ) option is used to traverse also all sub-directories of /path , whereas
- -l (or —files-with-matches ) option is used to only print filenames of matching files, and not the matching lines (this could also improve the speed, given that grep stop reading a file at first match with this option).
Actually if «string» is a text pattern to find, it’s better to use that functionality, otherwise someone can face problems when the string contains dot or special character which has meaning in regular expressions and not just a dot which should be found as a string, as-is. Then I would use -rlF switches, -F for «fixed string» (and not regexp — for example). Of course, if the task was using regexps, then excuse me. Sure, the same theory without -r too, I often see that people assumes grep searches «text» and it can cause problems which special ones which mean something as a regexp.
How Do I Use Grep to Search a File on Linux?
![]()
Grep is a versatile command that allows sorting input by following complex rules and regulations. It is a powerful command in a Linux environment. It is not for searching files directly on your system. It shows the file names that indicate the particular part of the string that matches your part present in the search query. In the proceeding article, we will explain some examples to let you understand searching with the help of Grep.
Syntax
The pattern should be a word or symbol that is to be searched in the file.
Prerequisites
For successful working of Grep in your system, you must have Linux operating system installed. After configuration, you will give the user information to have privileges to access the applications installed. Moving forward, go to the terminal command line by using a shortcut key ctrl+alt+T.
Grep Installation
If you haven’t yet installed Grep, you can install repositories of Grep in Ubuntu by using this command.
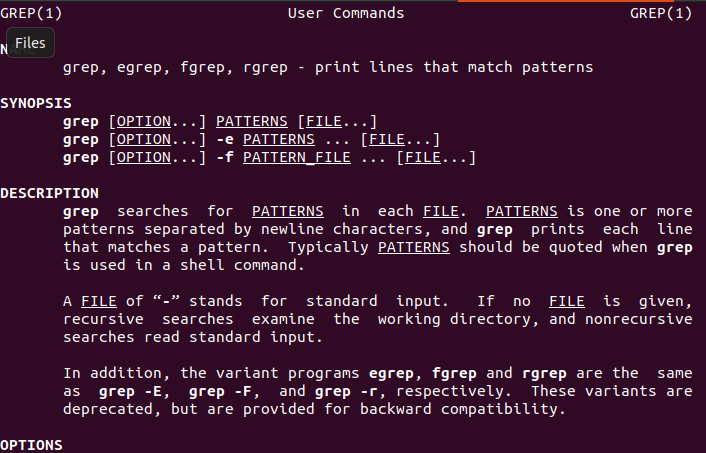
Grep Manual
To know about the Grep commands, we can go to the man page. Grep is very versatile and allows users to use it in complicated ways.

Some examples that help in understanding the functionality of Grep are as follows:
-I distinctions on the case is ignored
-n print the line number with output
-r search all directories on Linux
–color Display the matched result in colors
Show all Files
If you already have Ubuntu files and want to list them to see all filenames and extensions, you can use the following cited command.
You will simply use the “ls” command to display all files created.

File Creation if not Already Exists
To understand the functionality of searching a file, we need to have a file or files created in our system. If you don’t have any files, then you should create files. File in Linux is made in more than one way. A simple method that we are going to use is described as following.
The echo word is used to display data in the Linux command. Using this command, the user will be able to create a file and enter data in it by using the same command. In the particular example, the name of the file is file20.txt. As the file contains text, so we have used the file extension of ”.txt.”

Similarly, another example of file creation is that we have created more than one file at a time.

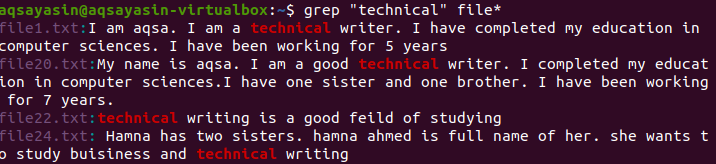
Search File by Sorting a Word
A file in Linux can be searched through a word. The syntax is quite comprehensible.
This command shows not only the filename but also the data present in it. In the current example, you will know that the word through which we have searched is highlighted to show its existence in the file. Moreover, the filename is written initially, “File*” means to search that particular word in all files. That’s how a single word helps in obtaining the output of filenames.
Search File using “-l”
“-l” is a command used to display only the names of files in Linux.
As the command mentioned above, “my” is a word that we want to search in files. As we have described above that “file*” means to search in all files created in the system. We can observe that there are four filenames with”.txt” extensions and one without any extension. It means that all files having particular words are shown. We will further see how specifically we can search a file by mentioning the extension.

Search File by File Extension
In the previous example, we have seen that by sorting all files were displayed. But to show filenames of specific extensions below written command is used “*.txt” represents the extension type of a file so that all files should be of this extension.
This is basic discrimination between the last two examples which is held through file extension.

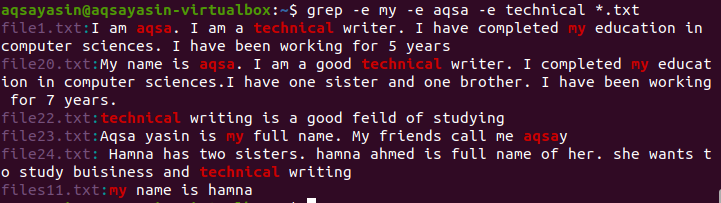
Search File by Using “-e”
There might exist a situation wherein you want to search files with the help of more than one word in different files. In these types of scenarios, we should use the“-e” command-line option. For example, you want to search those files having three specific words, then this command is recommended. Searching will be applied to all files present in your current working directory. These files must be of text extension as there is a limitation of text.
Grep, Aqsa, and Technical are three words based to search files. All these words are highlighted wherever these words are found in particular files. Filenames are mentioned in the starting. There is a possibility of the existence of only a single word in a file.
Search Data of a Single File
In previous examples, we have seen that the filename is displayed with data present in the file. If we don’t know the data present in the file or a single word is rememberable, we can search within the file with the help of the word.
In this example, the command fetches whole data with the help of a word in the file.

Search Data through more than a Single File
Like the preceding example, here searching is done by one word but in two files. Both files are of text extension, and the word that is present in both files are highlighted. Filenames are also displayed as we have searched with the help of both filenames.

Show Word Existence in File
To check file existence or presence of the words in a file. The“-q” flag is used, and it works to search particular terms in all files that display “1” or “0” as output. If “1” comes, it means there is no match, but if the match is found, it shows ”0”.

Conclusion
We have explained each example in detail to pursue information for users. It will apply to the Grep file searching effortlessly on files and within the files in the Linux environment.
About the author
Aqsa Yasin
I am a self-motivated information technology professional with a passion for writing. I am a technical writer and love to write for all Linux flavors and Windows.
Grep Command Tutorial – How to Search for a File in Linux and Unix with Recursive Find

Dillion Megida

grep stands for Globally Search For Regular Expression and Print out. It is a command line tool used in UNIX and Linux systems to search a specified pattern in a file or group of files.
grep comes with a lot of options which allow us to perform various search-related actions on files. In this article, we’ll look at how to use grep with the options available as well as basic regular expressions to search files.
How to use grep
Without passing any option, grep can be used to search for a pattern in a file or group of files. The syntax is:
Note that single or double quotes are required around the text if it is more than one word.
You can also use the wildcard (*) to select all files in a directory.
The result of this is the occurences of the pattern (by the line it is found) in the file(s). If there is no match, no output will be printed to the terminal.
For example, say we have the following files (called grep.txt):
Hello, how are you I am grep Nice to meet you The following grep command will search for all occurences of the word ‘you’:
Hello, how are you Nice to meet you you is expected to have a different color than the other text to easily identify what was searched for.
But grep comes with more options which help us achieve more during a search operation. Let’s look at nine of them while applying them to the example above.
Options used with grep
1. -n (—line-number) — list line numbers
This prints out the matches for the text along with the line numbers. If you look at the result we have above, you’ll notice there are no line numbers, just the matches.
1: Hello, how are you 3: Nice to meet you 2. -c (—count) — prints the number of lines of matches
Note that if there was another ‘you’ on line one, option -c would still print 2. This is because it is concerned with the number of lines where the matches appear, not the number of matches.
3. -v (—invert-match) — prints the lines that do not match the specified pattern
Notice that we also used option -n ? Yes, you can apply multiple options in one command.
4. -i (—ignore-case) — used for case insensitivity
# command 1 grep You grep.txt # command 2 grep YoU grep.txt -i # result 1 # no result # result 2 Hello, how are you Nice to meet you 5. -l (—files-with-matches) — print file names that match a pattern
# command 1 grep you grep.txt -l # command 2 grep You grep.txt -i -l # result 1 grep.txt # result 2 # all files in the current directory that matches # the text 'You' case insensitively #### 6. `-w` (--word-regexp) - print matches of the whole word By default, grep matches strings which contain the specified pattern. This means that grep yo grep.txt will print the same results as grep yo grep.txt because ‘yo’ can be found in you. Similarly, ‘ou’.
With the option -w , grep ensures that the matches are exactly the same pattern as specified. Example:
7. -o (—only-matching) — print only the matched pattern
By default, grep prints the line where the matched pattern is found. With option -o , only the matched pattern is printed line by line. Example:
8. -A (—after-context) and -B (—before-context) — print the lines after and before (respectively) the matched pattern
grep grep grep.txt -A 1 -B 1 Hello, how are you I am grep Nice to meet you This matched pattern is on line 2. -A 1 means one line after the matched line and -B 1 means one line before the matched line.
There’s also a -C (—context) option which is equal to -A + -B . The value passed to -C would be used for -A and -B .
9. -R (—dereference-recursive) — recursive search
By default, grep cannot search directories. If you try doing so, you’ll get an error («Is a directory»). With option -R , searching files within directories and subdirectories becomes possible. Example:
# 'you' matches in a folders # and files starting from the # current directory Regular expressions for patterns
grep also allows basic regular expressions for specifying patterns. Two of them are:
1. ^pattern — start of a line
This pattern means that the grep will match the strings whose lines begin with the string specified after ^ . Example:
2. pattern$ — end of a line
In contrast with ^ , $ specifies patterns that will be matched if the line ends with the string before $ . Example:
1: Hello, how are you 3: Nice to meet you Wrap up
grep is a powerful tool for searching files in the terminal. Understanding how to use it gives you the ability to easily find files via the terminal.
There are more options attached to this tool. You can find with man grep .
Dillion Megida
Developer Advocate and Content Creator passionate about sharing my knowledge on Tech. I simplify JavaScript / ReactJS / NodeJS / Frameworks / TypeScript / et al My YT channel: youtube.com/c/deeecode
If you read this far, tweet to the author to show them you care. Tweet a thanks
Learn to code for free. freeCodeCamp’s open source curriculum has helped more than 40,000 people get jobs as developers. Get started
freeCodeCamp is a donor-supported tax-exempt 501(c)(3) charity organization (United States Federal Tax Identification Number: 82-0779546)
Our mission: to help people learn to code for free. We accomplish this by creating thousands of videos, articles, and interactive coding lessons — all freely available to the public. We also have thousands of freeCodeCamp study groups around the world.
Donations to freeCodeCamp go toward our education initiatives, and help pay for servers, services, and staff.