- How can I install a .bin file?
- 8 Answers 8
- Installing Prebuilt Binaries in Ubuntu
- How does apt-get work?
- Prebuilt packages
- Real examples
- Go
- ArangoDB
- Clang + LLVM
- References and Further Reading
- How to Install Software from Source in Linux
- Downloading the Source Code
- Installing Vim from Source Code
- How to Install or Execute a .bin File in Ubuntu Linux
- Install Or Execute Bin File
- Conclusion
How can I install a .bin file?
I want to update Acrobat Reader for Firefox, but the download has the .bin extension. How can I install it?
You should always try to install software from repositories (that is using synaptic/software center) to get security updates, new release,etc much more easily. Please note that you won’t get support (from launchpad.net, ubuntuforums.org or other Ubuntu support channels) for applications that aren’t installed from official sources.
8 Answers 8
Go into a terminal and issue the following command in the directory where the bin file is,
If you get a permission error and/or you’re dealing with an installer that applies system-wide changes you might have to launch your application with root privileges:
Hi, I am very illiterate in terminal. I have the bin file in desktop. Please tell me how to execute it. thanks
In terminal type cd Desktop and press enter.And then type chmod a+x name_of_file.bin and press enter.Finally type sudo ./name_of_file.bin It will install the bin file.
if you wanted to do this without the terminal you can flip executable bit with right click properties -> permissions -> set executable bit. but run as I don’t know how to do without a terminal
Right click and select properties then go to permissions tab and tick allow excecuting.

Now double click the file and select run.
Some binaries require to be run from a terminal. If that’s the case with your .bin file and/or nothing happens after double-clicking, drag the file into a new terminal window and run it by pressing ‘Return’. The output should give you a clue on what’s wrong.
So! 1. I changed the «allow exectuing » from properties. 2. used chmod to change permission, currently the permission is -rwxr-xr-x- 3. then i executed using .?filename.bin there is no response after that! what should i do?
If you want to globally install any binary, use the install command.
sudo install ./mybin /usr/bin/ The install command is used to copy files, and it does so by combining several commands into one to make them easy to use, i.e. cp , chown , chmod , and strip .
I want to update the Acrobat reader for firefox.
Adobe Reader is available in the Software Center.
Important note: This is only relevant for packages that don’t have a 64-bit version (e.g. Acrobat Reader). Installing ia32-libs is not required if you can download a 64-bit executable and/or are running a 32-bit system in the first place.
If your 64-bit Ubuntu doesn’t have the following package installed , you will not able to access Acrobat Reader.
sudo apt-get install ia32-libs chmod a+x yourfile.bin sudo ./yourfile.bin Installing Prebuilt Binaries in Ubuntu
The primary way of installing software in Ubuntu and other Debian-based distros is through apt-get. It downloads packages from repositories and installs them locally. However, sometimes you might have to install packages that come as prebuilt binaries.
How does apt-get work?
apt-get locates packages on the software repositories listed in /etc/apt/sources.list or /etc/apt/sources.list.d. It uses dpkg as backend to perform the installation on your system. In order to locate where a package has been installed, run dpkg -L package_name .
1
2
3
4
5
6
7
8
9
10
11
12
13
14
15
16
17
18
dpkg -L vim
/.
/usr
/usr/bin
/usr/bin/vim.basic
/usr/share
/usr/share/bug
/usr/share/bug/vim
/usr/share/bug/vim/presubj
/usr/share/bug/vim/script
/usr/share/doc
/usr/share/doc/vim
/usr/share/doc/vim/NEWS.Debian.gz
/usr/share/doc/vim/changelog.Debian.gz
/usr/share/doc/vim/copyright
/usr/share/lintian
/usr/share/lintian/overrides
/usr/share/lintian/overrides/vim
The example above displays all the files that come with the vim package. Run apt show vim to get more details.
Prebuilt packages
Things can be really smooth with apt or apt-get , but when dealing with prebuilt packages, some manual intervention is required. These packages generally come as .tar.gz archives containing compiled binaries for a specific platform. You have to extract them and move the contents to /usr/local or /opt for a system-wide installation. /usr/local is for use by the system administrator when installing software locally, while /opt if for installing packages that are not part of the operating system. It’s up to you which one you choose, in my experience either works fine. Let’s say you want to install a prebuilt package named example.tar.gz. Note that any of the steps described bellow may require root privileges.
tar -C /opt -xzf example.tar.gz
- -C is used to change the target directory
- x is used to extract files from the archive
- z is used to filter the archive through gzip. For .tar.xz archives use J instead of z, and for .tar.bz2 use j.
- f indicates the archive to be processed
export PATH=«$PATH:/opt/example/bin»
Real examples
Go
You can find the official tutorial on golang.org.
wget https://golang.org/dl/go1.17.2.linux-amd64.tar.gz
sudo tar -C /opt -xzf go1.17.2.linux-amd64.tar.gz
# This line should be in your .bashrc file.
export PATH=«$PATH:/opt/go/bin»
go version
go version go1.17.2 linux/amd64
ArangoDB
Note that this may also be installed using apt-get . You can find details on arangodb.com.
wget https://download.arangodb.com/arangodb38/Community/Linux/arangodb3-linux-3.8.1.tar.gz
sudo rm -rf /opt/arangodb3-linux-3.8.1
sudo tar -C /opt -xzf arangodb3-linux-3.8.1.tar.gz
# This line should be in your .bashrc file.
export PATH=«$PATH:/opt/arangodb3-linux-3.8.1/bin»
arangod —version
3.8.1
architecture: 64bit
# .
# long output cropped
Clang + LLVM
Make sure the release is compatible with your OS version. Official releases available on github.
wget https://github.com/llvm/llvm-project/releases/download/llvmorg-10.0.0/clang+llvm-10.0.0-x86_64-linux-gnu-ubuntu-18.04.tar.xz
sudo rm -rf /opt/clang+llvm-10.0.0-x86_64-linux-gnu-ubuntu-18.04
sudo tar -C /opt -xJf clang+llvm-10.0.0-x86_64-linux-gnu-ubuntu-18.04.tar.xz
# This line should be in your .bashrc file.
export PATH=«$PATH:/opt/clang+llvm-10.0.0-x86_64-linux-gnu-ubuntu-18.04/bin»
clang —version
clang version 10.0.0
Target: x86_64-unknown-linux-gnu
Thread model: posix
InstalledDir: /opt/clang+llvm-10.0.0-x86_64-linux-gnu-ubuntu-18.04/bin
References and Further Reading
How to Install Software from Source in Linux
The most widely used Linux distributions, for example, Debian, Ubuntu, RedHat, Fedora, and many more, have a packaging system for distribution software. Binaries and configuration files of software are bundled in a package, which is nothing but an archive file, from which the package managers install the software.
However, advanced Linux users, developers, and those who are more on the geeky side of things often install software directly from the source code; i.e., manual compilation and installation.
As almost all software in GNU/Linux systems is free and open-source software, the source code is publicly available, usually in a version control system repository or even in the standard repositories in some distributions.
Let us take a look at how you can install software directly from its source code in Linux. For the purpose of demonstration, I am using Ubuntu 20.10. However, the steps are common to all Linux distributions.
Downloading the Source Code
The source code of any open-source software is usually available in a version control system, for example, Git. Developers also often maintain a source code download page on their website, from where the source code archive files can be downloaded.
As an example, I will try to install the text editor ‘Vim‘ from the source. First of all, install Git if it is not already present in the system, with the following command:
$ sudo apt install git [On Debian, Ubuntu & Mint] $ sudo yum install git [On RHEL, CentOS & Fedora] $ sudo pacman -S git [On Arch & Manjaro Linux] $ sudo zypper in git-core [On OpenSuse]
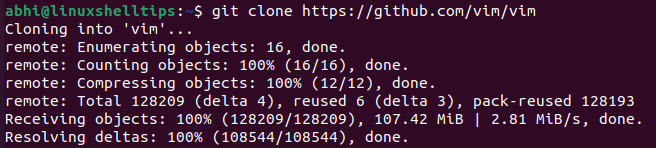
Then download the Vim source code using Git with the following syntax:
$ git clone https://github.com/vim/vim
If the source code for your software is not available via Git, you need to download the ‘.tar.gz’ package, extract the source code from the package with the following command:
Once the Git repository is cloned, or the package is extracted, go to the source code folder.

You can see the source code files for Vim in the screenshot above.
Installing Vim from Source Code
The first step while installing software from the source is to install the development tools. In Debian and Ubuntu, they are part of the package ‘build-essential‘.
In RedHat, CentOS, etc. these tools are a part of the Development Tools group. This package installs the most common software which are required to compile source code.
$ sudo apt install build-essential [On Debian, Ubuntu & Mint] $ sudo yum groupinstall "Development Tools" [On RHEL, CentOS & Fedora] $ sudo pacman -S base-devel [On Arch & Manjaro Linux] $ sudo zypper install -t pattern devel_C_C++ [On OpenSuse]
Next, run the ‘ ./configure ‘ file inside the Vim directory. The configure file is a script that checks various things; for example, if required environment variables are set, or if the dependencies required for the software are met in your system.
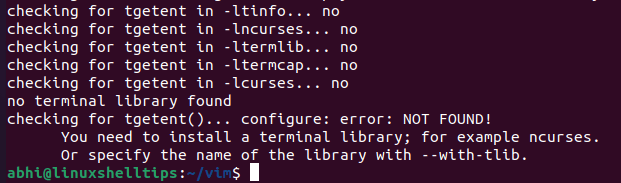
As you can see, the configure script has shown the error that no terminal library was found and suggested a library ‘ncurses‘. To install ‘ncurses‘ and all such missing dependencies use the package manager depending on which distro you are using.
$ sudo apt-get install libncurses5-dev libncursesw5-dev [On Debian, Ubuntu & Mint] $ sudo yum install ncurses-devel [On RHEL, CentOS & Fedora] $ sudo pacman -S ncurses [On Arch & Manjaro Linux] $ sudo zypper install ncurses [On OpenSuse]
and then run ‘ ./configure ‘ again.
Once the configure script is successfully completed, the next step is to compile the source code to generate the binaries. Run the ‘make‘ command to achieve this:
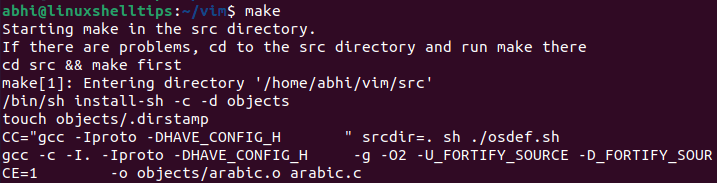
Make will take some time to compile, depending on the size of your software. Once ‘make‘ completes, the binary files are ready. Run the following to install the binaries and the configuration files in appropriate locations:
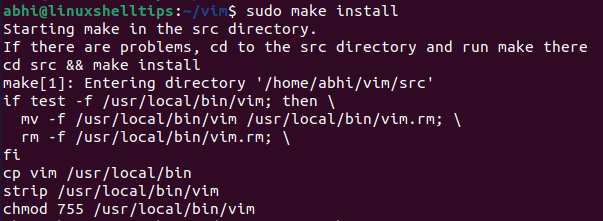
Once the command completes successfully, verify if Vim has been installed:

This completes the process of installing software in Linux from the source code.
Conclusion
We saw in a few easy steps how to install software from source in Linux. Obviously, software installed in this way is not managed by a package manager and hence all the latest updates, including the vital security updates, cannot be applied on Vim in this case.
Hence, this way should not usually be used for productive usage; only for development, learning, and similar purposes. Thanks a lot for reading and share your thoughts with us in the comments below!
How to Install or Execute a .bin File in Ubuntu Linux
Binary Files can be in .bin or .run files under Ubuntu Linux. and the .bin or .run is the only file types, and you need to mark as executable permission to install it on your Ubuntu system. You can install it either in terminal or through GUI.
Install Or Execute Bin File
This guide will introduce two methods to install executable file under Ubuntu Linux. And executable files can also be recognized by the extension .bin and .run.
Terminall Installation
Here are the steps to install .bin files via terminal on Ubuntu:
#1 you need to download the .bin file that you want to install.
#2 Open a terminal window by clicking the Ubuntu terminal icon located on the Launcher taskbar. and then searching for “Terminal” and then clicking Terminal icon on the result page. or you can right click on the desktop, and select Terminal from the popup menu list to open one terminal window.
#3 change the current directory to your directory where the executable file is stored. for example, you have downloaded .bin files into the /tmp directory. Then type the following command:
#4 You need to mark the file permission as executable with the following chmod command, type:
Then type the required password for root, and press Enter key. And the file can be executed by the current user with root privileges now.
#5 the bin file can be run in the terminal by typing the following command:
If you hit an error message such as “permission denied”, and you can try to execute the file by adding sudo before the above command.
GUI Installation
You can also install the executable binary files via Ubuntu Desktop GUI. Here are the steps:
#1 Click the Files icon on the Ubuntu Launcher to start the File Manger and then change to the directory in which the executable file is stored.
#2 right click on the BIN file and select Properties from the popup menu list, and the Properties dialog will appear. then switch to Permissions tab, and check the Allow Executing File as Program. then click the Close button.
#3 double-click on the .run or .bin file. and if there is no any action appears to be happening, and you need to run it in the terminal.
Conclusion
You should know that how to install the executable binary file (.bin or .run) on your Ubuntu 14.04 or 16.04 or 18.04 Linux from this guide.