- How to Install and Use dig and nslookup Commands in Linux
- Installing dig & nslookup in CentOS/RHEL
- Installing dig & nslookup on Debian / Ubuntu
- Installing dig & nslookup on ArchLinux
- Using the dig command
- Using the nslookup Command
- How to install software from the Linux command line
- What is a package management system?
- Debian, Ubuntu, Mint, and others
- RHEL, CentOS, Fedora, Mageia, and OpenMandriva
- Linux Install Command Tutorial
- Linux Install Command, All Linux Distros
- Install Option Commands
- Conclusion
How to Install and Use dig and nslookup Commands in Linux
In this article, you will learn how to install the dig command and nslookup command on Linux. These commands are used for network troubleshooting and gathering information about domain names.
Dig, short for Domain Information Gopher, is a DNS lookup utility used for probing DNS servers and troubleshooting problems associated with DNS servers. Due to its ease of use, system administrators rely on the tool to troubleshoot DNS issues.
Nslookup is used for handling DNS lookups and displays crucial information such as MX records, and the IP address associated with a domain name.
Newer Linux system ship both dig and nslookup utilities by default. However, older Linux systems may not. The two come bundled inside the bind-utils package.
Let’s see how we can install DNS troubleshooting utilities in Linux.
On this page:
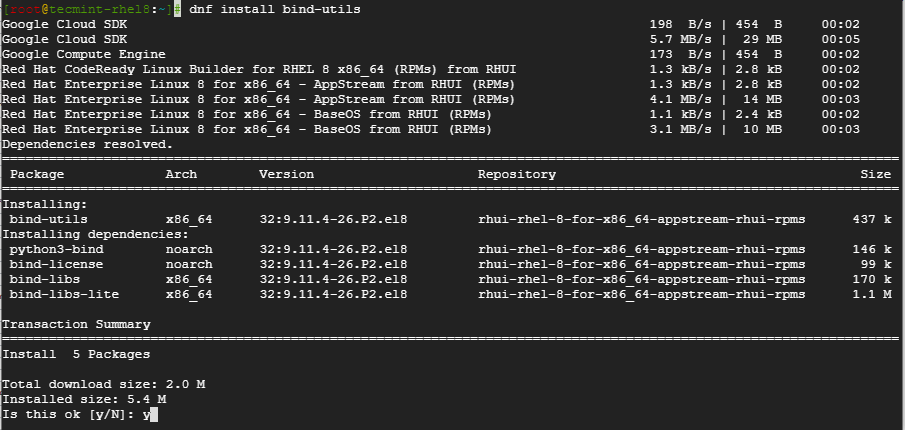
Installing dig & nslookup in CentOS/RHEL
On Red Hat Linux /CentOS, install dig and nslookup using the dnf command.
Upon successful installation, verify the version using the command below.

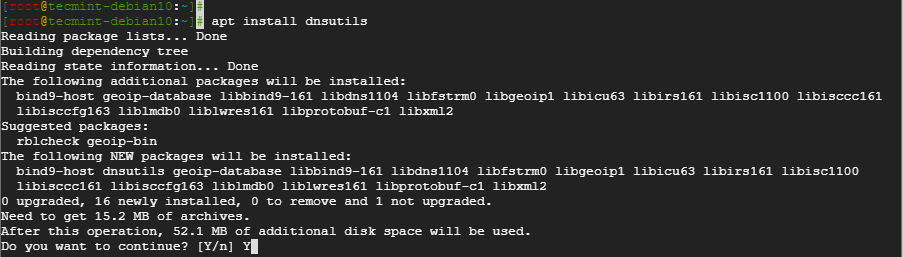
Installing dig & nslookup on Debian / Ubuntu
On Debian and any of its derivatives including Debian, the installation is done using the apt command.
Again, to verify the installation, run the command.

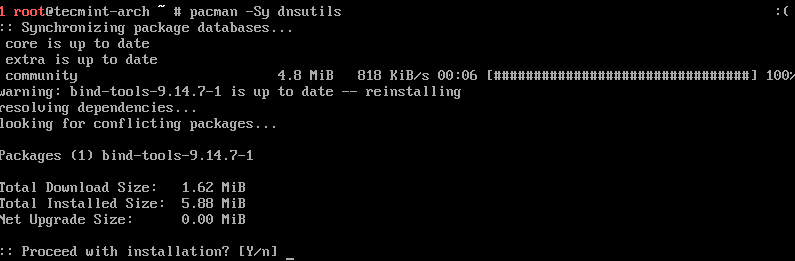
Installing dig & nslookup on ArchLinux
For ArchLinux, the command for installing dig and nslookup will be.
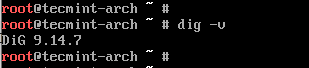
To check the version of dig installed, run.
Using the dig command
dig command can be used to query a domain name and retrieve information as shown:
The command displays a host of information such as the version of the dig command utility, the DNS server, and its corresponding IP address.
Sample Output
; > DiG 9.11.3-1ubuntu1.9-Ubuntu > fossmint.com ;; global options: +cmd ;; Got answer: ;; ->>HEADERTo get more specific and display only the IP of the domain name append the +short argument as shown:
# dig fossmint.com +short 104.17.179.254 104.17.171.254To check the MX record of the domain name run.
# dig fossmint.com MX +short 50 mx3.zoho.com. 20 mx2.zoho.com. 10 mx.zoho.com.Using the nslookup Command
To retrieve information about a domain name using the nslookup utility, use the following command.
Sample Output
Server: 127.0.0.53 Address: 127.0.0.53#53 Non-authoritative answer: Name: fossmint.com Address: 104.27.179.254 Name: fossmint.com Address: 104.27.171.254 Name: fossmint.com Address: 2606:4700:30::681b:b0fe Name: fossmint.com Address: 2606:4700:30::681b:b1feConclusion
In this article, you learned how to install dig and nslookup command utilities in different Linux distributions and also the basic usage of the commands. We do hope that you can now comfortably install the utilities when confronted with a system without them.
How to install software from the Linux command line
If you use Linux for any amount of time, you'll soon learn there are many different ways to do the same thing. This includes installing applications on a Linux machine via the command line. I have been a Linux user for roughly 25 years, and time and time again I find myself going back to the command line to install my apps.
The most common method of installing apps from the command line is through software repositories (a place where software is stored) using what's called a package manager. All Linux apps are distributed as packages, which are nothing more than files associated with a package management system. Every Linux distribution comes with a package management system, but they are not all the same.
What is a package management system?
A package management system is comprised of sets of tools and file formats that are used together to install, update, and uninstall Linux apps. The two most common package management systems are from Red Hat and Debian. Red Hat, CentOS, and Fedora all use the rpm system (.rpm files), while Debian, Ubuntu, Mint, and Ubuntu use dpkg (.deb files). Gentoo Linux uses a system called Portage, and Arch Linux uses nothing but tarballs (.tar files). The primary difference between these systems is how they install and maintain apps.
You might be wondering what's inside an .rpm , .deb , or .tar file. You might be surprised to learn that all are nothing more than plain old archive files (like .zip ) that contain an application's code, instructions on how to install it, dependencies (what other apps it may depend on), and where its configuration files should be placed. The software that reads and executes all of those instructions is called a package manager.
Debian, Ubuntu, Mint, and others
Debian, Ubuntu, Mint, and other Debian-based distributions all use .deb files and the dpkg package management system. There are two ways to install apps via this system. You can use the apt application to install from a repository, or you can use the dpkg app to install apps from .deb files. Let's take a look at how to do both.
Installing apps using apt is as easy as:
$ sudo apt install app_nameUninstalling an app via apt is also super easy:
To upgrade your installed apps, you'll first need to update the app repository:
Once finished, you can update any apps that need updating with the following:
What if you want to update only a single app? No problem.
Finally, let's say the app you want to install is not available in the Debian repository, but it is available as a .deb download. You can install it manually using dpkg , the system that apt helps manage:
RHEL, CentOS, Fedora, Mageia, and OpenMandriva
Red Hat, its upstream project Fedora, and its "midstream" project CentOS, use the dnf package manager. It has its own syntax, and is a front-end to the RPM system. Although the syntax is different, dnf is similar to apt in the sense that the mechanisms and goals are the same. The Mageia and OpenMandriva distributions, once focused exclusively on urpmi for package management, now also includes dnf in their distributions.
The dnf package manager is the successor to the previous yum command. The yum had a long time to engrain itself in the minds and servers of users, so to avoid breaking custom scripts that have been around on users' systems for over a decade, yum and dnf are now interchangeable (in fact, yum is now based on dnf .)
$ sudo dnf install app_nameRemoving unwanted applications is just as easy.
The dnf (or yum ) command is a front-end for the RPM packaging system. If you can't find an app in your software repository but you can find it for download directly from its vendor site, you can use dnf to manually install an .rpm file.
$ sudo dnf install ./app_name.rpmAs you can see, installing, uninstalling, and updating Linux apps from the command line isn't hard at all. In fact, once you get used to it, you'll find it's faster than using desktop GUI-based management tools!
For more information on installing apps from the command line, please visit the Debian Apt wiki, the Yum cheat sheet, and the DNF wiki.
Linux Install Command Tutorial
Find out everything you need to know about the Linux install command, and much more in this detailed blog.
List of content you will read in this article:
The install command in Linux is used to copy files to a given location and assign attributes to them. It transfers data to a designated location. As the name implies, it is not used to install applications. Depending on the distribution method, we could use apt-get, apt, yum, and other tools to download and install the software. It's quite close to the order 'cp'. It also gives us leverage over the properties of the destination data.
It's mostly used to copy programs from makefiles to their final destination. It would not copy files to itself. So in this guide, you will get brief information on the Linux "install command" and its use in all Linux distros.
Linux Install Command, All Linux Distros
The install command incorporates components from various commands, including cp, chown, chmod, mkdir, and strip. It enables one to combine the functions of all of these commands into a single operation.
install [OPTION]. [-T] SOURCE DEST
install [OPTION]. SOURCE. DIRECTORY
install [OPTION]. -t DIRECTORY SOURCE.
install [OPTION]. -d DIRECTORY.
The first three types are used to copy the source to a new directory or several sources to an existing directory and set permission modes and owner/group. On the other hand, the fourth form is used to construct all of the directory's components.
Install Option Commands
The install command provides the following option:

- --backup[=CONTROL]: For each current destination file, this alternative generates a backup file.
- -b: It's similar to the "--backup" alternative, except it doesn't need a claim.
- -C, --compare: It's used to compare each pair of source and destination files, and it doesn't always change the destination.
- -d, --directory: Both arguments would be treated as directory names if the "-d or -directory" option is defined.
- -D: It's used to build all of the target directory's components before copying the source to the destination.
- -g, --group=GROUP: It's used to determine the size of a group's holdings.
- -m, --mode=MODE:Instead of rwxr-xr-x, it is used to set the authorization mode (as in chmod).
- -o, --owner=OWNER: It's used to specify who owns what. Just the superuser has access to it.
- -p, --preserve-timestamps: The access time of the source file is applied to the specified file.
- -s, --strip: The strip symbol tables are generated with it.
- --strip-program=PROGRAM: It is used to remove the program's binaries.
- -S, --suffix=SUFFIX: It's used to replace the backup suffix that's usually used.
- -t, --target-directory=DIRECTORY: It copies all source arguments into the designated directory.
- -T, --no-target-directory: It's used to handle the destination file as if it were a regular file.
- -v, --verbose: It is used to print the directory names.
- --preserve-context: It aims to keep the SELinux security background secure.
- -Z: It's used to set the SELinux protection background of the destination file, as well as the default form of each newly generated directory.
- --help: The support manual is shown using the '-help' option.
- --version: It's used to display the details about the edition.
- Using the install button, we can tailor each folder and file to our specific requirements. It's seen like this:
install -D /src/folder/*.txt /dest/folder
The '-D' choice in the above command copies all text files from the source folder to the destination folder.
install -d /destination/newfolder
The command above will generate a new folder named 'newfolder' in the designated directory.
sudo install xyz.txt abc.txt Pictures
The above command copies the specified files to the 'Pictures' folder.
Conclusion
Many times people get confused with the install function and think it is used to install the software. Instead, it is widely used as a copy function. Different option commands can be used to execute different commands. We hope you got the complete details through our article and will use this command in your system.