- Before Getting Started
- Download
- Install
- BIOS
- Creating Installation Media
- Creating a LiveDVD
- To create a LiveUsb
- Final Install
- Cross-grading from Ubuntu To Ubuntu GNOME
- Basic or Auto Installation
- Side by Side
- Manual Installation
- Accessibility Options
- After Install
- How to Install GNOME Desktop Environment in Linux Mint
- Things to know before installing GNOME on Linux Mint
- Install GNOME Desktop Environment in Linux Mint
- Switching to GNOME
- Bonus Tip: How to Apply Themes with consistency
- Wrapping Up
- How To Install GNOME In Ubuntu Linux
- What is the difference between GNOME Shell and GNOME Desktop
- Installing GNOME in Ubuntu
- Switch to GNOME in Ubuntu
- Remove GNOME from Ubuntu
- Как установить Gnome на Ubuntu 20.04 LTS
- Установите Gnome на Ubuntu 20.04 LTS Focal Fossa
- Шаг 1. Во-первых, убедитесь, что все ваши системные пакеты обновлены, выполнив следующие команды apt в терминале.
- Шаг 2. Установка Gnome в Ubuntu 20.04.
- Шаг 3. После установки перезагрузитесь. В приглашении для входа выберите GNOME:
Before Getting Started
Before installing Ubuntu GNOME, you need to do a very important step:
Download
Once your personal files have been backed up, you can confidently move forward with download and then install.
Install
BIOS
The first action you’ll want to take is to enter into your BIOS. If you’ve never done this before, it can be achieved by pushing F2 Key or DEL Key or F10 Key while your computer is turning on. Lenovo has a special button to enter the bios that looks like an arrow with a curve in it. This may take a few tries, but one of the buttons will work.
Once you’re in the BIOS, poke around a bit using the arrow keys to navigate, and the enter key to «click». Spend a little time looking around and search for things you don’t understand.
The real thing you’re looking for is the Boot Order. Before the install, you will need to change this so that your CD drive or USB drive is the first device to boot from.
Creating Installation Media
There are several ways to install Ubuntu GNOME, and each has its advantages. USB is faster than DVD. Either way should work provided your system supports booting from a USB drive if you follow these directions exactly. If either of these methods doesn’t work, Please Contact Us!.
You need to create or borrow an Ubuntu GNOME DVD or USB-stick. Once you have an Ubuntu DVD or USB it should work as an installer and as a LiveDVD or LiveUSB.
Creating a LiveDVD
- A blank DVD-R or DVD-RW Note: you cannot use a CD, because they are not big enough.
- A computer that supports booting from a DVD. Most do, unless they don’t have a DVD drive.
Once you have burned the disc and changed your boot order (as described in BIOS), just put the disc in your drive, and reboot. Follow the guide of your choice from Final Install to complete the installation.
To create a LiveUsb
- A computer that supports booting from a USB (Check your bios).
- A USB drive of 2GB or more.
- Your preferred Download of Ubuntu GNOME.
Once you have created the LiveUSB and changed your boot order (as described in BIOS), just put the disc in your drive, and reboot. Follow the guide of your choice from Final Install to complete the installation.
For more information, please have a read at: Installing from USB.
Final Install
Cross-grading from Ubuntu To Ubuntu GNOME
First, you install the Ubuntu GNOME desktop, and enable GDM.
sudo apt-get install ubuntu-gnome-desktop^
Optionally, you can remove unneeded packages from Ubuntu.
sudo apt-get purge ubuntu-default-settings
sudo apt-get purge ubuntu-desktop
Basic or Auto Installation
This could be the easiest and shortest installation type. However, you should note that this will wipe any other system installed on the machine you are installing Ubuntu GNOME on.
Side by Side
This is the ideal type of install for the user who wants to be able to switch between Ubuntu GNOME and their existing OS at startup.
Manual Installation
This is the most customizable type of installation. It gives you more control over the installation process but a basic knowledge of Ubuntu Partitioning is required — also see HOWTO use Manual Partitioning during Installation. It is not a rocket science, yet you need to proceed with caution. In another word, you need to know what you’re doing. There are lots of information on the internet (videos, HOWTOs, articles, etc).
Accessibility Options
To install with accessibility options enabled, press F5 after you select your language and pick the options that you require. To use the speech installer, press CTRL + S after the disc has loaded. This will also enable GNOME screen reader on the installed system. Once your system is installed, the accessibility features can be re-enabled via the System Settings, in case you disable them by mistake.
After Install
Refer to our HowTo section for ideas about what to do next.
UbuntuGNOME/Installation (последним исправлял пользователь 200-90-252-22 2015-12-14 21:08:47)
The material on this wiki is available under a free license, see Copyright / License for details.
How to Install GNOME Desktop Environment in Linux Mint
Linux Mint is an excellent Linux distribution, especially for beginners.
I like that it stays on the familiar Ubuntu/Debian front and yet it does several things better than Ubuntu. One of them is that it doesn’t push Snaps down my throat.
However, I am not a fan of the Cinnamon desktop as I never really liked the Windows XP or 7’s default setup either.
As I was looking for the stability that Linux Mint offered with the ability to use GNOME and here’s what I got in the end:

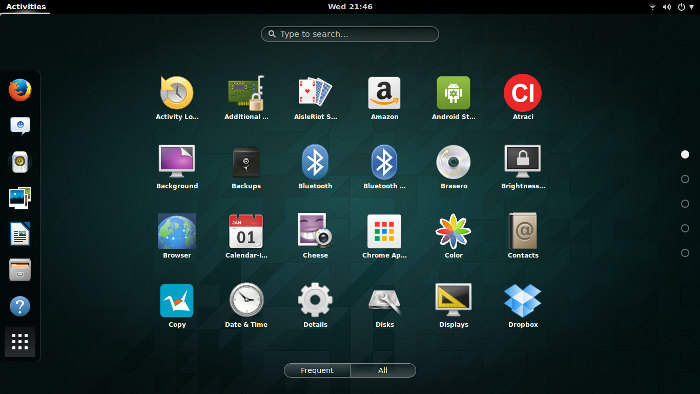
Nothing too fancy but this is my Linux Mint 21 running GNOME 42.5.
And if you want to install GNOME on Linux Mint, this guide is for you.
Things to know before installing GNOME on Linux Mint
You really should have good enough reasons to install GNOME on Mint. If you are just feeling experimental, try it in a virtual machine. I performed this tutorial with Linux Mint installed in VirtualBox.
The thing about installing a desktop environment other than the one provided by the distribution is that the removal part complicates the matter.
Cinnamon uses some GNOME elements. If you decide to remove GNOME later, it may impact some parts of Cinnamon.
This could be a cause of panic for inexperienced users. Of course, reinstalling the Cinnamon desktop from the TTY screen could be a possible solution here.
The gist of all this is that if you easily get spooked and don’t like troubleshooting, you should not do these ‘experiments’ on your main computer.
With that aside, let’s see the simple procedure of getting GNOME on Linux Mint.
Install GNOME Desktop Environment in Linux Mint
Here you have two options. Either you can go with a complete GNOME desktop which includes all the GNOME utilities, or you can go with the stripped-down version having the least amount of GNOME packages.
And I will be covering both.
To install GNOME with the least amount of GNOME utilities, you’d have to install a package named vanilla-GNOME using the given command:
sudo apt install vanilla-gnome-desktopAnd if you want to have a complete GNOME experience, you can simply install the gnome package:
Once you execute any of the two shown commands, you will be asked to choose the preferred display manager in the next step.
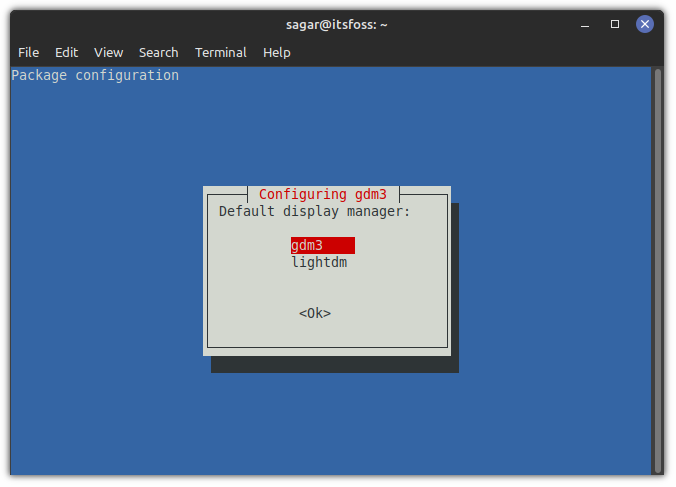
gdm3 is a display manager for the GNOME desktop while Linux Mint uses lightdm by default and both should work just fine, but I will suggest you go with gdm3 to have the complete GNOME experience.
Switching to GNOME
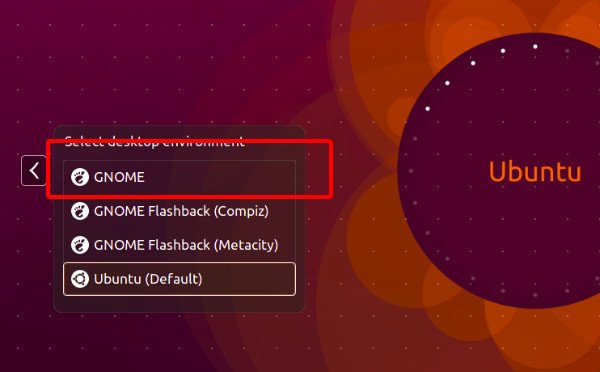
Once done, log out and hit enter once, and there you’d see a small gear icon. From here, choose GNOME:

And now, you have GNOME with Linux Mint as a base!
Bonus Tip: How to Apply Themes with consistency
You can use that Cinnamon themes, but most of them don’t work as expected, so I will recommend using GNOME themes such as Adwaita to have consistency around the desktop.
For me, the default fonts do not work at all, and I prefer something close to what Fedora offers. So open GNOME tweaks from the system menu and make changes as shown:

- Cantarell Regular (11) for both interface and document text.
- Noto Sans Mono Regular (13) for monospace text.
- Cantarell Bold (11) for window titles.
And it turned out to be far better than the default Ubuntu font scheme.
Since you have GNOME, you can use our detailed guide on installing and changing GNOME themes on Linux to make it as your heart desires.
Wrapping Up
As you can see, installing GNOME on Linux Mint is quite simple. And as I mentioned earlier, the removal part could complicate things as it has the possibility of removing some GNOME packages required by Cinnamon.
What is powering your main machine right now? I’m on Pop!_OS.
How To Install GNOME In Ubuntu Linux
In the series to install various desktop environment other than the default Unity, we have already seen:
Of course, the above two tutorials also contains the instructions to remove those desktop environments. Continuing the series, we shall see how to install GNOME Shell or GNOME desktop in Ubuntu.
Before we proceed to see the installation instructions, let’s first see the difference between GNOME Shell and GNOME Desktop.
What is the difference between GNOME Shell and GNOME Desktop
GNOME Shell is simply a desktop environment which changes the user interface. GNOME Desktop, on the other hand, has a lot more than GNOME Shell. Think of GNOME Desktop as a superset of GNOME shell. It contains GNOME Shell and various Gnome specific applications, packages along with gnome-session.
If you are wondering about whether you should install GNOME Shell or Desktop, I would suggest installing GNOME Shell. It will give you a feel of GNOME and you can easily remove it as well.
Installing GNOME in Ubuntu
GNOME is already included in Ubuntu software repository. All you have to do is to open a terminal (Ctrl+Alt+T) and use the following command to install GNOME Shell in Ubuntu 14.04:
sudo apt-get install gnome-shellSimilarly, to install GNOME Desktop, use the following command:
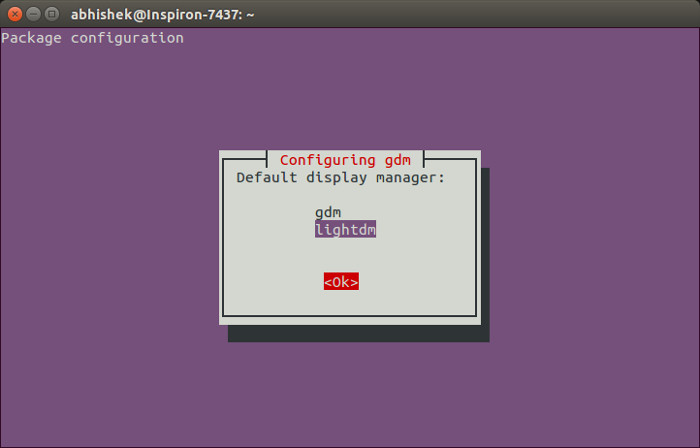
sudo apt-get install ubuntu-gnome-desktopRemember to choose LightDM when prompted for it during the installation. Use Tab to move between the choices and Enter to confirm your selection.
Switch to GNOME in Ubuntu
Once installed, log out of the system and click on the Ubuntu icobesidees the login field. Choose GNOME from the drop down:
This is what GNOME Shell looks like on my system:
Remove GNOME from Ubuntu
If you did not like GNOME and want to get rid of it, you can simply remove it using the following command if you installed GNOME Shell:
sudo apt-get remove gnome-shelland this command if you installed GNOME Desktop:
sudo apt-get remove ubuntu-gnome-desktopI hope this tutorial helped you to install GNMOE in Ubuntu . Since you have installed it, you should also consider to give it a different look and install themes in GNOME Shell with some of the best GNOME Shell themes. If you faced any issues, feel free to ask in the comment section. Ciao 🙂
Как установить Gnome на Ubuntu 20.04 LTS

В этом руководстве мы покажем вам, как установить GUI Gnome на Ubuntu 20.04 LTS. Для тех из вас, кто не знал, установка рабочего стола GNOME на Ubuntu очень проста. Большинство серверов Ubuntu работают в режиме CLI (интерфейса командной строки). Но в некоторых случаях может потребоваться рабочий стол для установки некоторых приложений в режиме графического интерфейса пользователя (Grapich User Interface). В этом случае мы будем использовать Gnome, самый популярный удобный рабочий стол для любой системы на базе UNIX.
В этой статье предполагается, что у вас есть хотя бы базовые знания Linux, вы знаете, как использовать оболочку, и, что наиболее важно, вы размещаете свой сайт на собственном VPS. Установка довольно проста и предполагает, что вы работаете с учетной записью root, в противном случае вам может потребоваться добавить sudo к командам для получения привилегий root. Я покажу вам пошаговую установку окружения рабочего стола Gnome на сервере Ubuntu 20.04 Focal Fossa.
Установите Gnome на Ubuntu 20.04 LTS Focal Fossa
Шаг 1. Во-первых, убедитесь, что все ваши системные пакеты обновлены, выполнив следующие команды apt в терминале.
sudo apt update sudo apt upgrade sudo apt install tasksel
Шаг 2. Установка Gnome в Ubuntu 20.04.
Чтобы установить ванильную версию GNOME для рабочего стола, выполните следующую команду:
sudo apt install gnome-session gdm3
Теперь мы используем tasksel команду для установки рабочего стола GNOME:
sudo tasksel install ubuntu-desktop
Шаг 3. После установки перезагрузитесь. В приглашении для входа выберите GNOME:

Поздравления! Вы успешно установили Gnome . Благодарим за использование этого руководства по установке среды рабочего стола Gnome с графическим интерфейсом пользователя в системе Ubuntu 18.04 LTS Focal Fossa. Для получения дополнительной помощи или полезной информации мы рекомендуем вам посетить официальный сайт Gnome .