- Classic SysAdmin: How to Install an SSL Certificate on Linux Server
- What is Plesk?
- How to install an SSL certificate on a Linux Server that has Plesk
- How to install SSL Certificate on Linux servers that do not have Plesk
- Настройка Apache + SSL для работы сайта по HTTPS
- Шаг 1. Создание сертификата
- Шаг 2. Установка модуля SSL для Apache
- Шаг 3. Настройка Apache
- Шаг 4. Проверка работоспособности
- Шаг 5. Настройка редиректа
- В конфигурационном файле
- В файле .htaccess
- Установка модуля rewrite
- Apache + NGINX
- How Do I Enable HTTPS On Apache Web Server
- Requirements.
- Installing Apache
- Enabling Mod_SSL and Mod_Rewrite Modules.
- Enable .htaccess Override
- Generating SSL Certificate
- Adding Cert to Apache Configuration
- Redirecting to HTTPS.
- Restart and Access Apache
- Conclusion
- About the author
- John Otieno
- RELATED LINUX HINT POSTS
- HTTPS Support on Linux
- Configuring HTTPS with a Reverse Proxy (Recommended)
- Example: ProGet NGINX Config
- Configuring HTTPS without a Reverse Proxy
Classic SysAdmin: How to Install an SSL Certificate on Linux Server
With Security being the top most priority in the e-commerce world, the importance of SSL Certificates has skyrocketed. Installing an SSL Certificate on an online portal has become the basic foundation of a company’s business structure.
But the question is ‘How to install an SSL Certificate on a server?’
It is not necessary that everyone who is into e-commerce has a technical background. E-commerce is all about business and the owners are mostly businessmen. So also the core team of an e-commerce industry is not fully technical. In such a situation it becomes very difficult for people with minimal technical knowledge to grasp concepts even as basic like SSL Certificates or its installation for that matter.
This article aims at giving a sneak peek into the process of installing an SSL Certificate on Linux server in lay man’s words. This would help the non-technical people also to get a grasp of what it is all about. Of course, every e-commerce company has a core technical team, so they can easily take over from here. But it is always good to have a know-how of the process.
The installation of SSL Certificates on a Linux server is very easy. It can be done using a Plesk control panel and also without it.
What is Plesk?
It is a web hosting platform that has a very simple configuration. This simple configuration helps all web hosting providers to manage a lot of virtual hosts easily and on a single server. Ever since its conception, Plesk has been coming up as a preferred choice for all the web hosting companies.
How to install an SSL certificate on a Linux Server that has Plesk
1. First Log into the control panel of Plesk.
3. The third step implies choosing the domain to be updated.
4. In the next step click on the ‘Add New Certificate’ icon.
5. Save the certificate name in the ‘Certificate Name’ box.
One would have the certificate and key files saved on the local computer. These certificate and key files are provided by the certificate authority and are important for the installation.
6. The next step is to find these files. Open these in a Notepad or in other similar text formats from where one can copy the text.
7. Copy the entire text of the files.
8. Paste them in the correct boxes. Reading through the content and the box name in Plesk will give one an idea where to paste it.
9. Next, click on the ‘Send Text’ button.
10. Go to the ‘Hosting Section’. It is on the domain screen.
11. Click ‘Set-up’ from this section. A drop down list will follow.
12. The next step is to click on the ‘new certificate’ from the drop down list.
How to install SSL Certificate on Linux servers that do not have Plesk
1. The first and foremost step is to upload the certificate and important key files. One can upload the files to the server using – S/FTP.
2. Login to Server. It is important to log in via SSH. Logging in via SSH will help the user to become the root user.
4. One can see /etc/httpd/conf/ssl.crt in the following step. Move the certificate file here
5. Next move key file also to /etc/httpd/conf/ssl.crt
It is important to ensure the security of the files that has been moved. One can keep the files secure by restricting permission. Using ‘chmod 0400’ will help users to securely restrict permission to the key.
6. Next Go to etc/httpd/conf.d/ssl.conf. Here the user will find Virtual Host Configuration set up for the domain.
7. Edit Virtual Host Configuration.
The technicality of installing an SSL certificate may baffle many non-technical people, but once one gets a hang of it, it becomes easy.
Ready to continue your Linux journey? Check out our free intro to Linux course!
Настройка Apache + SSL для работы сайта по HTTPS

Обновлено: 17.02.2022 Опубликовано: 31.01.2017
Используемые термины: Apache, CentOS, Ubuntu, FreeBSD. Инструкция написана для операционных систем на базе UNIX.
Шаг 1. Создание сертификата
Для боевого сервера, сертификат должен быть получен от доверенного центра сертификации — либо локального для компании, либо коммерческого. Или получен бесплатно от Let’s Ecnrypt. Для тестовой среды можно сгенерировать самоподписанный сертификат. Для этого сперва переходим в рабочую папку. а) на Red Hat / CentOS:
openssl req -new -x509 -days 1461 -nodes -out cert.pem -keyout cert.key -subj «/C=RU/ST=SPb/L=SPb/O=Global Security/OU=IT Department/CN=test.dmosk.local/CN=test»
* в данном примере созданы открытый и закрытый ключи на 4 года (1461 день); значения параметра subj могут быть любыми в рамках тестирования.
Шаг 2. Установка модуля SSL для Apache
Шаг 3. Настройка Apache
ServerName site.ru
DocumentRoot /var/www/apache/data
SSLEngine on
SSLCertificateFile ssl/cert.pem
SSLCertificateKeyFile ssl/cert.key
#SSLCertificateChainFile ssl/cert.ca-bundle
- ServerName — домен сайта;
- DocumentRoot — расположение файлов сайта в системе;
- SSLCertificateFile и SSLCertificateKeyFile — пути до файлов ключей, которые были сгенерированы на шаге 1;
- SSLCertificateChainFile — при необходимости, путь до цепочки сертификатов (если используем не самоподписанный сертификат).
Проверяем корректность настроек в Apache:
Перечитываем конфигурацию apache:
Шаг 4. Проверка работоспособности
Открываем браузер и переходим на наш сайт, добавив https://. При использовании самоподписного сертификата (как в нашем случае), обозреватель выдаст предупреждение, что передача данных не безопасна. Подтверждаем наше намерение открыть сайт. Если все работает, переходим к шагу 5.
Если сайт не заработал, пробуем найти причину по log-файлу. Как правило, он находится в каталоге /var/log/apache или /var/log/httpd.
Шаг 5. Настройка редиректа
Чтобы все запросы по http автоматически перенаправлялись на https, необходимо настроить перенаправление (redirect). Есть несколько способов это сделать.
В конфигурационном файле
Открываем файл с настройкой виртуальных доменов (как в шаге 3) и дописываем следующее:
* в конкретном примере, мы перенаправили все запросы для сайта site.ru.
** обратите особое внимание, что если у Вас уже есть VirtualHost *:80 для настраиваемого сайта, необходимо его закомментировать или отредактировать.
В файле .htaccess
Установка модуля rewrite
Чтобы перенаправление работало в Apache, необходимо установить модуль rewrite.
а) в CentOS открываем конфигурационный файл и проверяем наличие строки:
LoadModule rewrite_module modules/mod_rewrite.so
* если ее нет, добавляем; если она закомментирована, снимаем комментарий.
systemctl restart apache2
Apache + NGINX
При использовании веб-сервера на базе и Apache и NGINX, как правило, наружу смотрит последний. В таком случае, именно он будет отвечать на http-запросы, и в таком случае нужно настраивать SSL на NGINX.

Как настроить Apache для работы по HTTPS (SSL)
How Do I Enable HTTPS On Apache Web Server
![]()
Apache is one of the most popular web servers serving more than 30% percent of the websites. It is a free and open-source HTTP server. It comes packaged with tons of tools and features to run applications securely and with ease.
This tutorial describes how to set up SSL secure websites on the Apache Webserver.
NOTE: This tutorial is written and tested for Debian 9, 10, and 11 and Ubuntu 20.04.
Requirements.
To follow along with this guide, you will require to have the following:
- An Ubuntu/Debian installation
- A sudo or root permissions to install packages, modify configuration files, and restart services.
Installing Apache
If you do not have Apache installed, we need to install it. Enter the commands:
sudo apt install apache2 openssl
Once you have the Apache Server installed, start the service and ensure everything is working correctly.
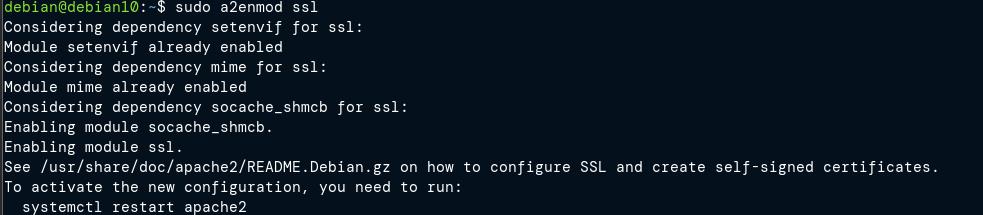
Enabling Mod_SSL and Mod_Rewrite Modules.
The next step is to enable the mod_ssl and mod_rewrite modules. To do this, we use the a2enmod script, which allows us to enable and disable modules in the apache configuration.
Use the commands as shown below:
Enable .htaccess Override
The next step is to edit the Apache configuration and add an entry to allow the Apache default settings to override. Overriding settings are done in the .htaccess file located in the Apache root directory.
Navigate to the end of the file and add the following entry:

Generating SSL Certificate
There are various ways to get a free SSL certificate. Tools such as certbot and SSL generators are great options.
However, in this guide, we will create a self-signed certificate using the OpenSSL utility.
Create a directory in the Apache configuration directory as:
Navigate into the directory created above.
Run the OpenSSL utility to generate your self-signed certificate as provided in the command below:
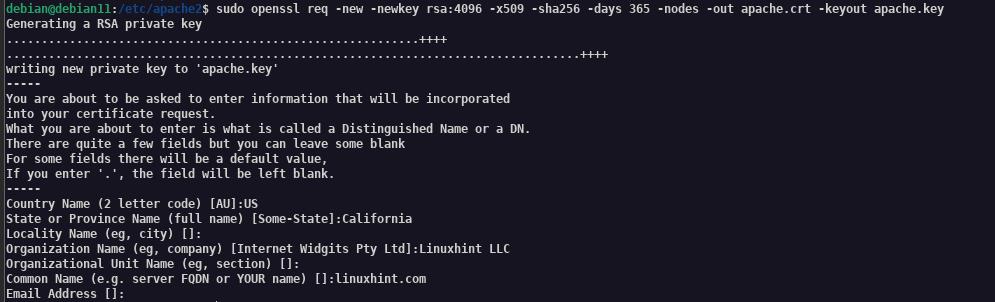
NOTE: You can provide any information in this process except Common Name. Ensure to give an IP address or hostname.
Once the process is completed successfully, you should have the apache.crt and apache.key in the certs directory.
Adding Cert to Apache Configuration
Add the certificate by editing the configuration file of the Apache default website.
Add a virtual host block on port 443 as shown:
< VirtualHost * : 443 >
ServerAdmin webmaster @ localhost
DocumentRoot / var / www / html
CustomLog $ / access.log combined
SSLCertificateFile / etc / apache2 / certs / apache.crt
SSLCertificateKeyFile / etc / apache2 / certs / apache.key

Redirecting to HTTPS.
In most cases, you will want to redirect users from no SSL endpoint to SSL. You do this by adding a Rewrite rule on the port 80 virtual hosts.
RewriteRule ^ / ? ( . * ) https: //% { SERVER_NAME } / $1 [ R = 301 ,L ]
NOTE: Ensure the Blocks above are under the port 80 virtual host.

Restart and Access Apache
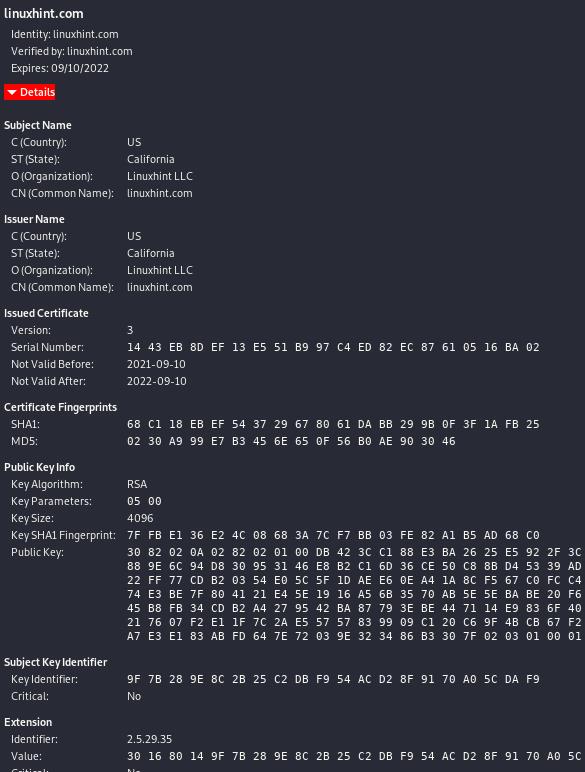
Once everything above is configured, restart the Apache service and access your website via localhost.
You can view the certificate information by clicking on the lock icon in your browser.
Conclusion
In this guide, we covered how to enable and configure SSL on the Apache webserver.
About the author
John Otieno
My name is John and am a fellow geek like you. I am passionate about all things computers from Hardware, Operating systems to Programming. My dream is to share my knowledge with the world and help out fellow geeks. Follow my content by subscribing to LinuxHint mailing list
RELATED LINUX HINT POSTS
HTTPS Support on Linux
HTTPS is increasingly becoming a requirement inside of many organizations, even for internal-only web applications. It’s also required by several third-party client tools, such as NuGet and Docker.
In this article, we’ll provide two options for enabing HTTPS for ProGet, BuildMaster, and Otter when installed on Linux. For Windows-based installations, see HTTPS Support on Windows.
Configuring HTTPS with a Reverse Proxy (Recommended)
The simplest way to configure HTTPS is by using a reverse proxy to terminate TLS and forward requests to your Inedo product. This has the added benefit of allowing multiple websites and applications to be hosted on the same IP address.
Example: ProGet NGINX Config
Configuring HTTPS without a Reverse Proxy
This is only supported in ProGet 2022.17+, and is considered expiremental.
Instead of using a reverse proxy, you can configure HTTPS bindings directly in your Inedo Product. This allows you to mount a volume that contains your certificate files and specify your «.pem» file and «.key» file as environment variables in your Docker container.
You will need to ensure that the «.pem» file also includes your certificate validation path.
- Mount the volume containing your certificates to /var/proget/ssl (ex: -v /path/to/pem/proget-ssl:/var/proget/ssl )
- Expose the SSL port 443 externally (ex: -p 8625:443 )
- Change your binding URLs to include an HTTPS binding (ex: -e ASPNETCORE_URLS=’http://*:80;https://*:443′ )
- Specify your certificate file using the SSL_CERT_FILE environment variable (ex: -e SSL_CERT_FILE=’ProGetCertificate.pem’ )
- Specify your key file usng the SSL_KEY_FILE environment variable (ex: -e SSL_KEY_FILE=’ProGetCertificateServer.key’ )
Here is an example docker run command that will expose HTTPS bindings on port 8625: