- Installing python modules on Ubuntu
- 5 Answers 5
- How To Use The Modprobe Command In Linux
- modprobe Command Syntax Explained
- Options for modprobe Command
- Management Options
- Query Options
- General Options
- Examples of modprobe Command
- Adding Kernel Modules With modprobe Command
- Removing Kernel Modules With modprobe Command
Installing python modules on Ubuntu
I need to install some modules for python on Ubuntu Linux 12.04. I want pygame and livewires but I’m not sure how to install them. I have the py file for livewires, which has been specially edited (from a book I’m reading) and I want to install it but I’m not sure how to, I also want to install pygame.
5 Answers 5
There are two nice ways to install Python packages on Ubuntu (and similar Linux systems):
sudo apt-get install python-pygame to use the Debian/Ubuntu package manager APT. This only works for packages that are shipped by Ubuntu, unless you change the APT configuration, and in particular there seems to be no PyGame package for Python 3.
The other option is to use PIP, the Python package manager:
sudo apt-get install python3-pip to fetch the PyGame package from PyPI and install it for Python 3. PIP has some limitations compared to APT, but it does always fetch the latest version of a package instead of the one that the Ubuntu packagers have chosen to ship.
EDIT: to repeat what I said in the comment, pip3 isn’t in Ubuntu 12.04 yet. It can still be installed with
sudo apt-get install python3-setuptools sudo easy_install3 pip sudo apt-get purge python-pip After this, pip is the Python 3 version of PIP, instead of pip3 . The last command is just for safety; there might be a Python 2 PIP installed as /usr/bin/pip .
@Infamouslyuseless: both options install packages into a location where you can import from, if you haven’t done crazy things to your Python setup.
«E: Invalid operation python3-setuptools» is what i got after i did «sudo apt-get python3-setuptools».
apt-get install python-pip pip install pygame You can use several approaches:
1 — Download the package by yourself. This is what I use the most. If the package follows the specifications, you should be able to install it by moving to its uncompressed folder and typing in the console:
python setup.py build python setup.py install 2 — Use pip. Pip is pretty straightforward. In the console, you have to type:
You can obtain pip here https://pypi.python.org/pypi/pip and install it with method 1
One thing to note: if you aren’t using a virtualenv, you’ll have to add sudo before those commands (not recommended)
It depends on the Ubuntu version and the IDE you are using. Ubuntu 15 and older come with Python 2.7 and Ubuntu 16.04 comes with both Python 2.7 and 3.5. Now based on the IDE you are using there are several ways to do this. Let`s say you only installed Spyder from Ubuntu app store or installed Jupyter. In other words you do not have a distribution like Anaconda or Enthought which install their own Python versions. This is important to pay attention to because once you are trying to install a package/library, you need to know which Python it is being installed to.
Now assuming you just have an IDE that is connected to Ubuntu`s default Python versions, you can use the terminal to install your packages:
Sometimes, for reasons that I don`t know, during the package installation process, Linux blocks access to the Python so try these as well:
sudo apt install python-libraryname sudo apt install python3-libraryname These have helped me to install all the libraries that I need.
Now, if you are using a distribution like Aanaconda or Enthought, there is a good chance that the libraries that you are installing are not going to be added to the libraries that those distributions use. In order to install the libraries for these distributions, once you run the distribution, go to the ipython console and write
In case of Enthought, it has it`s own Package Manager where it has most of the libraries you need and you can install them there without using pip or anything else.
How To Use The Modprobe Command In Linux
The Linux kernel has a modular design. Functionality is extendible with modules or drivers. Use the modprobe command to add or remove modules on Linux. The command works intelligently and adds any dependent modules automatically.
The kernel uses modprobe to request modules. The modprobe command searches through the standard installed module directories to find the necessary drivers.
This article explains how to use modprobe to add or remove kernel modules.
- A system running Linux
- Access to the terminal/command line
- A user account with sudo or root privileges
modprobe Command Syntax Explained
All modprobe commands require sudo privileges. The general syntax for using modprobe is:
By default, the modprobe command adds a module.
For multiple modules, expand with the option -a or -all :
Options for modprobe Command
The available modprobe command options are divided into categories based on their use-case.
Management Options
Management options enable different module handling situations when inserting or removing modules with the modprobe command.
| —all -a | Enables multiple modules to be inserted or removed at the same time. |
| —remove -r | Remove a module. Applies —remove-dependencies as well. Useful for removing broken modules. |
| —remove-dependencies | Removes dependency modules. |
| —resolve-alias -R | Look up and print all module names matching an alias. Useful for debugging alias problems. |
| —first-time | Prints an error for already inserted or removed modules. |
| —ignore-install —ignore-remove -i | Ignore install/remove commands written in the module when inserting/removing a module. |
| —use-blacklist -b | Blacklist resolved alias. Blacklisted modules are not automatically loaded. |
| —force -f | Force module insertion or removal when version errors appear. Applies both —force-modversion and —force-vermagic . Use with caution. |
| —force-modversion | Ignore module version on insertion or removal. Use with caution. |
| —force-vermagic | Ignore module version magic on insertion or removal. Use with caution. |
Query Options
Query options for modprobe show information about configuration and dependencies.
| —show-depends -D | Lists the module with the dependency files if there are any. The dependencies that install with the module have the “install” prefix. |
| —showconfig —show-config -c | Prints current configuration and exists. |
| —show-modversions —dump-modversions | Dumps module version dependencies. |
General Options
General options configure modprobe output options, module locations, and versions.
| —dry-run —show -n | Do not execute insert/remove but print the output. Used for debugging purposes. |
| —config= -C | Overrides the default configuration dependency (/etc/modprobe.d) with . |
| —dirname= -d | Use as filesystem root for /lib/modules. |
| —set-version= -S | Use specified kernel instead of using uname . |
| —syslog -s | Prints the error messages through syslog instead of standard error (stderr). When stderr is unavailable, errors get printed to syslog automatically. |
| —quiet -q | Disables display of error messages. |
| —verbose -v | Enables more messages to show, if available. modprobe only prints messages if something goes wrong. |
| —version -V | Shows the modprobe version. |
| —help -h | Shows the help message with all the commands listed. |
Examples of modprobe Command
All kernel modules are listed in the /lib/modules directory system in .ko (kernel object) files by default.
Find all the available modules for the current kernel version with:
find /lib/modules/$(uname -r) -type f -name '*.ko*' | more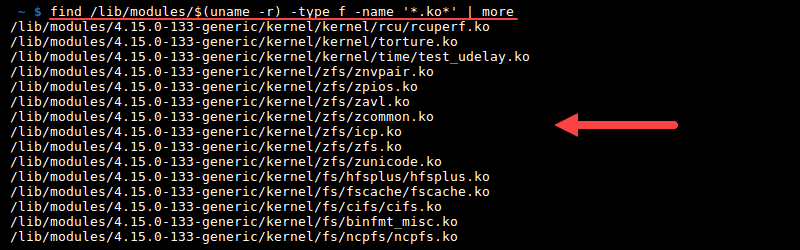
Note: Consider removing old kernel versions. Check out our guide on how to remove old kernels on Ubuntu.
Adding Kernel Modules With modprobe Command
1. Add a module using the modprobe command:

2. Confirm the module loaded with:
The output prints an error because the module is already in the kernel.

Alternatively, find the module in the active module loaded list with lmod :

Removing Kernel Modules With modprobe Command
1. Remove a module using the modprobe -r command:
2. Confirm the module is removed by running:
sudo modprobe -r --first-timeAn error message appears saying that the module is not in the kernel:

Alternatively, check the active module loaded list:
The removed module is not on the module loaded list.
The Linux kernel is created to be modular and easily extendible. Make sure to research the modules you want to add or remove to avoid problems with the kernel.
For further reading, follow our guide on how to build a Linux kernel from scratch.
Milica Dancuk is a technical writer at phoenixNAP who is passionate about programming. Her background in Electrical Engineering and Computing combined with her teaching experience give her the ability to easily explain complex technical concepts through her content.
All Linux distributions come with a predefined kernel. However, they are usually outdated. Follow this.
Linux released its latest LTS kernel version, the Linux kernel 5.7. Take a look at all the new features and.
There are several methods to remove old or unused kernels. It’s also considered good system hygiene practice.
The Linux kernel is much like the central brain of the operating system. Although it is open-source — meaning.