- Простая настройка OpenVPN Linux
- Настройка OpenVPN сервера в Linux
- Настройка клиента OpenVPN
- Выводы
- Installing OpenVPN Access Server on a Linux system
- Operating systems supported
- Installation requirements and preparation
- Install repository, then upgrade
- Finishing configuration and using the product
- Limitations of an unlicensed OpenVPN Access Server
- Updates & Announcements
- Cyber Shield Released
- Release Notes 2.12.0
- Access Server
- CloudConnexa™
Простая настройка OpenVPN Linux
OpenVPN часто используется для создания виртуальных безопасных сетей между компьютерами, которые находятся на очень большом расстоянии, но при этом между ними нужно получить шифрованное безопасное соединение, которое невозможно перехватить и прослушать.
Другое применение для OpenVPN — это обход блокировок различных интернет ресурсов. Существуют различные серверы OpenVPN серверы в интернете, но будет намного надежнее если развернуть OpenVPN на своем сервере. Мы рассматривали процесс в статье установка OpenVPN на Ubuntu, но для новичков это достаточно сложно. В этой инструкции мы рассмотрим как выполняется настройка OpenVPN linux с помощью скрипта openvpn-install, который упрощает процесс установки и настройки в несколько раз. С его помощью вы получите работающий сервер в течение нескольких минут.
Настройка OpenVPN сервера в Linux
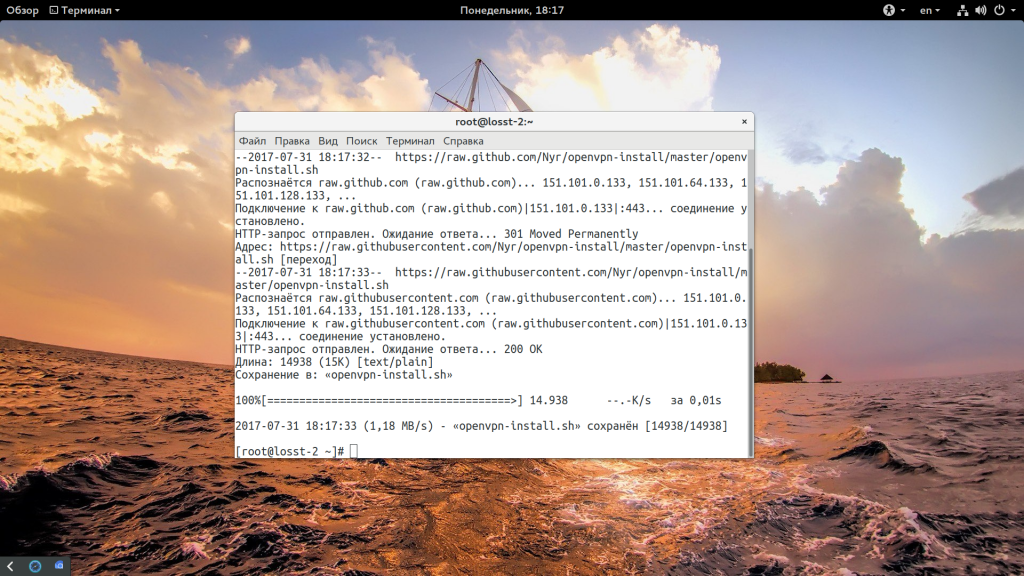
В этой статье, в качестве системы для примера мы будем использовать операционную систему CentOS, но операции не будут отличаться в других дистрибутивах. Сначала скачайте сам скрипт:
wget https://git.io/vpn -O openvpn-install.sh
Затем запустите скрипт от имени суперпользователя с помощью такой команды:
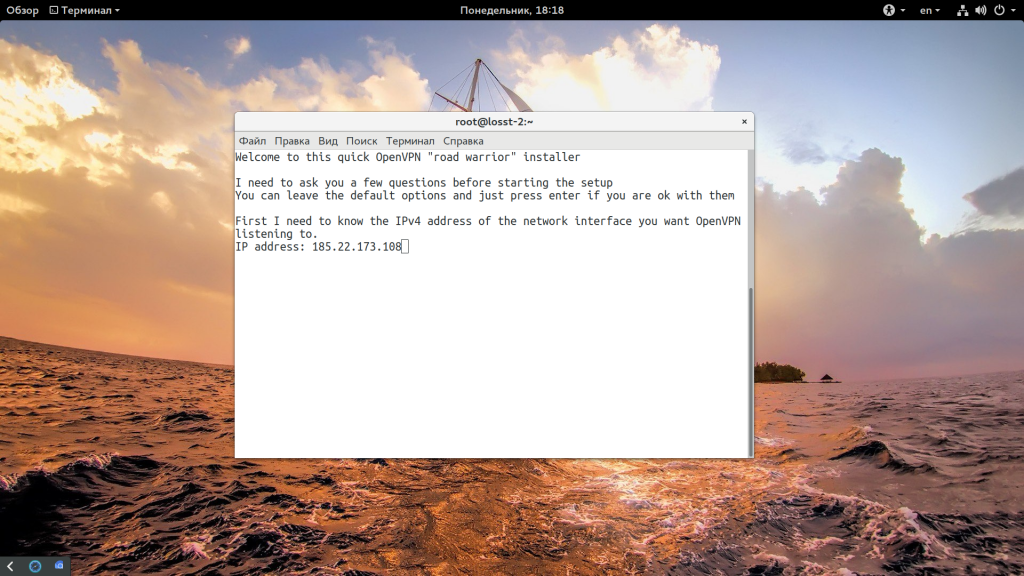
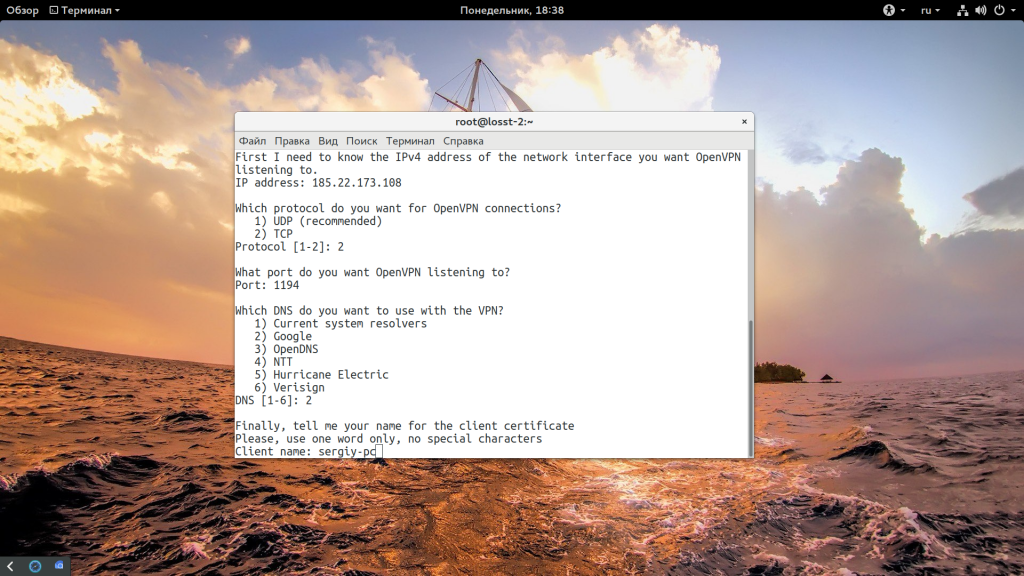
Дальше скрипт задаст несколько вопросов по настройкам OpenVPN. Сначала нужно указать точный ip адрес VPS, на котором будет запущен OpenVPN, именно на этом адресе программа будет слушать соединения:

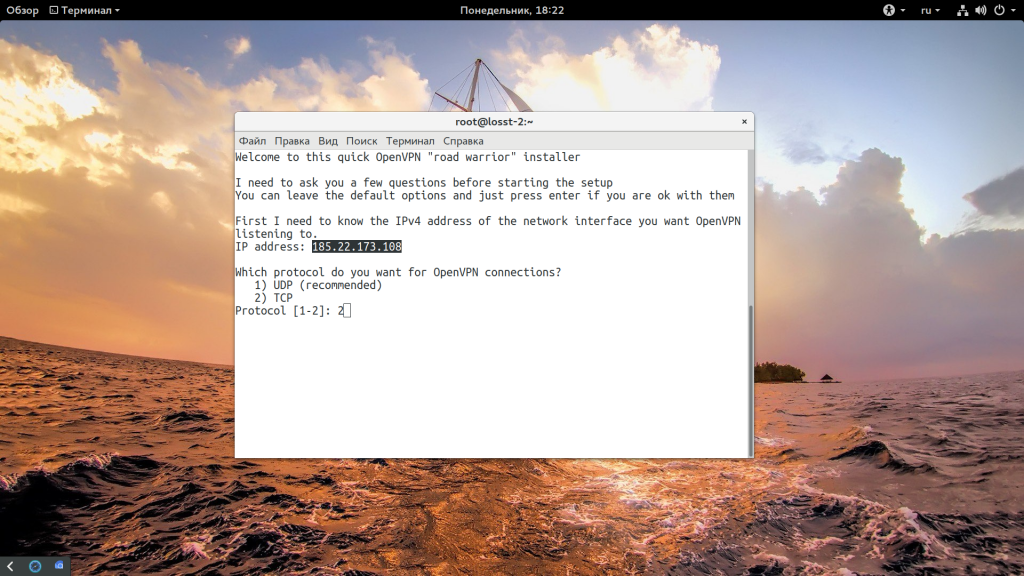
Затем выберите протокол, который вы хотите использовать. Например, если я хочу использовать TCP то нужно выбрать 2:
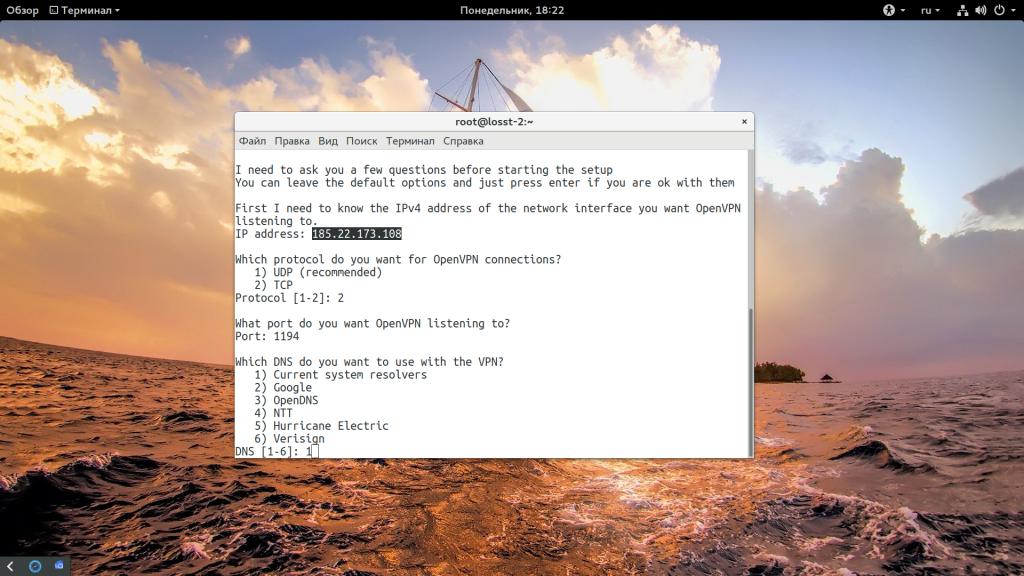
Затем введите номер порта, на котором будет слушать программа, можно оставить значение по умолчанию:

Выберите сервера DNS, которые нужно использовать, мне, например, нравятся сервера от Google:
Введите имя клиента, для которого будут подписаны сертификаты на доступ:
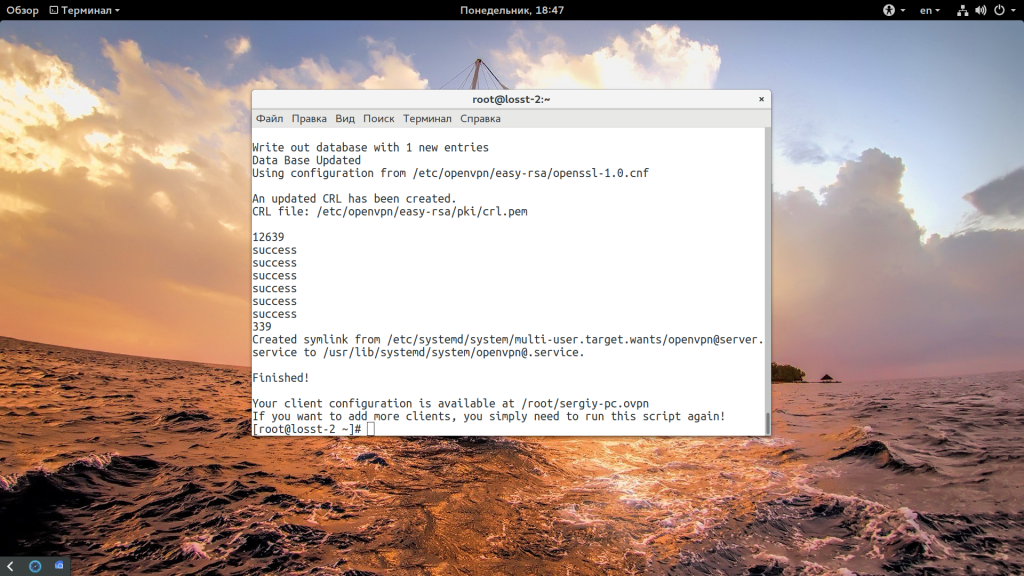
Дальше нажмите Enter, и подтвердите установку OpenVPN. Программа сама установит нужные пакеты в вашем дистрибутиве, а затем подпишет все необходимые сертификаты, запустит сервер openvpn и даже добавит его в автозагрузку systemd:
Последний шаг, это утилита спросит есть ли у вашего сервера дополнительный внешний ip адрес. Это может быть полезно, если вы используете NAT, и для доступа к серверу применяете какой-либо туннель. В других случаях этот пункт можно пропустить, для VPS точно пропускаем.
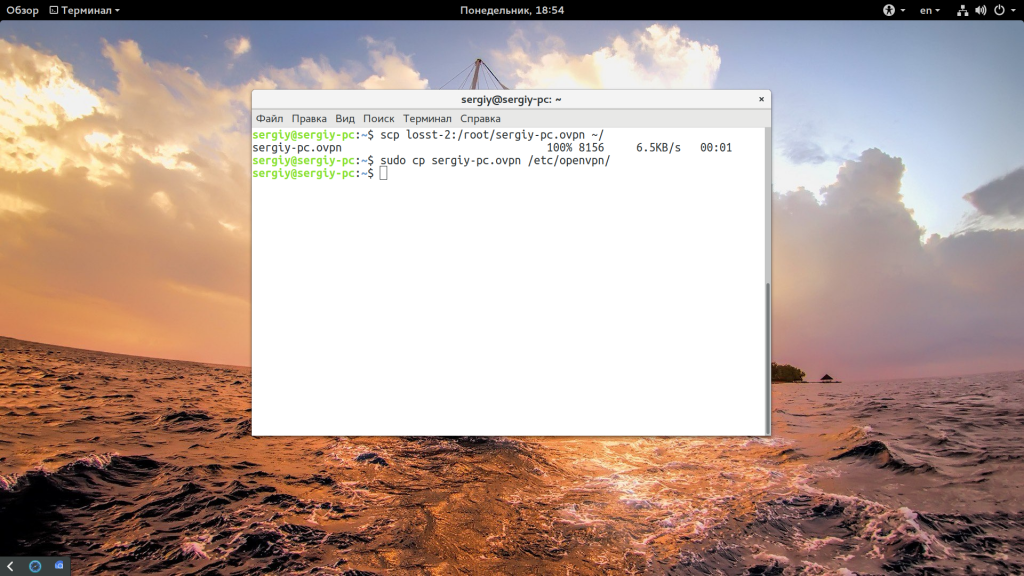
Теперь установка и настройка OpenVPN сервера Linux завершена. Конфигурационный файл для клиента сохранен по адресу /root/sergiy-pc.ovpn, может иметь и другое имя, в зависимости от того, какое имя вы дали клиенту. Самое интересное, что для того чтобы добавить новых клиентов, вам просто достаточно запустить скрипт еще раз. Осталось только скопировать полученный файл клиенту, для этого можно на клиентском компьютере выполнить scp:
scp root@адрес_сервера:/root/sergiy-pc.ovpn /etc/openvpn/
Настройка клиента OpenVPN
Вы можете настроить OpenVPN на клиентской машине как захотите, например, с помощью NetworkManager. Но мы рассмотрим ручной вариант. Сначала установите саму программу. Установка OpenVPN Linux Ubuntu выполняется командой:
Теперь для подключения к нашему серверу используем полученный файл:
openvpn —config /etc/openvpn/client.ovpn
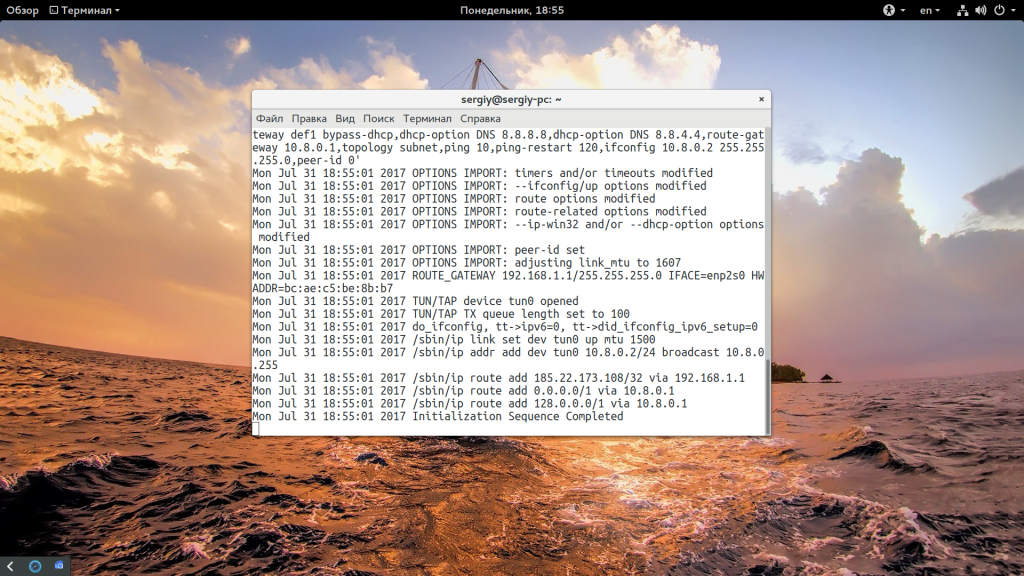
Вы можете использовать команду ip addr чтобы проверить ip адрес интерфейса OpenVPN — tun0:
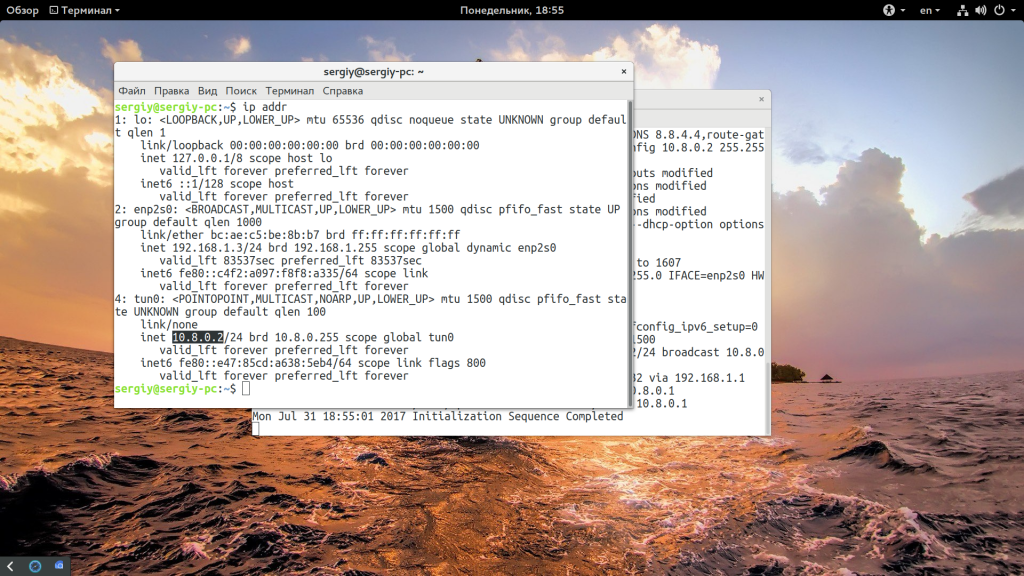
Как видите, OpenVPN автоматически выдал IP вашему компьютеру, теперь можете проверить подключение к этому серверу с помощью ping:
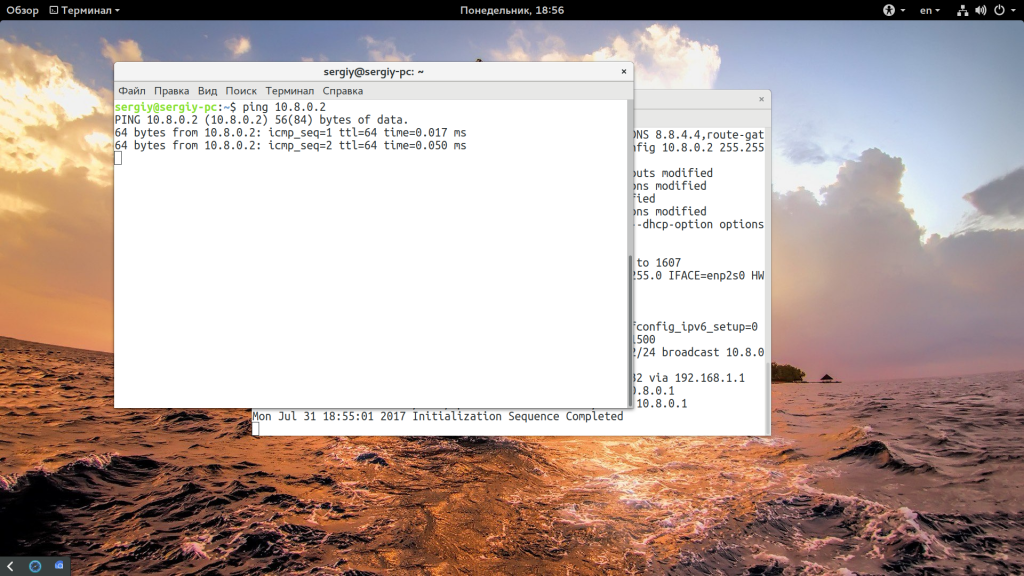
Вот и все, ваша сеть готова к работе.
Выводы
Пять минут и настройка OpenVPN Linux завершена, а не подключение следующего клиента уйдет еще меньше. Этот метод не специфичен для RPM систем и может использоваться также в DEB системах, таких как Ubuntu или Debian. Если у вас остались вопросы, спрашивайте в комментариях!
Обнаружили ошибку в тексте? Сообщите мне об этом. Выделите текст с ошибкой и нажмите Ctrl+Enter.
Installing OpenVPN Access Server on a Linux system
The following information will help you launch OpenVPN Access Server on a Linux operating system.
Tips for installing OpenVPN Access Server on a Linux system:
Operating systems supported
We distribute OpenVPN Access Server via our software repository on a number of popular Linux distributions. Refer to OpenVPN Access Server system requirements for the compatible Linux operating systems.
To install the repository and install Access Server:
Choose the platform from our download page and get the instructions for installing the repository and Access Server.
- Refer to the software repository download page.
- Find and click on the platform you’re using.
- Use the commands to install the repository and software.
We provide quick start guides for all supported operating systems as well; refer to OpenVPN Access Server installation options.
Our quick start guides step you through launching OpenVPN Access Server on:
Installation requirements and preparation
The following will help you prepare your platform for installation.
Verify that your server is ready
- You need a supported Linux OS with root level access. You can connect directly through the console or through an SSH session using a tool like PuTTY.
- If you need to sign in as an unprivileged user, sudo up to gain root privileges.
- Ensure your server has the correct time and date, required for certificate generation and verification as well as implementing multi-factor authentication.
- To check the current time, date and time zone on a Debian/Ubuntu system:
apt update
apt -y install tzdata
dpkg-reconfigure tzdata
Using the OpenVPN software repository
We distribute OpenVPN Access Server via a software repository.
For a system without internet access:
- You must download software packages separately.
- OpenVPN Access Server comes in two packages:
- OpenVPN Connect client software bundle
- OpenVPN Access Server
Install repository, then upgrade
Check your operating system
You need to know the correct operating system to use the appropriate commands for adding the repository and installing OpenVPN Access Server.
- Determine your operating system.
- Run these commands to find the necessary OS information:
cat /etc/issue
lsb_release -a
uname -a
Select your OS from our software repository page
- From the software repository page, click on the appropriate OS to open up the instructions for installing the repository.
- Ensure you select the correct version of your OS as well.
- The instructions work for upgrades and new installations of OpenVPN Access Server.
- Run the commands on your server’s command line as a root user.
- After adding the repository, when you run apt update and apt upgrade, you update Access Server when there’s a new version.
Note: If your operating system version is no longer listed on our software repository page you should not try to force instructions for a newer operating system onto your outdated system. In this situation you should consider either upgrading your operating system or migrating your Access Server configuration to a more up-to-date installation.
Finishing configuration and using the product
Verify configuration completes
Once OpenVPN Access Server installs, it automatically runs an initial configuration with default settings.
When the initial configuration completes, review the output for the admin account and addresses to access your Admin Web UI.
- Get the username and password for your admin user.
- Take note of the randomly generated password for the administrative account openvpn. Access Server versions older than 2.10 do not automatically generate a password. On older versions you set the password manually by typing passwd openvpn on the command line.
- The output provides the URL to connect to your Admin Web UI to configure your VPN server. From the Admin Web UI you can manage the configuration, certificates, users, and more settings in a web-based GUI. An example address: https://192.168.70.222/admin.
- The output also provides the URL to connect to your Client UI for downloading pre-configured OpenVPN Connect as well as connection profiles. An example address: https://192.168.70.222/.
- For more details about the web service, refer to OpenVPN Access Server web services.
- Enter the URL for your Admin Web UI into your web browser and sign in with your openvpn admin account.
- When you first sign in, you encounter a browser warning due to the self-signed certificate. This is expected and you can accept the warning and continue. To resolve this you can install a properly signed web SSL certificate.
- Once signed in, you can activate your Access Server with an activation key, set up authentication systems such as RADIUS or LDAP, add users to the local authentication database, manage access control, and so on.
Refer to further documentation to configure specific functions and configuration options for the OpenVPN Access Server:
Limitations of an unlicensed OpenVPN Access Server
OpenVPN Access Server launches with two free connections.
If you use Access Server without a license or activation key
- You can use these two free connections without a time limit.
- You have full access to all of the functionality of OpenVPN Access Server.
- You can’t have more than two simultaneous OpenVPN tunnel connections to your VPN server.
To unlock more connections, purchase a subscription. Refer to our pricing page for details.
Updates & Announcements
Cyber Shield Released
Cyber Shield protects you from cyber threats without requiring you to tunnel internet traffic. Turn Shield ON.
Release Notes 2.12.0
Access Server 2.12.0 comes with support for Data Channel Offload, a kernel accelerated method of encrypting/decrypting VPN traffic. It also allows setting unique global group subnets so routing in clustering mode is possible. Aside from this numerous fixes and improvements are included.
Access Server
Our popular self-hosted solution. Comes with two free connections. No credit card required.
CloudConnexa™
Cloud-delivered, as-a-service solution. Comes with three free connections. No credit card required.
OpenVPN is a leading global private networking and cybersecurity company that allows organizations to truly safeguard their assets in a dynamic, cost effective, and scalable way.
© Copyright 2023 OpenVPN | OpenVPN is a registered trademark of OpenVPN, Inc. |
CloudConnexa is a trademark of OpenVPN, Inc.
- Run these commands to find the necessary OS information: