- How to install software on linux mint
- Установка и удаление программ в Linux Mint
- Установка программы FileZilla в Linux Mint
- Шаг 1
- Шаг 2
- Шаг 3
- Удаление программ в Linux Mint
- Установка и удаление приложений в Linux Mint с помощью терминала
- Установка FileZilla с помощью терминала Linux Mint
- Удаление программы FileZilla с помощью терминала Linux Mint
How to install software on linux mint
There are several ways of installing softwares in linux and they are described in many tutorials. this tutorial will cover most of the processes of installing softwares in a linux system.
Online installation:
#1. Through software manager(linux mint)/software center(ubuntu):
first open the terminal and run this command to get the latest version of the software:
sudo apt-get update
1. open software manager/center. it’s in the menu.
2. search your desired software in the search box
3. if it’s in the list then it will appear before you . if it’s not in the list follow the instructions in the ppa installation section of this tutorial.
4. now double click on the desired software entry and then click «install«.
5. it will be installed on your system as per your network connection speed.
#2. Through synaptic package manager:
if it is absent in your linux distribution then you will have to install it through software manager/center first.
to me it’s the best way to install softwares in linux.
1. open synaptic package manager . click reload to get the latest version of the softwares.
2. search your desired software/s in the search box.
3. right click each software you want to install and mark them for installing. it will mark additional dependencies on it’s own.
if your softwares not in the list follow the instructions in the ppa installation section of this tutorial.
4. after marking for installing, click apply
6. it will download and install the marked softwares.
if you have a list of softwares then save the file with the list, with .list extension (this file should contain the exact package name one at every line with an extra string «install» included after each package name preceding by an space/tab). then go to file->read markings and then brows to the file and open it. synaptic will mark the softwares in the list automatically.
if you know the exact name of the software then you can install it through terminal by simply entering the command:
sudo apt-get update (to get the latest version)
sudo apt-get install software-package-name
if it says «unable to locate package. » then follow the instructions in the ppa installation section of this tutorial.
if your software’s not in the software list then it may come from private package archives (PPA’s).
these are private development of softwares so use it at your own risk.
1. search google for the ppa address for your software. (like ppa for package-name)
2. then add it to the repository by entering this command in terminal:
sudo add-apt-repository ppa. whatever_it_is
3. then run this command (must)
sudo apt-get update
4. now your desired software is in the list. so you can follow one of the above processes (#1,#2,#3)
Offline installation:
say, you downloaded your desired softwares from some website. in this case if you don’t trust the origin of the software then don’t install it or install it at your own risk.
Your downloaded softwares may come as a .zip, tar.gz, tar.bz2, .deb, .rpm, .tgz, tar.xz or any other types of archives.
if you are in linux mint or in ubuntu or in a debian based OS try to download .deb packages because it’s easier to install in debian based OS.
#5. installing .deb packages:
cd path_to_the_directory_that_contains_the_.deb_file
sudo dpkg -i filename.deb
through gdebi package manager:
if gdebi is not installed then you have to install it through one of the processes #1,#2,#3 (requires internet connection)
1. then double click on the .deb file or open the file with gdebi package manager and click install.
2. it will be istalled soon.
#6. installing .rpm packages:
rpm has to be installed in the system, otherwise follow one of the processes #1,#2,#3 to install rpm (requires internet connection)
cd path_to_the_directory_that_contains_the_.rpm_file
sudo rpm -i filename.rpm
#7. installing from archives(.zip tar.gz. etc):
these archives generally conatains the source of the package. each of them generally has a different approach to install. I will be discussing a common method which will supposedly work for all of them.
As these archives contains the source, your system needs the required programming languages to compile and build the source. so the general requirement packages stated above may not be sufficient for you. in that case you have to install the required packages through one of the processes #1,#2,#3 (requires internet connection). you can know about the dependencies about your software in a readme file included in the archives.
1. open the archives with archive manager by double clicking it, then extract it.
cd path-to-the-extracted-folder
3. inside the extracted folder look carefully.
a. if you find a file named configure then :
sudo make install
if the first code fails to execute then run this code before above codes:
chmod +x configure
b. if you find a file named install.sh then
chmod +x install.sh
./install.sh or sudo ./install.sh (if it needs root permission)
or you can double click it and select run in terminal or simply run
N.B : sometimes there is a file, something like your_software_name.sh is found instead of install.sh. for this case you have to replace install.sh with the correct name in the previous codes.
c. if you find a file named install then
chmod +x install
./install or sudo ./install (if it needs root permission)
or you can double click it and select run in terminal or simply run
d. if you find a file named make (if there is no configure file) then
sudo make install
e. If you still can’t find the required files
then it may be in a special folder (generally in a folder named ‘bin’). move to this folder with cd command with appropriate path and then look again and follow the same process.
some packages are archived as pre installed packages i.e you don’t have to install them , you just need to extract them in a secure place and theres an executable file (name is generally same as the software name) in the extracted folder or in child folders like bin,build etc. you have to find it and make it executable.
Example: eclipse, adt bundle (android developing tool)
chmod +x filename_with_exact_path
or double clicking it and selecting run in terminal or run, whatever supports your software.
some softwares come with a .sh file to install it
chmod +x filename.sh
./filename.sh or sudo ./filename.sh (if it needs root permission)
or double click it and select run in terminal or run, whatever supports your software.
some softwares come with a .run file to install it
chmod +x filename.run
./filename.run or sudo ./filename.run (if it needs root permission)
or double click it and select run in terminal or run, whatever supports your software.
Additional info about offline installation:
Often, softwares generally have a lot of dependencies. You need to download all of them, which sometimes can be very difficult and tiring. for this you can follow the instructions here which will save your time and effort.
for adding an entry in the menu for your newly installed software you can see my other tutorial:
W: The first three online methods are the safest way to install a software. For other methods you have to take risks of potential damage of your system or software dependencies.
N.B: A well formatted copy of this tutorial can be found here. (This link may change)
Установка и удаление программ в Linux Mint
Сегодняшний материал будет полезен начинающим пользователям операционной системы Linux Mint, которые не знают, как устанавливать и удалять программы в данной системе, так как здесь будет подробно рассмотрено несколько вариантов установки и удаления приложений в Linux Mint.
Итак, давайте приступать, самым простым и удобным способом установки и удаления программ в Linux Mint является, конечно же, способ с использованием «Менеджера программ».
Менеджера программ – это компонент Linux Mint, предназначенный для установки и удаления приложений, имеет интуитивно понятный интерфейс, удобную группировку по категориям, а также сортировку программ по рейтингу и популярности. Менеджер программ доступен во всех редакциях Linux Mint, т.е. неважно, какая у Вас графическая оболочка, будь то Cinnamon, MATE или KDE.
Более продвинутые пользователи могут использовать другой способ, например, устанавливать и удалять программы с помощью терминала Linux, мы его также сегодня рассмотрим.
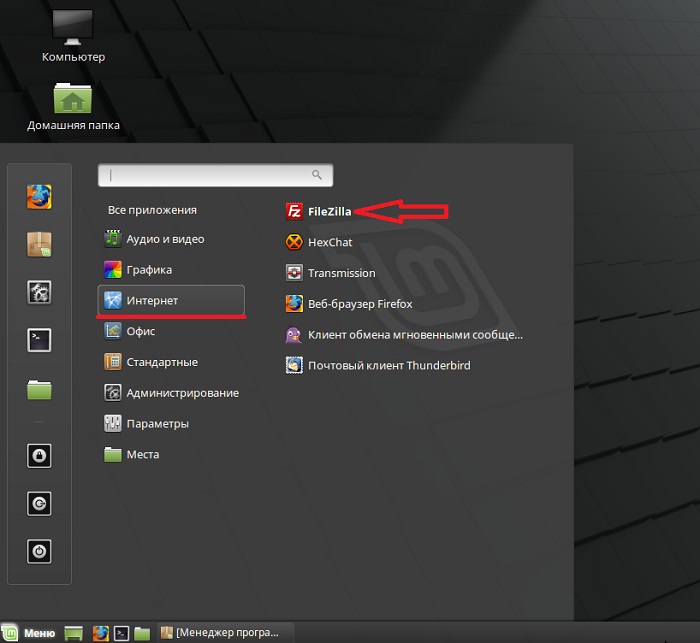
Переходим непосредственно к описанию процесса установки программ в Linux Mint и для примера давайте установим FileZilla (это бесплатный FTP-клиент), так как по умолчанию в системе данная программа не установлена.
Примечание! В качестве операционной системы у меня выступает версия Linux Mint 18.1 со средой рабочего стола Cinnamon, все, что мы будем рассматривать ниже, Вы можете использовать и в других версиях, например в 18 или 17.3. Если у Вас другая графическая оболочка, например MATE или KDE, то у Вас будет небольшое отличие в процессе запуска менеджера программ или терминала в плане интерфейса, но сам менеджер программ везде один и запустить его можно из меню Mint.
Установка программы FileZilla в Linux Mint
Сначала, конечно же, давайте разберем процесс установки с использованием «Менеджера программ», так как именно этот способ подходит для начинающих пользователей Linux Mint.
На заметку! Если Вы хотите научиться пользоваться Linux на домашнем компьютере без использования командной строки, то рекомендую почитать мою книгу – « Linux для обычных пользователей »
Примечание! Для установки программ требуется подключение к сети Интернет.
Шаг 1
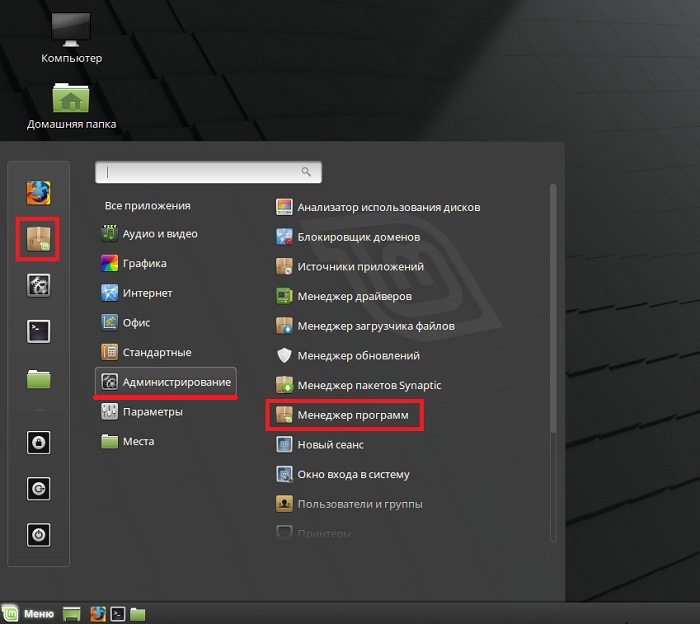
Запускаем менеджера программ, это можно сделать из меню «Mint», «Меню->Менеджер программ» или «Меню->Администрирование -> Менеджер программ».
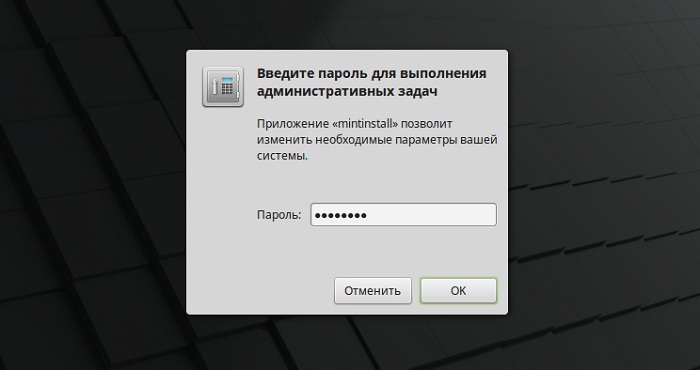
Затем Вас попросят ввести пароль администратора (например, тот пароль, который Вы задавали в процессе установки операционной системы, если устанавливали не Вы, то узнайте его у человека, который выполнял установку), жмем «ОК».
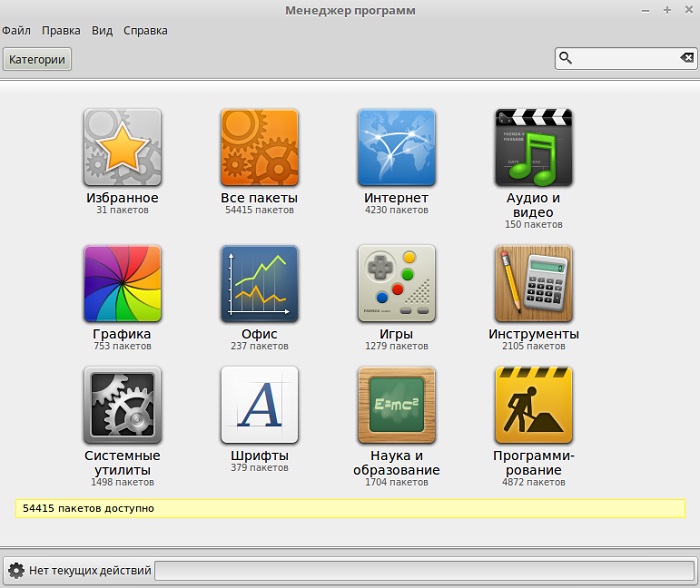
В итоге запустится менеджер программ.
Шаг 2
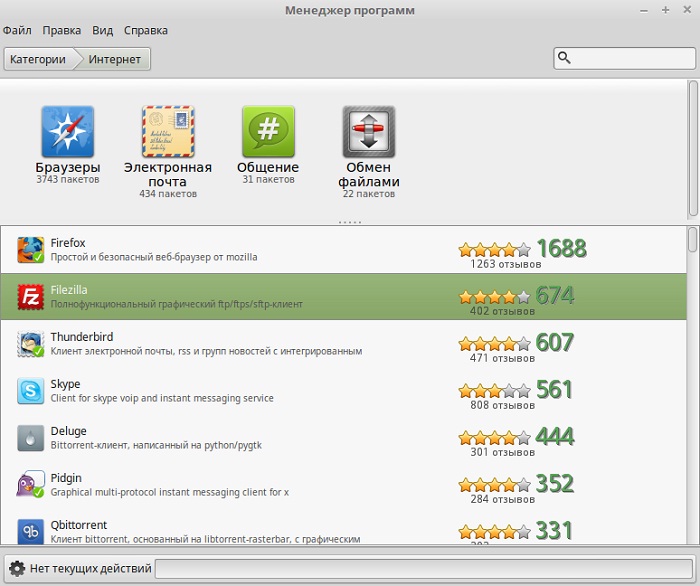
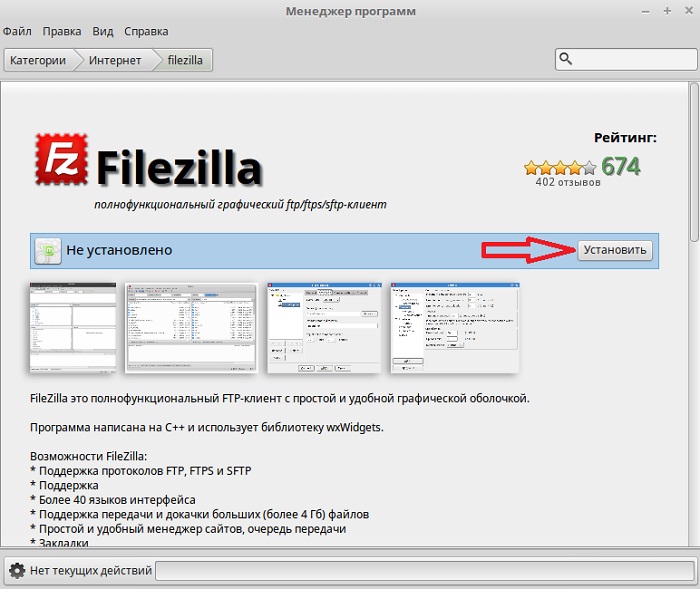
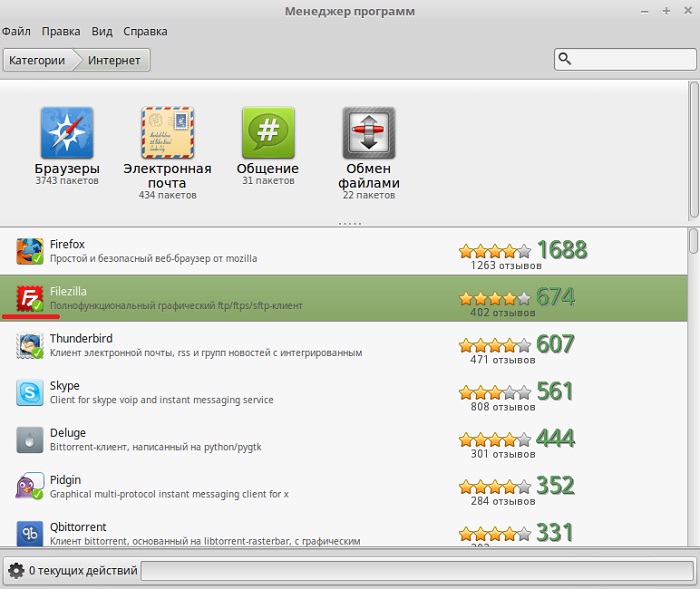
Как видите, все программы разбиты на категории, что значительно упрощает поиск нужной программы, полноценный поиск также присутствует. В нашем случае мы должны найти программу FileZilla, она относится к категории «Интернет» и достаточно популярна, поэтому она будет в самом начале. Программы, которые уже установлены в системе будут отмечены галочкой. Щелкаем двойным кликом мыши по нужной программе.
Шаг 3
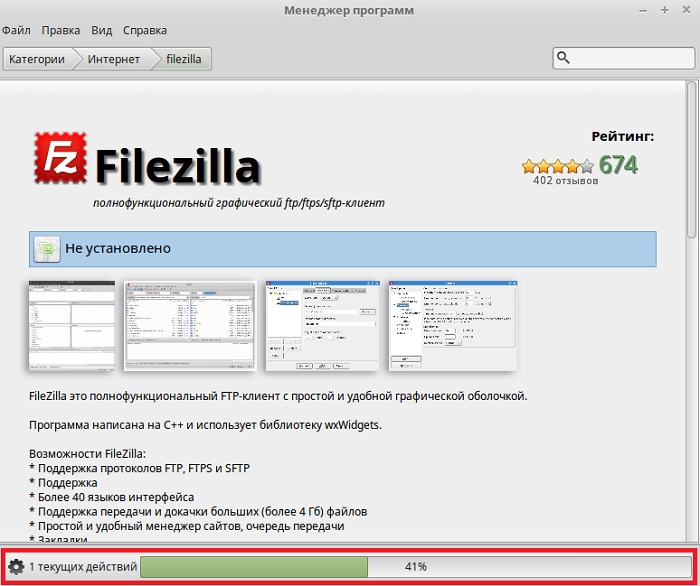
Начнется процесс установки и займет он совсем немного времени.
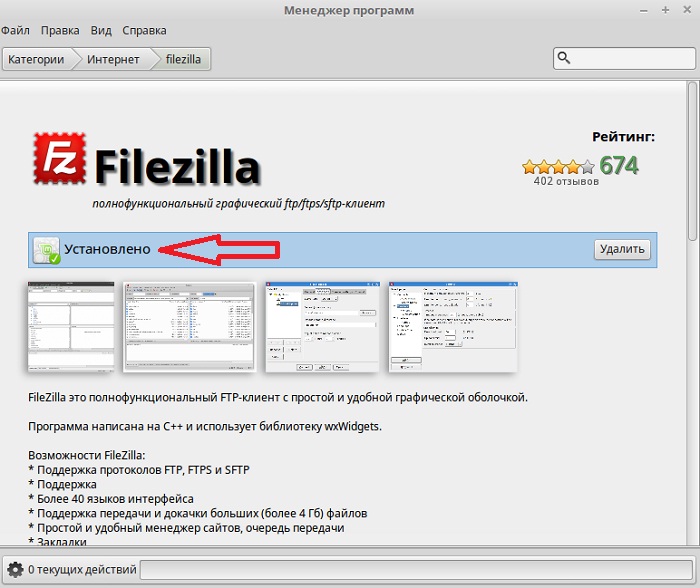
Установка будет завершена, как появится следующее сообщение.
После чего в меню Mint появится ярлык для запуска FileZilla.
Удаление программ в Linux Mint
А теперь давайте рассмотрим процесс удаления программ в Linux Mint с помощью менеджера программ, на примере все той же FileZilla.
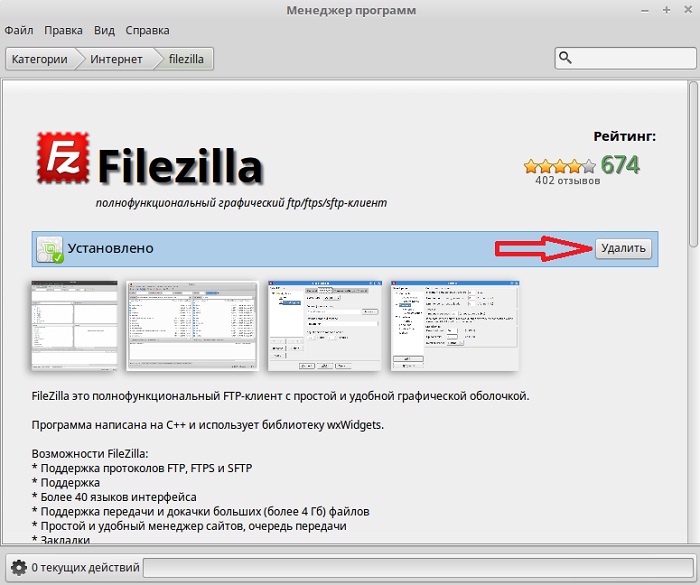
Сейчас, когда у нас уже установлена программа FileZilla, в менеджере программ, как я уже сказал, она будет отмечена галочкой.
Для удаления мы, также как и для установки, щелкаем по ней правой кнопкой мыши. Затем жмем «Удалить».
В итоге спустя всего несколько секунд программа удалится, а ее статус изменится на «Не установлено».
Установка и удаление приложений в Linux Mint с помощью терминала
Если говорить о терминале Linux, то это своего рода командная строка, которая значительно мощнее командной строки Windows. Более того, все продвинутые пользователи Linux пользуются именно терминалом для установки программ, настройки системы и так далее.
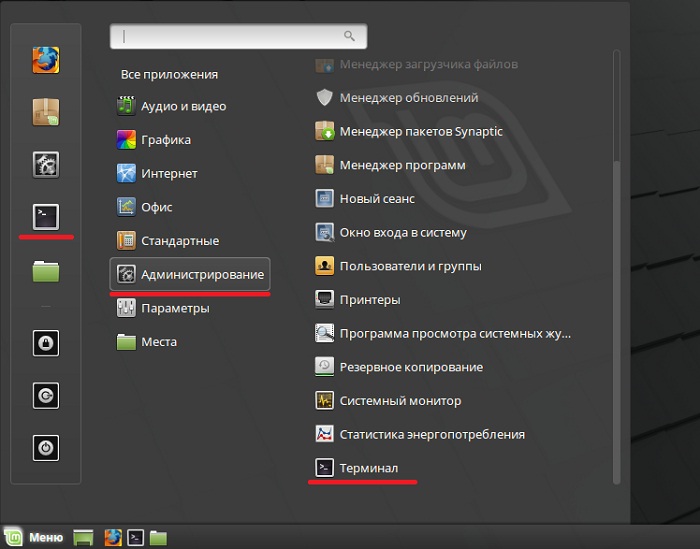
Для того чтобы установить программу в Linux Mint, используя терминал, необходимо запустить этот терминал, например из того же меню. «Меню -> Терминал» или «Меню -> Администрирование > Терминал».
Затем ввести необходимую команду. Для установки программ в Linux Mint можно использовать следующую команду
sudo apt-get install Название программы
sudo apt-get remove Название программы
Перед установкой программ можете выполнить команду update, для того чтобы обновить список всех приложений
Установка FileZilla с помощью терминала Linux Mint
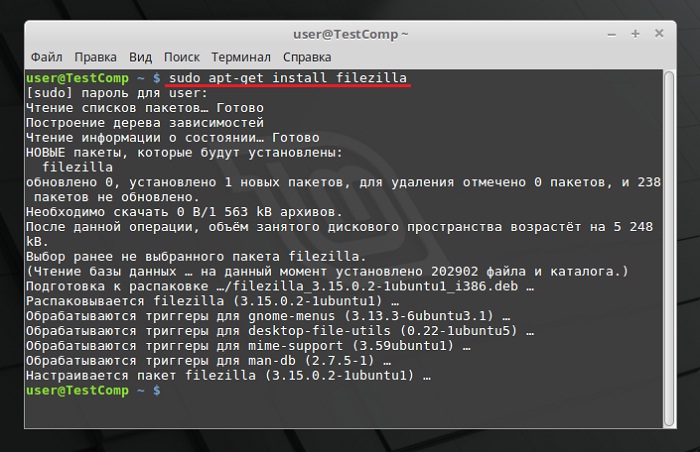
Чтобы установить программу FileZilla необходимо ввести следующую команду в терминале, и нажать ввод (Enter), затем система попросит ввести пароль, Вы его соответственно должны ввести и только после этого начнется установка.
sudo apt-get install filezilla
Удаление программы FileZilla с помощью терминала Linux Mint
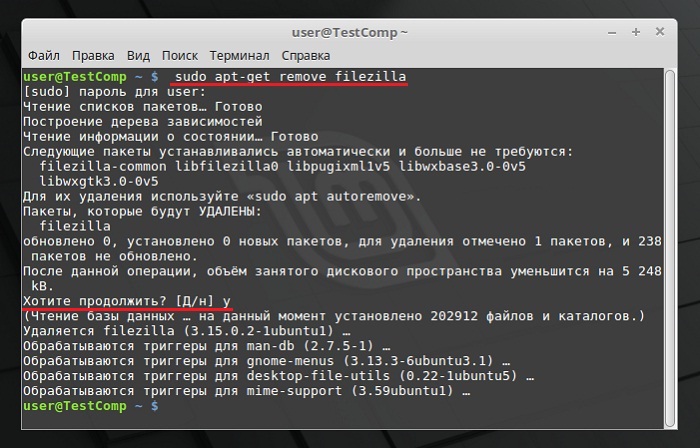
Чтобы удалить программу FileZilla введите следующую команду. На вопрос «Хотите продолжить?» введите y (т.е. Да).
sudo apt-get remove filezilla
Надеюсь, Вы теперь научились устанавливать и удалять программы в операционной системе Linux Mint, у меня на этом все, пока!
