How to Install VMware Tools on Kali Linux
If you are running Kali Linux on VMware Workstation or on a ESXi host you should ensure that the VMtools package is installed and working correctly. Having the vmtools package installed brings a number of improvements to the running of the virtual machine, including helping with the following:
- Low video resolution and Inadequate color depth
- Incorrect display of network speed
- Restricted movement of the mouse
- Inability to copy and paste and drag-and-drop files
- Missing sound
- Synchronizes the time in the guest operating system with the time on the host
When Kali is installed it is able to detect whether is its installed in a virtual machine, and should then enable the VMtools package as part of the install. However, there may be some occasions where you need to reinstall the vmtools manually. Luckily this is a fairly quick and easy process, and as this is a virtual machine, you can take a virtual machine snapshot to give yourself a great way to revert the change if needed!
Note, if you do have VMtools installed already on Kali, but are experiencing an issue, its worth restarting the service first before proceeding with a reinstall:
If you need to reinstall, read on…
First, it is recommended to ensure your Kali Linux system is fully updated. Next run the following to manually install the open vm tools package.
$ sudo apt update $ sudo apt install -y --reinstall open-vm-tools-desktop fuse $ sudo reboot -fAnd that’s it! Once your system restarts, vmtools should be installed on Kali and working as expected.
How to install VMware Tools on Kali Linux
If you’re running Kali Linux inside a VMware virtual machine, installing the VMware Tools software will help you get the most out of the system. VMware Tools will give the machine more capabilities, such as a shared clipboard with the host system, drag and drop file transfer, and automatic window resizing.
This makes copying data to and from a host system much more convenient. It also changes the VM’s resolution automatically when its window is resized, so you don’t need to change it manually. VMware Tools will work with just about any Linux distribution, but instructions can differ because of dependencies and package managers. Normally, Kali will automatically detect what platform the operating system has been installed on, and will include VMware Tools (if applicable) by default. If yours isn’t working or you just need to know how to use the features, we’ve got you covered in this guide.
In this guide, we’ll be going over the step by step instructions to get VMware Tools installed on Kali Linux. With these instructions, it doesn’t matter what host system you’re using, as long as the virtual machine is running Kali. This guide assumes that you’ve already installed Kali in the VM correctly.
In this tutorial you will learn:
| Category | Requirements, Conventions or Software Version Used |
|---|---|
| System | Kali Linux |
| Software | VMware Tools |
| Other | Privileged access to your Linux system as root or via the sudo command. |
| Conventions | # – requires given linux commands to be executed with root privileges either directly as a root user or by use of sudo command $ – requires given linux commands to be executed as a regular non-privileged user |
Install VMware Tools
Make sure your Kali virtual machine is powered on. Then, follow along with the steps below to install VMware Tools.
- Before starting, we need to make sure that Kali is up to date and has all new versions of software installed. Type the following commands in terminal to prepare the system.
$ sudo apt update $ sudo apt full-upgrade $ sudo apt -y autoremove
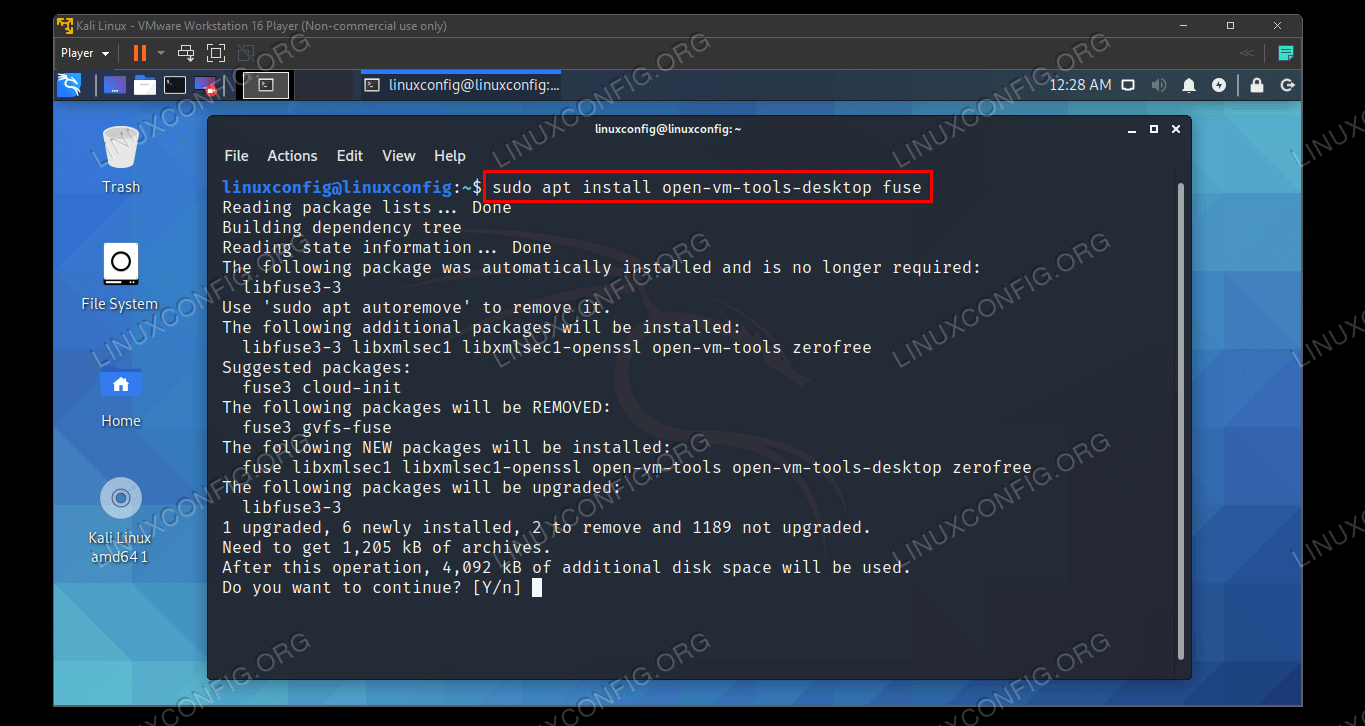
$ sudo apt install open-vm-tools-desktop fuse
If the output tells you that the package is already installed, but you’ve observed that it’s not working, you can reinstall it with the following command.
$ sudo apt install -y --reinstall open-vm-tools-desktop fuse
That’s all there is to it. When Kali finishes loading back up, you’ll be able to utilize the shared clipboard, drag and drop function, and automatic resolution resizing. You can configure additional settings related to VMware Tools under Manage > Virtual Machine Settings > Options > VMware Tools.
Closing Thoughts
In this guide, we saw how to install VMware Tools on a Kali Linux VM. VMware Tools makes virtual machines much easier to use. Although Kali usually includes the software by default, this doesn’t always work perfectly in the real world. You now know how to manually install the software, as well as control its other features from inside the VMware menus.
Related Linux Tutorials:
How to install vmware tools on kali linux
Installing “Guest Tools”, gives a better user experience with VMware VMs. This is why since Kali Linux 2019.3, during the setup process it should detect if Kali Linux is inside a VM. If it is, then automatically install any additional tools (in VMware case, open-vm-tools and open-vm-tools-desktop ). The Guest Tools are also pre-installed in the Live image since Kali Linux 2021.3.
As of September 2015, VMware recommends using the distribution-specific open-vm-tools (OVT) instead of the VMware Tools package for guest machines.
Open-VM-Tools
Should you decide to create your own VMware installation of Kali Linux (rather than using our pre-made VMware images), and you want to force a manual reinstall of open-vm-tools (as something has gone wrong), first make sure you are fully updated, then enter the following:
[email protected]:~$ sudo apt update [. ] [email protected]:~$ [email protected]:~$ sudo apt install -y --reinstall open-vm-tools-desktop fuse [. ] [email protected]:~$ [email protected]:~$ sudo reboot -f [email protected]:~$ Adding Support for Shared Folders When Using OVT
Unfortunately, shared folders will not work out of the box, some additional scripts are needed. Those can be installed easily with kali-tweaks :
In the Kali Tweaks menu, select Virtualization, then Install additional packages and scripts for VMware. Congratulations, you now have two additional tools in your toolbox!
The first one is a little script to mount the VMware Shared Folders. Invoke it with:
And with a bit of luck, checking /mnt/hgfs/ you should see your shared folders.
The second script is a helper to restart the VM tools. Indeed, it’s not uncommon for OVT to stops functioning correctly (e.g. such as copy/paste between the host OS and guest VM stops working). In this case, running this script can help to fix the issues:
For older versions of Kali Linux, here is our previous guide.
Updated on: 2023-Mar-06
Author: g0tmi1k
How to Install VMware Tools in Kali Linux
In this tutorial, we will learn How to install vmware tools in kali linux.
There are many articles teach you how to install Open-VM-Tools but not the official VMware tools.
If you use Kali Linux and want to run it in a virtual machine environment as a guest system, you may have some problems. Therefore, it is recommended for better usage of Kali Linux to install vmware tools in the virtual machine.
This guide will help you install VM Tools for each installation. Kali Linux (including bit 64).
But first What is VMware Tools?
VMware Tools is a set of utilities that improves the interaction of the virtual machine and the cloud platform, increases the performance of the operating system in the virtual machine, and also improves the management functions of the virtual machine.
With VMware Tools, you will be able to copy file’s and text between guest and host and your screen size will be auto resized
That’s what the most are looking for and here we will help you to make it work.
you will be able to drag and drop operations
Plus it will enhance the performance of the virtual machine’s guest operating system and improves the management of the virtual machine.
Step 1
you should always update & upgrade before trying to install any new software or tools, to do so type those commands in your terminal
apt-get update && apt-get upgrade –y
and you may need to add sudo at begining so it will be
sudo apt-get update && apt-get upgrade –y
Step 2
After we have done the update and upgrade step now it’s time to install Kali Linux headers
Type this command in terminal :
apt-get install -y linux-headers-$(uname -r)
sudo apt-get install -y linux-headers-$(uname -r)
in some cases, you can install the VMware tools without even installing the Linux headers and that was my case but to make sure thing will work fine without any problem you should install the Linux headers
Step 3
In the VM Menu of the VMware Workstation, Click Install VMware Tools.
This will mount a virtual CD-ROM drive containing the VMware Tools installation files.
Step 4
Click Open With Files on the pop-up menu inside Kali Linux copy the file
VMwareTools-9.9.3-2759765.tar.gz to your guest Desktop
Click Open With Files on the pop-up menu inside Kali Linux copy the file
VMwareTools-9.9.3-2759765.tar.gz to your guest Desktop
Step 5
open terminal and type those commands
cd Desktop/ ls tar -xf VMwareTools-9.9.3-2759765.tar.gz
make sure the .tar.gz file have the same name as you type it.
cd vmware-tools-distrib ls perl vmware-install.pl –d
now it’s installing the VMware tools don’t do anything just wait till it finishes and then reboot your Guest OS
you may check this video for this tutorial


