- How to install VSCode on Linux Ubuntu and Mint
- What is VSCode, the Visual Studio Code
- Installing VSCode on Linux Mint or Linux Ubuntu
- 1. Add the repository and the key to Visual Studio Code
- 2. Add the APT repository to Linux
- 3. Update the APT and install the vscode
- VSCode Extensions
- Final considerations
- Installing Microsoft Visual Studio Code on Ubuntu and Other Linux
- Method 1: Install Visual Studio Code on Linux using Snap
- Remove VS Code Snap
- Method 2: Using the .deb/.rpm packages
- Remove VS Code deb/rpm app
- Method 3: Using Flatpak
- Remove VS Code Flatpak
- Bonus Tip: Removing VS Code data
- Conclusion
How to install VSCode on Linux Ubuntu and Mint
Dive into this comprehensive guide on “How to install VSCode on Linux Ubuntu” and “How to install VSCode on Linux Mint”. We’ll walk you through the straightforward steps to install Microsoft’s Visual Studio Code, commonly known as VSCode, on these popular Linux distributions. Whether you’re using Ubuntu, Mint, or any other Debian-based Linux distribution, we’ve got you covered with the official packages for a seamless installation experience.
What is VSCode, the Visual Studio Code
Visual Studio Code, or simply VSCode, is a mild source code editor that provides comprehensive support and easy understanding for editing, navigation and code clearance.
Based on a rich extensibility model and mild integration with existing tools. VSCODE is free and based on open source for Linux, Windows and MacOS.
VS Code comes with integrated support for JavaScript, TypeScript and Node.js, has a rich ecosystem of extensions (plugins) for other programming languages, such as C++, C#, Java, Python, PHP, Go; and runtimes like .Net and Unity.
You can easily install VSCode extensions to add new interface languages, programming languages, themes, debugers and for connect to additional services such as databases or APIs.
In this tutorial I will show you how to install Visual Studio Code (VSCODE) on Linux Mint or Ubuntu.
Installing VSCode on Linux Mint or Linux Ubuntu
A VSCode installation package is supplied for use in Debian based systems, like Linux Ubuntu, Linux Mint, Kali Linux, etc.
You can check the latest packages on the VSCode download page . If you want to use the wget command line to get the .deb package directly, first install WGET as below.
Install the WGET if not present.
sudo apt-get update sudo apt-get -y install wget However, we will use an APT package of the Microsoft repository to install and keep up to date our Visual Studio Code editor.
1. Add the repository and the key to Visual Studio Code
The APT repository key is required to validate the signed packages to be installed.
Add the key to the system using the commands below:
sudo apt-get update sudo apt-get install apt-transport-https curl https://packages.microsoft.com/keys/microsoft.asc | gpg --dearmor > microsoft.gpg sudo install -o root -g root -m 644 microsoft.gpg /etc/apt/trusted.gpg.d/ 2. Add the APT repository to Linux
With the APT key imported to the system, proceed to add the contents of the repository.
sudo sh -c 'echo "deb [arch=amd64] https://packages.microsoft.com/repos/vscode stable main" > /etc/apt/sources.list.d/vscode.list' The contents are recorded in the file /etc/apt/sources.list.d/vscode.list .
3. Update the APT and install the vscode
Run the update of the APT package catalog and then install Visual Studio Code:
sudo apt-get update sudo apt-get install code After waiting for the installation to finish you can run the editor by calling it directly on the command line, or through the system menu:
If you want to execute Visual Studio Code with a specific folder opened in IDE, browse it through the command line console at the terminal, and run the code command with a point ( . ):
VSCode Extensions
One of the advantages of VSCode is the possibility of improving the environment with extensions developed by the community.
With them you can config the IDE to better meet your stack needs and preferences as a software developer.
Read in this article what extensions you should install to improve your productivity: VSCode extensions for developers.
Final considerations
Very well, now that you have learned how to install the VSCode on Linux Ubuntu and Mint, hands on and a lot of productivity in programming.
Installing Microsoft Visual Studio Code on Ubuntu and Other Linux
Microsoft’s open-source code editor, Visual Studio Code, is remarkable. Learn how to install VS Code on Ubuntu and other Linux distros.
Microsoft did the unexpected by releasing Visual Studio Code for all major desktop platforms, that includes Linux as well. Soon after its release, Microsoft Visual Code became one of the best open source code editors. The features it provides are useful not only to web developers, but for all kinds of programmers. I am not going to list the features of Visual Studio Code here. I presume you already know them. So, here, I am going to show you how to install Visual Studio Code on Ubuntu and other Linux distributions.
Method 1: Install Visual Studio Code on Linux using Snap
Visual Studio Code is available as a Snap package. Ubuntu users can find it in the Software Center itself and install it in a couple of clicks. Snap packaging means you can install it in any Linux distribution that supports Snap packages. Make sure to enable Snap support on your Linux distribution if you haven’t done already.
sudo snap install code --classicThe installation will depend on your internet connection speed.
Remove VS Code Snap
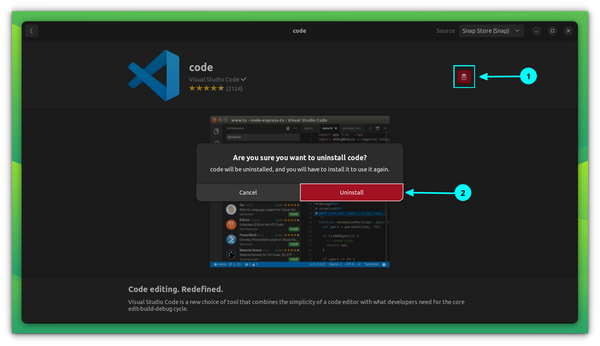
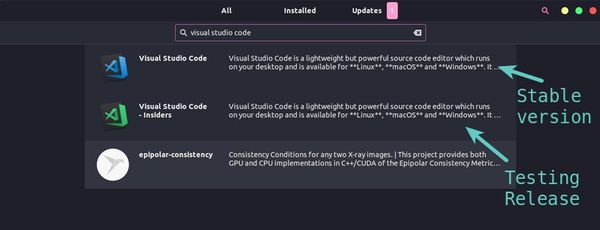
You can remove VS Code installed as a snap both through software center and terminal. Open the Software Center and browse VS Code in the “installed” apps section. Click on remove to uninstall it. Or, open a terminal and enter the following command, it is that easy:
sudo snap remove --purge codeMethod 2: Using the .deb/.rpm packages
Microsoft provides packages to install Visual Studio Code on Linux. Just head over to the download page of Visual Studio Code, and you’ll find the .deb and .rpm files options for the Linux platform.
If you are running Ubuntu or any other Linux distribution based on Ubuntu such as Linux Mint, elementary OS etc., you need to opt for .deb file. .rpm is for Fedora and SUSE based Linux distributions.
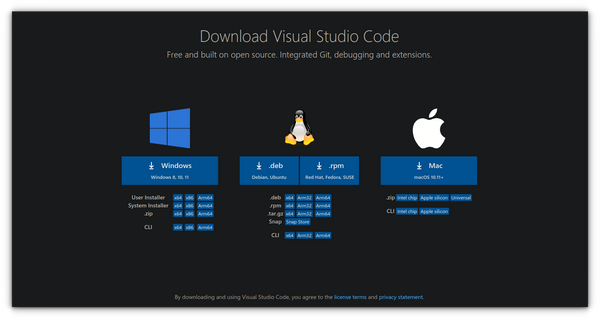 There are options for 32-bit systems as well. If you’re not sure about that, you can read our guide to find if your Ubuntu is 32 bit or 64 bit and then download the files accordingly. Once downloaded, you can simply follow the method suitable to you to install a deb file on Ubuntu (or other Ubuntu-based distros). Or, you can explore the right-click menu on the downloaded deb file and select open with software center. If you do not find the option there, select Open with other applications and from and next, Software Install.
 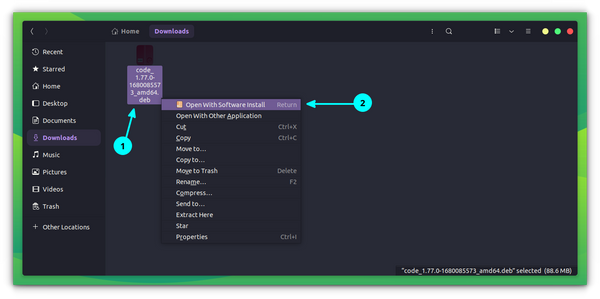 Now, press the “Install” button in the Software Center to install it.
 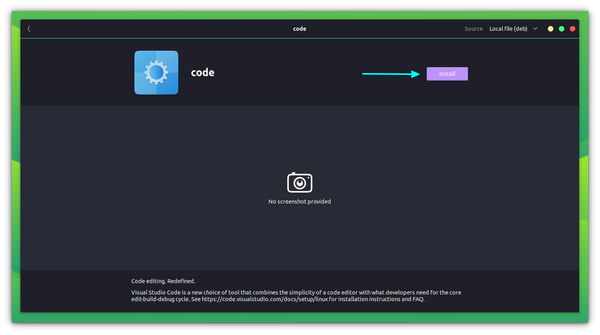 Suggested Read 📖
Remove VS Code deb/rpm app
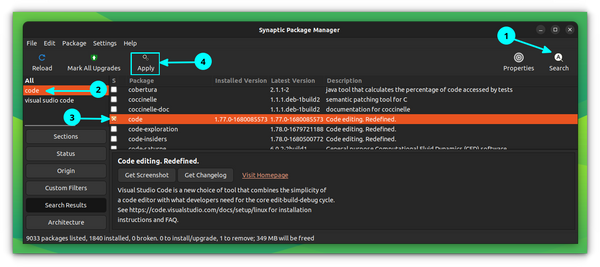
Removing software that was installed from a .deb file is the same as removing any app from the Software Center. Just go to the Ubuntu Software Center, search for the application name and click on Uninstall to remove it. Alternatively, you can use Synaptic Package Manager if you do not find it listed on the Ubuntu Software Center for some reason.
Method 3: Using Flatpak
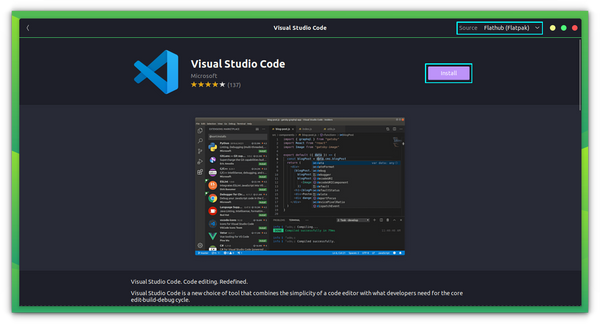
Hate using snap packages? You can always utilize Flatpak. I’d suggest you to refer to our guide to use Flatpak on Linux if you are a new user. Of course, if you have Flatpak support in your software store, you can simply look for the Visual Studio Code and get it installed. Once you have added Flatpak support, you can install the app using the following command:
flatpak install flathub com.visualstudio.codeSuggested Read 📖
Remove VS Code Flatpak
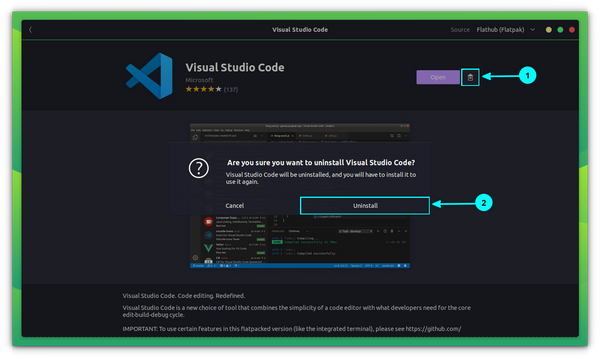
As in the case of snap, the Flatpak version can be removed either through the Flatpak supported Software center, or through the terminal. Open the Software Center and browse for VS Code in installed apps. Now click on uninstall to remove it. Or, open a terminal and enter:
flatpak uninstall com.visualstudio.codeIf you would rather not keep the unused runtimes and packages installed, which are no longer required, then run:
Bonus Tip: Removing VS Code data
VS Code keeps some data on the disk. If you reinstall it, you’ll find that your extensions and some other settings are still present. If you want to remove all traces of VS Code from the system, you should also remove these application related files. Usually, it creates .vscode folder in the home directory and a folder named Code in .config directory in your home directory. You delete these folders and it should remove all presence of VS Code.
Conclusion
As a last resort, you can always build it from the source code. You can find the source code of VS Code on its GitHub page.
It’s pretty easy to install Visual Studio Code on Ubuntu thanks to Snap, Flatpak, or deb/rpm packages available. Now that you know — what method do you prefer to install Microsoft’s Visual Studio Code on Linux? You are welcome to let me know your thoughts in the comments below! If you are curious to explore alternatives and more options to code on Linux, here are some picks for you: