- Беспроводные наушники своими руками
- DIY Bluetooth Headphones
- Step 1: Preparations
- Step 2: Power Connector and Switch
- Step 3: Speakers
- Step 4: Connecting Bluetooth Module
- Step 5: Final Steps
- Step 6: Testing
- 1 Person Made This Project!
- Recommendations
- Colors of the Rainbow Contest
- Metal Contest
- Project-Based Learning Contest
- 117 Comments
Беспроводные наушники своими руками
У вас есть наушники звук которых Вам нравится — но не нравятся провода?
Есть легкий способ от них избавиться — превратив старые добрые проводные наушники в современные беспроводные. Особенно приятно, что данное изделие получится полностью ремонтно-пригодным и если аккумулятор потеряет свою емкость — его всегда можно будет легко заменить. Данная переделка наушников не требует углубленных знаний в радиоэлектронике — достаточно уметь держать в руках паяльник.
Для того, чтобы сделать беспроводные наушники своими руками потребуется всего 5 компонентов
- Плата декодера MP3 Bluetooth аудио модуль MH-M28
- Зарядная плата TP4056 Micro USB 18650 для литиевых батарей, с двойной защитой
- Литий-полимерный аккумулятор (выбор зависит от наличия свободного места в наушнике — у меня его достаточно много поэтому я использую батарею LP803048 8*30*48мм и емкостью 1200мАч)
- Любой выключатель или кнопка с фиксацией
- SMD резистор — для настройки выходного тока зарядной платы под конкретно Ваш вариант аккумулятора (о нем чуть позже)
p.s: если использовать старый аккумулятор от смартфона — цена переделки будет где то в районе 150 рублей, а за такую цену качественные беспроводные наушники точно не купить.
Модуль MH-M28 прекрасен тем, что в нем уже есть встроенный усилитель для наушников. Питать его можно от батареи (3.7V-4,2 V), или через USB разъем, или внешнего источника питания напряжением 5V. Динамики наушников можно подключить либо через штекер, либо через контакты на плате.
В смартфоне или на ноутбуке (компьютере) он определяется как MH-M28, проблем с подключением не возникает, дальность прямой связи заявленная производителем 20м (одну капитальную стенку данный модуль прошибает на ура).
На плате также есть встроенный светодиод который показывает состояние подключения по Bluetooth.
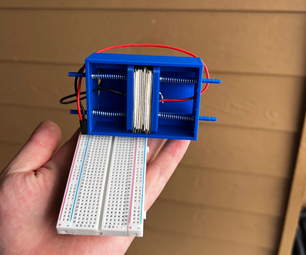
На следующем шаге необходимо «подружить» плату зарядки TP4056 с тем аккумулятором который есть у вас в наличии. Не смотря на то, что сама батарея которая у меня есть уже содержит в себе контроллер защиты от короткого замыкания, глубокого разряда и перезарядки — необходимо ограничить зарядный ток. (все эти компоненты защиты присутствуют и в TP4056 , что позволяет использовать данный модуль и с АКБ без встроенной защиты).
Для литий-полимерных аккумуляторов, правило простое — ток зарядки не должен превышать ёмкость батареи (более подробные данные необходимо смотреть в документацию на конкретную батарею), но для увеличения срока службы рекомендуют этот ток снизить вдвое. Плата TP4056 в своей заводской конфигурации обеспечивает на выходе ток 1А, так, что если у Вас аккумулятор не большой емкости без переделки не обойтись. И еще одна проблема заключается в том, что TP4056 это линейный стабилизатор то есть всю избыточную мощность он будет переводить в тепло, а места в наушнике не так много и обеспечить хороший теплоотвод в таких условиях вряд-ли получится — поэтому я решил снизить максимальный зарядный ток до значения 580мА. (ставлю SMD резистор на 2 ком)
Ищем на плате резистор номиналом 1,2 ком и меняем на тот номинал, который обеспечит необходимо-допустимый для зарядки ток. p.s. у меня он почему-то оказался не в том месте где обычно гуглится по картинкам.
Настроенная плата TP4056 готова к подключению аккумулятора и нагрузки. На плате есть два светодиода, красный горит когда идет зарядка, зеленый когда зарядка окончена, от самого аккумулятора плата ничего практически не потребляет т.е. отключать её не обязательно, в ней также есть защита при подключении неисправных аккумуляторов — и весь функционал на самом деле достоин написания отдельной статьи.
Паять все будем по следующей схеме:
DIY Bluetooth Headphones


Tired of ripping wires on your headset? Don’t like the feel of being «chained» to your computer? Then you came to the right place!
This is a quick DIY project. It can be done in less than 2 hours if you are familiar with the topic, and no more than 1 evening for a complete newbie.
The main objective is to modify your wired headphones into stereo bluetooth headset with the ability to work at least 6 hours on full charge and being able to recharge without any complications.
This frustrating activity (I’ll let you know why in a minute) requires minimum tools/materials and at least some experience working with hand tools and soldering iron.
ATTENTION: The new version of wireless headphones is available here
- PH0 and PH00 Philips screwdriver
- Rotary tool or small grinder (I am using a $20 grinder bought from China)
- 30-40W soldering iron with small tip
- Wire cutters or some old scissors
- LiIon Charger
- Victim headphones with enough space inside to hold the battery
(mine is an old beat-up Sennheiser hd 201 with 24Ohm speakers) - 3.7V LiIon battery$3.00 new (I am using really old Nokia BL-5C so it is free)
- 1mm wire (preferrably 4 different colors and at least 1m each) $0.
- 3.5mm Female Jack connector (mountable, not the ones you solder on PCB$) $0.30
- 3.5mm Male Jack $0.30
- Switch $0.30-$0.50
- BLK-MD-SPK-B Bluetooth module$10.00
Additional materials:
- Solder
- Soldering flux
- Electrical tape
- Hot glue w/ dispensor or just SuperGlue
Step 1: Preparations
Disassemble your headset. You may need to take it apart completely in order to modify wiring.
Select one earpiece, which will hold all the active components, including battery and Bluetooth module.
Run a pair of wires through headpiece. You may need to drill some holes and use some glue to hold wires in place. Fortunately I had a nice thick padding on it and everything fit nicely around it.
If your headphones have hinges, then you really need to avoid guiding wires through moving parts. The best way around is to drill a hole right in the middle of the «arm» and make a matching hole in the earpiece housing (see pictures).
Step 2: Power Connector and Switch
Use your grinder to make a hole large enough for your power switch. I am using a round switch with latches, so i don’t have to glue it. Do the same for 3.5mm Jack connector.
Important notes:
- Make sure you leave enough space for other components.when installing power switch. If you drill too close to the edge of housing, you may damage it or the speaker won’t fit.
- Drill holes in small portions, because high friction from rotary tool will cause plastic to melt and burn.
- Make sure the switch sits firmly in the socket, because you don’t wanna end up pushing it inside and breaking the whole thing
- If you did cut too much plastic — use hot glue to hold switch in place
Step 3: Speakers
On the active side solder two ground wires and one active speaker wire. One ground connection will go to the second speaker, and the other two wires — to Bluetooth module.
The other side only needs to be connected to wiring in your headpiece. You may also assemble and mount it (we are done here).
Step 4: Connecting Bluetooth Module
The first image shows the pinout for BLK-MD-SPK-B module. We are going to use pins 3,4,5 for audio output and pins 12,13 for power.
Solder all pins as shown in figure 2:
Pin 12 => Power Switch (Battery +)
PCB contacts on this module are really small and there is a high chance that you’ll have to redo this part several times. Make sure you don’t overheat solder points, because they are easily damaged. I had to perform a little restoration after accidentally scratching off the ground connector.
Every soldering operation on Bluetooth module damages contacts even more, so once it is done — you may not want to take it apart. If you feel that contact points are a bit loose — you can cover them with a little bit of hot glue or just use nail polish. Tape this contraption to the outside part of the earpiece housing with electrical tape, but keep it just below the board(where wires start).
Step 5: Final Steps
Solder 3 wires to the battery. «+» and «-» are always marked. The middle one is used to determine whether the battery is charging(blue wire on the picture). Attach all three wires to the power connector and then extend «+» wire to the second leg of the power switch.
Once done — mount the power connector (3.5mm jack) into the hole you’ve drilled for it and start assembling.
Make sure you don’t block the Bluetooth module.
If your battery is loose — stick it to the back side of earphone housing and put a little hot glue to it’s sides. Do not overheat the battery, because it may stop working or explode!
Test power connector and power switch, before putting everything together.
I’ve used my old phone as power supply, because I only had one spare 7.5V adapter, which happened to be a charger from my battery-donor-phone =)
I’ll try to come up with more permanent solution in a few days, but this would do for now. Charging only requires a steady supply of at least 500mA at 3.5-4V.you can use any charging device or power supply(just don’t use the middle wire from the battery), but you won’t be able to see whether it is fully charged or not. There is also a danger of overcharging the battery (shortens it’s life and may cause overheating).
Step 6: Testing
Once the battery is charged, unplug your headphones from power supply.
Enable bluetooth on your phone, tablet or computer and scan for audio devices. While scanning, flip the power switch on your freshly made headphones and wait for connection. In case there is a popup window asking for a Pairing PIN: it is «0000«.
Wait for drivers to install. At the end you will hear a short bell from your headphones, which means you are connected.
If you are unable to connect, try to reset headphones and scan again.
Good luck and enjoy life without wires!
P.S. Almost forgot the most important thing! After the initial test run my 8 y.o. battery was able to power this device for almost 10 straight hours (I don’t like to turn it up that much). And this is only 1000mAh!
If you are going to use a new 2400mAh battery, you will get much more than that. Maximum current consumption with 16Ohm speakers is about 150mA per channel, so in theory you will get no less than 8 solid hours of rocking and banging on full volume until you loose your hearing.


1 Person Made This Project!

Did you make this project? Share it with us!
Recommendations


Colors of the Rainbow Contest

Metal Contest

Project-Based Learning Contest

117 Comments

Hi, please please help with this question if you can. You say «At the end you will hear a short bell from your headphones, which means you are connected». Is it possible to customise for your own sounds when the headphones are connecting or disconnecting? How is this done please? Thank you.
Is it possible to connect the two speakers using two bluetooth modules? If so please make an instructable on it.

Trust me it in not possible. the «true wireless» technology has it patent issues i.e its not open source.

Independently u can but it will pose a very difficult situation when trying to configure ur connection