- NTFS
- Tips and tricks
- Improving performance
- Prevent creation of names not allowed by Windows
- Known issues
- Explicit file system type required to mount
- Troubleshooting
- unknown filesystem type ‘ntfs’
- udisks support
- Unable to mount with ntfs3 with partition marked dirty
- See also
- How To Mount NTFS in Linux With Read-only and Read-and-write Access
- In this article
- Prerequisites
- How To Mount NTFS in Linux with Read-Only Permissions
- How To Mount NTFS in Linux with Read-and-write Permissions
- Video Tutorial — Mount and read a USB Drive with an Ext4 File System Partition in Linux
- Final Thoughts
- Как монтировать нестандартные файловые системы в Linux
- NTFS
- Установка компонентов
- Ручное монтирование
- Автоматическое монтирование
- GeeseFS (Yandex Cloud диск)
- Установка компонентов
- Авторизация
- Ручное монтирование
- Автоматическое монтирование
NTFS
NTFS (New Technology File System) is a proprietary journaling file system developed by Microsoft. Starting with Windows NT 3.1, it is the default file system of the Windows NT family.
The ntfs3 kernel driver provides read and write support for the file system.
- All officially supported kernels with versions 5.15 or newer are built with CONFIG_NTFS3_FS=m and thus support it. Before 5.15, NTFS read and write support is provided by the NTFS-3G FUSE file system. Or you can use backported NTFS3 via ntfs3-dkmsAUR .
- Paragon Software, the author of the kernel module, has not yet released userspace utilities for NTFS3. You can use NTFS-3G userspace utilities without NTFS-3G driver via ntfsprogs-ntfs3AUR .
Tips and tricks
Improving performance
You can enable the prealloc mount(8) option to decrease fragmentation in case of parallel write operations (most useful for HDD).
Prevent creation of names not allowed by Windows
NTFS itself does not have restrictions for characters and names used, but Windows does.
Since the kernel version 6.2, ntfs3 supports windows_names mount(8) option. Use it to strictly maintain compatibility.
Known issues
Explicit file system type required to mount
ntfs3 requires the file system type to mount.
To be able to mount the file system, specify its type as ntfs3 . For example, using mount(8) ‘s -t / —types option:
# mount -t ntfs3 /dev/sdxY /mnt
Troubleshooting
unknown filesystem type ‘ntfs’
When mounting NTFS, you can encounter an error such as:
mount: /mnt: unknown filesystem type 'ntfs'
If you want to use ntfs3 as the default driver for ntfs partitions, such udev rule does the trick:
/etc/udev/rules.d/ntfs3_by_default.rules
SUBSYSTEM=="block", ENV=="ntfs", ENV="ntfs3"
Although, this method is not recommended and can confuse some 3rd party tools.
udisks support
This article or section is out of date.
Reason: The described problems have been fixed. Since kernel version 6.2, ntfs3 supports windows_names option. (Discuss in Talk:NTFS)
udisks supports NTFS3, but has some issues at the moment. See udisks ntfs3 PR and issue 932.
Issues can manifest as the following errors, when the NTFS3 driver is used because NTFS-3G is not installed, but with mount options that it does not recognize:
ntfs3: Unknown parameter 'windows_names'
Filesystem type ntfs3,ntfs not configured in kernel
The second error in particular can be encountered with Dolphin. Nautilus can also report the same error message in the case of a dirty NTFS partition (see #Unable to mount with ntfs3 with partition marked dirty).
As a workaround, add a such option to /etc/udisks2/mount_options.conf in [defaults] section:
ntfs_defaults=uid=$UID,gid=$GID,prealloc
Unable to mount with ntfs3 with partition marked dirty
When trying to mount a good NTFS partition (i.e. which successfully mounts with NTFS-3G and for which ntfsfix —no-action does not report any error), you may get the following error:
mount: /mnt: wrong fs type, bad option, bad superblock on /dev/sdb1, missing codepage or helper program, or other error. dmesg(1) may have more information after failed mount system call.
ntfs3 will not mount a partition where the volume is marked dirty without the force option. dmesg explicitly helps recognizing the situation, saying:
sdb1: volume is dirty and "force" flag is not set!
You can try passing the —clear-dirty argument to ntfsfix to clean it. [1]
See also
How To Mount NTFS in Linux With Read-only and Read-and-write Access
Does Linux support NTFS? Yes, you can integrate them together with Read-only or Read-and-write permission.

Margarete Cotty
While Windows is the most widely used operating system worldwide, Linux is still the preferred system program by most developers for its slick interface and highly maintained security. It provides a stable and reliable server for extremely sensitive and confidential data.
However, you can’t directly access a file stored on drives formatted in the Windows NTFS file system unless you mount NTFS on your Linux device. This process may seem like a handful, but don’t worry; this article will teach you how to set up NTFS Support in Linux with Read-only and Read-and-write permissions.
In this article
Prerequisites
- A Linux-based system
- A user account with sudo or root access.
- Terminal window / command line access (Activities > Search > Terminal)
Most Unix-like distros employ the NTFS-3g package and FUSE (Filesystem in USErspace) to mount NTFS in Linux. NTFS-3g is a free and open-source NTFS driver that allows users to create, delete, rename, and transfer files from non-Windows devices.
This type of distribution with NTFS-3g and FUSE installed usually finds and mounts NTFS data automatically. But if it doesn’t work on your device, the two mounting methods below might help you solve the problem. You can perform the following procedures with either Read-only or Read-and-write access.
How To Mount NTFS in Linux with Read-Only Permissions
Giving access privileges to anyone is vital. So, if you’re not confident about sharing your data with others, it’s best to mount the NTFS drive on your Linux device with Read-only permission. Such permission provides bounded access and only allows limited inputs. This way, the security of your data is further enhanced to avoid unnecessary changes and tampering.
For the process of mounting an NTFS partition with read-only access, follow the steps below.
Step 1: Determine the NTFS Partition.
Before mounting an NTFS partition, use the parted command to identify it:
For the details, rely upon the picture below:
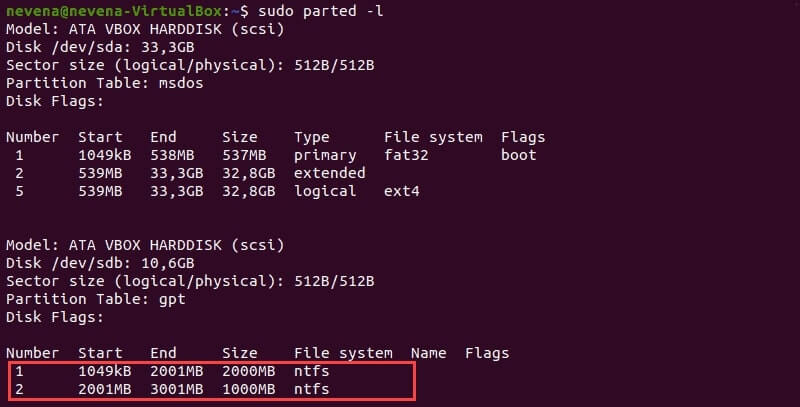
The example presents two NTFS partitions on the /dev/sdb disk. Before you continue, note the specific number of partitions you want to mount.
To display only NTFS partitions on a disk, run the fdisk and grep commands as listed below:
sudo fdisk -l | grep NTFS
Step 2: Make a mount point and mount an NTFS partition.
As seen from the example, the /dev/sdb1 partition has been set as read-only.
First, use the mkdir command to create the mount point:
Next, mount the partition to the directory you have just created. Run the mount command, together with the previously noted number of partitions:
sudo mount -t NTFS /dev/sdb1 /mnt/ntfs1
Verify the details of the file systems using the disk-free tool. It is for you to ensure that you have successfully mounted the partition. Afterward, run the command below:
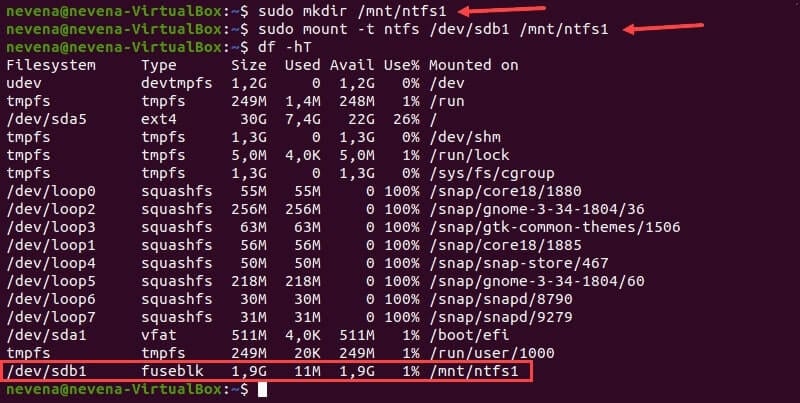
At the bottom of the list, the /dev/sdb1 partition is shown as mounted, which means you can now access the Windows NTFS partition from a Linux device with Read-only permission.
Accidentally deleted or lost data in NTFS Drive?
No worries, Wondershare Recoverit can get back your lost files within 3 steps. The professional yet easy-to-use data recovery software is totally reliable and 100% safe.)
How To Mount NTFS in Linux with Read-and-write Permissions
For some reason, it’s also important to mount NTFS in Linux with Read-and-write permission. Some users utilize Linux to fix Windows operating systems, while others use them both to access various files. Gladly, you can now access NTFS files from non-Windows devices and make several changes without too many limitations. All you have to do is to mount NTFS on your Linux device with Read-and-write access. Follow the step-by-step process below:
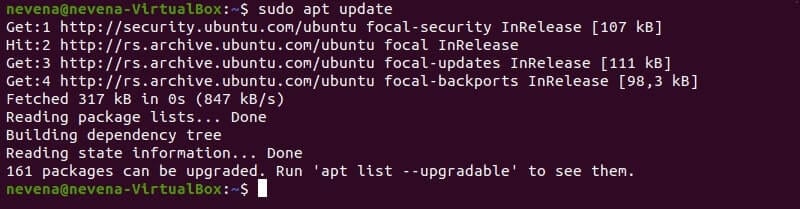
Step 1: Update Package Repositories.
To access and update the package repositories, run the following command:
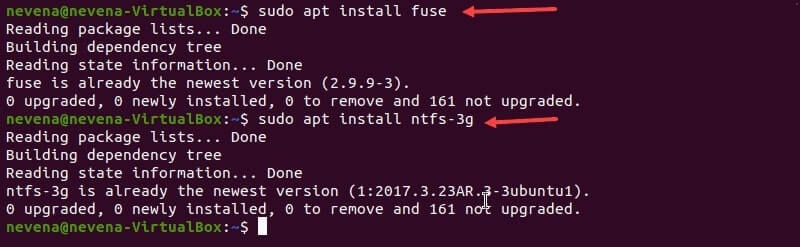
Step 2: Install fuse and NTFS-3g.
Install FUSE and NTFS-3 on your system to mount the partition with Read-and-write permissions. Note that some Linux distributions may come pre-installed with fuse and NTFS-3g. If that’s the case, you may skip this step.
Use the appropriate package manager to install FUSE from the default repository on your Linux system. Check the details before proceeding and ensure that the command inputs are correct. Refer to the code written below:
sudo apt install fuse
When the installation is finished, run the following command to install NTFS-3g:
sudo apt install NTFS-3g
After the FUSE and NTFS-3g have been installed, this is how the screen would look like:
Step 3: Partition NTFS Mount.
After installing the fuse and NTFS-3g software packages, you can now mount your NTFS partition. To do this, use the mkdir command to create a mount point:
Right after, use the mount command to mount the desired partition. For instance, /dev/sdb2:
sudo mount -t ntfs-3g /dev/sdb2 /mnt/ntfs2/
To verify if the partition is mounted, run the df command:
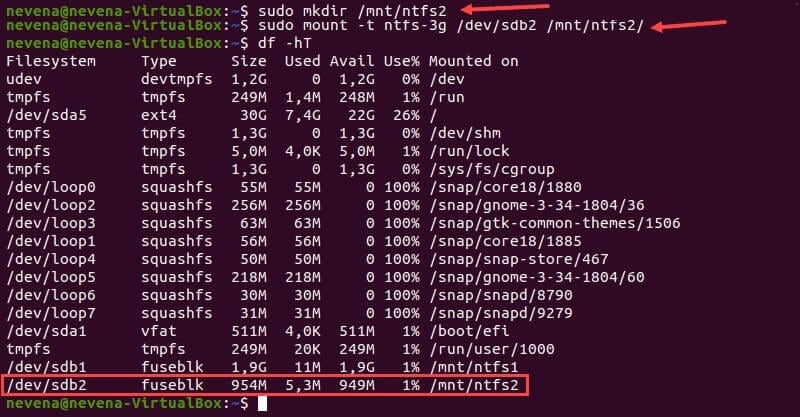
You now have Read-and-write access to the NTFS partition you mounted. Unfortunately, unless you’re using Linux kernel version 2.6.20 or much-updated versions, you can’t possibly mount a partition using NTFS-3g and FUSE.
Video Tutorial — Mount and read a USB Drive with an Ext4 File System Partition in Linux
Final Thoughts
Mounting and accessing NTFS partitions is a simple yet complicated process. However, going through the complete guide discussed above, you can easily mount NTFS on Linux devices. Stick to the steps above to access the read-only & read-and-write options.
For Windows XP/Vista/7/8/10/11
For macOS X 10.10 — macOS 13
Как монтировать нестандартные файловые системы в Linux

Обновлено: 09.07.2023 Опубликовано: 09.08.2016
Данную инструкцию можно рассматривать как шпаргалку для работы с некоторыми файловыми системами в системах Linux. По мере возможности, список примеров будет пополняться.
NTFS
Установка компонентов
Для начала необходимо установить пакет ntfs-3g. В противном случае, при попытке запустить команду на монтирование раздела NTFS мы получим ошибку mount: unknown filesystem type ‘ntfs’.
Сначала устанавливаем расширенный репозиторий:
Затем сам пакет ntfs-3g
После установки данного пакета в системе появятся дополнительные команды mount.ntfs-fuse и mount.ntfs-3g., а также команда mount распознает опцию -t ntfs.
Ручное монтирование
Монтирование NTFS на чтение и запись выполняется любой из трех команд:
mount -t ntfs-3g /dev/sdb1 /mnt
* в данном примере, примотировано устройство /dev/sdb1 в раздел /mnt. Понять, какой устройство нужно монтировать можно при помощи команды fdisk -l
Автоматическое монтирование
Чтобы раздел автоматически монтировался при перезапуске компьютера, открываем на редактирование файл:
/dev/sdb1 /mnt ntfs defaults 0 0
* в данном примере мы раздел /dev/sdb1 будем монтировать в каталог /mnt.
Чтобы применить настройку и проверить ее, вводим:
Посмотреть примонтированные разделы и файловые системы можно командой:
GeeseFS (Yandex Cloud диск)
Установка компонентов
Сначала устанавливаем утилиты fuse и wget. В зависимости
yum install fuse fuse3 wget
Скачиваем geesefs и сохраняем ее в /usr/bin/geesefs:
wget https://github.com/yandex-cloud/geesefs/releases/latest/download/geesefs-linux-amd64 -O /usr/bin/geesefs
Выставляем разрешение утилиты geesefs на запуск:
Проверяем работу утилиты, посмотрев ее версию:
Мы должны увидеть что-то на подобие:
Авторизация
Yandex Cloud для монтирования диска требует прохождение аутентификации с помощью токена. Его мы получаем в личном кабинете хостера.
Для настройки доступа создаем каталог .aws в домашней директории пользователя, под которым будем монтировать диск. В моем случае, пользователь root:
После создаем файл с токеном:
[default]
aws_access_key_id = H. D
aws_secret_access_key = H. 7
Ручное монтирование
Для монтирования используем команду geesefs:
Автоматическое монтирование
Чтобы раздел автоматически монтировался при перезапуске компьютера, открываем на редактирование файл fstab:
fuse.geesefs _netdev,allow_other,—file-mode=0666,—dir-mode=0777 0 0
Если мы хотим, чтобы точке монтирования назвачался определенный владелец и группы, указываем опции uid и gid:
fuse.geesefs _netdev,allow_other,—file-mode=0666,—dir-mode=0777,—uid=1024,—gid=1024 0 0
Чтобы применить настройку и проверить ее, вводим: