- How to Connect Over FTPS on Ubuntu?
- Installing FileZilla and connecting over FTPS (GUI)
- Connecting over FTPS on Ubuntu using lftp (Terminal)
- 1. Installing lftp on Ubuntu
- 2. Connecting and performing basic commands with lftp on FTPS
- Various methods to connect over FTPS
- Use lftp with Script and Bookmark
- Using a Bash Script for Connection
- Ensuring SSL Settings Before Opening a Connection
- Using a Custom lftp Configuration
- Conclusion
- Как подключиться к FTP-серверу
- Данные для доступа к FTP-серверу
- Как подключится к FTP через Проводник Windows
How to Connect Over FTPS on Ubuntu?

In this tutorial, we’ll learn how to connect over FTPS on Ubuntu one of the flavours of Linux systems. FTPS is an abbreviation of multiple terms – “FTP over TLS”, “FTP Secure”, “FTP+SSL” in Ubuntu. Despite its reputation for robust security measures, VSFTPD, while known for its strong security features, can be considered unsecure as it originally used the FTP protocol, which sends data in plain text, making it vulnerable to eavesdropping attacks.
Contemporary options like SFTP (SSH File Transfer Protocol) and FTP over TLS (Transport Layer Security) have risen in popularity, as they provide comprehensive encryption for data being transferred. These updated protocols mandate a certificate to set up a secure link, guaranteeing that data in transit stays undecipherable to any likely eavesdroppers. This makes them a safer choice for current data transfer requirements.
Installing FileZilla and connecting over FTPS (GUI)
The most popular FTP client is FileZilla, not only FTP, but it also supports FTPS, FTPES, SFTP. It is a free cross-platform software, easy to use and install.
Since we are planning to access and use FTPS server over your network, think of OpenSSL as your trusty sidekick. It’s a dynamic toolkit adept at managing the intricacies of Transport Layer Security and Secure Sockets Layer protocols. So, no matter what package or application be it FileZilla, lftp, or a desire to select a custom script, OpenSSL safeguards ensuring our data communication remains encrypted and secure.
You can easily install it by using the apt command:
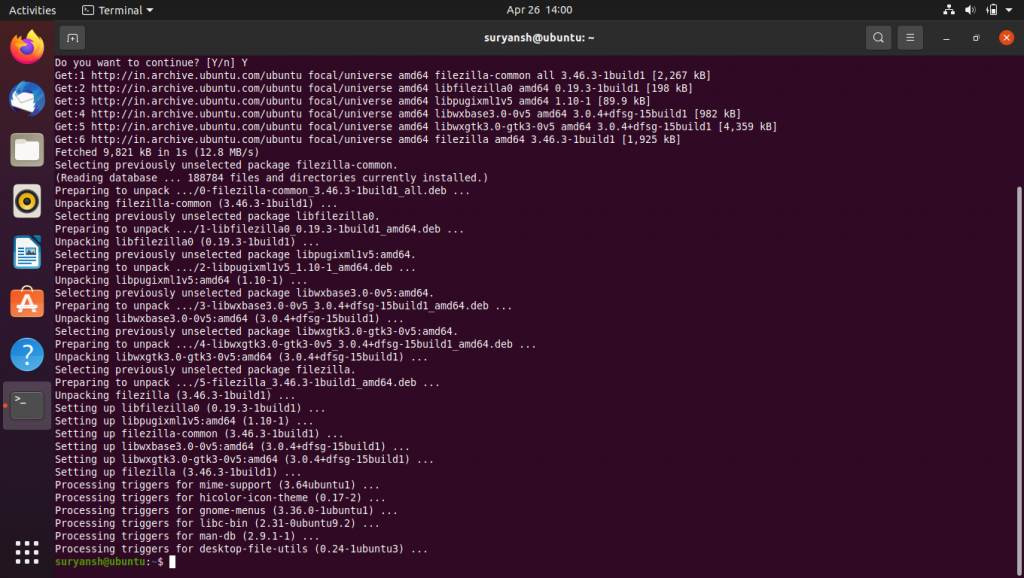
sudo apt install filezilla
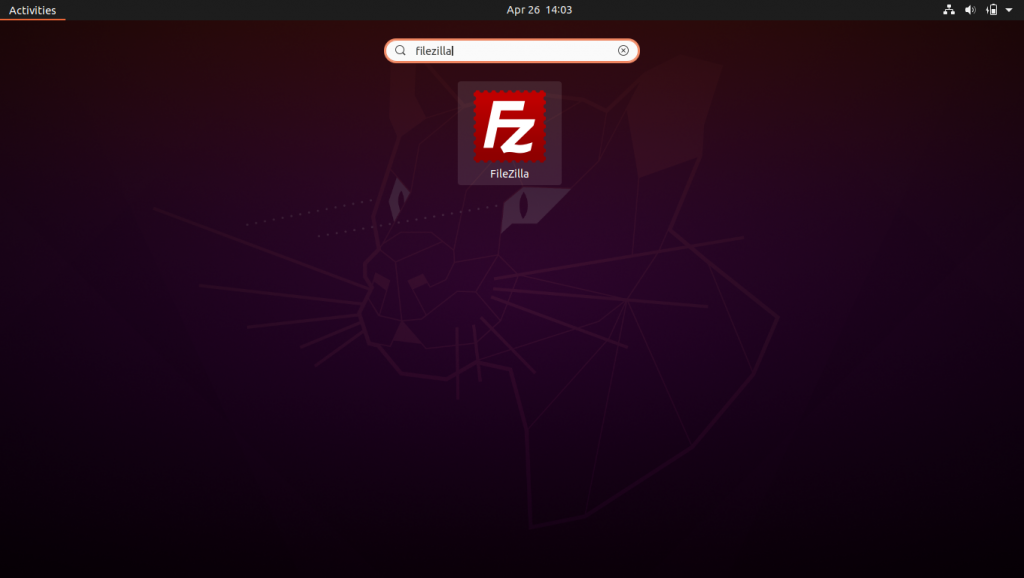
Now you easily search for FileZilla in your Applications,
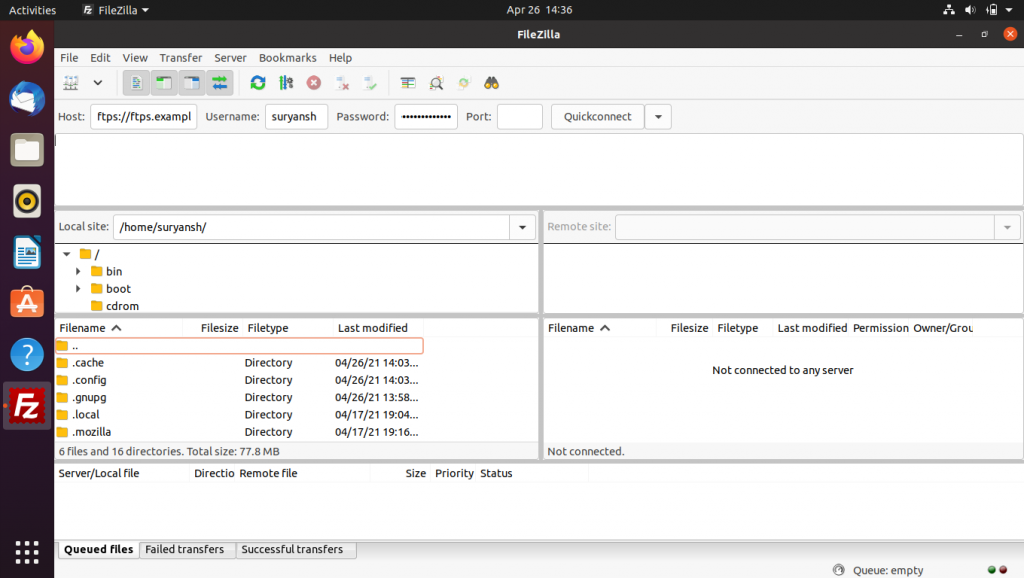
FileZilla has a very easy to use interface, to connect over FTPS, make sure you add ftps:// followed by the hostname (e.g. ftps://ftps.example.com).
Generally by default the FTPS port is 990, but incase it’s different you need to mention it with other credentials.
Connecting over FTPS on Ubuntu using lftp (Terminal)
The ftp package which comes pre-installed with Ubuntu Server, does not support FTPS. So we will use lftp to connect over FTPS in Ubuntu.
lftp is a sophisticated file transfer program which not only supports FTPS but also FTP, HTTP, HTTPS, HFTP, FISH, SFTP and file. You can read more about lftp by executing the following command to open up it man page:
1. Installing lftp on Ubuntu
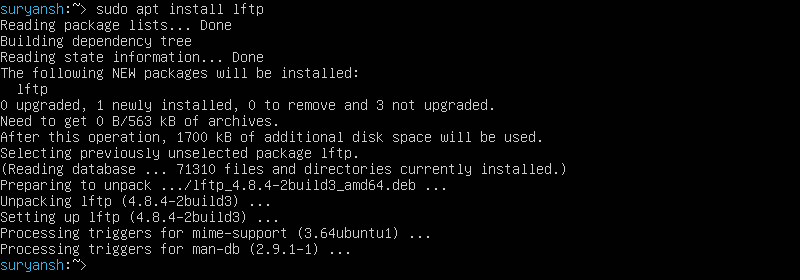
We’ll make use of apt command with sudo command to install lftp, as stated below:
2. Connecting and performing basic commands with lftp on FTPS
To connect to any FTPS server simply run:
lftp -u myuser ftps://ftps.example.com

To understand the basic functionality, we’ll list remote files then change active directory, then we’ll transfer a file from the local machine and rename it, then we’ll create a new directory and in the end we’ll download the file to the local machine and delete the file.
To get list of the remote files, enter ls command in lftp‘s interactive shell:

We can see a directory named remotedir. Next, we’ll change the active remote directory with cd:

Now we’ll transfer a local file to the remote server with put command:
This command will transfer your local test.txt file from your current active local directory to the current active remote directory as test.txt.

Now to rename any file in remote directory, we can make use of mv command:
This will rename test.txt to newtest.txt,

Now we’ll create a new remote directory with the mkdir command:
This command will create a new remote directory called newdir.

Now to download the file from the remote server, we’ll use the get command:

This will download the newtest.txt file in remotedir on the remote server to the active directory on the local machine. Now to delete a remote file, we’ll use the rm command:
This will remove a file named newtest.txt in the active remote directory,

And, similarly to remove a remote directory, we’ll use rmdir command:
This will remove a remote directory called newdir in the active remote directory.
Now that we have gone over how to install and run lftp command in the terminal, how to create a connection to secure ftp server, as well as perform various commands such as listing remote files with “ls”, changing directories with “cd”, transferring files with “put”, renaming files with “mv”, creating directories with “mkdir”, downloading files with “get”, deleting files with “rm”, and removing directories with “rmdir”. Let us go over other ways to connect over ftps.
Various methods to connect over FTPS
Use lftp with Script and Bookmark
These long command line could be tedious to some people we can get this automated using scripts and saving them as a bookmark.
$ cat lftp.ssl.commands user moo foopass set ftps:initial-prot ""; set ftp:ssl-force true; set ftp:ssl-protect-data true; open ftps://HOSTNAME:990
To make use of this script all we need to do is to save this code in a file. Then just run the lftp command without any arguments.
Now we source the script then save the bookmark. Delete the script to get rid of the clear-text password. In the future, we can use the bookmark to connect.
$ lftp lftp :~> source lftp.ssl.commands lftp HOSTNAME:~> dir `ls' at 0 [Connecting. ]
Using a Bash Script for Connection
Another method involves writing a bash script. This allows a series of commands to be executed in sequence.
#!/bin/bash lftp :990; user ; lcd /tmp; cd ; put foo.txt; exit; SCRIPT
This script won’t make any permanent changes to your lftp configuration files.
Ensuring SSL Settings Before Opening a Connection
In some cases, SSL settings should be set before the open command. Here’s an example:
lftp -c 'set ftp:ssl-allow true ; set ssl:verify-certificate no; open -u USERNAME,PASSWORD -e "cd /; mput LOCAL/PATH/TO/FILE/FILENAME.EXT; quit" HOST'
Using a Custom lftp Configuration
Creating a custom .lftprc file can help maintain a persistent set of configurations. Here is how to create a .lftprc file:
set ftp:ssl-auth TLS set ftp:ssl-force true set ftp:ssl-protect-list yes set ftp:ssl-protect-data yes set ftp:ssl-protect-fxp yes set ssl:verify-certificate no
Using ftp-ssl for Automatic SSL or TLS
ftp-ssl is a command that tries to connect via SSL or TLS authentication and encryption by default. If a secure connection is not available, it falls back to a standard FTP connection.
For example, ftp-ssl 192.168.35.100 or ftp-ssl something.local .
Conclusion
In this tutorial, we’ve taken a journey through the nuts and bolts of setting up a secure FTPS connection on an Ubuntu system which is linux based. We kicked things off by dipping our toes into the world of FTPS protocol, understanding why it’s such a step up from the traditional FTP.
After getting a handle on the basics, we plunged into the practical side of things. We explored how to use FileZilla, a user-friendly graphical client, to connect over FTPS. And for those who prefer the command-line, we didn’t leave you out! We also covered how to use the command-line client ‘lftp’ for the same purpose.
We walked through how to get these tools up and running on your machine, how to make that initial connection to a server, and the basics of executing commands. Plus, we gave you some insider tips on automating this process with the help of scripts and bookmarks.
And that’s not all! We dived into alternate strategies too. We touched on the use of a bash script, creating a custom lftp configuration, and even the ‘ftp-ssl’ command for automated SSL or TLS.
One thing to keep in mind though – while FTPS provides that much-needed security blanket, it’s essential to make sure that the systems and data you’re working with are locked up tight. This means adopting the best practices of data security and privacy.
Как подключиться к FTP-серверу

FTP (File Transfer Protocol) представляет собой протокол удаленной передачи файлов. С его помощью можно загрузить на сервер и скачивать с него же данные любого типа и размера, создавать или удалять файлы и папки.
В Windows, Linux и macOS подключиться к FTP-серверу можно с помощью встроенных средств и сторонних программ разного назначения. Полноценная работа со всеми средствами возможна только через специальные приложения, называемые FTP-клиентами. Теперь подробнее расскажем обо всех этих способах.
Данные для доступа к FTP-серверу
При подключении к FTP-серверу очень важно вводить правильные данные. Возьмем в качестве примера Timeweb. После регистрации на почту приходят два письма. Письмо с данными выглядит вот так:
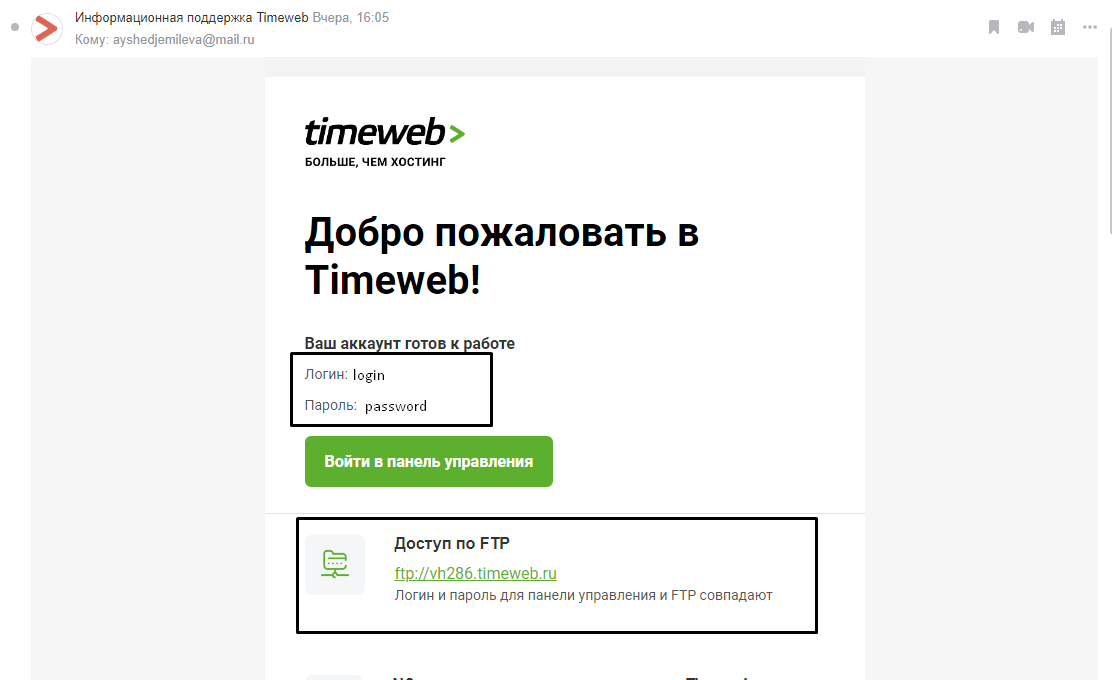
Теперь о том, какие данные необходимо иметь под рукой:
- логин,
- пароль,
- ссылка на FTP-сервер (указывается в том же письме),
- порт (по умолчанию устанавливается значение 21).

Как подключится к FTP через Проводник Windows
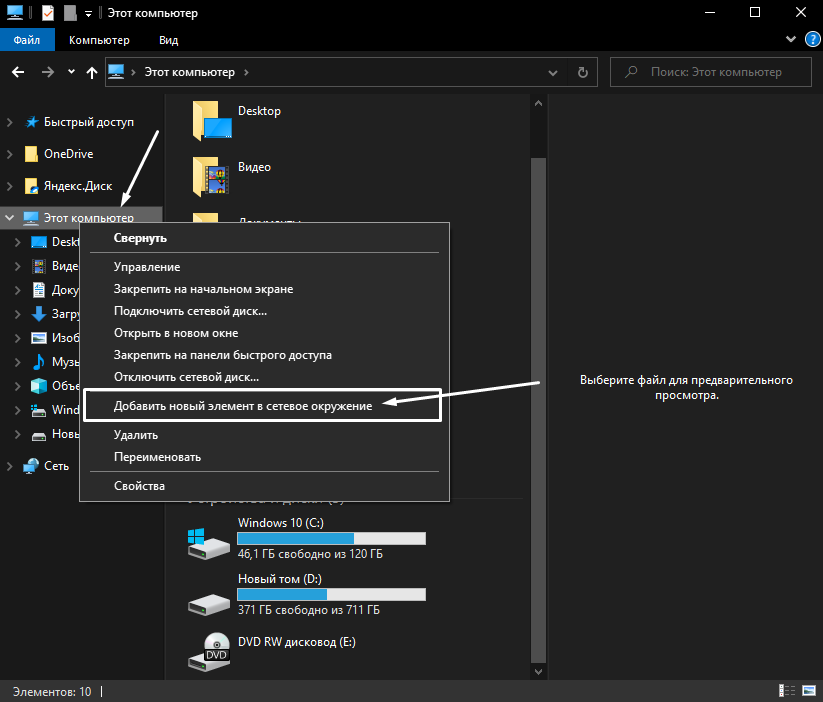
Сначала рассмотрим, как подключиться к FTP-серверу через программу «Проводник» в Windows 10. Здесь ничего дополнительно устанавливать не надо, просто открываем системный файловый менеджер. В левой панели находим значок «Этот компьютер» и жмем по нему правой кнопкой мыши для вывода контекстного меню. В списке выбираем элемент «Добавить новый элемент в сетевое окружение».
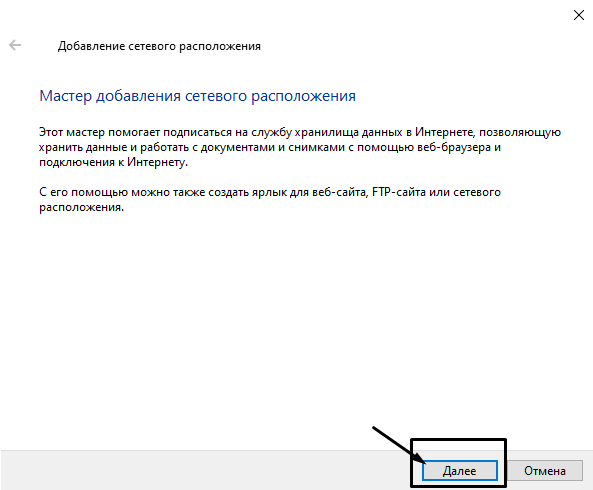
В результате откроется окно мастера добавления сетевого расположения. В начальном окне просто нажимаем «Далее».
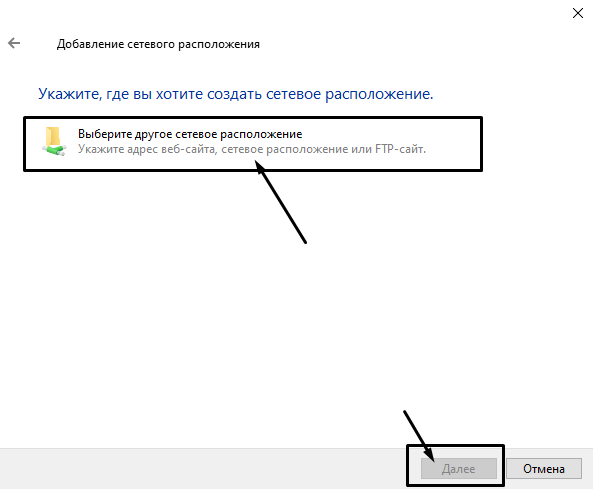
Следом надо выбрать его дальнейшее местоположение, но в этом окне нам доступен только один вариант. Для продолжения снова нажимаем на кнопку «Далее».
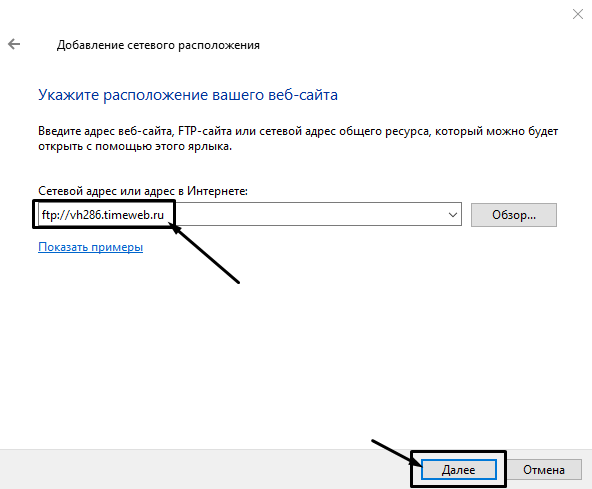
В этом окне понадобится указать ссылку на сетевой ресурс, к которому планируется провести подсоединение. Важно соблюдать предписанный формат (чуть ниже есть несколько примеров). В поле вводим адрес/ссылку и вновь идем дальше.
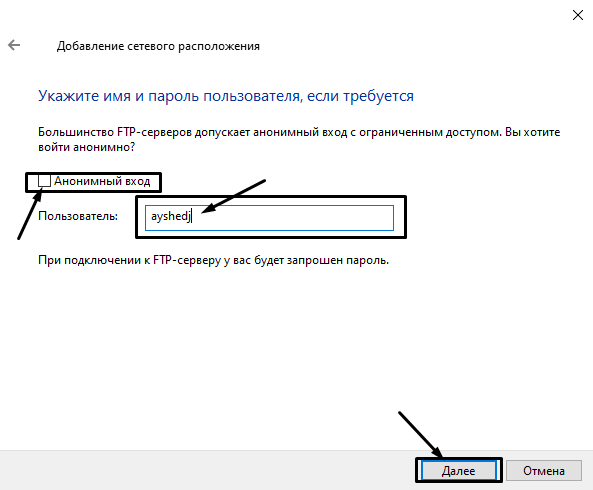
Теперь понадобится ввести в поле имя пользователя. Пароль заранее вводить не нужно, он будет запрашиваться только при подключении. Если на вашем хосте есть такая возможность, вход можно осуществить анонимно, отметив соответствующую галочку.
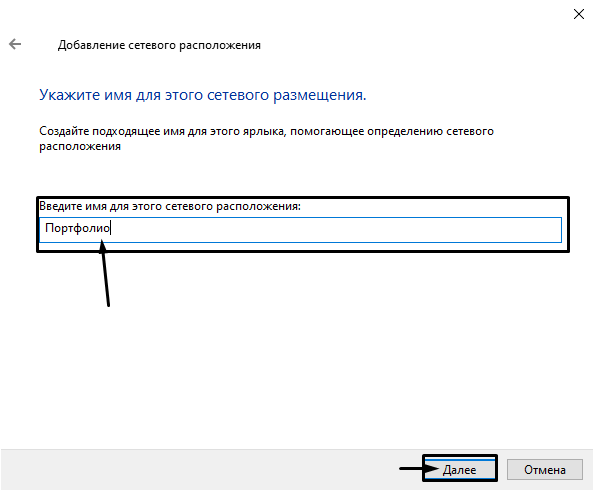
В самом конце даем название новому сетевому окружению.
На этом настройка завершена. При необходимости можно поставить галочку, чтобы сразу после нажатия на кнопку «Готово» открыть указанный сервер и приступить к работе.

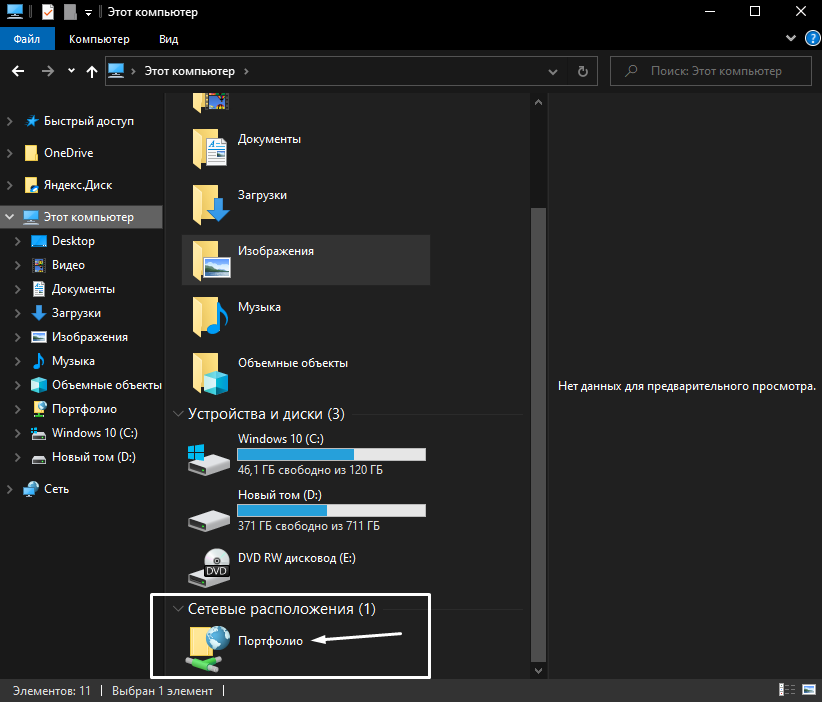
Новое подключение теперь находится в «Сетевых расположениях» в разделе «Этот компьютер».
Теперь подключаемся – открываем только что созданное соединение. Открывается маленькое окошко, где мы вводим пароль, затем жмем на кнопку «Вход».
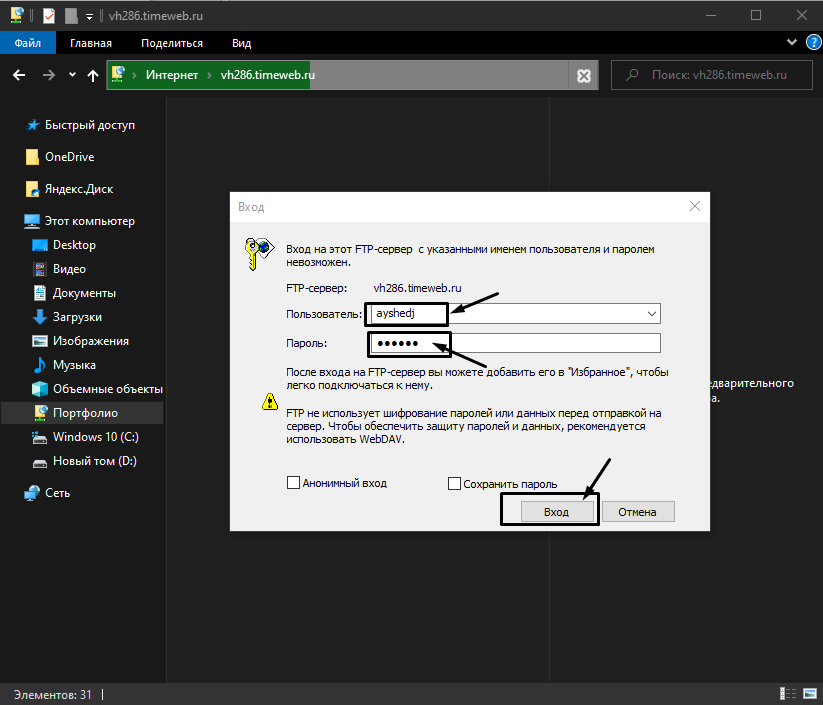
Если все данные введены успешно, откроется папка сервера. Можно приступать к работе.