- Create a Partition in Linux — A Step-by-Step Guide
- How to Create a Partition in Linux?
- Using the command mode
- Creating a partition
- Setting the partition type
- Finalising the changes
- Formatting a partition
- Wrapping up
- How to Create Partitions in Linux
- Option 1: Partition a Disk Using parted Command
- Step 1: List Partitions
- Step 2: Open Storage Disk
- Step 3: Make a Partition Table
- Step 4: Check Table
- Step 5: Create Partition
- Option 2: Partition a Disk Using fdisk Command
- Step 1: List Existing Partitions
- Step 2: Select Storage Disk
- Step 3: Create a New Partition
- Step 4: Write on Disk
- Format the Partition
- Mount the Partition
Create a Partition in Linux — A Step-by-Step Guide

While we believe that this content benefits our community, we have not yet thoroughly reviewed it. If you have any suggestions for improvements, please let us know by clicking the “report an issue“ button at the bottom of the tutorial.
In this tutorial, we’ll be covering the steps to create a partition in Linux. This can help you allocate different memory regions for specific uses. Creating partitions can also help you install multiple operating systems on your machine and minimize the damage in case of disk corruption.
How to Create a Partition in Linux?
In this tutorial, we will utilize the fdisk command to create a disk partition. The fdisk utility is a text-based command-line utility for viewing and managing disk partitions on a Linux system. Before we create a partition on our system, we need to list all the partitions on our system. This is essential as we need to choose a disk before we partition it. To view all the partitions currently on your system, we use the following command.

You might be prompted to enter your password again to verify your sudo privileges. Here we called the fdisk command with the -l to list the partitions. You should get an output similar to the following. Now, we choose one disk from this list to partition. For this tutorial, we will choose the disk. To create partitions, we use the ‘command mode’ of the fdisk command. To enter the command mode, we use this command in our terminal.

If you see an output similar to this, you have successfully entered the command mode.
Using the command mode

Once we enter the command mode, many beginners might get confused due to the unfamiliar interface. The command mode of fdisk uses single character commands to specify the desired action for the system. You can get a list of available commands by pressing ‘m’, as shown below.
Creating a partition

Our main objective here is to create a partition. To create a new partition, we use the command ‘n’. This will prompt you to specify the type of partition which you wish to create. If you wish to create a logical partition, choose ‘l’. Alternatively, you can choose ‘p’ for a primary partition. For this tutorial, we will create a primary partition. Now, we will be asked to specify the starting sector for our new partition. Press ENTER to choose the first available free sector on your system. Next, you’ll be prompted to select the last sector for the partition. Either press ENTER to use up all the available space after your first sector or specify the size for your partition. As shown in the screenshot above, we chose to create a 10 MB partition for this demonstration. Here ‘M’ specifies the unit as megabytes. You can use ‘G’ for gigabytes. If you don’t specify a unit, the unit will be assumed to be sectors. Hence +1024 will mean 1024 sectors from the starting sector.
Setting the partition type
Once we create a partition, Linux sets the default partition type as ‘Linux’. However, suppose we wish my partition type to be the ‘Linux LVM’ partition. To change the ID for our partition, we will use the command ‘t’. Now, we get prompted to enter the HEX code for our desired partition ID. We don’t remember the HEX code for the partition types on top of our heads. So we will take the help of the ‘L’ command to list all the HEX codes for the available partition types. This list should look as shown below.  We see that the HEX code 8e is the partition ID for the ‘Linux LVM’ partition type. Hence, we will enter the required HEX code. The following output gives us the confirmation that our partition ID has been changed successfully.
Finalising the changes

Now that we have created a new partition and given it our desired partition ID, we need to confirm our changes. All the changes made until this point are saved in the memory, waiting to be written on our disk. We use the command ‘p’ to see the detailed list of partitions for our current disk as seen in the screenshot below. This allows us to confirm all the changes we have done to the disk before making them permanent. Once you have verified the changes, press ‘w’ to write the new partition on your disk. If you don’t wish to permanently write your new partition to the disk, you can enter the command ‘q’. This will exit the fdisk command mode without saving any changes.
Formatting a partition
Once you create a new partition, it is advisable to format your new partition using the appropriate mkfs command. This is because using a new partition without formatting it may cause issues in the future. To see the list of all available mkfs commands, we enter the following in our command line.
This gives us a list of available mkfs commands. If we wish to format a partition on our current disk with the ext4 file system, we use this command.
sudo mkfs.ext4 [partition path] Wrapping up
That’s it! You now know how to create a partition in Linux using the fdisk command… You can reserve space for specific tasks. And in case one partition gets corrupted, you don’t need to worry about data on other partitions. As each partition is treated as a separate disk, data on other partitions remains safe. The fdisk utility is a powerful tool for the task of managing disk partitions, but it can often be confusing for new users. We hope this tutorial was able to help you understand how to create a new disk partition in Linux using the fdisk utility. If you have any feedback, queries or suggestions, feel free to reach out to us in the comments below.
Thanks for learning with the DigitalOcean Community. Check out our offerings for compute, storage, networking, and managed databases. Learn more about us
How to Create Partitions in Linux
Creating disk partitions enables you to split your hard drive into multiple sections that act independently.
In Linux, users must structure storage devices (USB and hard drives) before using them. Partitioning is also useful when you are installing multiple operating systems on a single machine.
In this step-by-step tutorial, you will learn how to create a partition using the Linux parted or fdisk command.
- A system running Linux
- A user account with sudo or root privileges
- Access to a terminal window / command line (Activities >Search >Terminal)
Option 1: Partition a Disk Using parted Command
Follow the steps below to partition a disk in Linux by using the parted command.
Step 1: List Partitions
Before making a partition, list available storage devices and partitions. This action helps identify the storage device you want to partition.
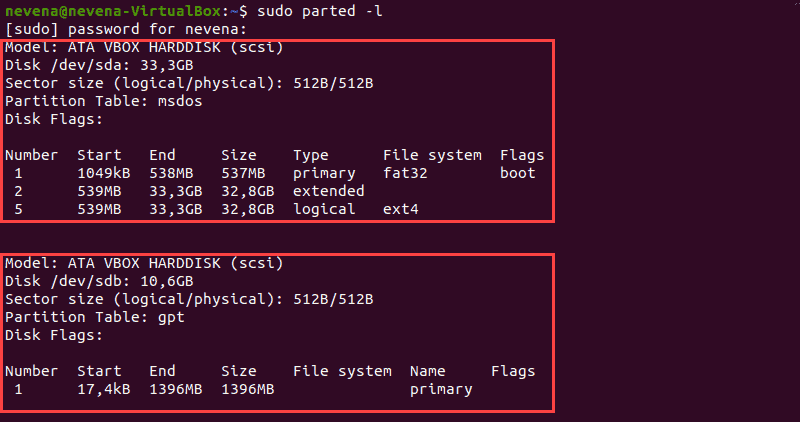
Run the following command with sudo to list storage devices and partitions:
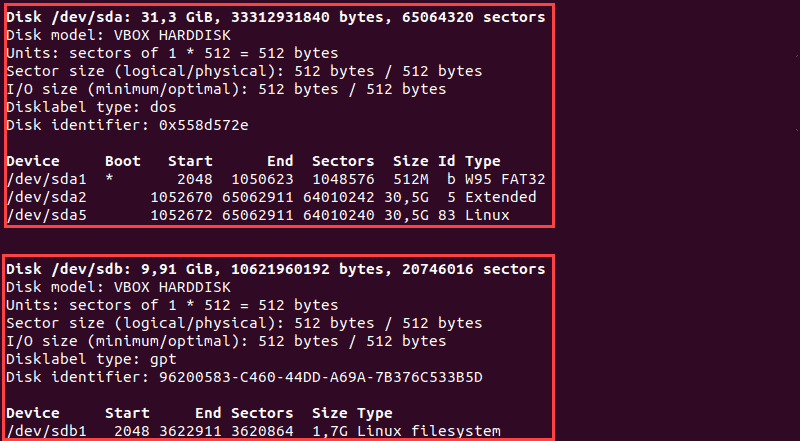
The terminal prints out available storage devices with information about:
- Model – Model of the storage device.
- Disk – Name and size of the disk.
- Sectorsize – Logical and physical size of the memory. Not to be confused with available disk space.
- PartitionTable – Partition table type (msdos, gpt, aix, amiga, bsd, dvh, mac, pc98, sun, and loop).
- DiskFlags – Partitions with information on size, type, file system, and flags.
- Primary – Holds the operating system files. Only four primary partitions can be created.
- Extended – Special type of partition in which more than the four primary partitions can be created.
- Logical – Partition that has been created inside of an extended partition.
In our example, there are two storage devices ( /dev/sda and /dev/sdb ):
Note: The first storage disk ( dev/sda or dev/vda ) contains the operating system. Creating a partition on this disk can make your system unbootable. Only create partitions on secondary disks ( dev/sdb , dev/sdc , dev/vdb , or dev/vdc ).
Step 2: Open Storage Disk
Open the storage disk that you intend to partition by running the following command:

Always specify the storage device. If you don’t specify a disk name, the disk is randomly selected. To change the disk to dev/sdb run:
The dev/sdb disk is open:

Step 3: Make a Partition Table
Create a partition table before partitioning the disk. A partition table is located at the start of a hard drive and it stores data about the size and location of each partition.
Partition table types are: aix, amiga, bsd, dvh, gpt, mac, ms-dos, pc98, sun, and loop.
The create a partition table, enter the following:
mklabel [partition_table_type]For example, to create a gpt partition table, run the following command:
Type Yes to execute:

Note: The two most commonly used partition table types are gpt and msdos. The latter supports up to sixteen partitions and formats up to 16TB of space while gpt formats up to 9.4ZB and supports up to 128 partitions.
Step 4: Check Table
Run the print command to review the partition table. The output displays information about the storage device:
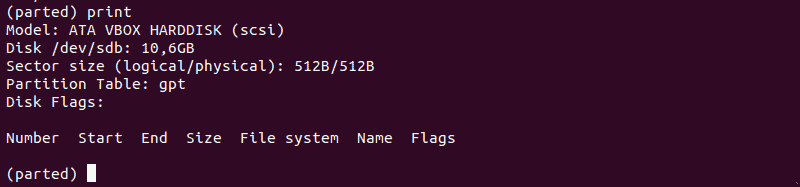
Note: Run help mkpart command to get additional help on how to create a new partition.
Step 5: Create Partition
Let’s make a new 1854MB-partition using the ext4 file system. The assigned disk start shall be 1MB and the disk end is at 1855MB.
To create a new partition, enter the following:
mkpart primary ext4 1MB 1855MBAfter that, run the print command to review information on the newly created partition. The information is displayed under the Disk Flags section:
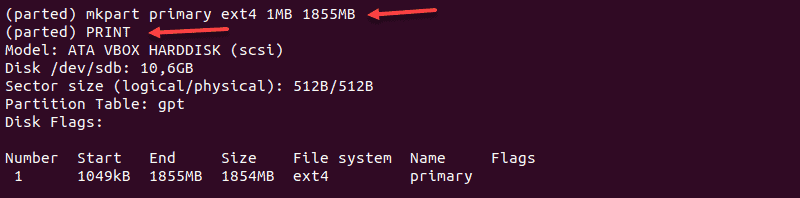
In a gpt partition table, the partition type is the mandatory partition name. In our example, primary is the name of the partition, not the partition type.
To save your actions and quit, enter the quit command. Changes are saved automatically with this command.

Note: The “You may need to update /etc/fstab file” message signals that the partition can be mounted automatically at boot time.
Option 2: Partition a Disk Using fdisk Command
Follow the steps below to partition a disk in Linux by using the fdisk command.
Step 1: List Existing Partitions
Run the following command to list all existing partitions:
The output contains information about storage disks and partitions:
Step 2: Select Storage Disk
Select the storage disk you want to create partitions on by running the following command:
The /dev/sdb storage disk is open:

Step 3: Create a New Partition
1. Run the n command to create a new partition.
2. Select the partition number by typing the default number (2).
3. After that, you are asked for the starting and ending sector of your hard drive. It is best to type the default number in this section (3622912).
4. The last prompt is related to the size of the partition. You can choose to have several sectors or to set the size in megabytes or gigabytes. Type +2GB to set the size of the partition to 2GB.
A message appears confirming that the partition is created.

Step 4: Write on Disk
The system created the partition, but the changes are not written on the disk.
1. To write the changes on disk, run the w command:

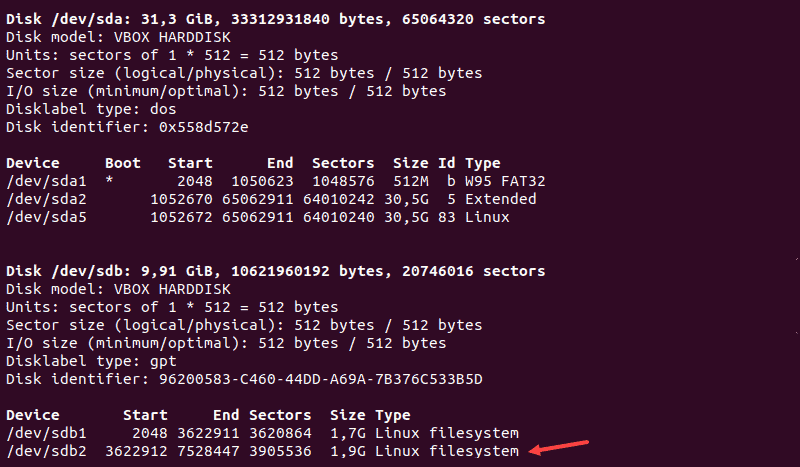
2. Verify that the partition is created by running the following command:
As you can see, the partition /dev/sdb2 has been created.
Format the Partition
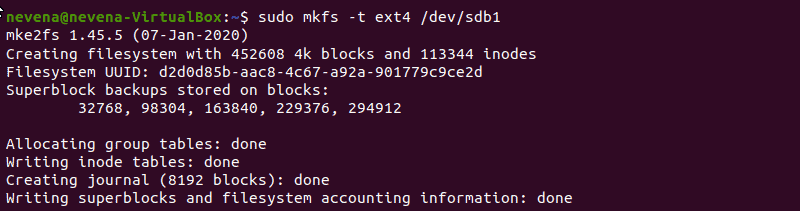
Once a partition has been created with the parted of fdisk command, format it before using it.
Format the partition by running the following command:
Note: Check out our guide and learn how to format and mount disk partitions in Linux using ext4, FAT32, or NTFS file system!
Mount the Partition
To begin interacting with the disk, create a mount point and mount the partition to it.
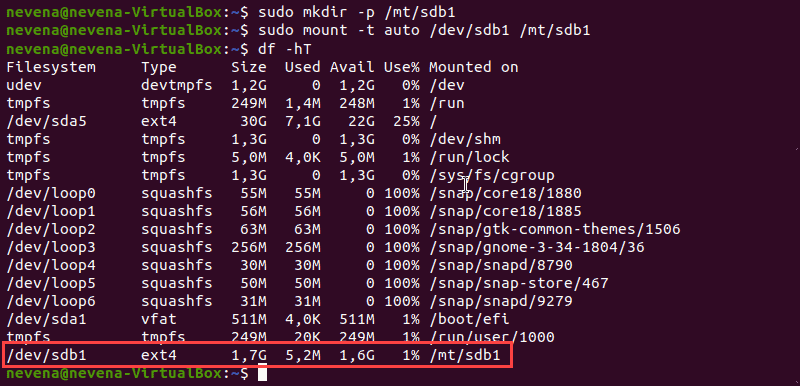
1. Create a mount point by running the following command:
2. After that, mount the partition by entering:
sudo mount -t auto /dev/sbd1 /mt/sdb1The terminal does not print out an output if the commands are executed successfully.
3. Verify if partition is mounted by using the df hT command:
Note: If you have NTFS partitions on your hard drive, check out our article on how to mount NTFS partitions in Linux.
After following this step-by-step tutorial, you should have a better understanding on how to partition a disk in Linux by using the parted or fdisk command.
For more Linux commands, see our Linux Commands Cheat Sheet.
Dejan is the Head of Content at phoenixNAP with over 8 years of experience in Web publishing and technical writing. Prior to joining PNAP, he was Chief Editor of several websites striving to advocate for emerging technologies. He is dedicated to simplifying complex notions and providing meaningful insight into data center and cloud technology.
sudo stands for SuperUser DO, and it’s used to temporarily elevate privileges in Linux. This guide will show.
Setting file and directory permission properly is important in multi-user systems such as Linux. You can set.
This article helps you install Ubuntu 20.04 on your machine. The latest Ubuntu Focal Fossa was released on.
Since there is no way to upgrade from CentOS 7 to CentOS 8, users need to go through the entire installation.