- Easy Linux Tips Project
- How to re-install Linux Mint easily
- How to upgrade to Linux Mint 21
- Troubleshooting
- Installing mintupgrade
- Repairing boot
- Notes
- Alternatives
- How To Reinstall Linux Mint Without Losing Your Data & Settings
- Create a Bootable Disk Or Drive Of The New Mint OS
- Backup Your Existing Software Applications
- Install Linux Mint
- Reinstall Your Programs
Easy Linux Tips Project
Easy tips for Linux Mint and Ubuntu, both for beginners and for advanced users.
How to re-install Linux Mint easily
Sometimes, in the beginning of your Linux adventure, you’ll want to re-install Linux Mint. Because you’ve inadvertently spoiled the system beyond easy repair (it happens to us all!).
A re-installation will typically only take about two hours: half an hour for the installation itself, plus an hour and a half for installing extra software, tweaking and configuring.
There are several ways to re-install (as always), but this is probably the quickest and easiest way to do it:
1. Backup your personal documents, music, pictures et cetera, on an external storage medium. Like a DVD, an external hard drive or a USB memory stick.
You can save e-mails and some application settings as follows.
First, make the hidden files visible.
Launch your file manager (Nemo, Caja or Thunar).
Use the shortcut (key combination) Ctrl h to make the hidden files visible.
Now you can see the hidden files and folders (with a dot before the name, such as .mozilla ). They contain application settings. Some of those you’ll want to keep.
For example: if you use Thunderbird as an e-mail application, then the e-mails are in the hidden directory .thunderbird (as well as the account settings of Thunderbird and the address book). If you want to save your e-mails and settings, copy this directory to a USB memory stick.
Same goes for other specific application settings that you want to keep.
2. Boot your computer from the Mint DVD (or from a live USB memory stick).
After the booting has completed, launch GParted:
Click on the Menu button. Query: Gparted .
Click on Gparted Partition Editor.
Then use this fine disk partitioner, to completely destroy the Mint partitions. All actions you do in Gparted have to be confirmed by a click on the Apply button in the panel (the tick), before they are being executed. An extra security measure, no doubt.
Note: don’t format the Mint partitions, just destroy them. Including the swap partion (if you have one)! The result will be «unallocated free space». Have a separate home partition? Better destroy it as well (good riddance).
Note: if you have a separate swap partition, then that needs to be unmounted before you begin. In Gparted, do as follows: click with the mouse on the swap partition, then right-click with the mouse, and choose Swapoff . Then you can proceed. Destroy the swap as well!
3. Reboot your computer. Don’t remove the Mint DVD.
4. Let the DVD check itself for errors: in the beginning, hit the space bar and choose «Check disc for defects» in the DVD boot menu.
5. When no errors are found, boot your computer from the DVD again, this time into the desktop.
6. After the booting has completed, establish internet connection and start the installation by clicking the desktop icon of the installer.
The installer will use the unallocated space automatically, without notification. Namely when you select the «alongside» option for the preservation of your existing Windows. Which is exactly what you want.
After you’ve agreed to its proposal, the installer takes automatically care of the rest!
However, should you feel so inclined, you can also do a manual partitioning.
7. Now finish your shiny new Mint installation with some polishing.
To the content of this website applies a Creative Commons license.
How to upgrade to Linux Mint 21
This page explains how to upgrade from Linux Mint 20.3 to Linux Mint 21.
First, refresh your cache and install the Upgrade Tool by typing the following commands in a terminal:
apt update apt install mintupgrade
Then type the following command to launch the Upgrade Tool:
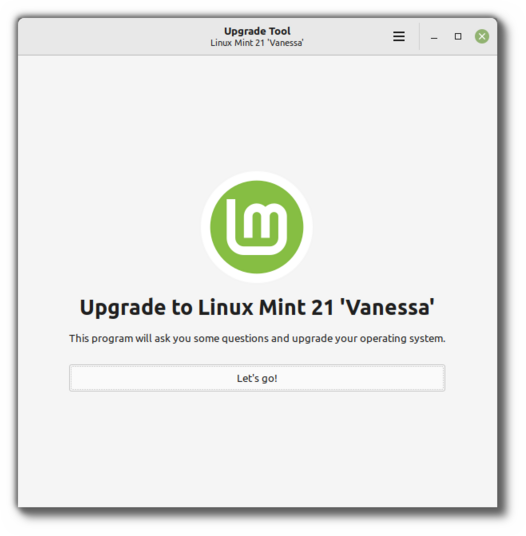
Follow the instructions on the screen.
When the tool is done and the upgrade is successful uninstall it and reboot your computer.
apt remove mintupgrade sudo reboot
This is a major upgrade. It can take several hours.
You will be asked to be up to date and to prepare system snapshots. Do not rush, do not take shortcuts.
Don’t hesitate to seek help if you have questions or if you face problems with the upgrade.
Troubleshooting
Installing mintupgrade
If you can’t find mintupgrade in the repositories, switch to the default Linux Mint mirror and refresh the APT cache.
Repairing boot
If the computer no longer boots, boot from the live Linux Mint 21 ISO.
From the live session, launch Boot Repair and use it to fix the boot sequence.
If this doesn’t work, boot from the live Linux Mint ISO again, and launch Timeshift .
Timeshift is able to scan your drives from the live session and restore your snapshot from there.
Notes
The upgrade overwrites files in /etc/ with default configuration files. You can restore files indivually by the Timeshift snapshot you made prior to upgrading.
To restore your lightDM settings, run the Login Window configuration tool (sudo lightdm-settings).
Alternatives
If you cannot upgrade perform a fresh installation.
Generic instructions on fresh upgrades are also available.
© Copyright 2020, Linux Mint Revision 92937742 .
Versions latest Downloads pdf html epub On Read the Docs Project Home Builds Free document hosting provided by Read the Docs.
How To Reinstall Linux Mint Without Losing Your Data & Settings
Do you want to reinstall or upgrade your Linux Mint Distribution but don’t want to lose all your settings and data in the process? It is possible and not that difficult.
Start by backing up your existing operating system in case you need to restore it if something goes wrong.
Create a Bootable Disk Or Drive Of The New Mint OS
Before installing a fresh Cinnamon Mint, it is best to create a bootable copy. The most recent release as of now is 19.2, codename “Tina”.
Burn a DVD (32-bit or 64-bit depending on which your hardware uses) or make a bootable USB thumb drive. If you are not sure which edition to select, the most popular is “Cinnamon 64-bit edition”. You can get the download link for Cinnamon Mint on the official page.
Refer to the Linux Mint Installation Guide to help you create your bootable media, download the right ISO image, and install Linux Mint on your computer. The guide is available in multiple languages and different formats such as PDF, ePub, and HTML.
Following the steps below will enable you to keep all your settings and save you a lot of time.
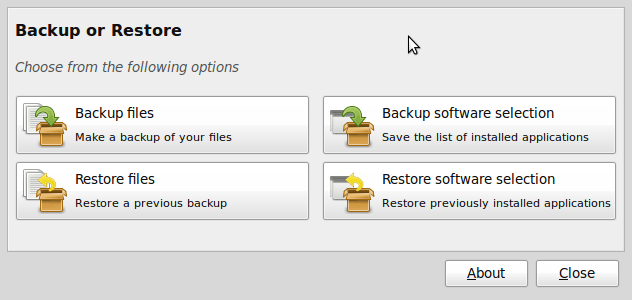
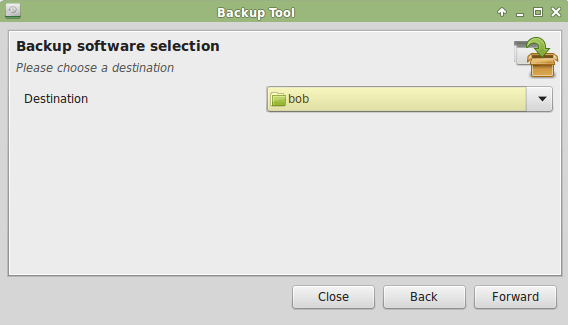
Backup Your Existing Software Applications
- Boot into your original operating system. From your menu, choose “Administrator” and select “backup tool.”
- In the backup tool, choose “backup software selection.”
- Select your home directory from the destination drop-down box. Choose the tool you want to use for your backup and click “apply.”
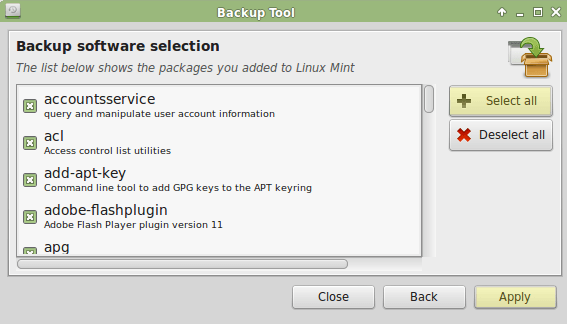
All your programs are now backed up on your system. Your next step is to open your home directory with Nemo file manager.
- Look in your home directory for the file you just created and double-click on it to open the file.
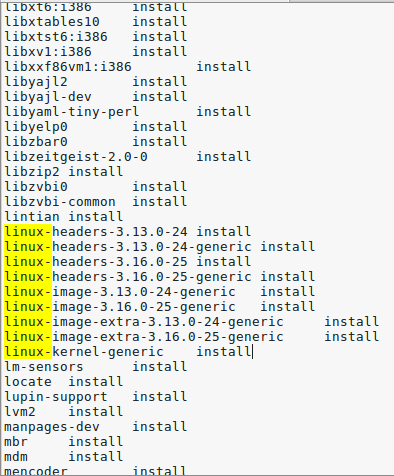
- Search for Linux and delete entries that start with “Linux”. See the highlighted entries in the image below.
- After ensuring you don’t have any blank lines, save the file. In the event that you have set up a data drive, you will need to copy the fstab file (system configuration file).
- Go to your terminal window and paste the following:
cp /etc/fstab /home/yourname
Install Linux Mint
Now you are ready to reinstall Mint. When you boot your system using an external drive (DVD or USB stick), it will start a live session of Linux Mint.
- Insert your DVD or USB into your computer and boot from it. You are now running a Live Distro of the new Mint OS.
- Don’t forget to make sure your WiFi is connected if you are on a laptop. From your desktop, double-click on the install icon. You will be automatically logged in with a username of mint. You will see the installer icon on your desktop.
![]()
When you run Linux Mint after it is permanently installed on your computer, it is not a live version. The live version is similar to a normal session except in the following ways:
- The live session is slower.
- Some applications such as Timeshift, Update Manager, and Flatpak either don’t work or work differently than in the normal session.
- Any changes you make in the live session have no impact on the installed system and are not permanent.
Double click on Install Linux Mint and select your language.
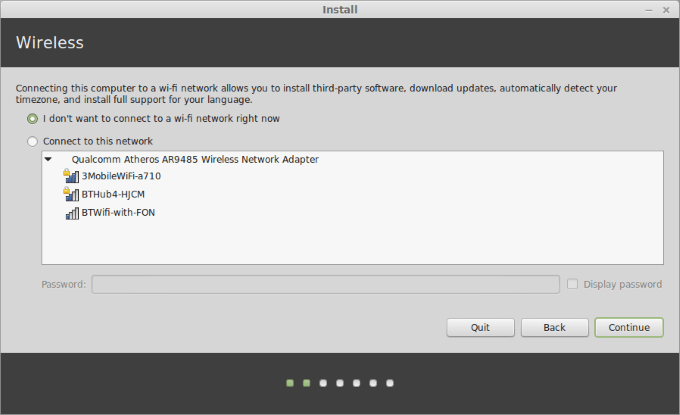
The next step will ask you to connect to your wireless network. This is an optional step. We recommend not connecting to the Internet. If you do, the installer will download all updates through your Internet connection.
If you have a slow connection or lose it, it will be difficult to know how far your installation got before the connection dropped. Complete your installation first and get your updates later.
Select I don’t want to connect to a wi-fi network right now.
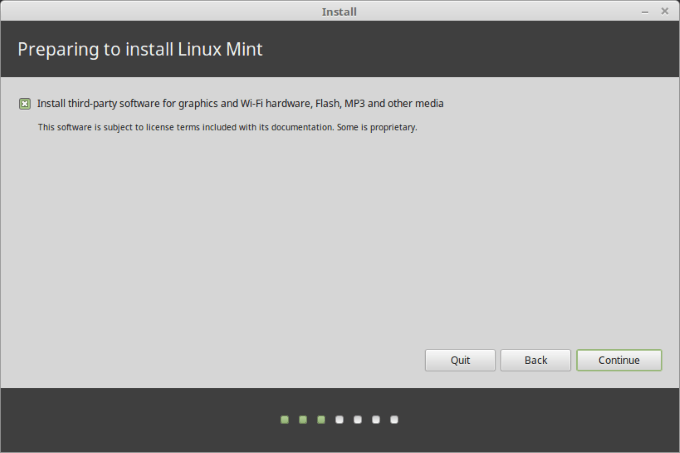
The next steps will let you know if you are prepared to install Linux Mint. You need to only be concerned about adequate disk space. Make sure your battery is charged if you are not using a power source.
As already stated, you don’t need to be connected to the Internet. Click continue.

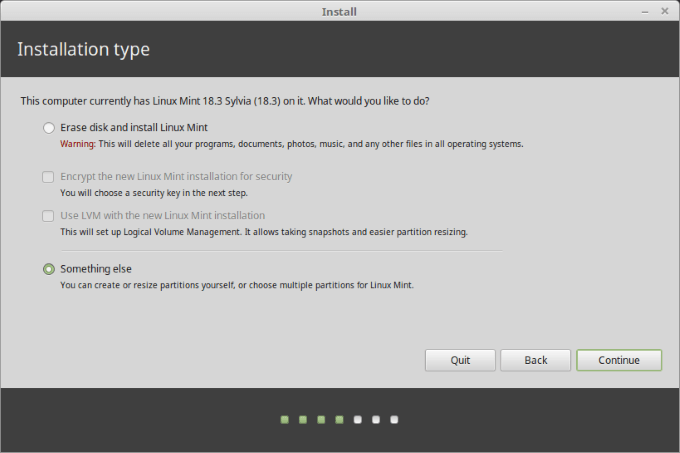
This next step where you choose an installation type is very important. You will have four choices. You want to select Something Else.
This option lets you manage the partitions. Choosing NOT to format your home partition is what keeps your data intact.
When you choose Something else, you will see partitions to choose from.
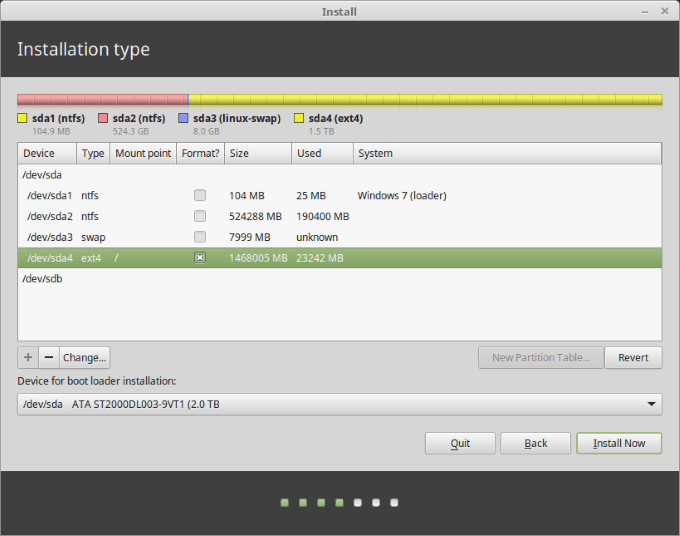
Select your Root partition and then choose change. Looking at the screenshot below:
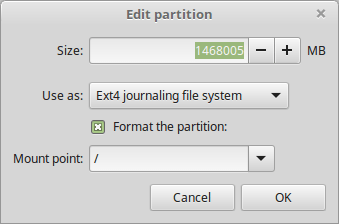
- Don’t make any changes to size as it is your old Root partition (you don’t want to change its size as you will be formatting over it).
- Choose Ext4 journaling file system where it says: use as.
- Be sure Format the partition is NOT selected.
- Where you see Mount point, choose / as this is the root symbol
- Select your time zone, keyboard layout, and add your user details. Be sure to use the same username and password from your old setup.

- When the installation is complete, remove the Live USB thumb drive or Live CD and reboot. Now it’s time to re-install your applications to your new OS.
Reinstall Your Programs
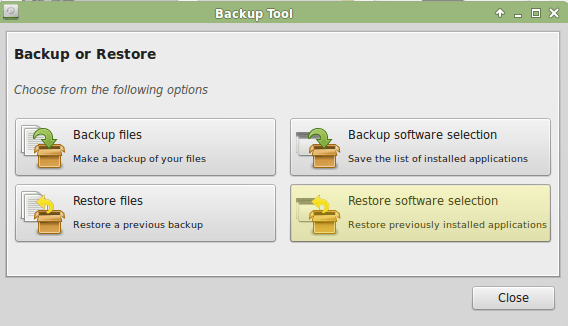
Select Backup Tool from Administrator in your Menu. Choose Restore software selection and navigate to your home directory.
Choose the software backup file you created earlier and then click Apply or Forward.
Now all your programs have been restored and all your settings have been preserved. Congratulations, you now have the latest version of Linux Mint.
David has a background in small business and lives in Australia. He is a WordPress and Ubuntu Developer who enjoys design, CSS and tech tool integration. Read David’s Full Bio
Did you enjoy this tip? If so, check out our YouTube channel from our sister site Online Tech Tips. We cover Windows, Mac, software and apps, and have a bunch of troubleshooting tips and how-to videos. Click the button below to subscribe!