- How to Check/Repair Linux File System on Boot
- The FSCK Linux Command
- FSCK Command Usage
- Repairing A Corrupted Linux File System
- Repairing Linux File System on Boot-Time
- Linux File System Repair on Boot
- Live CD/USB File System Repair
- Guide to Repair Linux Disk Using FSCK and Recover Linux Files
- Is your Linux system giving you hiccups? Do not fret! Whether it is Linux check disk, Linux repair disk or other functions that you need to run, we have all of it right here!
- How to Repair Linux Disk Using FSCK and Recover Linux File?
- Part 1. Overview of Linux Check Disk
- 1. What Linux Check Disk Means?
- 2. Causes of Linux Drive Corruption
- Part 2. How to Check Linux Disk?
- Smartctl
- Install smartmontools
- For Ubuntu:
- For Debian
- Boot-Repair
- Getting Boot-Repair
- 1st option : get a disk including Boot-Repair
- 2nd option : install Boot-Repair in Ubuntu
- Using Boot-Repair
- Advanced options
- External Links
How to Check/Repair Linux File System on Boot
An operating system user that is still a learner in the OS world can never escape the challenges the current elite users have overcome. The user impact of such challenges depends on the operating system flavor or distribution you are under.
For Linux users, you might think you are facing an impossible challenge only to realize that there are multiple valid solutions for every single OS problem faced.
The Linux file system is a maze that most users hesitate to enter. It is because this file system is responsible for the performance consistency of your Linux operating system and any slight modification to its hierarchy or file system structure can be a nightmare for any user.
The FSCK Linux Command
The Linux operating system handles file system issues through the fsck command-line utility. It is a prepackaged file system check toolkit that interactively checks and repairs corrupted files that might affect the performance of your operating system.
Most of the time, it is these corrupt files that are responsible for failed system boots and partition mounts.
FSCK Command Usage
The standard syntax for fsck command-line utility is as follows:
You need to be a sudoer user or have sudo privileges to effectively use the FSCK tool.
FSCK adheres to some predefined rules.
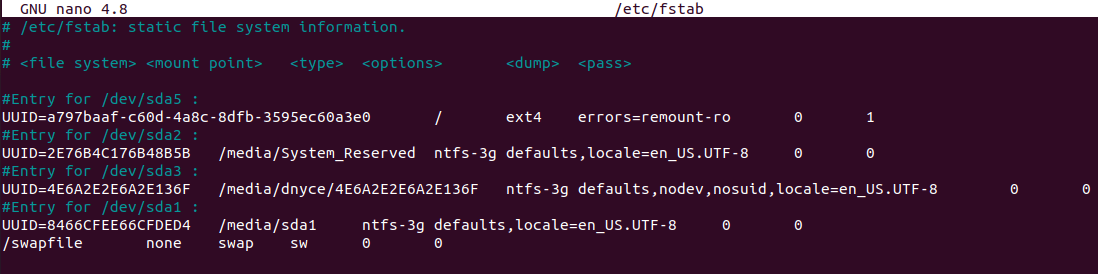
- It references the /etc/fstab file when a user does not provide [FILESYSTEM] as a command argument.
The column for the (/) and (ext4) is set to 1 because its file system checks and repair are prioritized.
It is not recommended to use the fsck command with mounted partitions as there is a high likelihood of permanent file system damage.
Repairing A Corrupted Linux File System
The first step is to identify the device partition that holds the Linux file system you would like to check and repair.

The second step is to unmount the device whose file system you want to check and repair. e.g.
The third step is to check and possibly repair the device’s file system using FSCK.
The -p command option is for automatic repair without any user intervention.
The final step is to re-mount your device once the fsck file system check and repair is complete.
Repairing Linux File System on Boot-Time
On a running machine, it is not possible to simultaneously check and repair your Linux file system while using the OS. In this case, we have the options of using a live CD/bootable usb drive or checking and repairing the Linux file system on boot (For installed Linux systems).
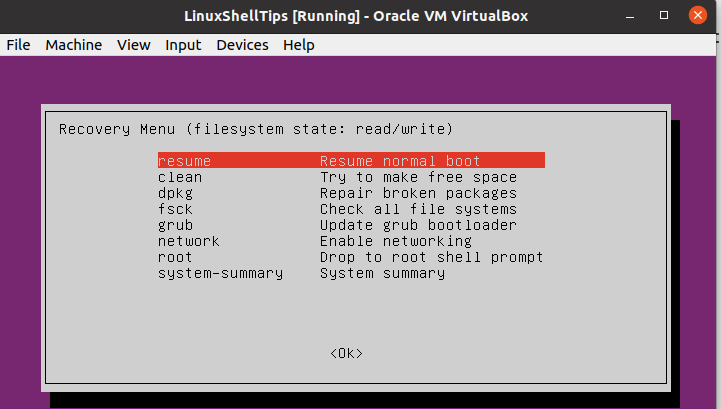
Linux File System Repair on Boot
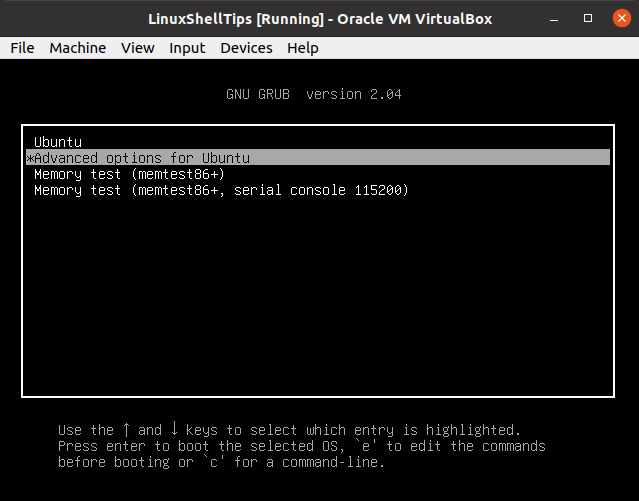
1. Restart your machine, press [Esc] or [Shift] and select Advanced Options on the resulting boot menu.
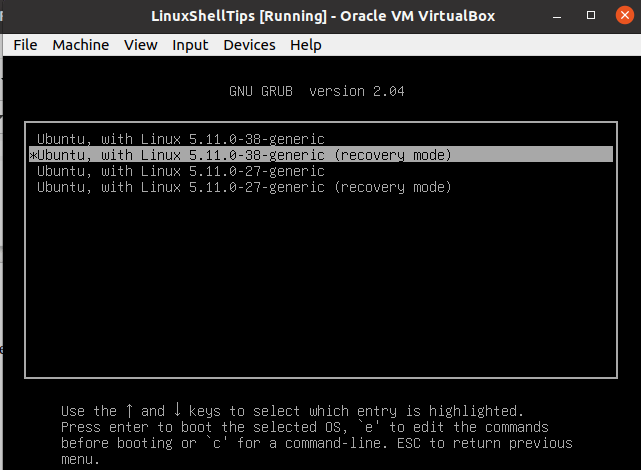
2. Select Recovery Mode and choose the fsck option from the resulting list of menu options.
3. Hit [Enter] and choose the fsck menu option.
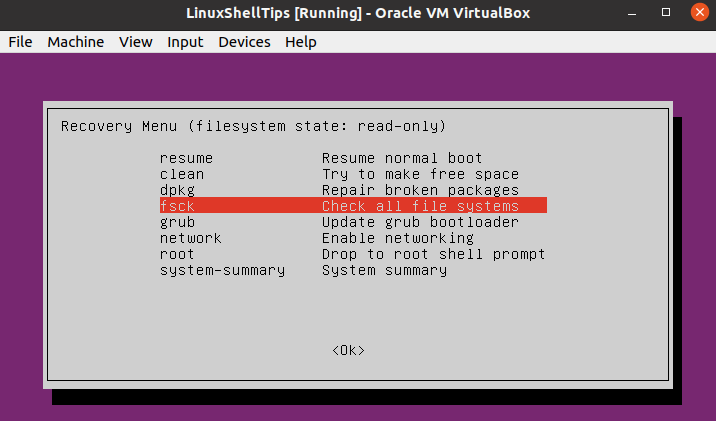
4. Choose Yes when asked whether to remount your OS root file system.

5. Once the file system check and repair is complete, direct your system to resume normal boot.
Live CD/USB File System Repair
- Boot into your machine from the live distribution (CD or USB).
- Open the Linux terminal and use sudo fdisk -l command to find the targeted Linux root partition name.
- If the root partition is identified by a name like /dev/sda1, running the following command will check and possibly repair its associated file system.
FSCK is a very effective tool to get you started on understanding the nature and performance of your Linux system. The man fsck command has more options on using the FSCK utility to check and optionally repair broken or corrupt Linux file systems.
Guide to Repair Linux Disk Using FSCK and Recover Linux Files
Is your Linux system giving you hiccups? Do not fret! Whether it is Linux check disk, Linux repair disk or other functions that you need to run, we have all of it right here!
How to Repair Linux Disk Using FSCK and Recover Linux File?
Theo Lucia
Jun 28, 2023 • Filed to: Recover Files • Proven solutions
Last night, I ran into disk problems in my Linux system. I have tried my hand at repairing it using tutorials from the internet, but nothing seems to be working for me. Then I stumbled upon a resource, which introduced me to fsck command. Everything changed from there.
Part 1. Overview of Linux Check Disk
The Linux check disk option checks bad sectors and errors on the drive.
1. What Linux Check Disk Means?
In Linux, the check disk command is represented by fsck, which is an abbreviation for file system consistency check. Simply put, it is a utility that helps a user scan the file database for any existing errors and repairs them if need be. Using a set of built-in tools, it checks the disk and then auto-generates a report of its evaluation. In certain systems, fsck often runs by default, usually, after the system shuts down improperly or after a series of reboots.
The Linux check disk (fsck) is a standard operation in Unix-based operating systems, the likes of which includes Linux and Apple operating systems. For the most part, fsck is activated by the system administrator manually or is automatically used at boot time. It works on the data structures directly, which are stored on the disk. The particular behavior of fsck can differ, but it generally follows a specific protocol for internal operations and give the users a common command-line interface.
2. Causes of Linux Drive Corruption
The Linux drive often gets corrupted to these common causes:
1. Accidental data deletion or some human error: Due to accidental deletion of key data, the Linux drive is often corrupted. This is often due to a lack of understanding or toying with files that you may be unaware of in the system.
2. Infection due to viruses: Malicious software or virus infection could be another cause for the corruption of the drive. It is often due to accessing of compromised websites from where these elements enter the system. It could also be due to access to unknown internet connections.
3. Bad sectors present on the hard drive: Bad blocks on the hard drive could cause drive corruption. It often occurs when the situation has gone from bad to worse.
To your benefit, Live CD of any given Linux Distros can easily detect the drive corruption and allow the users to recover their much-needed data in its original form.
Part 2. How to Check Linux Disk?
Fsck function is not just used for checking the hard drive in Linux systems. It can also perform a range of functions that will be examined below. Follow these simple, quick commands and you can execute a range of functions with it.
Smartctl
The modern Linux hard drives come with the S.M.A.R.T function. It is a useful tool, which allows the OS (Linux and Windows) to check up on their health and overall functionality. A fast way to check if your hard drive is equipped with the SMART feature is to extract it from your personal computer and check the information given on the label. You may also check the box it came packaged in.
Install smartmontools
In the case of Linux, there are multiple ways to affirm the S.M.A.R.T status of your hard drive. But the quickest of the lot is probably smartctl. Before looking at how to use this tool, let us first examine how the health of the hard drive is checked with smartctl.
For installing the Smartmontools, you need to open the terminal and follow the given instructions that show on your particular Linux distribution (there are so many).
For Ubuntu:
»Sudo apt install smartmontools’’
For Debian
»Sudo apt-get install smartmontools’’
Boot-Repair
Boot-Repair is a simple tool to repair frequent boot issues you may encounter in Ubuntu like when you can’t boot Ubuntu after installing Windows or another Linux distribution, or when you can’t boot Windows after installing Ubuntu, or when GRUB is not displayed anymore, some upgrade breaks GRUB, etc.
Boot-Repair lets you fix these issues with a simple click, which (generally reinstalls GRUB and) restores access to the operating systems you had installed before the issue.
Boot-Repair also has advanced options to back up table partitions, back up bootsectors, create a Boot-Info (to get help by email or forum), or change the default repair parameters: configure GRUB, add kernel options (acpi=off . ), purge GRUB, change the default OS, restore a Windows-compatible MBR, repair a broken filesystem, specify the disk where GRUB should be installed, etc.
This tool is aimed entirely at those new to Ubuntu who want to get past their booting issues and enjoy using Linux. For the purpose of helping the forum and IRC members help you diagnose issues with your boot setup, Boot-Repair creates a Boot-Info diagnosis for you to share that allows experienced members to see what’s wrong with your boot. The tool systematically asks if you want to upload this diagnosis to a pastebin or keep it local. The Pastebin is not easily searchable and automatically expires after some days, but for confidentiality purpose you may prefer to keep the report local.
Boot-Repair is a free software, licensed under GNU-GPL.

Getting Boot-Repair
1st option : get a disk including Boot-Repair
The easiest way to use Boot-Repair is to create a live-USB disk of Boot-Repair-Disk (a disc starting Boot-Repair automatically), and boot on it.
Remark : it is recommended to install the ISO on a live-USB (eg via UnetBootin or LiliUSB or Universal USB Installer). Do not burn it on a DVD if your boot is in EFI mode.
2nd option : install Boot-Repair in Ubuntu
— either from an Ubuntu live-session (boot your computer on a Ubuntu live-USB then choose «Try Ubuntu») or from your installed Ubuntu session (if you can access it)
— open a new Terminal, then type the following commands (press Enter after each line):
sudo add-apt-repository ppa:yannubuntu/boot-repair && sudo apt update sudo apt install -y boot-repair && boot-repair
Using Boot-Repair
- — First click the Create a Boot-Info Summary button. This will simply create a Boot-Info diagnosis. A pop-up will ask if you want to upload the report online in order to share it more easily.

- — Check the diagnosis contents. If any doubt, you can share it on Ubuntu Forums (here) along with a description of your boot issue, so that experienced forum members can advise. — Once you get green light from experienced forum members, click the Recommended repair button. When repair is finished, note the new URL (paste.ubuntu.com/XXXXX) that appeared on a paper, then reboot and check if you recovered access to your OSs. — If the repair did not succeed, indicate the URL to people who help you by email or forum.
Advanced options
Warning: the default settings are the ones used by the «Recommended Repair». Changing them in the Advanced options may worsen your problem. Don’t change them unless requested by experienced helpers.
External Links
Boot-Repair (последним исправлял пользователь yannubuntu 2022-01-18 23:30:53)
The material on this wiki is available under a free license, see Copyright / License for details
You can contribute to this wiki, see Wiki Guide for details