- Getting started with Anaconda Distribution
- Should I use Anaconda Navigator or conda?
- Free Anaconda Learning course — Get Started with Anaconda
- An introduction to Navigator and the command line
- What’s next?
- Navigator tutorials
- Conda resources
- IDE tutorials
- Jupyter Notebook external resources
- Spyder external resources
- How to Install Anaconda on Ubuntu 18.04 and 20.04
- Steps For Installing Anaconda
- Step 1: Update Local Package Manager
- Step 2: Download the Latest Version of Anaconda
- Step 3: Verify the Download Checksum
- Step 4: Run Anaconda Installation Script
- (Optional) Step 5: Install VSCode Editor
- Step 6: Activate and Test Installation
- How to Update Anaconda on Ubuntu
- Create and Activate Anaconda Environments
Getting started with Anaconda Distribution
Welcome to Anaconda! This document is here to help you get started with Anaconda Distribution, the free installation that includes conda, Anaconda Navigator, and over 250 scientific and machine learning packages .
Should I use Anaconda Navigator or conda?
Anaconda Navigator is a desktop application that is included with every installation of Anaconda Distribution. It is built on top of conda, the open-source package and environment manager, and allows you to manage your packages and environments from a graphical user interface (GUI). This is especially helpful when you’re not comfortable with the command line.
A command line interface (or CLI) is a program on your computer that processes text commands to do various tasks. Conda is a CLI program, which means it can only be used via the command line. On Windows computers, Anaconda recommends that you use the Anaconda Prompt CLI to work with conda. MacOS and Linux users can use their built-in command line applications.
If you installed Miniconda instead of Anaconda Distribution (see Should I use Anaconda Distribution or Miniconda? ), Anaconda Navigator is not included. Use the command conda install anaconda-navigator to manually install Navigator onto your computer.
Free Anaconda Learning course — Get Started with Anaconda
Learn to use Anaconda Navigator to launch an application. Then, create and run a simple Python program with Spyder and Jupyter Notebook. Watch our short training videos on Anaconda Learning to get up and running with Jupyter Notebook and JupyterLab, along with several other popular integrated development environments (IDEs):

An introduction to Navigator and the command line
Navigator and the CLI interact with conda in similar but distinct ways, and each have their benefits and drawbacks. Anaconda recommends that you learn the basics of both to determine what is preferable for your programming workflow. See My first Python program: Hello, Anaconda! to go through a short programming exercise and get a better idea for what you prefer.
What’s next?
Navigator tutorials
Conda resources
IDE tutorials
The following tutorials show you the basics of using some popular IDEs (integrated development environments) with Anaconda:
Jupyter Notebook external resources
Jupyter Notebook is a web-based development application that you can launch from Navigator. The resources below can help get you started and provide more information about using notebooks for your education, research, and work:
Spyder external resources
Spyder is a free development environment that you can launch from Navigator. The resources below provide more information about using notebooks for your education, research, and work:
How to Install Anaconda on Ubuntu 18.04 and 20.04
Anaconda is a package manager used in scientific computing and data science. It’s designed to provide scientific libraries and dependencies in the Python programming language. Anaconda is commonly used for machine learning and artificial intelligence applications.
This step by step guide will show you how to install Anaconda on an Ubuntu 18.04 or Ubuntu 20.04 system.

Note: This guide is also available for CentOS 7 or CentOS 8.
- A user account with sudo privileges
- Access to a command line/terminal window (Ctrl-Alt-T)
Steps For Installing Anaconda
Our tutorial on installing Anaconda on Ubuntu 18.04 or Ubuntu 20.04 includes downloading the latest version, verifying data integrity of the installer, and running the bash install script.
Step 1: Update Local Package Manager
Start by updating the local package manager. Open a terminal window and enter the following:
If your system doesn’t have curl, install it by entering:
Step 2: Download the Latest Version of Anaconda
At the time this article was written, the latest version of Anaconda is 2020.02. Check the developer’s download page to view the newest version.
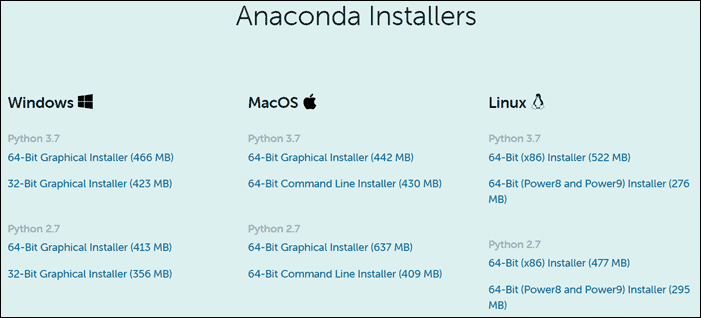
Note the URL and use it to download the correct version.
Switch to the /tmp directory and use curl to download the installer using your command terminal:
curl –O https://repo.anaconda.com/archive/Anaconda3-2020.02-Linux-x86_64.shThis version is designed for Python 3.7. If you are using Python 2.7, use the appropriate URL.
Step 3: Verify the Download Checksum
Checksum is a security tool used to verify the authenticity and integrity of a downloaded script.
sha256sum Anaconda3–2020.02–Linux–x86_64.shYour system will display a series of letters and numbers:
69581cf739365ec7fb95608eef694ba959d7d33b36eb961953f2b82cb25bdf5a Anaconda3-2019.07-Linux-x86_64.shCompare those to the appropriate checksum (or hash) in the Anaconda documentation. If you have chosen a different version, make sure to check the documentation for that version’s checksum.
Step 4: Run Anaconda Installation Script
The Anaconda installer is a bash script. To run the installation script, use the command:
bash Anaconda3-2020.02-Linux-x86_64.shA license agreement will appear. Use the Enter key to review the agreement.

At the bottom, type yes to agree to the terms.
The installer will prompt you to accept the default location, or install to a different location. Use the default path unless you have a specific need to change it. (You may cancel the installation here if needed.)

The installation will finish. After sucessful installation, the following will appear:
installation finished. Do you wish the installer to prepend the Anaconda3 install location to PATH in your /home/user/.bashrc ? [yes|no]This determines if you want to use the conda command without changing the directory. Type yes and hit enter, unless you have a specific need to do otherwise. The system will respond as follows:
Appending source /home/user/anaconda3/bin/activate to /home/linux4one/.bashrc A backup will be made to: /home/user/.bashrc-anaconda3.bak For this change to become active, you have to open a new terminal. Thank you for installing Anaconda3!(Optional) Step 5: Install VSCode Editor
The system will ask if you want to install Microsoft Visual Studio Code Editor. It will display the following:
Anaconda is partnered with Microsoft! Microsoft VSCode is a streamlined code editor with support for development operations like debugging, task running and version control. To install Visual Studio Code, you will need: - Administrator Privileges - Internet connectivity Visual Studio Code License: https://code.visualstudio.com/license Do you wish to proceed with the installation of Microsoft VSCode? [yes|no]Decide by typing yes or no to continue.
Step 6: Activate and Test Installation
Once finished, activate the installation by entering:
Use the conda command to test the installation:
The system should display a list of data similar to:
active environment : None user config file : /home/user/.condarc populated config files : conda version : 4.5.4 conda-build version : 3.10.5 python version : 3.7.0.final.0 base environment : /home/user/anaconda3 (writable) channel URLs : https://repo.anaconda.com/pkgs/main/linux-64 https://repo.anaconda.com/pkgs/main/noarch https://repo.anaconda.com/pkgs/free/linux-64 https://repo.anaconda.com/pkgs/free/noarch https://repo.anaconda.com/pkgs/r/linux-64 https://repo.anaconda.com/pkgs/r/noarch https://repo.anaconda.com/pkgs/pro/linux-64 https://repo.anaconda.com/pkgs/pro/noarch package cache : /home/user/anaconda3/pkgs /home/user/.conda/pkgs envs directories : /home/user/anaconda3/envs /home/user/.conda/envs platform : linux-64 user-agent : conda/4.5.4 requests/2.18.4 CPython/3.6.5 Linux/4.15.0-22-generic ubuntu/18.04 glibc/2.27 UID:GID : 1000:1000 netrc file : None offline mode : FalseHow to Update Anaconda on Ubuntu
To update Anaconda on Ubuntu, start by updating the conda utility:
Next, run the Anaconda package update command:
Create and Activate Anaconda Environments
Create a Python 3 environment named test_environment by entering the following:
conda create ––name test_environment python=3Activate this environment:
conda activate test_environmentThe command prompt will change. This indicates that you are now in a shell environment using Python 3. You can now work in this environment.
You now have a working Anaconda installation on your Ubuntu System for use within your Python environment.
Get started with scientific computing, data processing, and predictive analytics with over 1,500 open source packages available from its repository.
You can also install Python independently by following our step by step guide on installing Python 3.7 on Ubuntu 18.04.
Vladimir is a resident Tech Writer at phoenixNAP. He has more than 7 years of experience in implementing e-commerce and online payment solutions with various global IT services providers. His articles aim to instill a passion for innovative technologies in others by providing practical advice and using an engaging writing style.
Docker Compose is a software package that modifies the behavior of Docker. Docker creates a specific.
The XAMPP stack is an open-source Apache distribution of a PHP development environment consisting of.