- How to do a Port Scan in Linux?
- Why Do We Need to Do a Port Scan and What Ports are Used in Linux?
- Method 1: Port Scanning Using nmap
- Installing nmap
- Using nmap
- Method 2: Port Scanning Using netcat
- Install netcat
- Using netcat
- Method 3: Port Scanning Using ss Command
- Method 4: Port Scanning Using netstat
- Method 5: Port Scanning Using lsof Command
- Method 6: Port Scanning Using telnet Command
- Conclusion
- How to Scan & Find All Open Ports with Nmap
- What Are Ports?
- How to Scan Nmap Ports
- Scan a Single Port, All Ports, or Series
- Other Types of Nmap Port Scans
- Common Ports
- Nmap Scanning Best Practices
How to do a Port Scan in Linux?
The port scan is the process of checking whether the ports it’s listening to the outside connections or not. Two ports can be used in Linux for an IP: TCP (Transmission Control Protocol) and UDP. The advancement in network technology produces a lot of risks over the internet/remote connections that cause security issues. This write will discuss the methods to do a port scan in Linux using the below-supporting content:
- Why Do We Need to Do a Port Scan and What Ports are Used in Linux?
- Port Scanning Using nmap
- Port Scanning Using netcat
- Port Scanning Using ss Command
- Port Scanning Using netstat
- Port Scanning Using lsof Command
- Port Scanning Using telnet Command
Why Do We Need to Do a Port Scan and What Ports are Used in Linux?
With the advancement in network technology, internet attacks have increased. Port scanners have become a helpful tool to avoid external attacks that scan the ports. We need to do a port scan in Linux for several reasons that are as follows:
- To check which ports are opened, closed, or filtered to send or receive the information.
- To find out which services are available or running on a host.
- To Identify the vulnerabilities in the system that helps the network engineers to diagnose the issues in the system.
The ports in Linux are reserved for different purposes. The port allocation by the ICANN (International Corporation for Assigned Names and Numbers) is as follows:
- 0-1023: Reserved for the well-known or system ports.
- 1024: 49151: Reserved for the user or registered ports.
- 49152-65535: Reserved for the dynamic/private ports.
Let’s discuss the port scanners used to do a port scan.
Method 1: Port Scanning Using nmap
Among the most common tools for port scanning, nmap offers advanced scanning capabilities. The nmap allows the users to find the hosts and the available services on a machine’s network by sending the data packets and diagnosing the response.
Installing nmap
To use the nmap network discovery tool, you must install it via one of the following commands (as per the distribution ).
$ sudo apt install nmap #Debian-Ubuntu-based $ sudo snap install nmap #snap enabled Linux distro
Using nmap
To scan the target hostname itslinuxfoss.com for finding the open ports and the services available on those available, the below nmap command is executed:
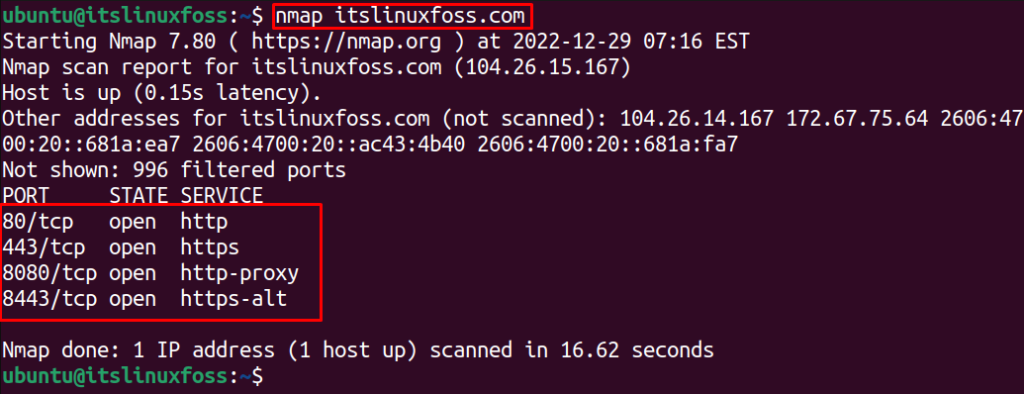
It shows that four ports are opened (listening to the incoming connections) “80”, “443”, “8080” and “8443” that are using different services which are listed in front of the port number.
To scan for TCP ports, use the “sT” option of the nmap command as displayed below:
$ sudo nmap -sT itslinuxfoss.com
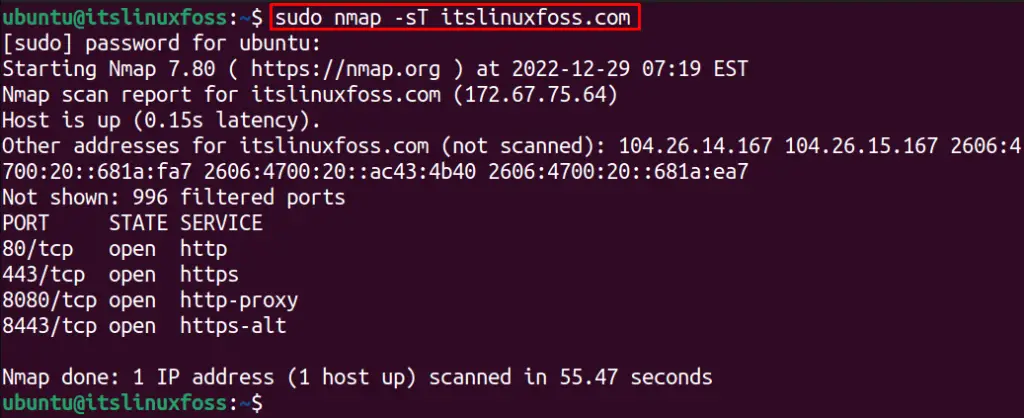
All the TCP ports are shown in the above output.
To check the open ports for UDP, utilize the “sU” option with the nmap command:
$ sudo nmap -sU itslinuxfoss.com

There are no open ports for the UDP service.
Note: There can be three different statuses for the nmap port scans:
- Open: Open means the system is listening on that port.
- Filtered: The nmap has checked for those ports but cannot identify if the port is open or closed.
- Close: The port is not listening for any connections
Method 2: Port Scanning Using netcat
The netcat tool is a command utility used for network discovery, testing, and security auditing. The netcat command can be used to scan the open ports.
Install netcat
Before using it, ensure that the utility is installed on your Linux system.
$ sudo apt install netcat #Debian/Ubunut-based $ sudo yum install nc #Fedora/RedHat-based
Using netcat
For instance, the below command will scan port “80”, if it’s open and listening or not:
$ nc -z -v itslinuxfoss.com 80

It shows the status “succeeded”, which means that the port has successfully established connection with itslinuxfoss.com on port 80.
Similarly, a range of ports can be scanned to see whether a port can connect successfully to the server. For example, the below-mentioned command will scan for ports 20 to 30 to check which ports the connection can be established with itslinuxfoss.com:
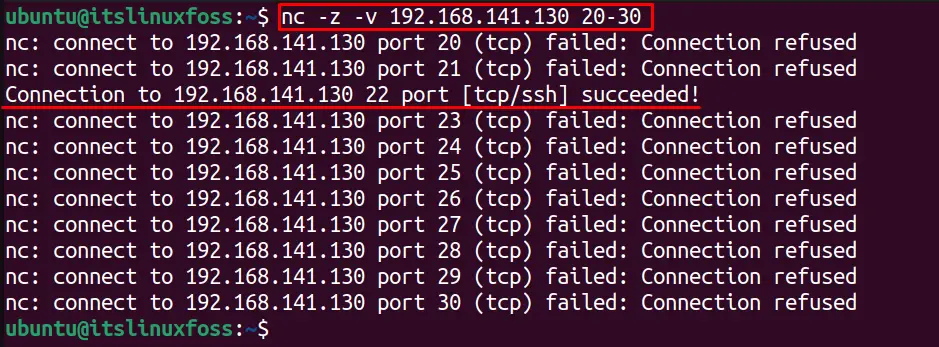
It shows that only port “22” is successfully connected to the server.
Note: The netcat tool can show two different statuses for the port scan, which are as follows:
- Succeeded: It shows that the connection is successfully established and the port is open.
- Connection refused: The connection has been rejected by that port, and the port is closed.
Method 3: Port Scanning Using ss Command
The ss (socket statistics) command displays the details of the computer socklets. It displays different details about the ports, such as state, ports on which they are listening, and netid. For instance, to scan the TCP and UDP open ports, use the below ss command options:
- t: Checks for the TCP ports.
- u: It checks the UDP ports.
- l: It shows the listening sockets.
- p: It displays the related socket PID and the name.
- n: Don’t resolve names
Let’s execute the command to check the open ports:
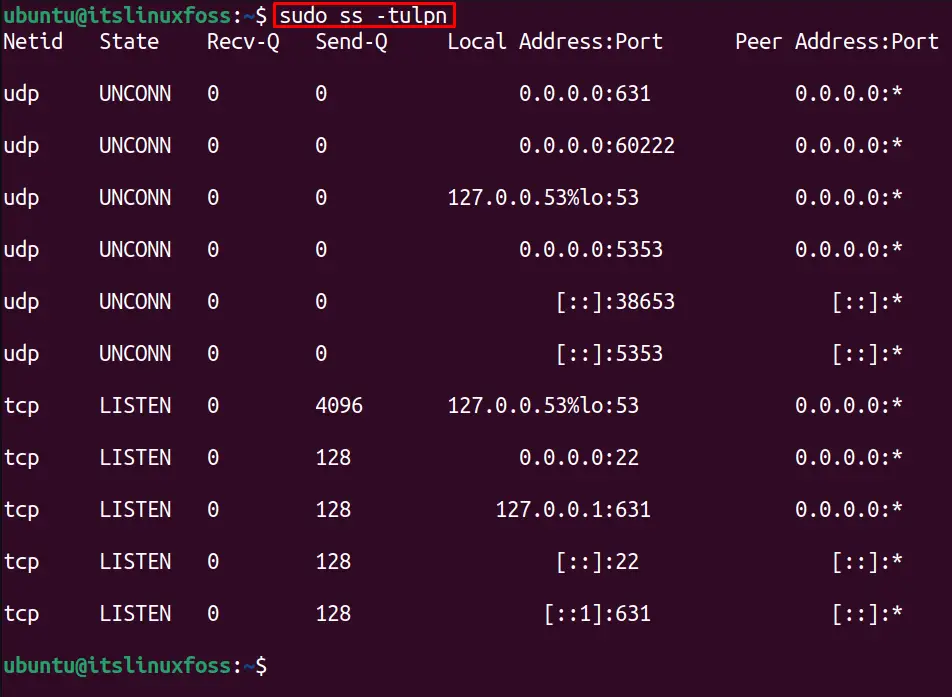
The output shows the opened ports, such as port “631” which is opened for UDP service and listening on all the IP addresses (0.0.0.0). Moreover, the “60222” port is opened and listening to the IP address “127.0.0.53”.
Method 4: Port Scanning Using netstat
The netstat command shows the network statistics and configurations. It works the same way as the ss command and shows the details after sending the data packets and analyzing its response. The options below can be used to find the open ports using the UDP and TCP services:
- t: Checks for the TCP ports.
- u: It checks the UDP ports.
- l: It shows the listening sockets.
- p: It displays the related socket PID and the name.
- n: Don’t resolve names
- grep LISTEN: It displays open ports only whose status is “LISTEN”.
Let’s execute the below command to find the opened ports:
$ sudo netstat -tulpn | grep LISTEN
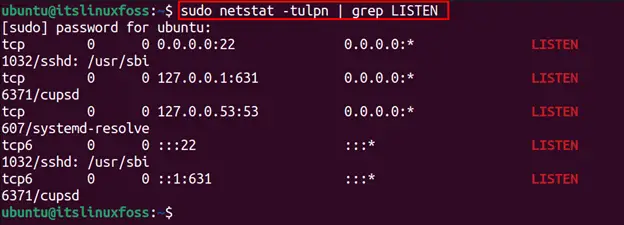
The output shows the opened ports, such as port “22”, which is opened by sshd processes and listening on all the IP addresses for SSH connections. Moreover, the “631” port is opened by cupsd service and listening to the IP address “127.0.0.1”.
Method 5: Port Scanning Using lsof Command
The lsof command stores the details of the open files, which can be used to get the “LISTEN” port details. For instance, to get the details of the TCP and UDP services details, use the following lsof command options:
- -i: To display the listing ports.
- -P: Prevents network files from being converted from port numbers to names.
- -n: Avoid using DNS names.
- grep LISTEN: Filters the ports with “LISTEN” status only.
Let’s execute the below lsof command to find the system’s UDP and TCP open ports:
$ sudo lsof -i -P -n | grep LISTEN
It shows the process used by the open ports along with the service (TCP) and the desired port numbers.. For instance, the IP address “127.0.0.53” is listening on port “53” to the “sshd” service.
Method 6: Port Scanning Using telnet Command
The telnet command is used to port scan and send the request to the server for creating a remote connection. The telnet connection is created on port “23” by default.
For instance, to do a port scan on port “80” for “itslinuxfoss.com”, use the following command:
$ telnet itslinuxfoss.com 80

The user is successfully connected to the itslinuxfoss.com server.
This is how we can scan ports in Linux.
Conclusion
We need to do a port scan in Linux to check the system’s opened, filtered, or closed ports, which helps us find the computer’s services for connection. Several methods are used to do a port scan that, includes nmap, netcat, ss, netstat, lsof, and telnet commands which are described in detail throughout this guide.
How to Scan & Find All Open Ports with Nmap
Nmap is the world’s leading port security network scanner. The Nmap hosted security tool can help you determine how well your firewall and security configuration is working.
This guide will show you how to use Nmap to scan all open ports on Linux systems.
- Linux operating system
- Access to a user account with sudo or root privileges
- Access to a command line/terminal window
- The apt package manager, included by default (Debian / Ubuntu)
- The yum package manager, included by default (Red Hat, CentOS)
What Are Ports?
On modern operating systems, ports are numbered addresses for network traffic. Different kinds of services use different ports by default.
For example, regular web traffic uses port 80, while the POP3 email uses port 110. One of the ways that a firewall works is by allowing or restricting traffic over a particular port.
Because the port configuration can cause a security risk, it’s critical to know which ports are open and which are blocked.
If you need assistance with installing Nmap, refer to our tutorial on How to Install Nmap on Linux systems.
How to Scan Nmap Ports
To scan Nmap ports on a remote system, enter the following in the terminal:
Replace the IP address with the IP address of the system you’re testing. This is the basic format for Nmap, and it will return information about the ports on that system.
In addition to scanning by IP address, you can also use the following commands to specify a target:
To scan a range of IP addresses (.1 – .10):
To run Nmap on a subnet:
To scan targets from a text file:
Note: The developers at nmap.org provide a test server that you can experiment on, located at scanme.nmap.org. You can use this to test your Nmap utility.
Scan a Single Port, All Ports, or Series
Nmap commands can be used to scan a single port or a series of ports:
Scan port 80 on the target system:
Scan ports 1 through 200 on the target system:
Scan (Fast) the most common ports:
To scan all ports (1 – 65535):
Other Types of Nmap Port Scans
Different types of scans can be performed:
To scan using TCP connect (it takes longer, but is more likely to connect):
To perform the default SYN scan (it tests by performing only half of the TCP handshake):
To instruct Nmap to scan UDP ports instead of TCP ports (the –p switch specifies ports 80, 130, and 255 in this example):
nmap –sU –p 80,130,255 192.168.0.1Run a fast scan on the target system, but bypass host discovery. (Host discovery uses ping, but many server firewalls do not respond to ping requests. This option forces the test without waiting for a reply that may not be coming):
The nmap utility can be used to detect the operating system of a particular target:
It can also be used to probe for the services that might be using different ports:
Note: The –sV option can be tuned to be more or less aggressive in its scan. Use the ––version-intensity 2 option to specify the level of testing. Replace the number 2 with a number from 0 (light testing) to 9 (run all probes). The more intense the testing, the longer the scan will take.
Common Ports
Here is a brief list of standard ports and their designations:
- 21 – FTP
- 22 – SSH
- 25 – SMTP (sending email)
- 53 – DNS (domain name service)
- 80 – HTTP (web server)
- 110 – POP3 (email inbox)
- 123 – NTP (Network Time Protocol)
- 143 – IMAP (email inbox)
- 443 – HTTPS (secure web server)
- 465 – SMTPS (send secure email)
- 631 – CUPS (print server)
- 993 – IMAPS (secure email inbox)
- 995 – POP3 (secure email inbox)
A Linux firewall can be configured to block all traffic on a particular port.
For example, a firewall can be set to block Port 80, but users won’t be able to load any website in that case. You can use firewall rules to allow some ports, but block others. Use a firewall in conjunction with other network security tools and software to scan traffic on a particular port, and to watch for suspicious traffic.
Nmap Scanning Best Practices
You should only use Nmap port scanning on servers that you own, or that you have permission to scan. Often, port-scanning is seen as an aggressive method, or a prelude to a cyber attack. It is also considered a bad practice to tie up a server’s resources by using Nmap to run repeated scans on the same target.
It is possible that during your scan, you may find unusual activity. For example, you may see a service running on an unusual port number. This means there is something strange going on, and should be investigated.
The OS and Service scanning options are helpful for scanning a particular port or service to get more information. If a service is running on a non-default port, it might be by design – or it might suggest there is a security breach.
Ports often have a default usage. Most ports under 1000 are dedicated and assigned to a specific service.
This guide provided an overview of Nmap scanning and how you can use it for testing ports in Linux. You should now understand how ports work, and why it is important to know how they are used.
Nmap adds a versatile tool to any system administrator’s arsenal for debugging and locating security flaws.