How to obtain CPU information on Linux
If you’ve forgotten some information about your CPU, there’s no need to dig out the box or open the case to figure out the make, model, and other information about it. Information about your CPU is stored in Linux, at the operating system level. This means it’s perfectly accessible for normal users, we just have to know where to look.
In this guide, we’ll see how to obtain CPU information on Linux, from both command line and GUI. On a related note, check out our guide on how to check and monitor CPU utilization if you want to measure the performance of your CPU.
In this tutorial you will learn:
| Category | Requirements, Conventions or Software Version Used |
|---|---|
| System | Any Linux distro |
| Software | lscpu, hardinfo |
| Other | Privileged access to your Linux system as root or via the sudo command. |
| Conventions | # – requires given linux commands to be executed with root privileges either directly as a root user or by use of sudo command $ – requires given linux commands to be executed as a regular non-privileged user |
Obtain CPU information via command line
There are several command line utilities we can use to obtain CPU information on Linux. The following methods show the most useful tools, which are installed by default on almost any Linux distribution.
The /proc/cpuinfo virtual file contains a lot of information about the CPUs installed in our system. View it with the following command.
# cat /proc/cpuinfo processor : 0 vendor_id : GenuineIntel cpu family : 6 model : 61 model name : Intel(R) Core(TM) i5-5300U CPU @ 2.30GHz stepping : 4 microcode : 0xffffffff cpu MHz : 2294.689 cache size : 3072 KB physical id : 0 siblings : 4 core id : 0 cpu cores : 2 apicid : 0 initial apicid : 0 fpu : yes fpu_exception : yes cpuid level : 20 wp : yes flags : fpu vme de pse tsc msr pae mce cx8 apic sep mtrr pge mca cmov pat pse36 clflush mmx fxsr sse sse2 ss ht syscall nx pdpe1gb rdtscp lm constant_tsc rep_good nopl xtopology cpuid pni pclmulqdq ssse3 fma cx16 pcid sse4_1 sse4_2 movbe popcnt aes xsave avx f16c rdrand hypervisor lahf_lm abm 3dnowprefetch invpcid_single pti ssbd ibrs ibpb stibp fsgsbase bmi1 hle avx2 smep bmi2 erms invpcid rtm rdseed adx smap xsaveopt flush_l1d arch_capabilities bugs : cpu_meltdown spectre_v1 spectre_v2 spec_store_bypass l1tf mds swapgs taa itlb_multihit srbds bogomips : 4589.37 clflush size : 64 cache_alignment : 64 address sizes : 39 bits physical, 48 bits virtual power management: .
The only downside to this method is that it will output information for each logical processor, so the terminal can get a bit spammy – you could always pipe to more to clean it up.
Most CPUs these days have multiple cores, and the operating system will perceive each one as an individual processor. Therefore, the procinfo method could output the same information 16 times (assuming you have an 8 core CPU with multithreading).
Some helpful information from the /proc/cpuinfo virtual file is as follows:
- CPU make and model: Intel(R) Core(TM) i5-5300U
- CPU speed: 2.30GHz
- Number of CPU cores: 2
- Number of logical CPUs: 4
- CPU cache size: 3072 KB
- Enabled flags for the CPU – tells us what features the CPU is capable of
Another useful utility, which you may find a bit easier to use because of its concise output, is the lscpu command.
$ lscpu Architecture: x86_64 CPU op-mode(s): 32-bit, 64-bit Byte Order: Little Endian Address sizes: 39 bits physical, 48 bits virtual CPU(s): 4 On-line CPU(s) list: 0-3 Thread(s) per core: 2 Core(s) per socket: 2 Socket(s): 1 Vendor ID: GenuineIntel CPU family: 6 Model: 61 Model name: Intel(R) Core(TM) i5-5300U CPU @ 2.30GHz Stepping: 4 CPU MHz: 2294.689 BogoMIPS: 4589.37 Hypervisor vendor: KVM Virtualization type: full L1d cache: 64 KiB L1i cache: 64 KiB L2 cache: 512 KiB L3 cache: 3 MiB .
This tells us a lot of the same information, but some of it’s easier to interpret. In particular, we get a nicer breakdown of CPU cores. Here’s how to interpret:
- Sockets: 1 (this is the actual number of physical CPUs)
- Cores per socket: 2 (therefore we have 2 cores total)
- Threads per core: 2 (2 threads x 2 cores = 4 logical CPUs)
The lscpu command also gives us information about our hypervisor and various cache sizes.
There are even more command line utilities available, but they’re not installed by default on some distros, and all the information we need can usually be obtained from the two utilities covered above.
Obtain CPU information via GUI
If you’d prefer to use a GUI application to view CPU info, rather than fiddle with the command line, there’s a very handy program called “hardinfo” that can be installed on any major Linux distribution. Use the appropriate command below to install it with your system’s package manager.
To install hardinfo on Ubuntu, Debian, and Linux Mint:
$ sudo apt install hardinfo
$ sudo dnf install hardinfo
To install hardinfo on Arch Linux and Manjaro:
After it’s installed, you can either open it from your system’s app launcher, or just execute hardinfo in a terminal.
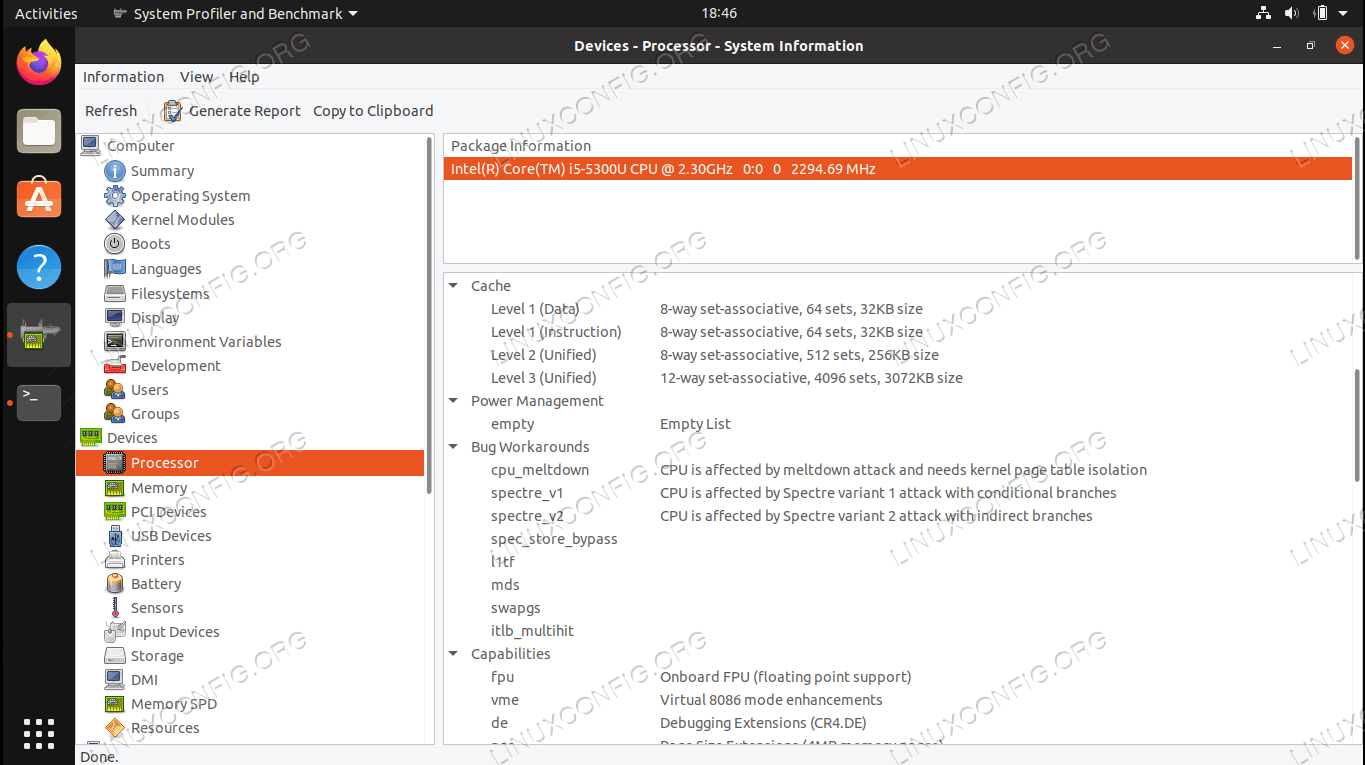
The application shows us information about all of our system’s hardware, but to see CPU info specifically, click on the processor tab in the left pane.
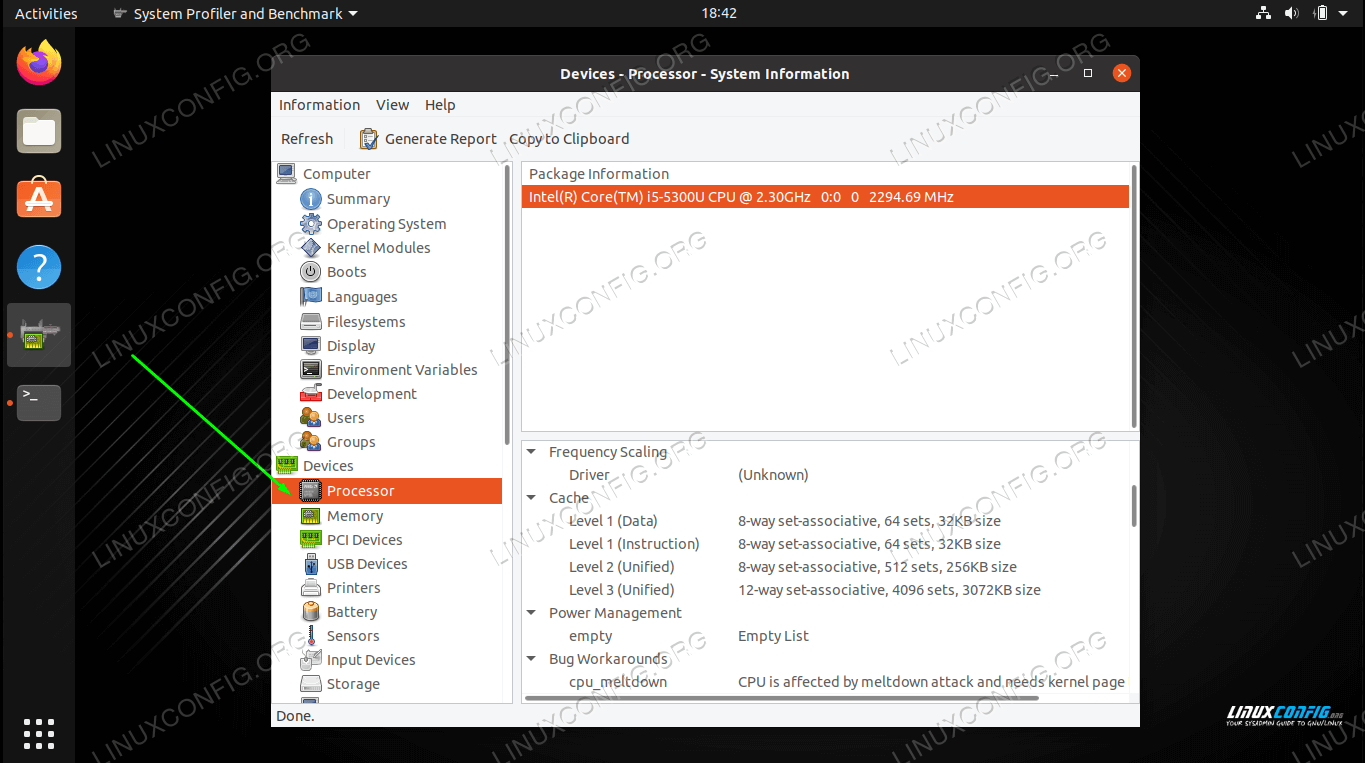
Highlight your CPU, and check the bottom pane for a lot of detailed information. In the screenshot below, we’ve expanded the information pane to better see the CPU’s specs.
Closing Thoughts
In this guide, we saw how to obtain information about our installed CPUs on a Linux system. This included two command line methods, as well as a GUI application. This should tell you enough about your system, without needing to check the manual or research your PC specs.
Related Linux Tutorials:
Comments and Discussions
NEWSLETTER
Subscribe to Linux Career Newsletter to receive latest news, jobs, career advice and featured configuration tutorials.
WRITE FOR US
LinuxConfig is looking for a technical writer(s) geared towards GNU/Linux and FLOSS technologies. Your articles will feature various GNU/Linux configuration tutorials and FLOSS technologies used in combination with GNU/Linux operating system.
When writing your articles you will be expected to be able to keep up with a technological advancement regarding the above mentioned technical area of expertise. You will work independently and be able to produce at minimum 2 technical articles a month.
TAGS
FEATURED TUTORIALS
- VIM tutorial for beginners
- How to install the NVIDIA drivers on Ubuntu 20.04 Focal Fossa Linux
- Bash Scripting Tutorial for Beginners
- How to check CentOS version
- How to find my IP address on Ubuntu 20.04 Focal Fossa Linux
- Ubuntu 20.04 Remote Desktop Access from Windows 10
- Howto mount USB drive in Linux
- How to install missing ifconfig command on Debian Linux
- AMD Radeon Ubuntu 20.04 Driver Installation
- Ubuntu Static IP configuration
- How to use bash array in a shell script
- Linux IP forwarding – How to Disable/Enable
- How to install Tweak Tool on Ubuntu 20.04 LTS Focal Fossa Linux
- How to enable/disable firewall on Ubuntu 18.04 Bionic Beaver Linux
- Netplan static IP on Ubuntu configuration
- How to change from default to alternative Python version on Debian Linux
- Set Kali root password and enable root login
- How to Install Adobe Acrobat Reader on Ubuntu 20.04 Focal Fossa Linux
- How to install the NVIDIA drivers on Ubuntu 18.04 Bionic Beaver Linux
- How to check NVIDIA driver version on your Linux system
- Nvidia RTX 3080 Ethereum Hashrate and Mining Overclock settings on HiveOS Linux
LATEST TUTORIALS
- Enabling SSH on Raspberry Pi: A Comprehensive Guide
- Boot Your Raspberry Pi from a USB: A Tutorial
- Checking Your Raspberry Pi’s OS Version
- Install an OS on Your Raspberry Pi: Step-by-Step
- Finding Your Raspberry Pi’s IP Address: A Quick Guide
- Easy Steps to Update Your Raspberry Pi
- Connecting Your Raspberry Pi to Wi-Fi: A How-To
- How to install RealVNC viewer on Linux
- How to check Raspberry Pi RAM size and usage
- How to check Raspberry Pi model
- Understanding UEFI and BIOS in Relation to Linux Nvidia Driver Installation
- How to orchestrate Borg backups with Borgmatic
- How to monitor filesystem events on files and directories on Linux
- Debian USB Firmware Loader Script
- How to install and self host an Ntfy server on Linux
- How to backup your git repositories with gickup
- How to bind an SSH public key to a specific command
- Creating a Bootable USB for Windows 10 and 11 on Linux
- How to list all displays on Linux
- List of QR code generators on Linux