- How to Sync Time in Linux Server using Chrony
- Install Chrony on CentOS / RHEL / Fedora System
- Install Chrony on Debian / Ubuntu System
- Configuration File of Chrony
- Testing Chrony
- Start and Enabled Chronyd Service
- Verify and Track Chrony Synchronization
- Check Chrony Sources
- Check Chrony Source Statistics
- Configure Chrony NTP Server
- Commands to Sync Time with NTP Server in Linux
- What is NTP
- How to Enable NTP Synchronization on Linux
- How to Enable NTP for Linux Distributions without “systemd”
- About time synchronisation
- How time synchronisation works
- About timesyncd
- About timedatectl
- Further reading
How to Sync Time in Linux Server using Chrony
Time plays an important role in Linux servers specially when they are used in banking, stock markets and other financial sectors. If we want all our Linux servers should have the correct time, then we must configure some NTP client which will fetch correct time always from remote NTP Servers and if needed makes the required adjustments for syncing the time.
In this article we will demonstrate how we can sync time with NTP servers in Linux Server using Chrony (NTP Client).
Install Chrony on CentOS / RHEL / Fedora System
To Install Chrony on CentOS, RHEL and Fedora System, execute the following yum or dnf command
~]# yum install chrony -y Or ~]# dnf install chrony -y
Install Chrony on Debian / Ubuntu System
To install Chrony on Debian and Ubuntu Systems, run the following apt command,
~]$ sudo apt install chrony -y
Once the chrony is installed on Linux server then it offers two programs,
- chronyc : It is command line interface of chrony
- chronyd : It is daemon for chrony which start and enable chrony service across the reboot.
Configuration File of Chrony
Configuration file for Chrony is “/etc/chrony.conf” , sample chrony.conf file is listed below,
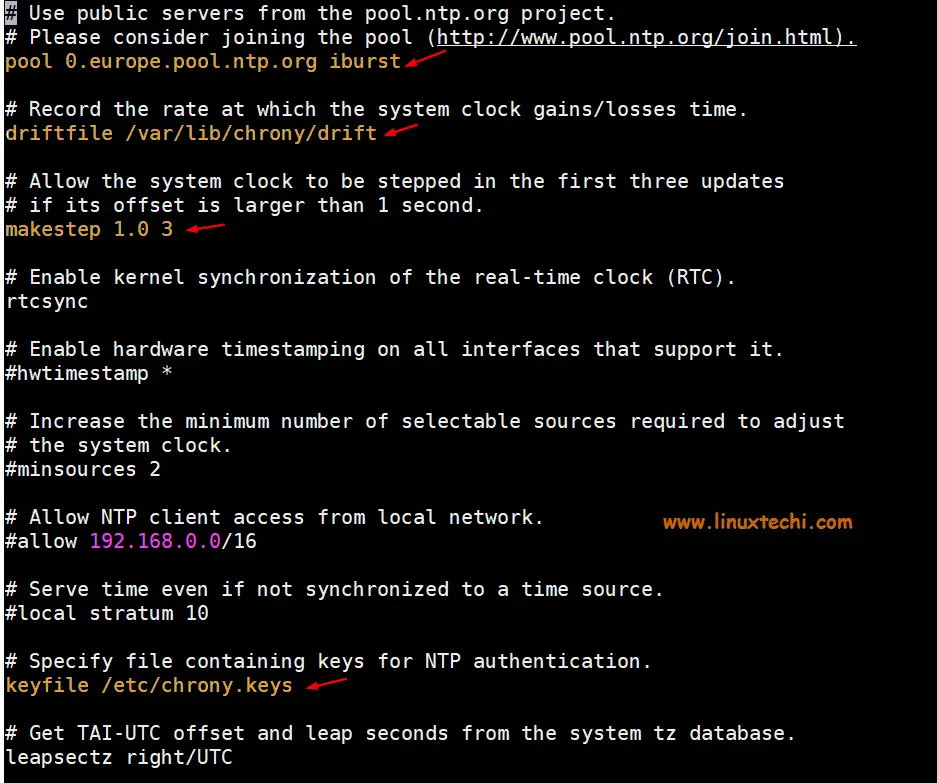
- pool 0.europe.pool.ntp.org iburst is the remote NTP server from where chrony will fetch the time.
- driftfile /var/lib/chrony/drift is the drift file which contains drift data
- makestep 1.0 3 is the parameter which will step system clock (speedup or slow down) if adjustment is larger than 1 second but only for first 3 clock updates
- keyfile /etc/chrony.keys as the name suggest this file contains keys for NTP authentication.
- logdir /var/log/chrony , it is the log file which logs of Chrony.
Testing Chrony
Just like ntpdate command in NTP distribution, we can use chronyd to sync time of our Linux server with remote NTP server manually,
Syntax: # chronyd -q ‘server iburst’
~]# chronyd -q 'server 0.europe.pool.ntp.org iburst'
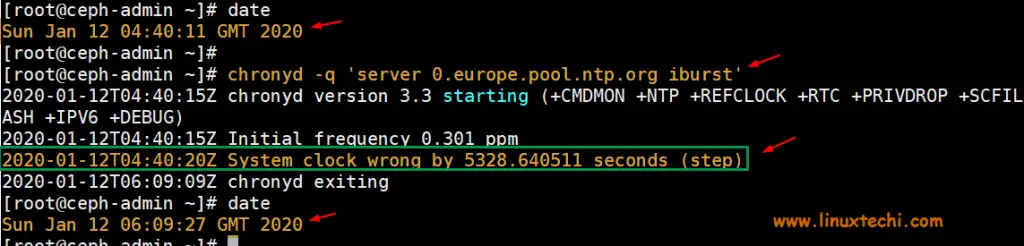
As we can see in above output, chrony has corrected the system time, before running the chronyd command system time was almost 2 hours behind from accurate time.
Start and Enabled Chronyd Service
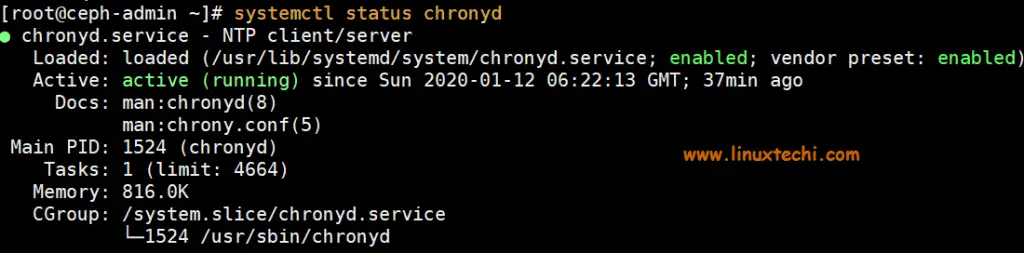
Run the following commands to start and enable chronyd daemon so that it will be available across the reboots.
Run the beneath command to verify the chronys service status
Verify and Track Chrony Synchronization
To verify whether your system’s time is synchronized using chrony, issue the following command,
[[email protected] ~]# chronyc tracking Reference ID : 904C13DD (its.no-fun.de) Stratum : 3 Ref time (UTC) : Sun Jan 12 06:23:26 2020 System time : 0.000174314 seconds slow of NTP time Last offset : -0.000199483 seconds RMS offset : 0.000199483 seconds Frequency : 0.301 ppm fast Residual freq : -40.403 ppm Skew : 0.541 ppm Root delay : 0.172664896 seconds Root dispersion : 0.047364954 seconds Update interval : 64.8 seconds Leap status : Normal [[email protected] ~]#
- Reference ID is the ID and name of server to which your system’s time currently synced.
- Stratum , it indicates the number of hops away from the server with an attached reference clock we are.
Check Chrony Sources
To list information about the current time sources that the chronyd is using, run the following command,
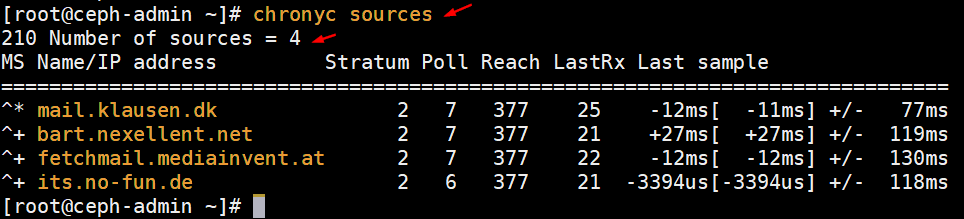
To list more detailed information about sources then run the following command
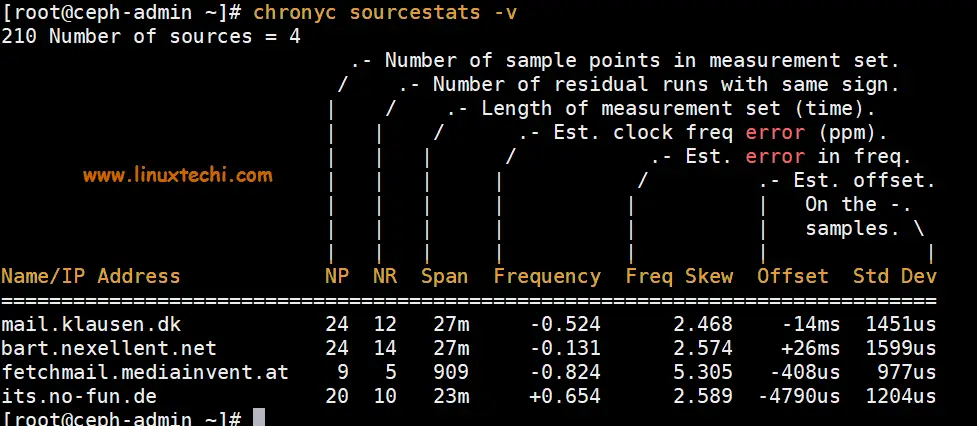
Check Chrony Source Statistics
To list the information about drift speed and offset estimation of each source that the chronyd is using, run the following command
Configure Chrony NTP Server
Let’s assume you want to configure your Linux Server as a Chrony NTP server for all internal systems. To accomplish this, we need to uncomment two lines from configuration file “/etc/chrony.conf”
Execute the following commands
~]# sed -i "s/#local stratum 10/local stratum 10/g" /etc/chrony.conf ~]# sed -i "s/#allow 192.168.0.0\/16/allow 192.168.0.0\/16/" /etc/chrony.conf
When we uncomment the line “ local stratum 10″ then makes our Linux Server as chrony NTP server and continue to work normally even if it is disconnected from network. Whereas “ allow 192.168.0.0/26 ” indicates that clients from this network is allowed to make connection to our Chrony NTP server for time syncing.
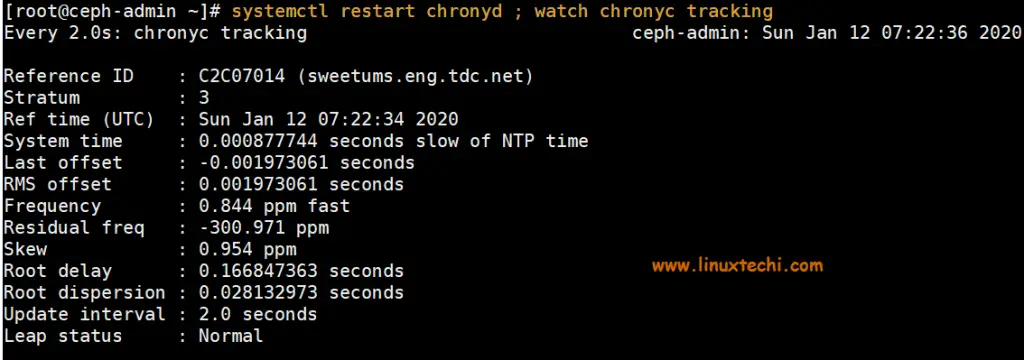
After making changes restart chrony service and track chrony
~]# systemctl restart chronyd ; watch chronyc tracking
Allow NTP Service in firewall using following command,
~]# firewall-cmd --add-service=ntp –permanent ~]# firewall-cmd --reload
That’s all from this article, I hope you get an idea how we can sync our linux system’s time with NTP server using chrony service and apart from this we have also learned how we can configure our own Chrony NTP server. Please do share your valuable feedback and comments.
Commands to Sync Time with NTP Server in Linux
![]()
For many people, computer clocks in your devices, network machines, and servers are generally accurate. But that’s not true! These clocks are manually maintained and backed by batteries which over time drift the clock, especially in the older machines.
So why is accurate time so important? Having exact time on your machine is quite significant because of several reasons. Many aspects of your computer activity are linked with time. Perfectly synched time is crucial for tracking security-related issues; troubleshooting can become quite difficult if the timestamps in log files are incorrect. Even for financial services, keeping accurate time is critical.
Many companies solve time-related issues by connecting their networks with NTP. So what is NTP? Let’s dig into it first:
What is NTP
The full form of NTP is “Network Time Protocol”, which has been one of the most authentic ways to synchronize the clock over a network. If your system uses NTP, you don’t need to check and set your time manually. It automatically updates the clock every time the device reboots. It is an extremely accurate way to update the clock of your device. Since the internet is everywhere, NTP is being used by every modern computer.
How to Enable NTP Synchronization on Linux
Most of the Linux distributions are using “systemd”, which comes with NTP for clock synchronization. To verify this, use the command given below:
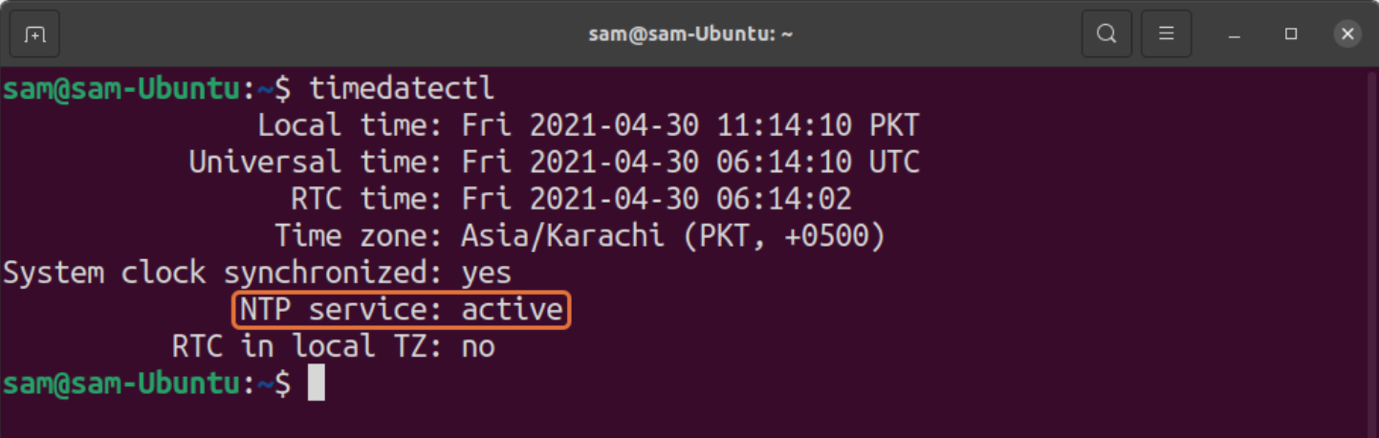
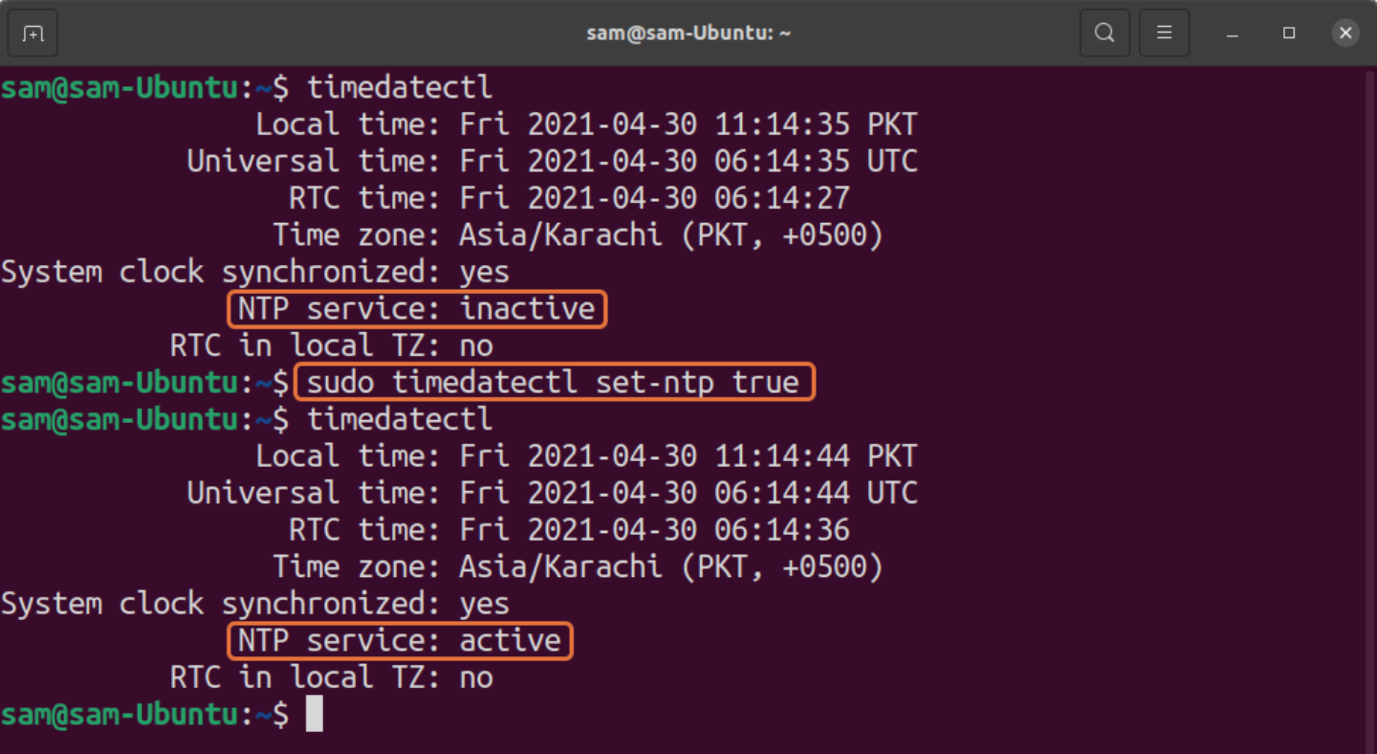
It indicates that NTP is active. If, for some reasons, it is not active, then use the below-mentioned command to enable it:
How to Enable NTP for Linux Distributions without “systemd”
But what if your distribution does not come with “systemd”? Well, in that case, you can install NTP.
About time synchronisation
Network Time Protocol (NTP) is a networking protocol for synchronising time over a network. Basically, a client requests the current time from a server, and uses it to set its own clock.
Behind this simple description, there is a lot of complexity. There are three tiers of NTP servers; tier one NTP servers are connected to atomic clocks, while tier two and tier three three servers spread the load of actually handling requests across the Internet.
The client software is also a lot more complex than you might expect. It must factor in communication delays and adjust the time in a way that does not upset all the other processes that run on the server. Luckily, all that complexity is hidden from you!
By default, Ubuntu uses timedatectl / timesyncd to synchronise time, and they are available by default. See our guide If you would like to know how to configure timedatectl and timesyncd .
Users can also optionally use chrony to serve NTP.
How time synchronisation works
Since Ubuntu 16.04, timedatectl / timesyncd (which are part of systemd ) replace most of ntpdate / ntp .
About timesyncd
timesyncd replaces not only ntpdate , but also the client portion of chrony (formerly ntpd ). So, on top of the one-shot action that ntpdate provided on boot and network activation, timesyncd now regularly checks and keeps your local time in sync. It also stores time updates locally, so that after reboots the time monotonically advances (if applicable).
About timedatectl
If chrony is installed, timedatectl steps back to let chrony handle timekeeping. This ensures that no two time-syncing services can conflict with each other.
ntpdate is now considered deprecated in favor of timedatectl (or chrony ) and is no longer installed by default. timesyncd will generally keep your time in sync, and chrony will help with more complex cases. But if you had one of a few known special ntpdate use cases, consider the following:
- If you require a one-shot sync, use: chronyd -q
- If you require a one-shot time check (without setting the time), use: chronyd -Q
While use of ntpd is no longer recommended, this also still applies to ntpd being installed to retain any previous behaviour/config that you had through an upgrade. However, it also implies that on an upgrade from a former release, ntp / ntpdate might still be installed and therefore renders the new systemd -based services disabled.
Further reading
- ntp.org: home of the Network Time Protocol project
- pool.ntp.org: project of virtual cluster of timeservers
- Freedesktop.org info on timedatectl
- Freedesktop.org info on systemd-timesyncd service
- Chrony FAQ
- Feeding chrony from GPSD
- Also see the Ubuntu Time wiki page for more information.