- How to Mount and Unmount Filesystem in Linux
- 1. Understanding Mounting and Unmounting
- 2. Identifying Storage Devices
- 3. Creating a Mount Point
- 4. Mounting a Filesystem
- 5. Unmounting a Filesystem
- 6. Automounting Filesystems
- Conclusion
- Related Posts
- Understanding the Linux File System: A Comprehensive Guide
- dd Command in Linux (Syntax, Options and Use Cases)
- DUF – A Cross-Platform Disk Usage/Free Utility for Linux, BSD & macOS
- 4 Comments
- Как размонтировать диск в Linux
- Синтаксис и опции umount
- Как размонтировать диск в Linux
- 1. Размонтировать диск
- 2. Размонтировать все устройства
- 3. Размонтировать путь
- Выводы
How to Mount and Unmount Filesystem in Linux
Managing storage devices and filesystems is a fundamental skill for Linux users and administrators. As you work with Linux, you’ll frequently need to mount and unmount filesystems to access and manage data stored on various storage devices. This article will provide a comprehensive guide on mounting and unmounting filesystems in Linux, helping you master storage management and enhance your Linux experience.
1. Understanding Mounting and Unmounting
In Linux, before you can access the files and directories stored on a device, you must first “mount” the filesystem. Mounting a filesystem involves attaching it to a specific directory in the existing filesystem hierarchy. This designated directory, known as the mount point, serves as an access point to the mounted filesystem.
Unmounting, on the other hand, is the process of detaching a filesystem from its mount point, making it inaccessible to the user.
2. Identifying Storage Devices
Before you can mount a filesystem, you need to identify the storage device you want to access. You can use the “lsblk” command to list all available block devices and their associated partitions:
Another useful command is “fdisk”, which displays detailed information about your storage devices and their partitions:
3. Creating a Mount Point
To create a mount point, you need to choose or create a directory that will serve as the access point for the mounted filesystem. You can create a new directory using the “mkdir” command:
4. Mounting a Filesystem
To mount a filesystem, use the “mount” command followed by the device name and the mount point:
sudo mount /dev/sdb1 /mnt/my-storage The filesystem on the specified device will now be accessible through the mount point directory.
5. Unmounting a Filesystem
To unmount a filesystem, use the “umount” command followed by the mount point:
The filesystem will now be detached from the mount point and become inaccessible.
6. Automounting Filesystems
If you want a filesystem to be mounted automatically at system startup, you can configure the “/etc/fstab” file. The “fstab” file contains a list of filesystems and their corresponding mount points, options, and other parameters.
To edit the “fstab” file, open it with a text editor such as “nano” or “vim”:
Add a new line with the following format:
Save the file and exit the text editor. The specified filesystem will now be mounted automatically at startup.
Conclusion
Mounting and unmounting filesystems in Linux is a fundamental skill that is essential for effective storage management. By understanding the process and its related commands, you can easily access, manage, and configure storage devices and their filesystems. This comprehensive guide has provided you with the tools and knowledge necessary to master storage management in Linux, enabling you to manage your data efficiently and enhance your overall Linux experience.
Related Posts
Understanding the Linux File System: A Comprehensive Guide
dd Command in Linux (Syntax, Options and Use Cases)
DUF – A Cross-Platform Disk Usage/Free Utility for Linux, BSD & macOS
4 Comments
I have a dedicated server provided to me by 1and1. I started migrating websites to the server only to realise that I am running out of disk space. I had to clear my backups in order to continue migrating my sites. I thought this to be weird as the server comes with 4T of disk space. On accessing the system via ssh. I see the following setup by 1and1: #vgdisplay — Volume group —
VG Name vg00
System ID
Format lvm2
Metadata Areas 1
Metadata Sequence No 8
VG Access read/write
VG Status resizable
MAX LV 0
Cur LV 3
Open LV 3
Max PV 0
Cur PV 1
Act PV 1
VG Size PE Size 4.00 MiB
Total PE 13823
Alloc PE / Size 11520 / 45.00 GiB
Free PE / Size 2303 / VG UUID CmLv2a-xKAn-cFQQ-K4TU-f5y2-UK8K-Uv1PO9 — Volume group —
VG Name hdd
System ID
Format lvm2
Metadata Areas 1
Metadata Sequence No 2
VG Access read/write
VG Status resizable
MAX LV 0
Cur LV 1
Open LV 1
Max PV 0
Cur PV 1
Act PV 1
VG Size PE Size 4.00 MiB
Total PE 938308
Alloc PE / Size 1024 / 4.00 GiB
Free PE / Size 937284 / VG UUID Pv2xfH-zkE1-hgH0-dOzZ-FgKp-IobS-5C2zea Also #pvscan reveals this:
PV /dev/sda3 VG vg00 lvm2 [ PV /dev/sdb1 VG hdd lvm2 [ — Physical volume —
PV Name /dev/sda3
VG Name vg00
PV Size Allocatable yes
PE Size 4.00 MiB
Total PE 13823
Free PE 767
Allocated PE 13056
PV UUID 6J06IE-52et-s8aV-bXk0-alud-0N1v-NEwHHr — Physical volume —
PV Name /dev/sdb1
VG Name hdd
PV Size Allocatable yes
PE Size 4.00 MiB
Total PE 938308
Free PE 937284
Allocated PE 1024
PV UUID bGlBQQ-gnmF-gOav-VTfj-np5R-sAKs-YNxemq I would like to reduce the physical volume in /dev/sdb1 by 2 or 3TB and increase /dev/sda3 by the same amount. Can this be done? If so what process would I need to follow? If not I noticed mentioned in the replies «Migrating the websites to hdd» What process would I have to follow and what are the implications of doing this? Logical Volumes: — Logical volume —
LV Path /dev/vg00/usr
LV Name usr
VG Name vg00
LV UUID sRvgQ3-W80K-AJQD-lZid-fqF3-1KTY-JH2Ul0
LV Write Access read/write
LV Creation host, time ,
LV Status available
# open 1
LV Size 15.00 GiB
Current LE 3840
Segments 2
Allocation inherit
Read ahead sectors auto
– currently set to 8192
Block device 253:0 — Logical volume —
LV Path /dev/vg00/var
LV Name var
VG Name vg00
LV UUID xWSCRG-vBPH-JLha-yJ8X-3zMP-WgRG-AOoJqO
LV Write Access read/write
LV Creation host, time ,
LV Status available
# open 1
LV Size 31.00 GiB
Current LE 7936
Segments 3
Allocation inherit
Read ahead sectors auto
– currently set to 8192
Block device 253:1 — Logical volume —
LV Path /dev/vg00/home
LV Name home
VG Name vg00
LV UUID 2foQrE-Wy3C-Ig1Z-zIDy-tTFQ-YyO5-ayHBZl
LV Write Access read/write
LV Creation host, time ,
LV Status available
# open 1
LV Size 5.00 GiB
Current LE 1280
Segments 1
Allocation inherit
Read ahead sectors auto
– currently set to 8192
Block device 253:2 — Logical volume —
LV Path /dev/hdd/data
LV Name data
VG Name hdd
LV UUID GwJgTL-LC8r-jn0a-yQ5H-mTX3-dARL-Xz0eOU
LV Write Access read/write
LV Creation host, time ,
LV Status available
# open 1
LV Size 4.00 GiB
Current LE 1024
Segments 1
Allocation inherit
Read ahead sectors auto
– currently set to 8192
Block device 253:3 I increased the LV on /dev/vg00/var by 100% (This is where the websites are stored). but this will quickly be used up once I continue to migrate more sites over! This may also help. This is from running the mount command I have removed additional lines: /dev/sda1 on / type ext3 (rw,noatime,data=ordered)
/dev/mapper/vg00-usr on /usr type ext4 (rw,noatime,data=ordered)
/dev/mapper/hdd-data on /data type ext4 (rw,noatime,quota,usrquota,data=ordered)
/dev/mapper/vg00-home on /home type ext4 (rw,noatime,quota,usrquota,data=ordered)
/dev/mapper/vg00-var on /var type ext4 (rw,noatime,quota,usrquota,data=ordered) Thank you for your responses much appreciated!
which one of the following system that you cannot mount with the mount command .
a) iso9660 b)swap c)FAT d)root e)VFAT
Как размонтировать диск в Linux
При прекращении работы с диском в Linux, чтобы полностью закрыть к нему доступ и избежать повреждения данных при выключении, следует его размонтировать. Для этих целей существует утилита umount, которая запускается через терминал.
В данной статье мы разберемся с ее синтаксисом и опциями. А заодно рассмотрим, как размонтировать диск в Linux. Для удобства все будет описано на конкретных примерах.
Синтаксис и опции umount
В отличие от mount, команда umount Linux размонтирует указанный диск. В результате он становится недоступным. Это относится и к любым подключенным устройствам. У команды достаточно понятный синтаксис:
$ umount опции /путь/к/точке/монтирования
$ umount опции название_устройства
Перейдем к списку доступных опций:
- -a, —all – размонтировать все файловые системы, указанные в /proc/self/mountinfo. Исключение составляют roc, devfs, devpts, sysfs, rpc_pipefs и nfsd.
- -A, —all-targets – размонтировать все точки монтирования в текущем пространстве имен для указанной файловой системы.
- -c, —no-canonicalize – не канонизировать пути.
- -d, —detach-loop – освободить петлевое устройство при размонтировании.
- —fake – не выполнять никаких реальных действий, но посмотреть результат выполнения команды.
- -f, —force – принудительно размонтировать, когда диск недоступен.
- -l, —lazy – размонтировать файловую систему, когда она перестанет быть занятой.
- -N, —namespace – размонтировать указанное пространство имен.
- -n, —no-mtab – выполнение операции без записи в /etc/mtab.
- -O, —test-opts – размонтировать только те файловые системы, которые имеют указанный набор опций, записанный в /etc/fstab.
- -q, —quiet – не выводить сообщения с ошибкой not mounted.
- -R, —recursive – рекурсивное размонтирование.
- -r, —read-only – при появлении ошибки попробовать перемонтировать файловую систему в режиме read only.
- -t, —types – размонтировать файловую систему указанного типа. При необходимости параметры следует разделить запятыми.
- -v, —verbose – подробное протоколирование действий.
- -V, —version – вывести информацию о версии утилиты.
- -h, —help – получить справочную информацию.
Это были основные опции, которые могут пригодиться при выполнении команды umount. А теперь перейдем к практическим примерам ее использования.
Как размонтировать диск в Linux
Для удобства мы разберем четыре популярных сценария, с которыми может столкнуться каждый: размонтировать диск, все подключенные устройства и разделы, конкретный путь и рекурсивное размонтирование.
1. Размонтировать диск
В качестве примера возьмем USB-диск, на который были загружены бэкапы данных. Перед отключением от компьютера его следует размонтировать. Сначала посмотрим полный список доступных дисков:
sudo lsblk -o NAME,FSTYPE,SIZE,MOUNTPOINT,LABEL
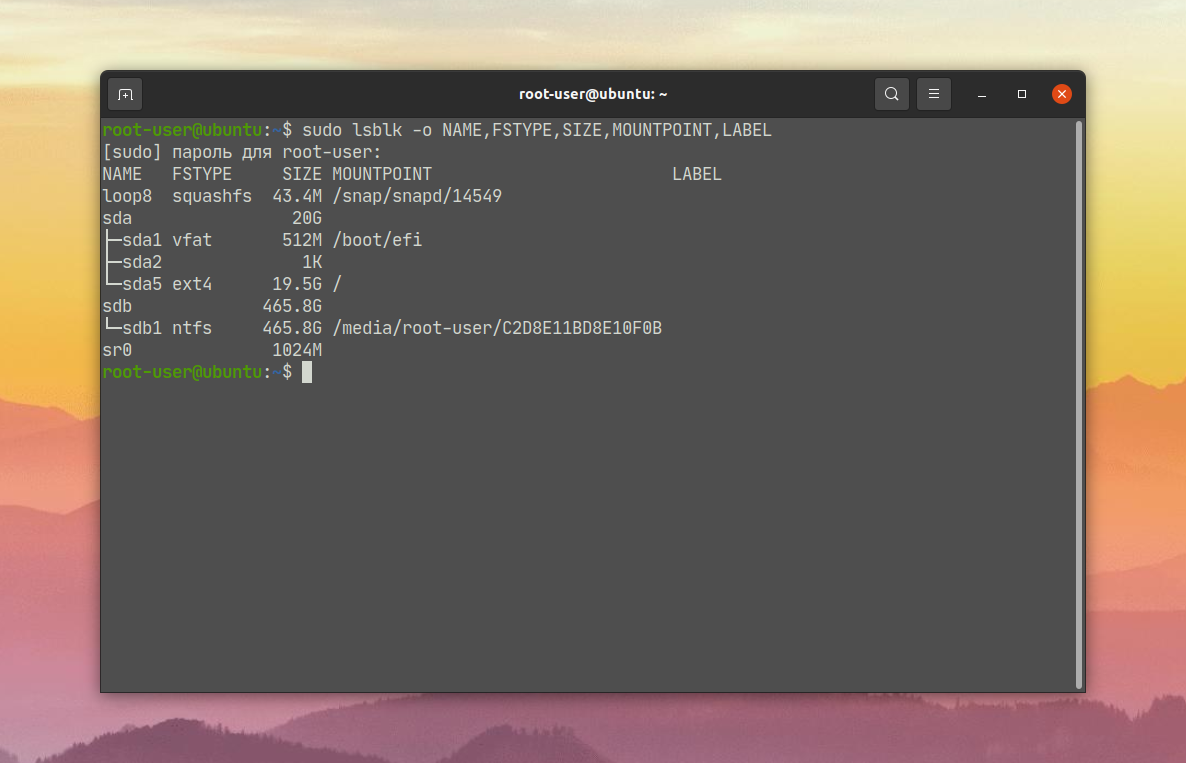
USB-диск объемом 500 ГБ маркирован как sdb1. Для его размонтирования следует выполнить команду:
2. Размонтировать все устройства
Опция -a, которая упоминалась в самом начале списка, отвечает за размонтирование всех смонтированных файловых систем. Но есть несколько разделов с исключениями: roc, devfs, devpts, sysfs, rpc_pipefs и nfsd. Запускать ее нужно с осторожностью, ведь будут размонтированы важные разделы.
Перед выполнением основной команды вы можете посмотреть то, какие устройства будут затронуты. Для этого пригодятся опции —fake (fake-команда) и -v для вывода подробной информации:
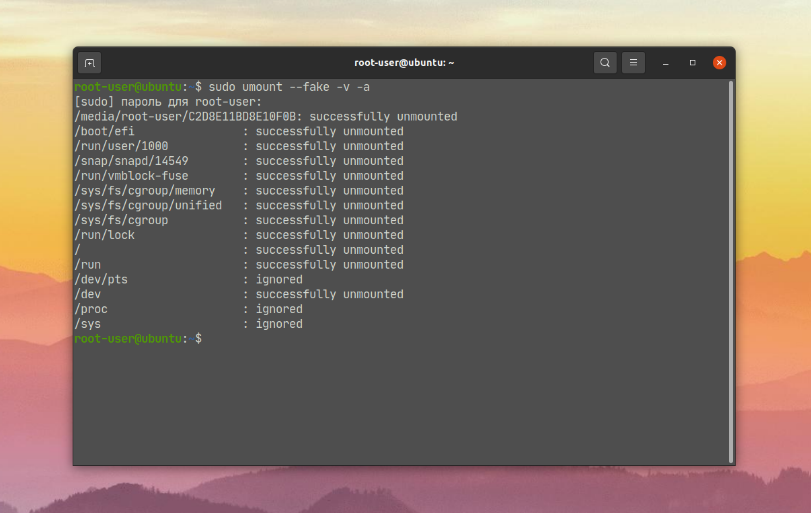
В результате отобразится полный список путей и устройств, которые будут размонтированы. Для полноценного запуска процедуры выполните команду без опций —fake и -v:
3. Размонтировать путь
Если вы хотите отключить конкретный путь от корневой файловой системы Linux, то подход будет несколько иной. В качестве примера возьмем каталог, расположенный по пути /run/lock/tmpfs. Команда для размонтирования будет выглядеть следующим образом:
Для рекурсивного размонтирования определенной директории, например, каталога, к описанной выше команде следует добавить опцию -R или —recursive:
sudo umount -R /run/lock/tmpfs
Выводы
В начале данной статьи мы описали утилиту umount Linux, особенности ее синтаксиса и доступные опции. А затем перешли к конкретным примерам использования, с которыми может столкнуться каждый. По описанным принципам можно понять, как размонтировать диск linux, а также любой раздел или директорию.
Обнаружили ошибку в тексте? Сообщите мне об этом. Выделите текст с ошибкой и нажмите Ctrl+Enter.