- Пользователи Linux Mint 20.3 теперь могут перейти на Linux Mint 21, инструкция
- Вот как обновить Linux Mint 20.3 до Linux Mint 21
- How to upgrade to Linux Mint 21
- Troubleshooting
- Installing mintupgrade
- Repairing boot
- Notes
- Alternatives
- How to upgrade to Linux Mint 20
- Requirements
- 64-bit architecture
- Experience with APT
- Preparation
- Apply all package updates
- Create a system snapshot
- Purge PPAs and 3rd party repositories
- Upgrade
- Install the upgrade tool
- Check the upgrade
- Download the package updates
- Apply the upgrades
- Downgrade foreign packages
- Delete foreign packages
- Troubleshooting
- Installing mintupgrade
- Restoring a snapshot
- Skipping the timeshift requirement
- Computer freeze
- Broken boot
- Boot warnings
- Notes
- Alternatives
Пользователи Linux Mint 20.3 теперь могут перейти на Linux Mint 21, инструкция
Путь обновления с Linux Mint 20.3 «Una» до Linux Mint 21 «Vanessa» теперь открыт, чтобы, наконец, пользователи могли обновитсся до последней и самой лучшей версии популярного дистрибутива на основе Ubuntu. Linux Mint 21 «Vanessa» был выпущен только в эти выходные и поставляется с более новой базой, чем Linux Mint 20.3 «Una» , из серии операционных систем Ubuntu 22.04 LTS (Jammy Jellyfish) , а также с более новым ядром Linux и графическими стеками и другими серьезные внутренние изменения. Несмотря на эти важные внутренние изменения, процесс обновления с Linux Mint 20.3 до Linux Mint 21 будет немного трудоемким, но, к счастью, Linux Mint 21 поставляется с новым инструментом обновления , предназначенным для значительного облегчения обновления между основными выпусками Linux Mint для новичков. . Новый инструмент обновления Linux Mint полностью настраивается и включает в себя такие функции, как полностью графический процесс обновления, возможность выполнять дополнительные проверки, чтобы убедиться, что процесс обновления пройдет гладко в различных сценариях, возможность сохранения выбора пользователем зеркал и предупреждения. о потерянных пакетах.
Вот как обновить Linux Mint 20.3 до Linux Mint 21
Предупреждение: во-первых, убедитесь, что у вас есть резервная копия самых важных файлов, знаете ли, на случай, если что-то пойдет не так и убедитесь, что ваша установка обновлена. При обновлении между основными версиями ОС всегда существует риск из-за несовместимости некоторых сторонних пакетов, которые вы могли установить, поэтому вы делаете это на свой страх и риск. В Linux Mint 21 процесс обновления осуществляется с помощью новой утилиты, над которой команда Linux Mint работала в течение цикла разработки Linux Mint 21. Утилита называется mintupgrade (Upgrade Tool), и когда она запускается из командной строки, она предоставляет пользователям полный графический процесс обновления. Инструмент обновления впервые стал доступен несколько месяцев назад для Linux Mint Debian Edition 4, позволяя пользователям выполнить обновление до Linux Mint Debian Edition 5 . Но с сегодняшнего дня, 7 августа 2022 года, он также доступен для пользователей Linux Mint 20.3 «Una», которые хотят обновить свои установки до Linux Mint 21 «Vanessa». Вы можете установить mintupgrade, выполнив коменду:
Затем все, что вам нужно сделать, это следовать инструкциям на экране, чтобы обновить установку Linux Mint 20.3 до Linux Mint 21.
Новый инструмент обновления состоит из нескольких этапов. Сначала он выполнит некоторые проверки работоспособности, попросит вас выполнить резервное копирование с помощью утилиты Timeshift (вы можете отключить это в настройках инструмента обновления), загрузит пакеты (показывая вам, какие пакеты будут обновлены и удалены) и выполнит фактическое обновление. После завершения процесса обновления вам будет показан список потерянных пакетов, которые будут удалены. Конечно, весь процесс обновления займет некоторое время в зависимости от пропускной способности вашего Интернета и характеристик компьютера. Но как только процесс будет завершен, вы сможете наслаждаться совершенно новой установкой Linux Mint 21 «Vanessa» и ее захватывающими новыми функциями!
Средняя оценка 0 / 5. Количество оценок: 0
Оценок пока нет. Поставьте оценку первым.
How to upgrade to Linux Mint 21
This page explains how to upgrade from Linux Mint 20.3 to Linux Mint 21.
First, refresh your cache and install the Upgrade Tool by typing the following commands in a terminal:
apt update apt install mintupgrade
Then type the following command to launch the Upgrade Tool:
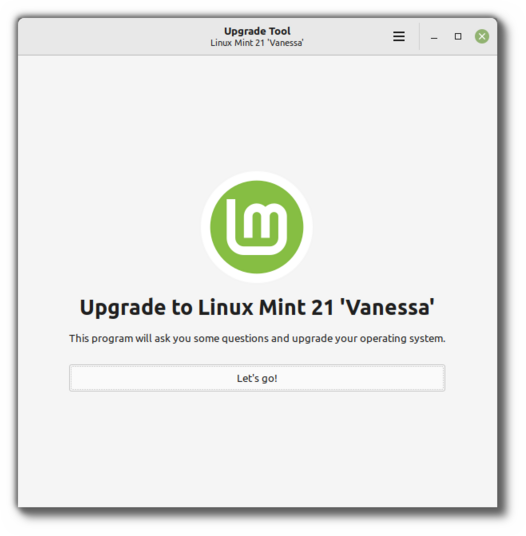
Follow the instructions on the screen.
When the tool is done and the upgrade is successful uninstall it and reboot your computer.
apt remove mintupgrade sudo reboot
This is a major upgrade. It can take several hours.
You will be asked to be up to date and to prepare system snapshots. Do not rush, do not take shortcuts.
Don’t hesitate to seek help if you have questions or if you face problems with the upgrade.
Troubleshooting
Installing mintupgrade
If you can’t find mintupgrade in the repositories, switch to the default Linux Mint mirror and refresh the APT cache.
Repairing boot
If the computer no longer boots, boot from the live Linux Mint 21 ISO.
From the live session, launch Boot Repair and use it to fix the boot sequence.
If this doesn’t work, boot from the live Linux Mint ISO again, and launch Timeshift .
Timeshift is able to scan your drives from the live session and restore your snapshot from there.
Notes
The upgrade overwrites files in /etc/ with default configuration files. You can restore files indivually by the Timeshift snapshot you made prior to upgrading.
To restore your lightDM settings, run the Login Window configuration tool (sudo lightdm-settings).
Alternatives
If you cannot upgrade perform a fresh installation.
Generic instructions on fresh upgrades are also available.
© Copyright 2020, Linux Mint Revision 92937742 .
Versions latest Downloads pdf html epub On Read the Docs Project Home Builds Free document hosting provided by Read the Docs.
How to upgrade to Linux Mint 20
This page explains how to upgrade from Linux Mint 19.3 to Linux Mint 20.
Requirements
64-bit architecture
Although both 32-bit and 64-bit versions of Linux Mint 19.3 are supported until April 2023, new releases of Linux Mint, including 20, are only available in 64-bit.
To upgrade to Linux Mint 20 you need to be running the 64-bit version of Linux Mint 19.3.
To check which version you’re running type:
If it says amd64 you can upgrade to Linux Mint 20.
If it says i386, it means you’re using the 32-bit version. In this case you cannot upgrade and you need to stick with Linux Mint 19.3.
Experience with APT
To upgrade to Linux Mint 20 you need experience with APT and the command line.
Upgrading to a newer package base is not trivial and it should not be performed by novice users.
You need to know how to type commands and read their output.
You also need to be experienced with APT. During the upgrade you’ll need to understand the output of APT commands. You’ll need to understand if a package needs to be removed, if it blocks the upgrade or if it conflicts with another package.
Preparation
Apply all package updates
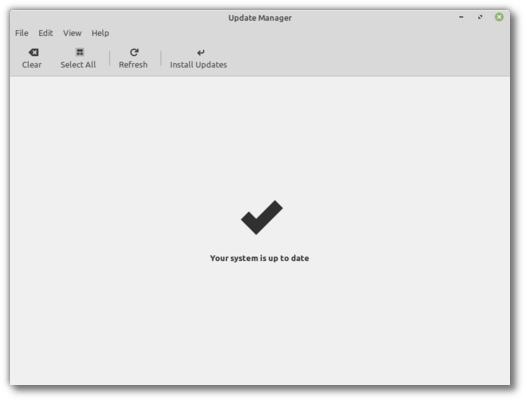
- Launch the Update Manager with Menu ‣ Administration ‣ Update Manager .
- Press the Refresh button to update the cache.
- Press the Select All button to select all updates.
- Press the Install Updates button.
- Follow the instructions from the Update Manager and install all updates until the manager tells you the system is up to date.
- Reboot the computer.
Create a system snapshot
If anything breaks or if anything goes wrong during the upgrade, you can go back in time and revert all changes by restoring your latest system snapshot. Whatever happens, you’re covered. You’ll be able to restore your operating system to this current state, either from within Linux Mint, or by launching Timeshift from a live Mint session (live DVD or live USB).
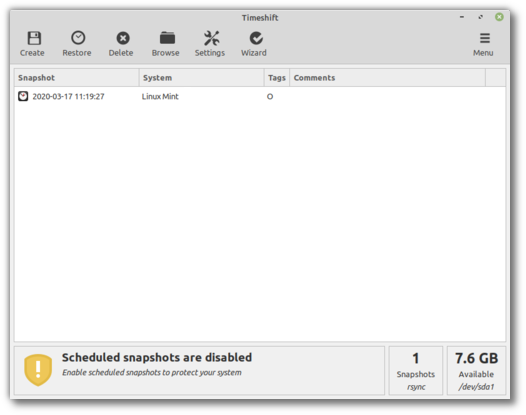
To create a system snapshot:
- Launch Timeshift with Menu ‣ Administration ‣ Timeshift .
- Follow the wizard to select a destination for your snapshots.
- In the toolbar, click on the Create button to make a manual snapshot of your operating system.
Purge PPAs and 3rd party repositories
PPAs or 3rd party repositories can introduce issues during the upgrade if the versions of the packages they provide are higher than in Linux Mint 20. This can result in unmet dependencies, held packages or resolver issues.
To purge 3rd party packages follow these steps:
- Launch the Software Sources tool from Menu ‣ Administration ‣ Software Sources .
- Open the Additional repositories tab and disable all additional repositories.
- Open the PPA tab and disable all PPAs.
- Click on the button to refresh your APT cache.
- Open the Maintenance tab and click on Downgrade Foreign Packages .
- Select all foreign packages and click Downgrade .
- Click on Remove Foreign Packages .
- Select all foreign packages and click Remove .
- Reboot the computer.
- Create another Timeshift snapshot.
This step is optional but it is strongly recommended. Some PPAs are perfectly fine, some aren’t. Some only add packages and don’t impact the upgrade process, others introduce dependencies which cannot be resolved.
You can leave some foreign packages installed or in their 3rd party version and try to upgrade if you want. If it works, then great. If it doesn’t, you can always restore the previous snapshot and follow the steps above to purge them before trying again.
Upgrade
Install the upgrade tool
To install the upgrade tool, open a terminal and type:
Check the upgrade
To simulate an upgrade, open a terminal and type:
Then follow the instructions on the screen.
This command temporarily points your system to the Linux Mint 20 repositories and calculates the impact of an upgrade.
Note that this command doesn’t affect your system. After the simulation is finished, your original repositories are restored.
The output shows you if the upgrade is possible, and if it is, which packages would be upgraded, installed, removed and kept back.
It is extremely important that you pay close attention to the output of this command.
Keep using mintupgrade check and do not proceed to the next step, until you’re happy with the output.
If this steps fails half-way through type mintupgrade restore-sources to go back to your original APT configuration.
Download the package updates
To download the packages necessary to upgrade, type the following command:
Note that this command doesn’t actually perform the upgrade itself, but just downloads the packages.
Apply the upgrades
This step is non-reversible. Once you perform it, the only way to go back is by restoring a system snapshot.
To apply the upgrades, type the following command:
Downgrade foreign packages
Some of your packages might have a lower version in Linux Mint 20 than in Linux Mint 19.3. To guarantee they function properly, they need to be downgraded.
- Launch the Software Sources tool from Menu ‣ Administration ‣ Software Sources .
- Open the Maintenance tab and click on Downgrade Foreign Packages .
- Select all foreign packages and click Downgrade .
Delete foreign packages
Some packages no longer exist in Linux Mint 20 and can safely be removed.
- Launch the Software Sources tool from Menu ‣ Administration ‣ Software Sources .
- Open the Maintenance tab and click on Remove Foreign Packages .
- With the exception of packages you want to keep, select all foreign packages and click Remove .
Troubleshooting
Installing mintupgrade
If you can’t find mintupgrade in the repositories, switch to the default Linux Mint mirror and refresh the APT cache.
Restoring a snapshot
A known issue affects Timeshift. When restoring a snapshot, if the Disclaimer window is empty, wait for about 2 minutes for the text to appear. Once the disclaimer text is there you can press Next and restore your snapshot. Pressing Next before the text appears results in a failure to restore. If you did, reboot and try to restore again.
Skipping the timeshift requirement
If you’re using another snapshot tool and would rather not use Timeshift, you can skip the Timeshift requirement with the following command:
echo "<>" | sudo tee /etc/timeshift.json
Don’t forget to remove that file after the upgrade if you want Timeshift to work properly.
Computer freeze
On some computers the upgrade can be quite intensive and it can temporarily freeze the desktop. This can last for up to 10 minutes at times or even take hours on slow computers. This is OK, be patient and give it time.
If this becomes a problem, logout completely, drop to console with CTRL+ALT+F2 and run mintupgrade upgrade from there instead.
Broken boot
If the computer no longer boots, boot from the live Linux Mint 19.3 ISO.
From the live session, launch Boot Repair and use it to fix the boot sequence.
If this doesn’t work, boot from the live Linux Mint ISO again, and launch Timeshift .
Timeshift is able to scan your drives from the live session and restore your snapshot from there.
Boot warnings
You can ignore boot warnings related to ACPI or initramfs unpacking . They’re cosmetic and do not affect the boot sequence.
Notes
The upgrade overwrites files in /etc/ with default configuration files. You can restore files indivually by the Timeshift snapshot you made prior to upgrading.
To restore your lightDM settings, run the Login Window configuration tool (sudo lightdm-settings).
Alternatives
If you cannot upgrade perform a fresh installation.
Generic instructions on fresh upgrades are also available.
© Copyright 2020, Linux Mint Revision 92937742 .
Versions latest Downloads pdf html epub On Read the Docs Project Home Builds Free document hosting provided by Read the Docs.